| 183rd (Mixed) HAA Regiment, RA | |
|---|---|
 Royal Artillery cap badge | |
| Active | 26 October 1942–25 May 1945 |
| Country |
|
| Branch |
|
| Role | Air defence |
| Size | Regiment (3–4 batteries) |
| Part of |
Anti-Aircraft Command 21st Army Group |
| Engagements |
Baby Blitz Operation Diver Air Defence of Antwerp |
183rd (Mixed) Heavy Anti-Aircraft Regiment was an air defence unit of Britain's Royal Artillery formed during World War II. Around two-thirds of its personnel were women from the Auxiliary Territorial Service (ATS). The regiment was heavily engaged in Operation Diver, defending England against V-1 flying bombs, and later was deployed to Antwerp to carry out anti-Diver duties there in the closing stages of the war.
Organisation[]
Cap Badge of the Auxiliary Territorial Service
By 1941, after two years of war Anti-Aircraft Command, tasked with defending the UK against air attack, was suffering a manpower shortage. In April its commander-in-chief, Lieutenant-General Sir Frederick 'Tim' Pile, proposed to overcome this by utilising the women of the Auxiliary Territorial Service (ATS). The ATS was by law a non-combatant service, but it was decided that Defence Regulations permitted the employment of women in anti-aircraft (AA) roles other than actually firing the guns. They worked the radar and plotting instruments, range-finders and predictors, ran command posts and communications, and carried out many other duties. With the increasing automation of heavy AA (HAA) guns, including gun-laying, fuze-setting and ammunition loading under remote control from the predictor, the question of who actually fired the gun became blurred as the war progressed. The ATS rank and file, if not always their officers, took to the new role with enthusiasm and 'Mixed' batteries and regiments with the ATS supplying two-thirds of their personnel quickly proved a success.[1][2][3][4]
By late 1942 the training regiments were turning out a regular stream of Mixed HAA batteries, which AA Command formed into regiments to take the place of the all-male units being sent to overseas theatres of war. One such new unit was 183rd (Mixed) HAA Regiment. Regimental Headquarters (RHQ) was formed on 26 October 1942 at Datchet, Buckinghamshire, with 564 (Mixed) HAA Battery transferred from 157th (M) HAA Rgt. and over the next few months the following batteries were regimented with it:[5][6]
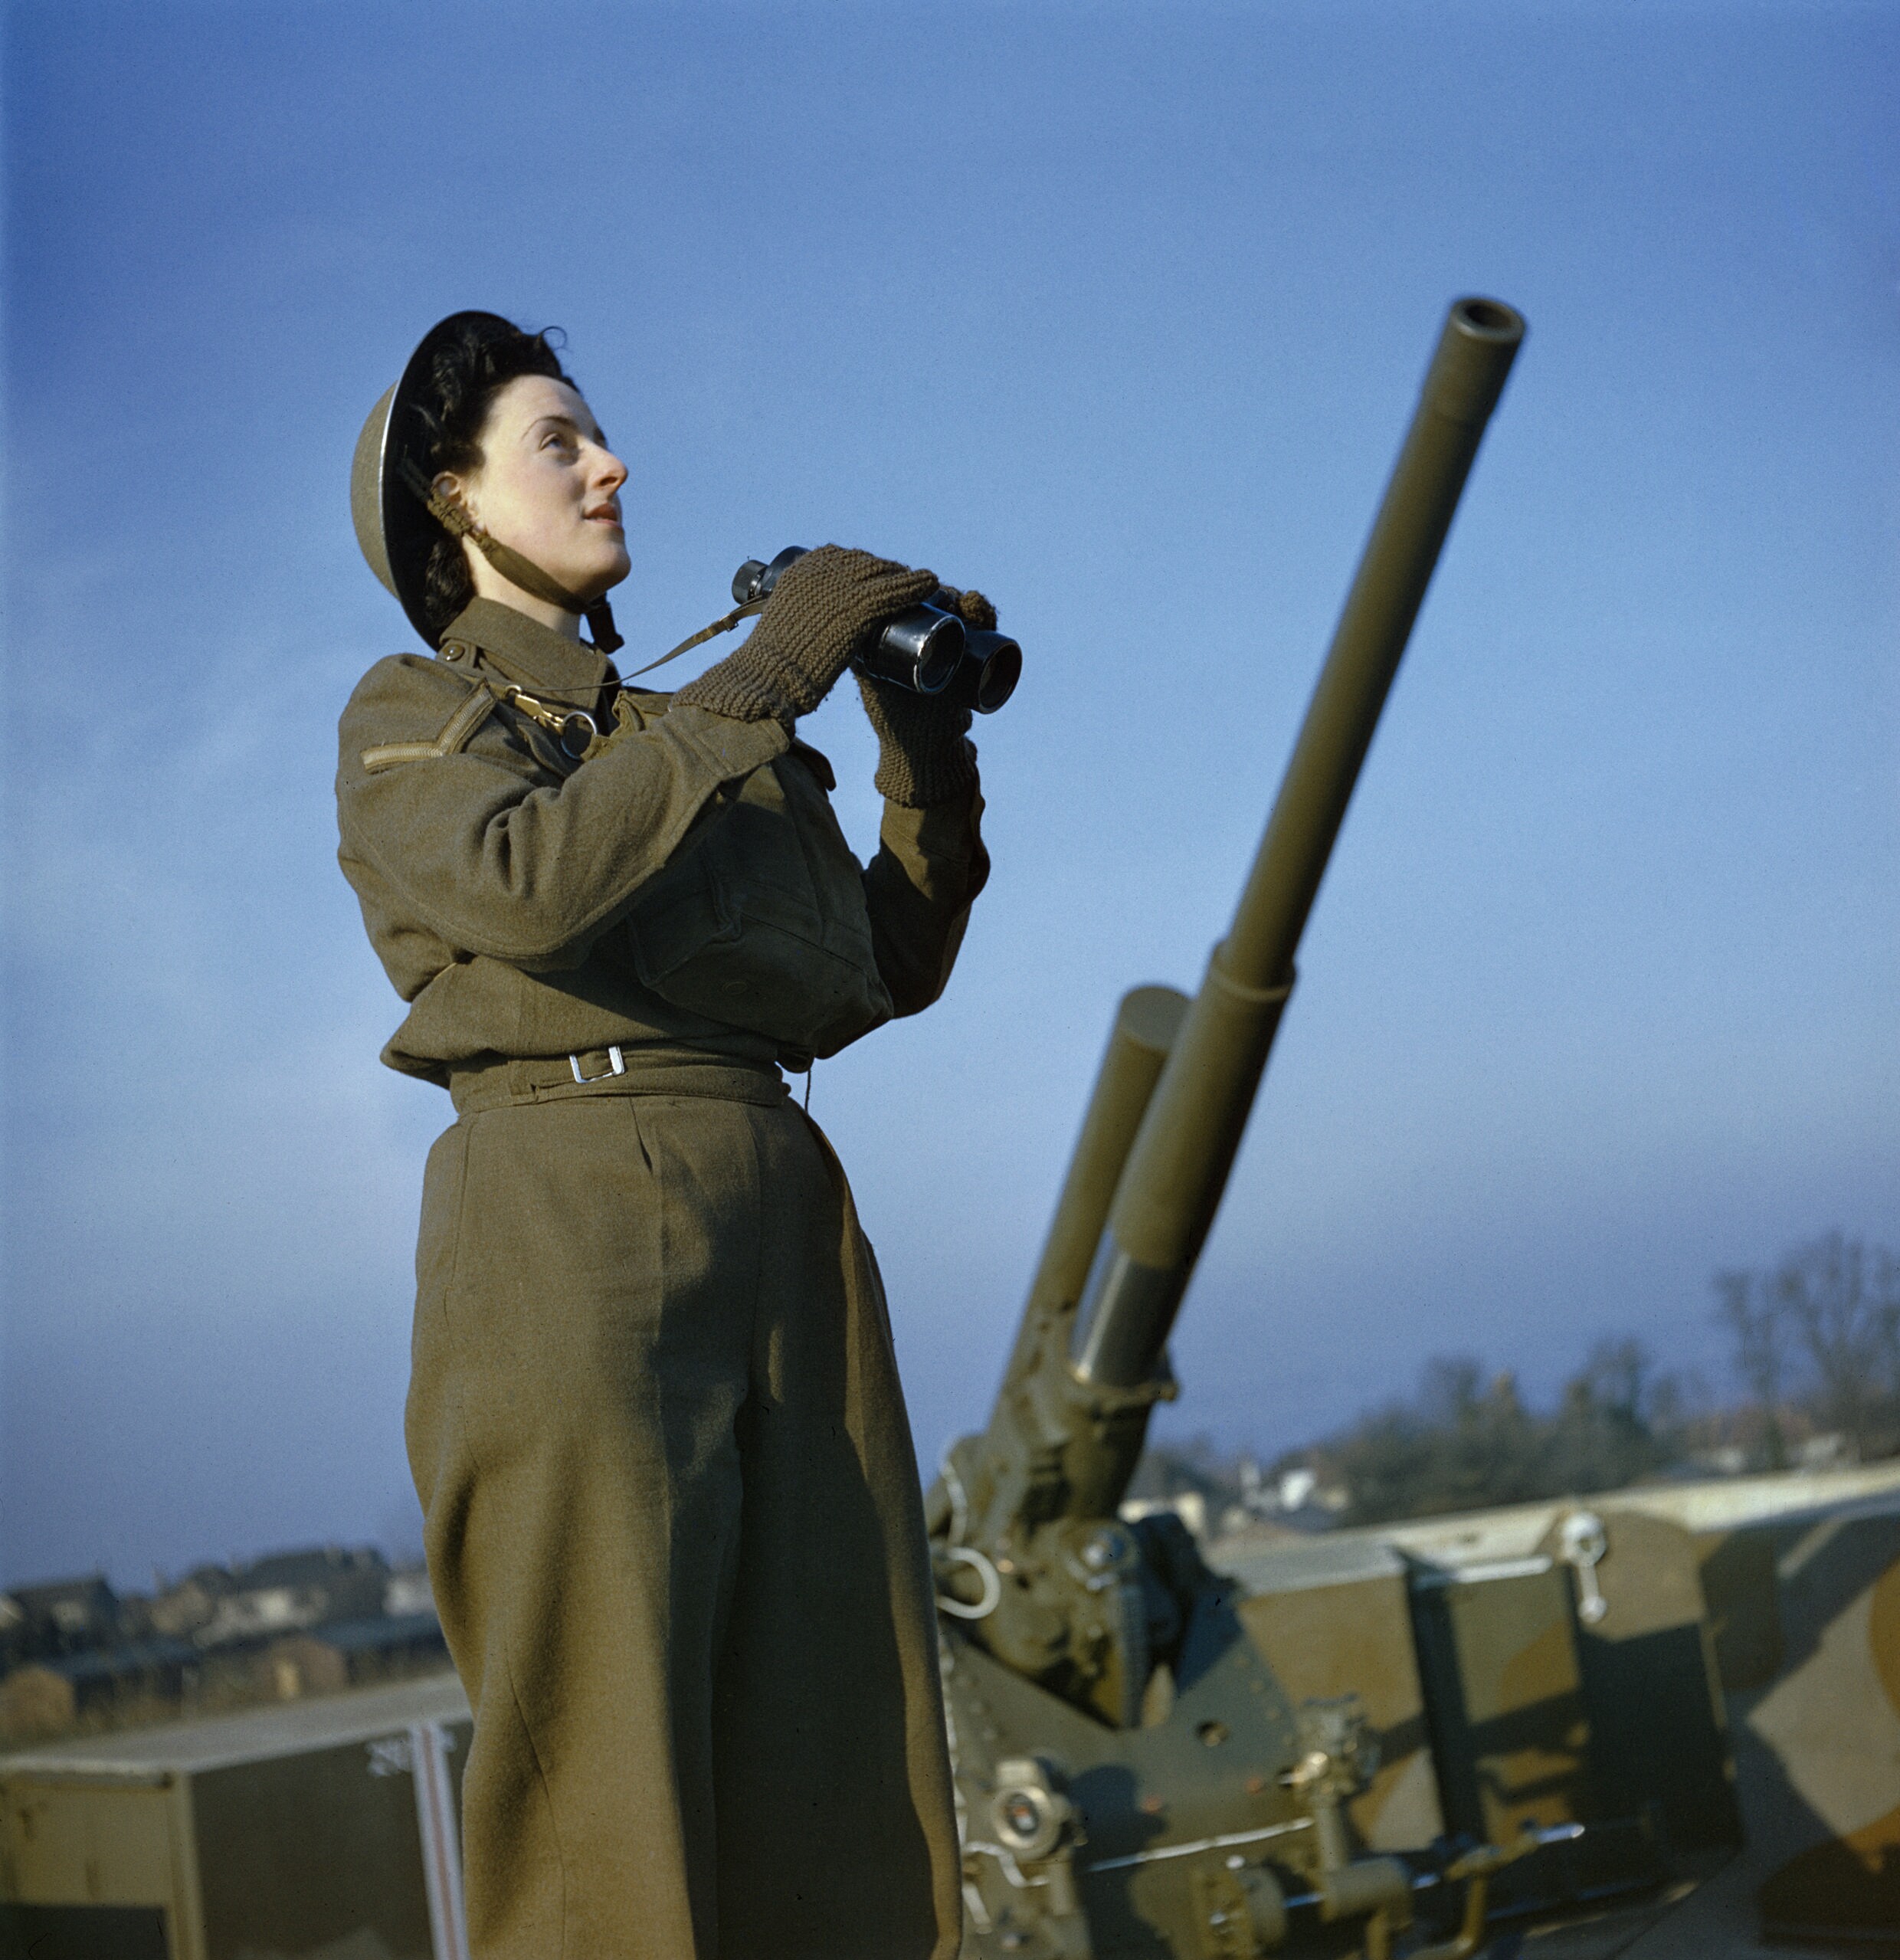

_serving_with_a_3.7-inch_anti-aircraft_gun_battery,_December_1942._TR460.jpg)
An ATS member of a mixed 3.7-inch HAA gun battery, December 1942.
- 590 (M) HAA Bty, formed on 19 August 1942 by 210th HAA Training Rgt at Oswestry, joined the regiment on its formation but soon left for 137th (M) HAA Rgt
- 591 (M) HAA Bty, formed on 26 August by 206th HAA Training Rgt at Arborfield, joined on 16 November
- 608 (M) HAA Bty, formed on 9 September by 24th HAA Training Rgt at Blackdown, joined 30 November
- 624 (M) HAA Bty, formed on 18 November at 206th HAA Training Rgt, joined 1 February 1943; transferred to 148th (M) HAA Rgt 24 February, and replaced by:
- 640 (M) HAA Bty joined from 160th (M) HAA Rgt
Deployment[]
By December 1942 the regiment had joined 38 AA Brigade in 2 AA Group covering South East England.[6][7] This remained the regiment's deployment for over a year.[8][9][10]


ATS women operating a height and range finder on an HAA gun site, December 1942.
Most of the Luftwaffe attacks on the UK in 1943 involved 'hit and run' raids on coastal towns by Fighter-bombers, which were Light AA (LAA) targets, and a few sporadic raids on London. However, in January 1944 it resumed night raids on London, which became known as the 'Baby Blitz'. These raids employed new faster bombers with sophisticated 'pathfinder' techniques and radar jamming. For example, on the night of 21 January 200 hostile aircraft were plotted approaching the South Coast in two waves, which intermingled with returning aircraft of RAF Bomber Command. This caused problems of identification and restrictions on fire, but the guns of 2 AA Group engaged as the raiders approached London. Only one-fifth of the raiders reached the city, the remainder turning away to bomb open country. AA guns brought down eight aircraft. Other raids came in along the Thames Estuary, which was the responsibility of 1 AA Group.[11][12][13]
As preparations for the Allied invasion of Normandy (Operation Overlord) gathered momentum, AA Command redeployed its resources in Southern England to cover the assembly areas and embarkation ports. 183rd HAA Regiment was briefly with 30 AA Bde and then in May 1944 it joined 102 AA Bde, a designated 'Overlord' HQ.[10]
Operation Diver[]


3.7-inch HAA guns on anti-Diver duty at Hastings, 28 July 1944.
A week after 'Overlord' began on D-Day (6 June), the Germans began launching V-1 flying bombs, codenamed 'Divers', against London. V-1s (known to Londoners as 'Doodlebugs') presented AA Command's biggest challenge since The Blitz of 1940–41. Defences had been planned against this new form of attack (Operation Diver), but the missiles' small size, high speed and awkward height presented a severe problem for AA guns. 2 AA Group's HAA batteries left their 'Overlord' sites and moved to pre-planned sites across the 'funnel' of V-1 flightpaths. However, the initial results were disappointing, and after a fortnight AA Command changed its tactics. The HAA gun belt was moved to the coast and interlaced with LAA guns to hit the missiles out to sea, where the gun-laying radar worked best and where a 'downed' V-1 would cause no damage. This new belt was divided into six brigade sectors, 43 AA Bde taking charge of one sector, with 183rd (M) HAA Rgt under command. The whole process involved the movement of hundreds of guns and vehicles and thousands of servicemen and women, but a new 8-gun site could be established in 48 hours. After moving the mobile 3.7-inch HAA guns to the coast, these were progressively replaced by the static Mark IIC model, which had power traverse that could more quickly track the fast-moving targets, accompanied by the most sophisticated Radar No 3 Mark V (the SCR-584 radar set) and No 10 Predictor (the all-electric Bell Labs AAA Computer). These were emplaced on temporary 'Pile platforms' named after the C-in-C of AA Command. The introduction of VT Proximity fuzes also increased the 'kill rate'. The guns were constantly in action, but success rates against the 'Divers' steadily improved, until over 50 per cent of incoming missiles were destroyed by gunfire or fighter aircraft. This phase of Operation Diver ended in September after the V-1 launch sites in Northern France had been overrun by 21st Army Group.[1][10][14][15][16]


A static Mk IIC 3.7-inch gun on a Pile platform during Operation Diver.
In August 183rd (M) HAA Rgt had moved to 71 AA Bde, still in the Diver Belt, but in September–October it was with 5 AA Bde under 1 AA Group, which operated a 'Diver Box' covering the Thames Estuary, as the Luftwaffe began air-launching V-1s over the North Sea. In November it left 71 AA Bde once more and rejoined 30 AA Bde, now in 5 AA Group, which was controlling the 'Diver Fringe' protecting the East Coast against air-launched V-1s.[10][16]
Antwerp 'X' deployment[]


3.7-inch HAA gun of a Mixed HAA battery in Belgium, January 1945.
Once 21st Army Group had captured Brussels and Antwerp, these cities became targets for V-1s launched from within Germany, and anti-Diver or 'X' defences had to be established. AA Command's experience had shown that the power-operated, remotely controlled Mk IIC 3.7-inch gun, with automatic fuze-setting, SCR 584 radar and Predictor No 10 were required to deal effectively with V-1s, but 21st Army Group's mobile HAA units did not have experience with this equipment. In December the first overseas deployment of Mixed HAA units began, and 183rd (M) HAA Rgt was one of those selected. The war establishment of an HAA regiment on service overseas was three batteries, so 640 (M) HAA Bty left to become independent on 30 November (it disbanded on 12 December).[5][17]
The regiment arrived at Antwerp in January 1945, taking over Mk IIC 3.7-inch guns on Pile platforms in bitter weather with inadequate hutting, and were immediately in action against the onslaught of V-1s. The Antwerp 'X' defences under 80 AA Bde involved an outer line of Wireless Observer Units sited 40 miles (64 km) to 50 miles (80 km) in front of the guns to give 8 minutes' warning, then Local Warning (LW) stations positioned half way, equipped with radar to begin plotting individual missiles. Finally there was an inner belt of Observation Posts (OPs), about 20,000 yards (18,000 m) in front of the guns to give visual confirmation that the tracked target was a missile. The LW stations and OPs were operated by teams from the AA regiments. Radar-controlled searchlights were deployed to assist in identification and engagement of missiles at night. The success rate of the X defences had been low at first, but after the arrival of Mk IIC guns and experienced crews from AA Command the results improved considerably, with best results in February and March 1945. The number of missiles launched at Antwerp peaked at 623 a week in February, but dropped rapidly as 21st Army Group continued its advance, and in the last week of action the AA defences destroyed 97.5 per cent of those reaching the defence belt.[18][19]
The war in Europe ended on VE Day, 8 May 1945. 183rd (Mixed) Heavy Anti-Aircraft Regiment, together with 564, 591 and 608 Batteries, was disbanded on 25 May.[5]
Insignia[]
Brass collar badge of the Royal Artillery
While the male members of the regiment wore the Royal Artillery's 'gun' cap badge, the women wore the ATS cap badge, but in addition they wore the RA's 'grenade' collar badge as a special badge above the left breast pocket of the tunic. Both sexes wore the white RA lanyard on the right shoulder.[20]
Notes[]
- ↑ 1.0 1.1 Pile's despatch.
- ↑ Collier, Chapter XVII.
- ↑ Routledge, pp. 399–400.
- ↑ Routledge, pp. 338, 407.
- ↑ 5.0 5.1 5.2 Frederick. pp. 761–2, 796.
- ↑ 6.0 6.1 Order of Battle of Non-Field Force Units in the United Kingdom, Part 27: AA Command, 1 October 1942, with amendments, The National Archives (TNA), Kew, file WO 212/82.
- ↑ Routledge, pp. 400–1, Map 36.
- ↑ Order of Battle of Non-Field Force Units in the United Kingdom, Part 27: AA Command, 13 March 1943, TNA file WO 212/83.
- ↑ Order of Battle of AA Command, 1 August 1943, TNA file WO 212/84.
- ↑ 10.0 10.1 10.2 10.3 Order of Battle of AA Command, 27 April 1944, with amendments, TNA file WO 212/85.
- ↑ Collier, Chapter XXI.
- ↑ Collier, Table XLII.
- ↑ Routledge, pp. 409–10.
- ↑ Collier, Chapter XXIV.
- ↑ Collier, Appendix XLV.
- ↑ 16.0 16.1 Routledge, pp. 410–16; Table LXX, p. 423; Map 38.
- ↑ Routledge, pp. 333–6.
- ↑ Joslen, p. 463.
- ↑ Routledge, pp. 333–6, 336–41, Map 31.
- ↑ Sainsbury, Plate 9, p. 7.
References[]
- Basil Collier, History of the Second World War, United Kingdom Military Series: The Defence of the United Kingdom, London: HM Stationery Office, 1957.
- J.B.M. Frederick, Lineage Book of British Land Forces 1660–1978, Vol II, Wakefield, Microform Academic, 1984, ISBN 1-85117-009-X.
- Lt-Col H.F. Joslen, Orders of Battle, United Kingdom and Colonial Formations and Units in the Second World War, 1939–1945, London: HM Stationery Office, 1960/Uckfield: Naval & Military Press, 2003, ISBN 1-843424-74-6.
- Gen Sir Frederick Pile's despatch: 'The Anti-Aircraft Defence of the United Kingdom from 28th July, 1939, to 15th April, 1945' London Gazette 18 December 1947.
- Brig N.W. Routledge, History of the Royal Regiment of Artillery: Anti-Aircraft Artillery 1914–55, London: Royal Artillery Institution/Brassey's, 1994, ISBN 1-85753-099-3.
- Col J.D. Sainsbury, The Hertfordshire Yeomanry Regiments, Royal Artillery, Part 2: The Heavy Anti-Aircraft Regiment 1938–1945 and the Searchlight Battery 1937–1945; Part 3: The Post-war Units 1947–2002, Welwyn: Hertfordshire Yeomanry and Artillery Trust/Hart Books, 2003, ISBN 0-948527-06-4.
The original article can be found at 183rd (Mixed) Heavy Anti-Aircraft Regiment, Royal Artillery and the edit history here.