| 2/9th Battalion | |
|---|---|
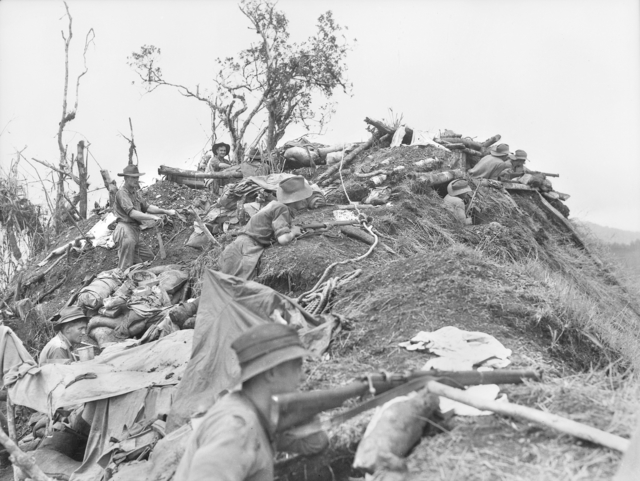 'C' Company, 2/9th Battalion during the fighting at Shaggy Ridge, January 1944 | |
| Active | 1939–1946 |
| Country |
|
| Branch | Army |
| Type | Infantry |
| Size | ~800–900 men[Note 1] |
| Part of | 18th Brigade, 7th Division |
| Motto(s) | Never Late |
| Colours | Black over Light Blue |
| Engagements | |
| Insignia | |
| Unit Colour Patch |
|
The 2/9th Battalion was an infantry battalion of the Australian Army during World War II. Raised in Queensland as part of the Second Australian Imperial Force (2nd AIF) shortly after the outbreak of the war, it served as part of the 18th Brigade and over the course of the war it was attached to the 6th, 9th and finally the 7th Division. It served in the United Kingdom in 1940, before taking part in the Siege of Tobruk and then the Syria-Lebanon campaign in 1941. In 1942 it was brought back to Australia where it took part in the New Guinea campaign throughout 1942–44. Its final involvement in the war was the Borneo campaign in 1945. It was disbanded shortly after the war in early 1946.
History[]
Formation[]
Formed on 13 November 1939 at Redbank Camp, Brisbane, the 2/9th Battalion was the first of four battalions raised for the Second Australian Imperial Force (2nd AIF) in Queensland.[2] Initially assigned to the 18th Brigade, 6th Division, its first commanding officer was Lieutenant Colonel Eric Gifford Martin, formerly of the 42nd Battalion, a Militia battalion based in Rockhampton.[3] The majority of the battalion's officers were drawn from the Militia, although like many of the 2nd AIF units it was supplied with a Regular officer initially to serve in the role as adjutant.[4]
Following training at Redbank and then later in New South Wales at Rutherford and Ingleburn, the 2/9th was among the force of 8,000 Australians sent to the United Kingdom in early 1940. Initially it had been planned to send this force to France to serve alongside the British Expeditionary Force, however, by the time they arrived in Scotland on 16 June 1940, France had fallen and so it was decided that the Australians would remain in the United Kingdom to help defend against a possible invasion.[5][6]
With an establishment of 28 officers and 790 other ranks, the battalion was transported by rail to the south of England where they set up a camp at Lopcombe Corner, on Salisbury Plain in Wiltshire.[7] Here they manned anti-aircraft defences, undertook training exercises and formed a mobile striking force in the event of an invasion.[8] In September another change of higher command came when the 18th Brigade was transferred to the 9th Division, which was being raised from the extra personnel in Britain at the time.[9] The following month, on 14 October they moved to Meeanee Barracks, in Colchester, Essex, where they took over responsibility for a defence sector from a British officer training battalion. They remained in Colchester until 10 November when orders came for the 18th Brigade to hand over to the 25th Brigade, and the 2/9th was relieved by the 2/31st Battalion.[10] With the threat of invasion having passed, however, the decision was made to redeploy the Australians to North Africa where they might be actively employed in combat operations. Following this, preparations for embarkation began as orders were received for the battalion to entrain for Glasgow where, on 15 November 1940, they boarded HMT Strathaird.[11]
Middle East[]
Sailing via Durban, South Africa, where they marched through the city under arms on 13 December 1940,[12] the battalion disembarked in Alexandria, Egypt on 31 December 1940 and went into camp at Iking Maryut with 33 officers and 707 men.[13] In February 1941 the battalion was transferred once more, as the 18th Brigade was re-assigned to the 7th Division.[14] With the 7th Division the battalion fought its first major engagement of the war on 21 March 1941, when it led the 18th Brigade's assault on the Italian fortress at Giarabub, which was held by about 1,500 Italians.[15] Advancing from Siwa in Egypt, the battalion, supported by elements of the 2/10th and 2/12th Battalions, attacked from the south across marshland, while cavalry from the 6th Division Cavalry Regiment feined an against the strongest point of the fortress. Amidst a sandstorm that limited visibility heavy fighting ensued and the garrison surrendered at around 2:00 pm; 250 Italians were killed, while 1,300 were taken as prisoners of war.[16] 17 Australians were killed and 77 were wounded, with the majority of these being men from the 2/9th Battalion.[17] Afterwards, the battalion was sent to Ikingi Maryut[18] and the following month they were transported to Tobruk by road and sea as German forces surrounded the strategic port in an effort to capture it.[19]
On 3 May, the 2/9th Battalion launched a counterattack on the German forces around "the Salient" in order to retake some of the posts that had previously been lost to the Germans. After being subjected to a heavy German artillery bombardment at their form up point, at 8:45 pm the battalion attacked from the southern flank under the cover of considerable counterbattery fire from the British artillery.[20] After capturing a number of positions and inflicting heavy losses upon the defenders, the Australians were eventually forced to withdraw at around 3:00 am on 4 May when it became apparent that they would not be able to complete the advance before daylight. Having lost three men killed, three missing and 51 wounded, at dawn the 2/9th Battalion returned to the Blue Line, where they took over a defensive position south of Bianca.[21] Here a series of small skirmishes ensued during which time the battalion was able to extend their lines by about 0.5 miles (0.80 km).[22]
For the rest of May the battalion undertook defensive construction tasks and raids into "no mans land" southwest of Bianca before being relieved by the 2/17th Battalion on the night of 4/5 June 1941. Following this, the 18th Brigade went into reserve and the battalion saw little action for the next month as they were moved back to the Bardia–El Adem Road junction.[23] In July they returned to the Salient, spending a period of time in brigade reserve in the Pilastino sector before being moved back up to the Red Line in the El Adem sector where they undertook aggressive patrols into no mans' land, penetrating a number of minefields and moving booby traps.[24][25] On 23 July the battalion launched a major raid in their sector in an effort to gauge German responses, penetrating over 800 metres (870 yd) through the German lines, but after finding their objective unoccupied, they withdrew.[26]
Following this the battalion went back into reserve for a period, before briefly returning to the Red Line at the start of August.[27] This was short-lived, though, for later in the month the decision was made to withdraw the 18th Brigade from Tobruk and the 2/9th Battalion was subsequently sent to Palestine to undertake training. Later they were transferred to Syria where they were employed on occupation duties following the defeat of the Vichy French forces in that country.[28][29]
Pacific[]
In February 1942 the 2/9th, along with the rest of the 2nd AIF, was withdrawn back to Australia in response to the threat posed by Japan's entry into the war following the attacks on Pearl Harbor and in Malaya.[30][31] Returning via Bombay and Colombo, the 2/9th arrived in Australia, landing in Port Adelaide, South Australia in March 1942 and from there proceeded to camp in Sandy Creek, near Gawler.[32] They remained there until April when they were moved to Tenterfield, and then Kilcoy,[33] where they carried out training prior to their departure overseas.[28] On 6 August 1942 the order to deploy came and the battalion embarked from Brisbane along with the rest of the 18th Brigade,[34] bound for Milne Bay in New Guinea where they arrived on 21 August.[35]
From the beginning of August the Japanese had been bombing the troops of the 7th Brigade which had initially been sent to garrison the area, and as a Japanese invasion force was expected, the three battalions of the 18th Brigade were quickly placed into positions where they could be most effective. The 2/9th was assigned the task of defending Milne Force Headquarters at Hagita House and the Number 1 Strip (also known as Gurney Field).[36] Upon arrival, the 2/9th Battalion was used to construct roads and lay steel matting on the airstrip as well as unloading stores from ships as they arrived and carrying out patrolling operations.[37] Following the Japanese landing on 25 August, the battalion was placed on alert and increased its patrolling operations around the airfield, however, for five days no contact was made. On 3 September they moved from Gili Gili to KB Mission and alongside the 2/12th Battalion, which had launched a counteroffensive along the north coast of the bay, they went into battle with the Japanese for the first time.[38] Over the course of the next two days the Japanese were beaten back and eventually a withdrawal was ordered by the Japanese commanders. By this time, the 2/9th Battalion had lost 29 men killed and a further 86 wounded.[39]
After taking part in defeating the Japanese at Milne Bay, the battalion was transferred to Oro Bay aboard HMAS Broome and went on to fight at Buna in December and then Sanananda in early January 1943, by which time its strength had fallen from over 600 to just under 100 men due to the effects of tropical diseases and heavy fighting.[28][40] In March 1943, after being withdrawn back to Port Moresby, the 2/9th Battalion returned to Australia where they undertook further jungle training at Ravenshoe on the Atherton Tablelands.[41] In August, however, they returned to Port Moresby, embarking at Townsville and continued further training in the areas surrounding the port.[42] They remained there until December when they deployed into the Finisterre Range, being flown into Dumpu, from where they took part in the Battle of Shaggy Ridge in January 1944, capturing "Green Sniper's Pimple" on 21 January as part of a brigade-level operation to carry the ridge.[28][43][44] In May they were brought back to Australia where they undertook a period of over a year training for the final Australian amphibious operation of the war—the landing at Balikipapan.[28]
Landing on 1 July 1945, the 2/9th took part in the Borneo campaign until the end of the war.[28] At the start, the battalion was assigned the role of being the 18th Brigade's reserve,[45] however, late on the opening day it was ordered forward to relieve the 2/10th Battalion, taking Klandasan before noon, and commencing house-to-house clearances in concert with a troop of tanks.[46] From there it forced a small Japanese force off Santosa Hill, before tying in its positions at 6:00 pm and digging-in for the night.[46] On 5 July the 2/9th landed on the western side of Balikpapan Bay. Along with a small force of armour, artillery, mortars and other supporting arms, it began to clear inland from Penadjam. Over the course of the following month they sent detachments south along the coast towards the Semsumpu river and north towards the Riko river and onto the Parehpareh river via Separi.[47] By 12 August, posts had been established astride the Pamaluan–Bandjermasin Road, and a detachment from 'C' Company had reached Pamaluan, where they linked up with elements from the 2/1st Pioneer Battalion.[48]
Finally, in mid August, the fighting on Borneo came to an end following the Atomic bombings of Hiroshima and Nagasaki and the subsequent surrender of Japan. After this the 2/9th Battalion carried out various garrison duties such as guarding prisoners of war and maintaining internal security while the demobilisation process took place.[28] As personnel were repatriated back to Australia or transferred to other units for further service, the battalion's strength dropped until it was finally disbanded on 3 January 1946 while still at Balikpapan.[28]
Disbandment[]
During the course of the war, a total of 4,107 men served with the 2/9th Battalion[49] of whom 319 were killed in action or died on active service, and a further 726 wounded.[28][Note 2] One of its members, John Alexander French, was posthumously awarded the Victoria Cross for his actions during the fighting around Milne Bay in September 1942.[51] Other decorations that men of the 2/9th received were: one CBE, four DSOs, one OBE, one MBE, nine Military Crosses, three Distinguished Conduct Medals, 19 Military Medals and 68 Mention in Despatches.[28][Note 3]
Battle honours[]
For their service during World War II, the 2/9th Battalion received 10 battle honours:
- North Africa, Giarabub, Defence of Tobruk, The Salient 1941, South-West Pacific 1942–1945, Buna–Gona, Sanananda Road, Cape Endaiadere–Sinemi Creek, Sanananda–Cape Killerton, Milne Bay.[28]
Notes[]
- Footnotes
- ↑ By the start of World War II, the authorised strength of an Australian infantry battalion was 910 men all ranks, however, later in the war it fell to 803.[1]
- ↑ There is a discrepancy in these figures to those provided by the battalion historian, who lists the following: 218 killed in action, 69 died of wounds and a further 688 wounded.[50] Johnston's figures also vary, citing 218 killed in action, 72 died of wounds, eight died on active service and 755 wounded in action.[49]
- ↑ There is a discrepancy in these figures to those provided by the battalion historian, who lists the following awards: one VC, four DSOs, nine MCs, 18 MMs, three DCMs and 69 MIDs.[52]
- Citations
- ↑ Palazzo 2004, p. 94.
- ↑ Spencer 1999, p. 24.
- ↑ Dickens 2005, p. 5.
- ↑ Dickens 2005, p. 6.
- ↑ Spencer 1999, pp. 27–28.
- ↑ Dickens 2005, pp. 32–45.
- ↑ Dickens 2005, p. 32.
- ↑ Dickens 2005, p. 38.
- ↑ Dickens 2005, p. 367.
- ↑ Dickens 2005, p. 45.
- ↑ Dickens 2005, p. 46.
- ↑ Dickens 2005, p. 47.
- ↑ Dickens 2005, pp. 48–49.
- ↑ Wilmot 1993, p. 60.
- ↑ Coulthard-Clark 1998, p. 179.
- ↑ Coulthard-Clark 1998, p. 180.
- ↑ Johnston 2005, p. 22.
- ↑ Johnston 2005, p. 25.
- ↑ Wilmot 1993, p. 80.
- ↑ Wilmot 1993, p. 149.
- ↑ Wilmot 1993, pp. 150–151.
- ↑ Wilmot 1993, p. 151.
- ↑ Dickens 2005, p. 105.
- ↑ Dickens 2005, pp. 108–109.
- ↑ Wilmot 1993, pp. 227–228.
- ↑ Dickens 2005, p. 110.
- ↑ Dickens 2005, p. 111.
- ↑ 28.00 28.01 28.02 28.03 28.04 28.05 28.06 28.07 28.08 28.09 28.10 "2/9th Battalion, World War II". Australian War Memorial. Archived from the original on 22 July 2009. http://www.webcitation.org/5iSt43QSe. Retrieved 22 July 2009.
- ↑ Spencer 1999, pp. 75–77.
- ↑ Spencer 1999, p. 83.
- ↑ Dickens 2005, p. 137.
- ↑ Dickens 2005, pp. 143–145.
- ↑ Dickens 2005, pp. 147–149.
- ↑ Thompson 2008, p. 339.
- ↑ Brune 2003, p. 279.
- ↑ Brune 2003, p. 282.
- ↑ Dickens 2005, p. 161.
- ↑ Dickens 2005, p. 167.
- ↑ Dickens 2005, p. 181.
- ↑ Dickens 2005, p. 157.
- ↑ Dickens 2005, p. 239.
- ↑ Bradley 2004, p. 179.
- ↑ Bradley 2004, p. 180.
- ↑ Thompson 2008, p. 381.
- ↑ Long 1963, p. 511.
- ↑ 46.0 46.1 Long 1963, p. 519.
- ↑ Long 1963, p. 540.
- ↑ Dickens 2005, p. 342.
- ↑ 49.0 49.1 Johnston 2005, p. 248.
- ↑ Dickens 2005, p. 369.
- ↑ Dickens 2005, p. 172.
- ↑ Dickens 2005, p. ix.
References[]
- Bradley, Phillip (2004). On Shaggy Ridge: The Australian Seventh Division in the Ramu Valley from Kaiapit to the Finisterres. Melbourne, Victoria: Oxford University Press. ISBN 978-0-19-555100-6.
- Brune, Peter (2003). A Bastard of a Place: The Australians in Papua. Crows Nest, New South Wales: Allen & Unwin. ISBN 1-74114-403-5.
- Coulthard-Clark, Chris (1998). Where Australians Fought: The Encyclopaedia of Australia's Battles. St Leonards: Allen and Unwin. ISBN 1-86448-611-2.
- Dickens, Gordon (2005). Never Late: The 2/9th Australian Infantry Battalion 1939–1945. Loftus, New South Wales: Australian Military History Publications. ISBN 1-876439-47-5.
- Johnston, Mark (2005). The Silent 7th: An Illustrated History of the 7th Australian Division 1940–46. Crows Nest, New South Wales: Allen & Unwin. ISBN 1-74114-191-5.
- Long, Gavin (1963). The Final Campaigns. Australia in the War of 1939–1945, Series 1 – Army, Volume VII. Canberra, Australian Capital Territory: Australian War Memorial. OCLC 1297619. http://www.awm.gov.au/histories/second_world_war/volume.asp?levelID=67909.
- Palazzo, Albert (2004). "Organising for Jungle Warfare". In Dennis, Peter; Grey, Jeffrey. The Foundations of Victory: The Pacific War 1943–1944. Canberra, Australian Capital Territory: Army History Unit. ISBN 978-0-646-43590-9. http://www.army.gov.au/Our-history/Army-History-Unit/Chief-of-Army-History-Conference/Previous-Conference-Proceedings/~/media/Files/Our%20history/AAHU/Conference%20Papers%20and%20Images/2003/2003-The_Pacific_War_1943-1944_Part_1.ashx.
- Spencer, Bill (1999). In the Footsteps of Ghosts: With the 2/9th Battalion in the African Desert and the Jungles of the Pacific. St Leonards, New South Wales: Allen & Unwin. ISBN 1-86508-145-0.
- Thompson, Peter (2008). Pacific Fury: How Australia and her Allies Defeated the Japanese Scourge. North Sydney, New South Wales: William Heinemann. ISBN 978-1-74166-708-0.
- Wilmot, Chester (1993) [1944]. Tobruk 1941. Ringwood, New South Wales: Penguin Books Australia. ISBN 0-14-017584-9.
External links[]
The original article can be found at 2/9th Battalion (Australia) and the edit history here.