| 20th Middlesex Rifle Volunteer Corps 3rd City of London Regiment 69th (3rd City of London) S/L Regiment 625th Light Anti-Aircraft Regiment | |
|---|---|
| Active | 13 December 1859 – 10 March 1955 |
| Country |
|
| Branch |
|
| Role |
Infantry Air Defence |
| Size |
1 Battalion 4 Battalions (WWI) 3 Batteries (WWII) |
| Part of |
Royal Fusiliers London Regiment |
| Garrison/HQ |
Edward Street, Hampstead Road, St Pancras (3rd Londons) Harrow Road, Paddington (69th S/L) |
| Nickname(s) | Railway Rifles |
| Engagements |
Second Boer War 2nd Bn: WWII: |
The 3rd (City of London) Battalion, London Regiment (Royal Fusiliers) was a volunteer unit of the British Army under various titles from 1860 to 1961. Originally raised from railwaymen, the battalion sent a detachment to the Second Boer War and several battalions fought in World War I. Shortly before World War II it became a searchlight unit and defended the UK during the Blitz, remaining in the air defence role in the postwar Territorial Army.
Volunteer Force[]
The enthusiasm for the Volunteer movement following an invasion scare in 1859 saw the creation of many Rifle Volunteer Corps (RVCs) composed of part-time soldiers eager to supplement the Regular British Army in time of need.[1] One such unit was the Railway Rifles, raised at Euston Square on 13 December 1859, chiefly from employees of the London and North Western Railway (LNWR) at nearby Euston Station. It became the 20th Middlesex Rifle Volunteers (Railway Rifles).[2][3][4] The unit drew largely upon lower middle class volunteers, while railway managers and engineers were later recruited into the officers-only Engineer and Railway Volunteer Staff Corps based at the professional engineering institutions in Westminster.[5]
Initially consisting of three companies, the unit was attached to the 4th Administrative Battalion of Middlesex RVCs from August 1860 to May 1861, but as the number of companies rose (it had nine by 1866) it became a fully independent battalion.[2][3][6] The first Captain Commandant, later Lieutenant-Colonel, was Thomas Edward Bigge, who had formerly served in the Royal Welch Fusiliers.[3] His immediate successors, Henry Malet (appointed 1870) and Charles Gore-Brown (1876–83) had also been professional officers in the Grenadier Guards and 49th Foot respectively.[6][7] The 3rd Duke of Sutherland, who had extensive railway interests in Scotland, became Honorary Colonel in 1867.[6] Like many other RVCs, the uniform of the 20th Middlesex at this time was grey, which the unit wore with scarlet facings.[3][8]
When the Cardwell Reforms introduced 'Localisation of the Forces' in 1873, the 20th Middlesex was brigaded, together with several other London and Middlesex Volunteer and Militia battalions, in Brigade No 51 & 52 under the 60th Rifles. The Volunteer units of these brigades met once a year for a training camp.[6][9][10] In 1880, following disbandments and amalgamations among less successful corps, the 20th Middlesex became the 11th (Railway) Middlesex RVC, with its HQ at Albany Street. In 1881 as part of the Childers Reforms it was named as the 4th Volunteer Battalion of the 60th Rifles (King's Royal Rifle Corps), but the following year this was changed to 3rd Volunteer Battalion, Middlesex Regiment. In 1890 the unit's affiliation was changed again and it became the 3rd Volunteer Battalion Royal Fusiliers (City of London Regiment). By now the Railway connection had disappeared, and the unit had adopted the scarlet coat and blue facings of the Royal Fusiliers.[2][3]
The Stanhope Memorandum of December 1888 proposed a comprehensive Mobilisation Scheme for Volunteer units, which would assemble in their own brigades at key points in case of war. In peacetime these brigades provided a structure for collective training.[11][12] The battalion formed part of the West London Brigade, together with other VBs of the Royal Fusiliers and Middlesex Regiment.[6]
Second Boer War[]
During the Second Boer War a composite Service Company drawn from the 1st, 2nd and 3rd VBs Royal Fusiliers joined the 2nd Royal Fusiliers at Fourteen Springs on 7 May 1900. It served with the regulars during the guerrilla phase of the war, involving long marches, including the 'Great De Wet Hunt', and then tedious garrison duty in the Blockhouse lines. A second composite company joined the 2nd Royal Fusiliers on 22 July 1901, and a third on 1 April 1902. These volunteers earned the Battle honour South Africa 1900–1902 for their battalions.[6][13][14]
Territorial Force[]
When the Volunteer Force was subsumed into the new Territorial Force (TF) under the Haldane Reforms of 1908,[15][16] the Volunteer units in and around London were formed into a new London Regiment, with the 3rd Volunteer Battalion of the Royal Fusiliers becoming the 3rd (City of London) Battalion, the London Regiment (Royal Fusiliers), conveniently shortened to '3rd Londons'. The battalion headquarters was at Edward Street, Hampstead Road, St Pancras.[2][3][6][17][18][19] The 1st–4th Bns London Regiment (formerly the 1st–4th VBs Royal Fusiliers) remained brigaded together as 1st London Brigade of the 1st London Division of the TF.[6][20][21][22]
In 1912 the 10th Bn London Regiment (Paddington Rifles) was disbanded, and the 3rd Londons took over its battalion HQ at Harrow Road, Paddington, as a drill station and absorbed many of its personnel.[2]
World War I[]
Mobilisation[]
The 1st London Division left by train from Waterloo station on Sunday 2 August 1914 for its annual training camp, which was to be held at Wareham, Dorset. No sooner had the battalions reached camp than they received orders to return to London for mobilisation. This process had been carefully planned, and was completed on 3 August, so that before war was declared on 4 August the battalions of the 1st London Brigade were already at their war stations, guarding the vital London and South Western Railway line between Waterloo and Southampton. The 3rd Bn was assigned to the Basingstoke–Eastleigh section.[20][23][24][25][26]
On the night of 31 August/1 September the 1st London Bde was ordered back to its peacetime headquarters to mobilise for garrison duty overseas. The 1st London Brigade was the first Territorial formation to go overseas, sailing to Malta on 4 September to relieve the Regular troops in garrison there. A small number of officers and men ruled medically unfit or who had not volunteered for overseas service were left at Hampstead Road to begin recruiting a reserve battalion. Shortly afterwards this was designated the 2/3rd Bn London Regiment, after which the parent unit became the 1/3rd Battalion.[20][23][27][28][29]
Recruitment was rapid, and the 2/3rd was soon ready for overseas service, while a 3rd Line was formed as a reserve battalion to provide drafts for the 1/3rd and 2/3rd. Later a 4/3rd Battalion was also raised (see below).[20][30]
1/3rd Londons[]
Malta 1914[]
The 1/3rd Bn disembarked in Malta on 14 September and went to Mtarfa where it began guard duties as well as training the recruits in its ranks. On 2 January 1915 the 1/3rd Bn was relieved by the 2/3rd Bn (leaving its obsolete rifles and equipment for the newcomers) and embarked for Marseilles in France.[23][29][31][32][33]
Meerut Division[]

Neuve Chapelle
After re-equipping with charger-loading Long Lee-Enfield rifles and 1914 pattern equipment, 1/3rd Londons joined GHQ Reserve at Saint-Omer on 25 January for further training and then joined the Indian Corps, being attached to Ferozepore Brigade of the 3rd (Lahore) Division on 10 February, transferring to the Garhwal Brigade of the 7th (Meerut) Division a week later.[20][34][35][36][37][38]
At the Battle of Neuve Chapelle on 10 March the Gharwal Bde was the assaulting formation of the Indian Corps, attacking Neuve Chapelle village from the 'Port Arthur' salient in the south west with 1/3rd Londons under Lt-Col A.A. Howell as the reserve battalion. The leading battalions went through the southern end of the village and took the brigade objective (the German second line trench), leaving just a short section of the German front line in front of Port Arthur uncaptured. Two companies of 1/3rd Londons were sent up to help capture this outpost. Together with four platoons of 1/39th Garhwal Rifles they made a frontal attack at 17.00. It was 'carried out with great gallantry' and at first the Londoners suffered serious casualties, but as they neared the trench the garrison of 80 men surrendered.[39][40][41]
For the Battle of Aubers Ridge on 9 May, the Gharwal Bde was in divisional support and missed the worst of the carnage.[42][43] For the opening of the Battle of Festubert on 15 May the Gharwal Bde put in a night attack, but surprise was lost. 1/3rd Londons were in support, providing carrying parties, and once again missed the worst of this disastrous attack.[44][45]
During the Battle of Loos the Meerut Division carried out a subsidiary attack on 25 September near Neuve Chapelle, known as the Action of Pietre. The Gharwal Bde was held up, except for the 2/8th Gurkha Rifles, but the brigade reserves (including 1/3rd Londons) were unable to exploit this fleeting success because the communication trenches to the front were knee-deep in mud.[46][47]
The Indian Corps was transferred to Mesopotamia in November 1915, but its British battalions remained in France. 1/3rd Londons temporarily transferred to 139th (Sherwood Foresters) Brigade, 46th (North Midland) Division, on 6 November and then to 142nd (6th London) Brigade, 47th (2nd London) Division, on 16 November.[20][36][38]
56th (1/1st London) Division[]
In February 1916 the battalion returned to the 1st London Division, which was being reformed in France as the 56th (1/1st London) Division. The battalion was once more assigned to the 1st London Brigade, now numbered as the 167th (1st London) Brigade, along with the 1/1st Londons and 7th and 8th Bns Middlesex Regiment.[20][21][37][48][49]
After the reformed division had shaken down, on 4 May 167th Brigade took over part of the line facing the Gommecourt Salient, where it was due to attack in the forthcoming Battle of the Somme. On 5 May the battalion received a large draft of veterans of Gallipoli and Egypt from the 2/3rd Bn which was being disbanded (see below). The Gommecourt sector was static – the division's first action was on 18 May when 1/3rd Bn beat off a German raid – but working parties of the battalion were required to dig new communication trenches in preparation for the offensive, and these parties suffered a trickle of casualties from German artillery. The working parties alternated with periods holding the frontline trenches and sending out night patrols. On the night of 25/26 May, 167th Bde dug a new jumping-off trench half-way across No man's land. Over following days and nights this position was enlarged and linked with communication trenches.[50][51] Another round of intense work in preparing trenches, roads and dumps in June left the battalion exhausted and having suffered numerous casualties.[52]
167th Brigade held the line in late June while the rest of the division practised the assault they were to make on Z Day (which was delayed by weather to 1 July).[53] On the night of 29 June, 1/3rd Bn sent out a 20-man raiding party to a suspected machine gun post at Point 94, the junction of two German trenches codenamed 'Fir' and 'Firm'. After crawling across 300 yards of No man's land through heaps of barbed wire, the patrol surprised a German working party and after a violent fight returned with a prisoner. Major F.D. Sainsbury took over command of the battalion in 30 June. A and B Companies moved up into the reserve trenches, then early on the morning of 1 July the rest of 167th Brigade withdrew while the assaulting brigades took up their positions in the new jumping-off trench.[53][54]
Gommecourt[]
1/3rd Londons' role in the attack was split. While two companies were detailed to fill the gap to the 46th (North Midland) Division attacking on the other side of the Gommecourt Salient, and then to occupy the reserve trenches,[55] the other two were to follow the leading battalions and dig communication trenches across No man's land from the jumping-off trench to the German front line. Guided by sappers of 416th (Edinburgh) Field Company, Royal Engineers, these two companies were responsible for digging 'C' trench from the end of 'Yellow Street' to the junction of 'Fen' and 'Ferret' trenches, and 'D' trench from 'Z' hedge to Point 94 at the junction of 'Fir' and 'Firm'. The battalion had already suffered from enemy shellfire as it moved up to the front, and started to take casualties as soon as it entered the communication trenches. Three times the men of the digging companies tried to enter No man's land and begin their task, but each time the men were shot down within yards of their own trenches and the task was suspended. No 15 Platoon, in reserve in the Z hedge, were almost wiped out by a salvo of German shells. Meanwhile, the German counter-barrage across No man's land and on their own line meant that in the absence of the communication trenches no help to could be got up to the attacking battalions isolated in the German lines. They were driven out or mopped up by the end of the afternoon. The remainder of 1/3rd Londons were kept in the reserve trenches; nevertheless, by the end of the day the battalion had suffered over 150 casualties.[56][57]


British troops advancing during the Battle of Ginchy
The Gommecourt attack had been a diversion and no further attack was made in the area. The reduced battalions of 56th Division had to hold their line until 20 August. After being relieved, the 56th Division moved to the southern Somme sector, where it trained with the first tanks to arrive in France.[58][59]
Somme[]
On 5 September 1916 the 56th Division went back into the line during the Battle of Ginchy. 168th Bde attacked before dawn with partial success, but lost direction, and their relief later in the day by 167th Bde caused some problems.[60] For the Battle of Flers–Courcelette on 15 September, 167th Bde attacked towards Bouleaux Wood with two of the new tanks in support. The attack went in at 06.20, but one tank had broken down, while the other was hit by a field gun and set on fire after giving early support. And because neighbouring troops caould not take the flanking strongpoint known as 'the Quadrilateral' the brigade's attack made little progress and the attack was called off in the afternoon.[61] It was the same story when the division made a second attempt on 18 September, but at least the Quadrilateral fell. When the division attacked again on 25 September (the Battle of Morval), German resistance began to crumble, and by midnight 167th Bde was in the lower part of Bouleaux Wood and beyond the derelict tank from the 15 September fighting.[62]


British troops at Morval 25 September 1916
In early October 167th Bde occupied a line of linked-up outposts in a sea of mud, and the planned attack on 5 October. It went in on 7 October (the Battle of Le Transloy) and 167th Bde on the left was fairly successful, but in the follow-up attack at 15.30 on 8 October, 1/3rd Londons failed to make any appreciable advance against machine gun fire. The division was relieved the following night.[63]
There followed months of light training and line-holding in the Neuve Chapelle sector while the units of 56th Division were slowly rebuilt. Despite further casualties while holding the line and raiding the enemy, 1/3rd Londons attained a strength of almost 1100 all ranks when it returned to active operations in March 1917.[64]
Arras[]
In March 1917 the 56th Division was preparing to attack as part of the forthcoming Battle of Arras when patrols discovered that the Germans in front had disappeared – the beginning of their retreat to the Hindenburg Line. At Arras this retreat was minor, so the attack went in on schedule on 9 April, from old German communication trenches. 167th Brigade attacked with 1/3rd Londons and 8th Middlesex leading, the objective being Neuville-Vitasse. 1/3rd Londons progressed well, two tanks working with the battalion dealing with a strongpoint at Neuville Mill, and reached their objective by 10.00. Despite delays, the follow-up troops were in the main Hindenburg Line defences by the end of 10 April.[65]
The Arras Offensive was renewed on 3 May and went badly for 56th Division, but 1/3rd Londons were not in the leading waves. This was followed by much small-scale fighting until the division was relieved on 20 May.[66]
Ypres[]
In August 1917, 56th Division moved to the Ypres Salient to take part in the second phase of the Third Ypres Offensive (the Battle of Langemarck, 16 August). The offensive was already bogged down in mud. 167th Brigade found a marsh blocking its advance, which had to be avoided, leaving a gap to 169th Bde on the right. When 167th Bde ran into a second marsh it was held up, under flanking fire from the gap, and then subjected to a counter-attack. Prevented from making progress, the brigade withdrew to a more favourable position in the afternoon, having gained just 400 yards.[67]
Cambrai[]
The casualties from the Ypres fighting were not replaced, and the whole division was numerically weak, so 56th Division was sent to a quiet sector.[68] It was given the task of making a demonstration with dummy tanks and figures on the flank of the great tank attack that opened the Battle of Cambrai on 20 November. The demonstration succeeded in attracting German defensive fire.[69] On 23 November the division joined in fighting round Tadpole Copse and in the Hindenburg Line trenches that lasted for three days. In 30 November the Germans began a major counter-attack that slowly recaptured the ground,. That night the 1/3rd Londons relieved the battered 1/2nd Londons, and the fighting continued the next day until the German advance was held. The division was relieved and sent to a quieter sector on 3 December. At the end of the battle the 1/3rd with 850 all ranks was one of the stronger battalions in the battered division.[70][71]
Due to manpower shortages the BEF disbanded one in four of its infantry battalions in January 1918. 1/3rd Londons was selected for disbandment from 167th Bde. It supplied drafts to each of the remaining battalions in the brigade, and the remainder went to reinforce the 'new' 2/3rd Londons in 58th Division. Henceforward the 2/3rd was referred to as simply the 3rd Londons (see below).[20][72][73][74]
Commanding Officers[]
1/3rd Battalion London Regiment was commanded by the following officers:[6][75]
- Lt-Col A.A. Howell, appointed 8 March 1910; became Brig-Gen commanding 1st London (Reserve) Bde in 1916[76]
- Lt-Col F.D. Samuel, DSO, TD, from June to September 1916 and March 1917 to March 1918, when 1/3rd and 2/3rd Bns merged, after which he went to Palestine to command 40th Bn Royal Fusiliers[77]
- Lt-Col A.E. Maitland, DSO, MC, (Essex Regiment) until March 1917, when he was transferred to 1/4th Bn[78]
2/3rd Londons[]
The 2/3rd Battalion disembarked at Malta on 31 December 1914, allowing the 1/3rd Battalion to embark for France on 2 January 1915 (see above).[23][30][33][79][80]
Gallipoli[]
While on Malta the 2/3rd Bn continued training. It was still regarded as a draft-finding unit for 1/4th Bn. On 13 April they moved to Egypt, landing at Port Said before going on to garrison Khartoum in Sudan. On 15 September they left Khartoum and returned to Port Said before carrying on to Mudros, where they arrived 18 September. It entered the Gallipoli Campaign on 26 September when it landed at Suvla and was attached to the Regulars of 86th Brigade in 29th Division. Here it was assigned to 'C' section of the 'Dublin Castle' sector of the line, with A Company attached to 2nd Bn Royal Fusiliers for training.[23][81][82][83]
During two months of trench holding the battalion lost approximately half its strength. then on 26 November a great thunderstorm hit the peninsula and their trenches were flooded, followed by snow. The 2/3rd Londons were the worst hit of any unit: 50 men drowned and another 30 were evacuated with frostbite, leaving the battalion with an effective strength of just six officers and 50 other ranks. The battalion was evacuated to Mudros on 12 December (the whole Suvla sector was evacuated shortly afterwards) but was re-inserted in the Cape Helles sector on 16 December, taking up positions in the 'Gully Beach' area. It was finally evacuated from Gallipoli on 2 January 1916, a week before the campaign was finally shut down. From Mudros the battalion was taken to Alexandria.[81][84]
Old and New 2/3rd Battalion[]
Once in Egypt, the London battalions underwent rest and reorganisation at Beni Salama Camp, attached to 53rd Welsh Division. Some of them took part in the Senussi Campaign, but the weak 2/3rd was not involved. In April 1916, the 2/1st London Brigade concentrated at Sidi Bishr Camp at Alexandria. The men handed in their obsolete long Lee-Enfields and were issued with the short pattern (SMLE). On 17 April the whole brigade embarked on HMT Transylvania and sailed to Marseilles.[85][86]
Once in France, the 2/1st London Brigade moved to Rouen, where it was disbanded. The troops were drafted, mainly to their 1st Line battalions in 56th Division preparing for the attack at Gommecourt (see above). Meanwhile, the 3/3rd Londons (see below), completing their training in the UK, were renumbered as the 'New' 2/3rd Bn. The battalion formed part of 173rd (3/1st London) Brigade (popularly known as the Fusilier Brigade) in 58th (2/1st London) Division.[30][87][88]
At the time of the renumbering, the 58th Division was carrying out coast defence duties in East Anglia, but on 10 July 1916 it concentrated at Sutton Veny for final training on Salisbury Plain. In January 1917, the battalion embarked at Southampton Docks for Le Havre, and joined the division concentrated around Lucheux.[30][89] In February the division went into the line for the first time, at Ransart, south of Arras. This was considered a quiet sector, and the battalions were introduced to trench warfare by units of the 46th (North Midland) and 49th (West Riding) Divisions.[90][91][92] From February to April the 58th Division followed up the German retreat to the Hindenburg Line and was then put to work to repair the roads and railways destroyed by the retreating troops.[93][94][95]
Bullecourt[]
Under heavy shellfire during the night of 13/14 May, 173rd Bde relieved the 15th Australian Brigade, which had been attacking at the Second Battle of Bullecourt. 2/3rd and 2/4th Battalions took over the front line, driving off a serious counter-attack on 15 May, while the rest of the division completed the capture of the village over succeeding days. At the end of the month 2/3rd Bn was in support of the extended line.[96][97][98] On 15 June 173rd Bde attacked a section of the Hindenburg Line from 'The Knuckle' to 'The Hump', supported by the full artillery of V Corps and 7th, 58th (2/1st London) and 62nd (2nd West Riding) Divisions. One company of 2/3rd Bn formed the right of the attack under the command of 2/1st Londons. Zero Hour was set for 02.50, and after a struggle to overcome a number of pillboxes or Mebus, the objectives were taken and consolidated behind a standing barrage. The second phase of the attack, against the Hindenburg Support line, followed the next day, with three companies of 2/3rd Bn in the first wave. Preparations for this attack were hampered by a series of German counter-attacks during the night, the attackers were unable to recognise their objectives in the shell-damaged line and got too far forward, artillery support coud not be arranged, and by the end of the day no gains had been made.[99][100]
Ypres[]


.jpg)
Captured German pillbox or Mebu at Passchendaele
After a period of trench holding near Arras, the 58th Division moved to the Ypres Salient in late August 1917. 2/3rd Londons held the line until relieved on 18 September by 2/4th Londons, who were detailed for the attack of 20 September (the Battle of the Menin Road Ridge). The battalion then took up positions to make a dummy attack over a waterlogged portion of No man's land where no real attack was possible. The attack by 2/4th Londons was successful, except at Schuler Farm. One company of 2/3rd Londons went up to stiffen the depleted 2/4th Bn. The 2/3rd was tasked with making a renewed attack with a platoon on Schuler Farm at daybreak on 21 September. After German counter-attacks the previous day, the attack on Schuler Farm was delayed for further reconnaissance, during which the platoon commander, 2/Lt Middlemiss, saw the farm's garrison surrender to another unit, but he was hit by fire from another Mebu. The platoon's objective was thus turned to this strongpoint, but this was found to have been abandoned, so the whole position was in British hands and was successfully held against fierce counter-attacks during the evening.[101][102]
Although 58th Division participated in the Battle of Polygon Wood (26 September), 173rd Bde was not engaged, and afterwards the 58th went into reserve.[103][104]


Passchendaele mud
The division returned to the line for the Second Battle of Passchendaele. 2/3rd and 2/2nd Bns Londons were detailed to capture and consolidate the first objective, then after 45 minutes the 2/4th Bn would leap-frog through and take 173rd Bde's second objective. But as the division arrived, the weather broke, and the pre-battle assembly in the Poelcapelle area was extraordinarily difficult. The battalion was then forced to jump off at 05.30 on 26 October from a line of flooded craters under enemy shellfire and struggle forward behind a weak barrage that advanced too quickly. The exhausted men, with hardly a rifle able to fire because of the mud, got no closer than 250 yards from their objective at Spider Crossroads before being pushed back to their start line by a counter-attack at 07.20. The withdrawal of 2/3rd Bn exposed the flank of 2/2nd Bn, who were also forced to withdraw from all but one objective. The battalion's CO, Lt-Col P.W. Beresford, was killed, and at the end of the day the frontline strength of the 2/3rd Bn was just two officers and 17 men.[105][106][107]
The 58th Division remained at Poelcappelle to hold the line during November and December before it was transferred to the south in January 1918. Here it spent time digging defences, converting former French positions into the newly devised defences in depth. At the end of January 1918 the battalion absorbed drafts from the disbanded 2/1st Bn in 173rd Bde and 1/3rd Bn from 56th Division and became simply the 3rd Londons (see above).[30][108][109][110]
Spring Offensive[]
When the German Spring Offensive opened on 21 March 1918, 58th Division was positioned astride the River Oise with 173rd Bde north of the river at La Fère. It was covering a wide frontage of about 5000 yards with 3rd Londons in reserve at Viry-Noureuil. General Oskar von Hutier directed four German divisions under Von Gayl against this front. The German attack developed behind a heavy bombardment and shrouded by mist, using infiltration tactics. The battalion sent a company up to support the 2/4th Londons ar Fargniers in the Battle Zone, while the rest of the battalion patrolled and tried to make contact with the 2/2nd Bn in the Forward Zone. By midday the Germans had cleared the Forward Zone, but several of the strongpoints in the Battle Zone held out. The company at Fargniers was ordered to counter-attack, which was only partially successful, and in the afternoon a second company was sent up to reinforce Ferme Rouge Farm. However, only two platoons reached their objective, while the other two were destroyed by enemy fire while crossing the Crozat Canal. Resistance in the defended localities in the Battle Zone continued as a rearguard action until the fighting petered out at nightfall. By midnight most of the survivors of 173rd Bde had withdrawn in good order across the Crozat Canal.[111][112][113]
While 8th Londons held the canal, the remnants of 173rd Bde dug in on the Vouel Line behind them. The German attack was renewed in the afternoon of 22 March, but the canal was held until nightfall, the only attacks on the Vouel Line coming from German artillery ranged in by spotter aircraft. The following day, the Vouel Line (now the British front line) became crowded with French troops from a failed counter-attack on the canal, while the left flank was 'in the air' after the retreat of 18th (Eastern) Division. The position became untenable at mid-day, when they were ordered to withdraw to the Green Line about 1500 yards back, and the brigade and the French troops had to fight their way back to this partly-dug position. With continued pressure on the open left flank, 173rd Bde was forced to withdraw again, beyond Viry-Noureuil.[114][115][116]
The mixed force under 173rd Bde held out on the fourth day of the battle until the afternoon, when they made a planned withdrawal, and by 16.30 had retired across the Oise to join the rest of 58th Division. Here a composite 'Fusilier Battalion' was formed under Lt-Col Dann of the 2/4th, with a company drawn from each of the 2/2nd, 3rd, 2/4th and 8th Londons: No 4 Company comprised 189 men of 3rd Bn under a 2nd Lieutenant. The Fusilier Battalion held the river crossings until relieved on the night of 25/26 March. In the period 21–24 March the casualties of 3rd Bn were 18 officers and 341 other ranks out of a strength of 47 officers and 909 other ranks when the battle opened.[117][118]
Villers Bretonneux[]
58th Division was relieved by the French on 2/3 April and was moved by rail to cover Villers-Bretonneux against the continuing German advance. On 12 April, 173rd Bde was in support behind Australian troops, and on 18 April it relieved 5th Australian Brigade in the front line, with 3rd Bn taking the right sector. Much work had to be done to improve the 'line', which consisted of no more that isolated posts not yet connected up or wired in, and the work was hampered by frequent German shelling.[119][120][121]


Knocked-out A7V tank.
The German Second Army launched the Second Battle of Villers-Bretonneux on 24 April. On 173rd Be's front the bombardment opened shortly before 04.00 and inflicted serious casualties. Supported by six A7V tanks and attacking out of the mist, the Gemans pushed the left flank of the brigade back from Hangard Wood, but 3rd Bn maintained its position round Hangard Village on the right, and the position was stabilised with the support of British tanks. A counter-attack that night restored the original line.[122][123][124][125]
Chipilly[]


Regimental aid post near Chipilly, 10 August 1918.
The battalion spent the summer of 1918 working on the defences in front of Amiens and alternating with 2/2nd and 8th Londons in tours of duty in the line.[126][127][128] The Germans in front were now beginning to give ground, and the Allies prepared to go back to the offensive. For the opening attack of the Allied Hundred Days Offensive (the Battle of Amiens) on 8 August 1918, 174th Bde was given the initial objective of capturing Malard Wood, after which 173rd Bde would pass through to take the vital Chipilly Ridge overlooking a bend in the River Somme and flanking the battlefield. 3rd Londons led on the right of 173rd Bde's advance in 'artillery formation' through the German barrage that fell behind 174th Bde. In the morning mist the battalion drifted 500 yards left of its intended line through the gullies. At 08.30, as the leading companies reached the far edge of Malard Wood, the mist began to clear and the battalion was brought to a halt by machine gun fire across the valley in front and so dug in at the edge of the wood. Other battalions, coming up in support, were unable to renew the advance.[129][130][131][132]


The ruins of Chipilly after its capture
The failure to take Chipilly Ridge resulted in heavy casualties to the troops to the left of 58th Division who were overlooked by this feature. The division therefore made a second attack on 9 August. 3rd Londons attacked on the right of 173rd Bde, from an assembly trench that turned out to be no more than a string of shell-holes, and behind a misdirected barrage. The supporting American battalion was not yet in line and the brigade was enfiladed from Chipilly village. Under heavy fire and taking serious casualties, the battalions dug in under the shelter of the Chipilly gully. At nightfall the 2/10th Londons managed to clear Chipilly village and dislodge the defenders from the ridge.[133][134][135][136]
Bapaume[]
The Second Battle of Bapaume opened on 22 August and was continued with a night attack on 23/24 August, in which 173rd Bde supported 175th Bde and 47th Division. A dawn attack followed on 25 August with 3rd Londons on the left of 173rd Bde in close support. In the morning mist the leading units found the German positions empty, and so 173rd Bde passed through to begin the pursuit. 2/4th Londons followed the cavalry to Billon Wood, where the enemy was contacted and the infantry deployed and attacked. Despite intense shelling, 3rd Londons made good progress towards Maricourt and at dusk sent two companies to thicken up the line established by 2/2nd Londons.[137][138][139]
The attack was renewed at 04.30 on 26 August, with 3rd Londons leading the advance towards Maricourt behind a heavy barrage. Although they penetrated into the village, they faced strong opposition in 'Crest Avenue' and their flanks were in the air, so they fell back. A renewed attack at 04.55 on 27 August saw the battalion pass through and mop up the village during the morning. Although the troops were tired, the pressure was kept up. On 28 August 3rd Londons attacked towards Clapham Farm and gained another 1000 yards. The brigade was relieved that evening. However, it was immediately called forward again and on 1 September, with 3rd Londons on the left, attacked behind a creeping barrage at 05.30 towards Bouchavesnes. The village was captured and the old British front line secured. The attack was then slowed by stubborn resistance and open flanks but at the end of the day the brigade made good its final objective overlooking the River Tortille and the Canal du Nord.[140][141][142]
Épehy[]
After a period in reserve, the very weak 173rd Bde (900 strong) attacked again on 10 September towards the villages round Épehy, with 3rd Londons on the right following a creeping artillery barrage and machine gun barrage along a NE–SW spur leading to Épehy. They managed to get into the village and reached the railway line beyond, but considerable opposition was met from the German Alpine Corps, the attack lost cohesion in the ruined streets, and the attackers had to withdraw to their starting position. Infiltration tactics were tried with no better success. After a short period of training the brigade made a more deliberate attack on 18 September supported by tanks and succeeded in taking Épehy and Pezières, 3rd Londons dealing with the strongpoint of Fisher's Keep. With the fall of Épehy the way to the main Hindenburg Line defences was open.[143][144][145][146]
58th Division was now sent to hold a quiet sector in the area of Lens, with 3rd Londons as the support battalion for 173rd Bde. On 2 October the Germans on this front began to withdraw because of pressure elsewhere. The division followed up until resistance stiffened at Méricourt on 4 October. For the next few days 3rd Londons, in the outpost line, patrolled forwards and on 9 October they succeeded in pushing through Loison. On 11 October the Germans continued their withdrawal. On 14 October, 173rd Bde put in a deliberate attack with artillery support to get to the line of the Haute Deûle canal. Patrols that night found the canal strongly held[147][148][149]
The German withdrawal continued on 15 October and 173rd Bde was in divisional reserve while the pursuit continued. On 20 October the brigade took over the lead with 3rd Londons as advanced guard meeting only against slight resistance. On 21 October the division reached the Scheldt and established posts in the villages overlooking the river. After a failed attempt to cross the river, the outposts were thinned out and 173rd Bde went into reserve.[150][151] On 8 November the enemy began to pull back from the Scheldt and 173rd Bde followed rest of the division in pursuit until 11 November, when the Armistice with Germany came into force.[152][153]
After the Armistice, 58th Division remained in the Péruwelz area of Belgium. Education and training courses were carried out for men preparing for demobilisaton, and skilled tradesmen and miners were the first to be sent home. At the beginning of March 1919 the dwindling division concentrated round Leuze, and the last units returned home at the end of June 1919.[30][154][155]
3/3rd Londons[]
The 3/3rd Bn London Regiment was formed in January 1915 when the 2/3rd Bn went overseas. At the end of April the 3rd Battalions of the regiments of the old 1st London Brigade were concentrated at Tadworth as the 3/1st London Brigade.[23][156]
In June 1915 a reorganisation saw the men of the 3/1st London Brigade who were unfit for overseas service separated out into a composite battalion, the 100th Provisional Battalion. The new battalion was stationed at Aldeburgh, guarding the East Coast as part of 6th Provisional Brigade. In August, all the men of the Provisional Battalion were returned to their units except those who had not volunteered for overseas service. The Home Service men continued serving in home defence until 1916, when the Military Service Act swept away the Home/Overseas service distinction and the provisional battalions took on the dual role of home defence and physical conditioning to render men fit for drafting overseas. The 100th Provisional Battalion officially became the 29th (City of London) Bn, London Regiment (TF) on 1 January 1917. The battalion never served overseas, and was demobilised early in 1919.[23][157][158][159][160][161]
The 3/1st London Brigade moved to Bury St Edmunds, and was soon recruited back to full strength after the departure of the Provisional Battalion. It absorbed large drafts of recruits under the Derby scheme in February 1916, and in June it moved into camp outside Ipswich. That month the battalion was renumbered to replace the disbanded 2/3rd Bn (see above).[23][30][162]
4/3rd Londons[]
The 4/3rd Battalion was formed in May 1915 to train drafts for the two battalions already serving overseas and the 3/3rd Bn preparing to go overseas in 58th Division. It briefly joined the 173rd Bde in 58th Division, then in January 1916 the reserve battalions for the whole 1st London Division were concentrated on Salisbury Plain. On 8 April the unit's title was changed to 3rd (Reserve) Bn, London Regiment, forming part of the 1st London Reserve Group. On 1 September 1916 the 3rd Reserve Bn absorbed the 4th Reserve Bn, and continued training recruits for the rest of the war in 1st London (Reserve) Bde under the command of Brig-Gen Howell, CO of 3rd Londons on the outbreak of war. The battalion spent the winter of 1916–7 in billets in Torquay, then in April 1917 went to Dettingen Barracks at Blackdown Camp, near Aldershot [23][163][164]
Commanding Officers[]
The following officers commanded 3rd (Reserve) Bn:
- Lt-Col T. Montgomerie Webb, until January 1918 when he was attached to the Royal Flying Corps[163][165]
- Lt-Col Hanbury Sparrow, DSO, MC, (Royal Berkshire Regiment) [163]
Interwar[]
The TF was reconstituted (as the Territorial Army) in 1920 and the battalion was reformed at Harrow Road. The London Regiment had fallen into abeyance in 1916 and the battalions were treated as independent regiments affiliated to their parent regiments, so the battalion was now designated 3rd City of London Regiment (The Royal Fusiliers). The London Regiment was formally disbanded in 1937, when the battalion became the 10th (3rd City of London) Battalion, The Royal Fusiliers (City of London Regiment).[2]

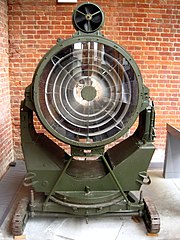
90 cm Projector Anti-Aircraft, displayed at Fort Nelson, Portsmouth
In 1935 the increasing need for anti-aircraft (AA) defence, particularly for London, was addressed by converting the 47th (2nd London) Division into the 1st Anti-Aircraft Division. A number of London battalions were subsequently converted to the AA role, the 3rd Londons becoming a searchlight (S/L) unit in 1938 with 69th Searchlight Regiment added to its title and the following organisation:[2][166]
10th (3rd City of London) Battalion, The Royal Fusiliers (69th Searchlight Regiment)
- Battalion HQ at Harrow Road, Paddington
- 456th S/L Company
- 457th S/L Company
- 458th S/L Company
The unit formed part of 40th Anti-Aircraft Brigade in 2nd AA Division.[166][167][168]
World War II[]
Mobilisation[]
The TA's AA units were mobilised on 23 September 1938 during the Munich Crisis, with units manning their emergency positions within 24 hours, even though many did not yet have their full complement of men or equipment. The emergency lasted three weeks, and they were stood down on 13 October.[169] In February 1939 the existing AA defences came under the control of a new Anti-Aircraft Command. In June a partial mobilisation of TA units was begun in a process known as 'couverture', whereby each AA unit did a month's tour of duty in rotation to man selected AA and searchlight positions. On 24 August, ahead of the declaration of war, AA Command was fully mobilised at its war stations.[170]
Battle of Britain and Blitz[]
In August 1940 all Army S/L units were transferred to the Royal Artillery (RA), and the battalion became 69th (3rd City of London) Searchlight Regiment, RA, though retaining its Royal Fusiliers cap badge; the AA companies were redesignated S/L batteries.[171][172][173][174] By this stage the regiment had been transferred within 2nd AA Division to 41st (London) AA Bde covering East Anglia.[175][176] It remained with this formation throughout the Battle of Britain and The Blitz.[177]
Mid-War[]
In the summer of 1941 the regiment was joined by a newly formed 561 S/L Bty;[178] otherwise the regiment's organisation and subordination remained unchanged[179][180] until January 1943, when 354 S/L Bty, a mobile S/L unit stationed at Peterborough, was re-regimented from 39th (Lancashire Fusiliers) S/L Rgt to 69th (3rd Londons) and moved to Old Buckenham in Norfolk. (354 S/L Bty continued to wear its Lancashire Fusiliers regimental badges and buttons.) 39th S/L Regiment was being disbanded and its former CO, Lt-Col R.R. Rainsford, TD, took over as CO of the 69th on 5 July 1943.[181][182][183][184]
In the summer of 1943 the regiment moved to the West Country, joining 64th Anti-Aircraft Brigade in 3 AA Group (a new system of AA Groups had replaced the AA Divisions the previous year). 354 S/L Battery moved to Kintbury in Berkshire in May 1943. By this stage of the war AA Command was being forced to make manpower cuts, and 69th S/L Rgt lost its junior battery (561 S/L Bty).[184][185][186]
By March 1944, AA Command was forced to release further manpower for Operation Overlord (the Allied invasion of Normandy) and most S/L regiments lost one of their four batteries: 69th S/L Rgt was reduced to 354, 456 and 457 Btys.[187][188] The regiment remained in the West Country, 354 S/L Bty moving to Castle Cary, Somerset, in February 1944, and then to Sturminster Marshall, Dorset, in August.[184]
Operation Diver[]
Soon after D Day, the Germans began launching V-1 flying bombs against London by day and night. The AA resources in SE England were strongly reinforced in Operation Diver, the S/L belt being thickened up both to cooperate with RAF Night fighters and to use their S/L Control (SLC or 'Elsie') radar to guide LAA guns. Once 21st Army Group overran the V-1 launching sites in northern France, the Luftwaffe took to air-launching V-1s from bombers over the North Sea, a tactic that resulted in further redeployment of AA Command's resources. 69th S/L Regiment transferred to 56th Light AA Brigade (an all-S/L formation) in 1 AA Group, later in 9 AA Group, which was created specifically to counter these attacks. 354 S/L Battery was based at Hadleigh, Suffolk from September.[184][188][189]
The regiment remained stationed along the East Coast in 33rd AA Bde of 5 AA Group during 1945,[184][190] and was placed in suspended animation in 1946.[172]
Postwar[]
When the TA was reconstituted in 1947, the regiment was reformed as two separate regiments: 604th Searchlight Regiment, RA (The Royal Fusiliers) with HQ at Wembley, and 625th Light Anti-Aircraft Regiment, RA (The Royal Fusiliers) with HQ at Paddington.[172][173][191][192]
604th S/L Regt formed part of 82nd AA Bde (the old 56th Light AA Bde) while 625th LAA Rgt formed part of 97th (AA) Army Group Royal Artillery, though these were disbanded in 1954 and 1950 respectively.[192][193][194][195]
604th S/L Rgt was reconstituted in 1949 as 604th (Mixed) Light Anti-Aircraft/Searchlight Regiment, RA (The Royal Fusiliers), ('Mixed' indicating that members of the Women's Royal Army Corps were integrated into the unit).[191][192] On 15 June the following year it absorbed 610th (Middlesex) LAA Rgt based in Cowley, Uxbridge.[191][192]
625 Regiment was adopted by the Metropolitan Borough of Paddington in 1951.[196]
Anti-Aircraft Command was disbanded in March 1955 and there was a major reduction in AA units of the TA in which 625 LAA Rgt was disbanded on 30 June 1955,[172][192] while 604 (M) LAA/SL amalgamated with 517th (Middlesex) LAA/SL Rgt and 595th (9th Battalion, Middlesex Regiment) LAA Rgt. It formed R Battery in the combined 517th (9th Battalion, Middlesex Regiment) LAA Rgt.[191][192][197][198] In 1961 the regiment was combined with 7th and 8th Bns Middlesex Regiment and reverted to the infantry role, when the 3rd Londons' lineage was discontinued.[197][198]
Insignia[]
When the regiment joined the Royal Artillery it retained the Royal Fusiliers' cap badge and white feather Hackle. Officers also wore the Royal Fusiliers' bronze collar badges in service dress and battledress. Officers and Warrant Officers continued to wear a blue lanyard (of a pattern adopted by the 3rd Londons in about 1910) in place of the RA white lanyard.[171][172]
Honorary Colonels[]
The following served as Honorary Colonel of the regiment:[2][6]
- 3rd Duke of Sutherland, appointed 20 April 1867
- Sir William Charley, VD, (a prominent judge, he was one of the units' first officers, and was CO from 1883) appointed 21 December 1889
- Sir J.F. Parsons, Bt, appointed 4 November 1910
- Col F.S.M. Samuel, DSO, TD, (CO of 1/3rd Bn during World War I) appointed 24 January 1923
- Lt-Col H.A. Moore, CBE, MC, TD, appointed 29 January 1938
- Richard, 3rd Viscount Long, TD, formerly of the Royal Wiltshire Yeomanry, had commanded a battery of 32nd (7th City of London) Searchlight Regiment in 1941-42 and was Hon Col in 1953.[199]
Memorials[]
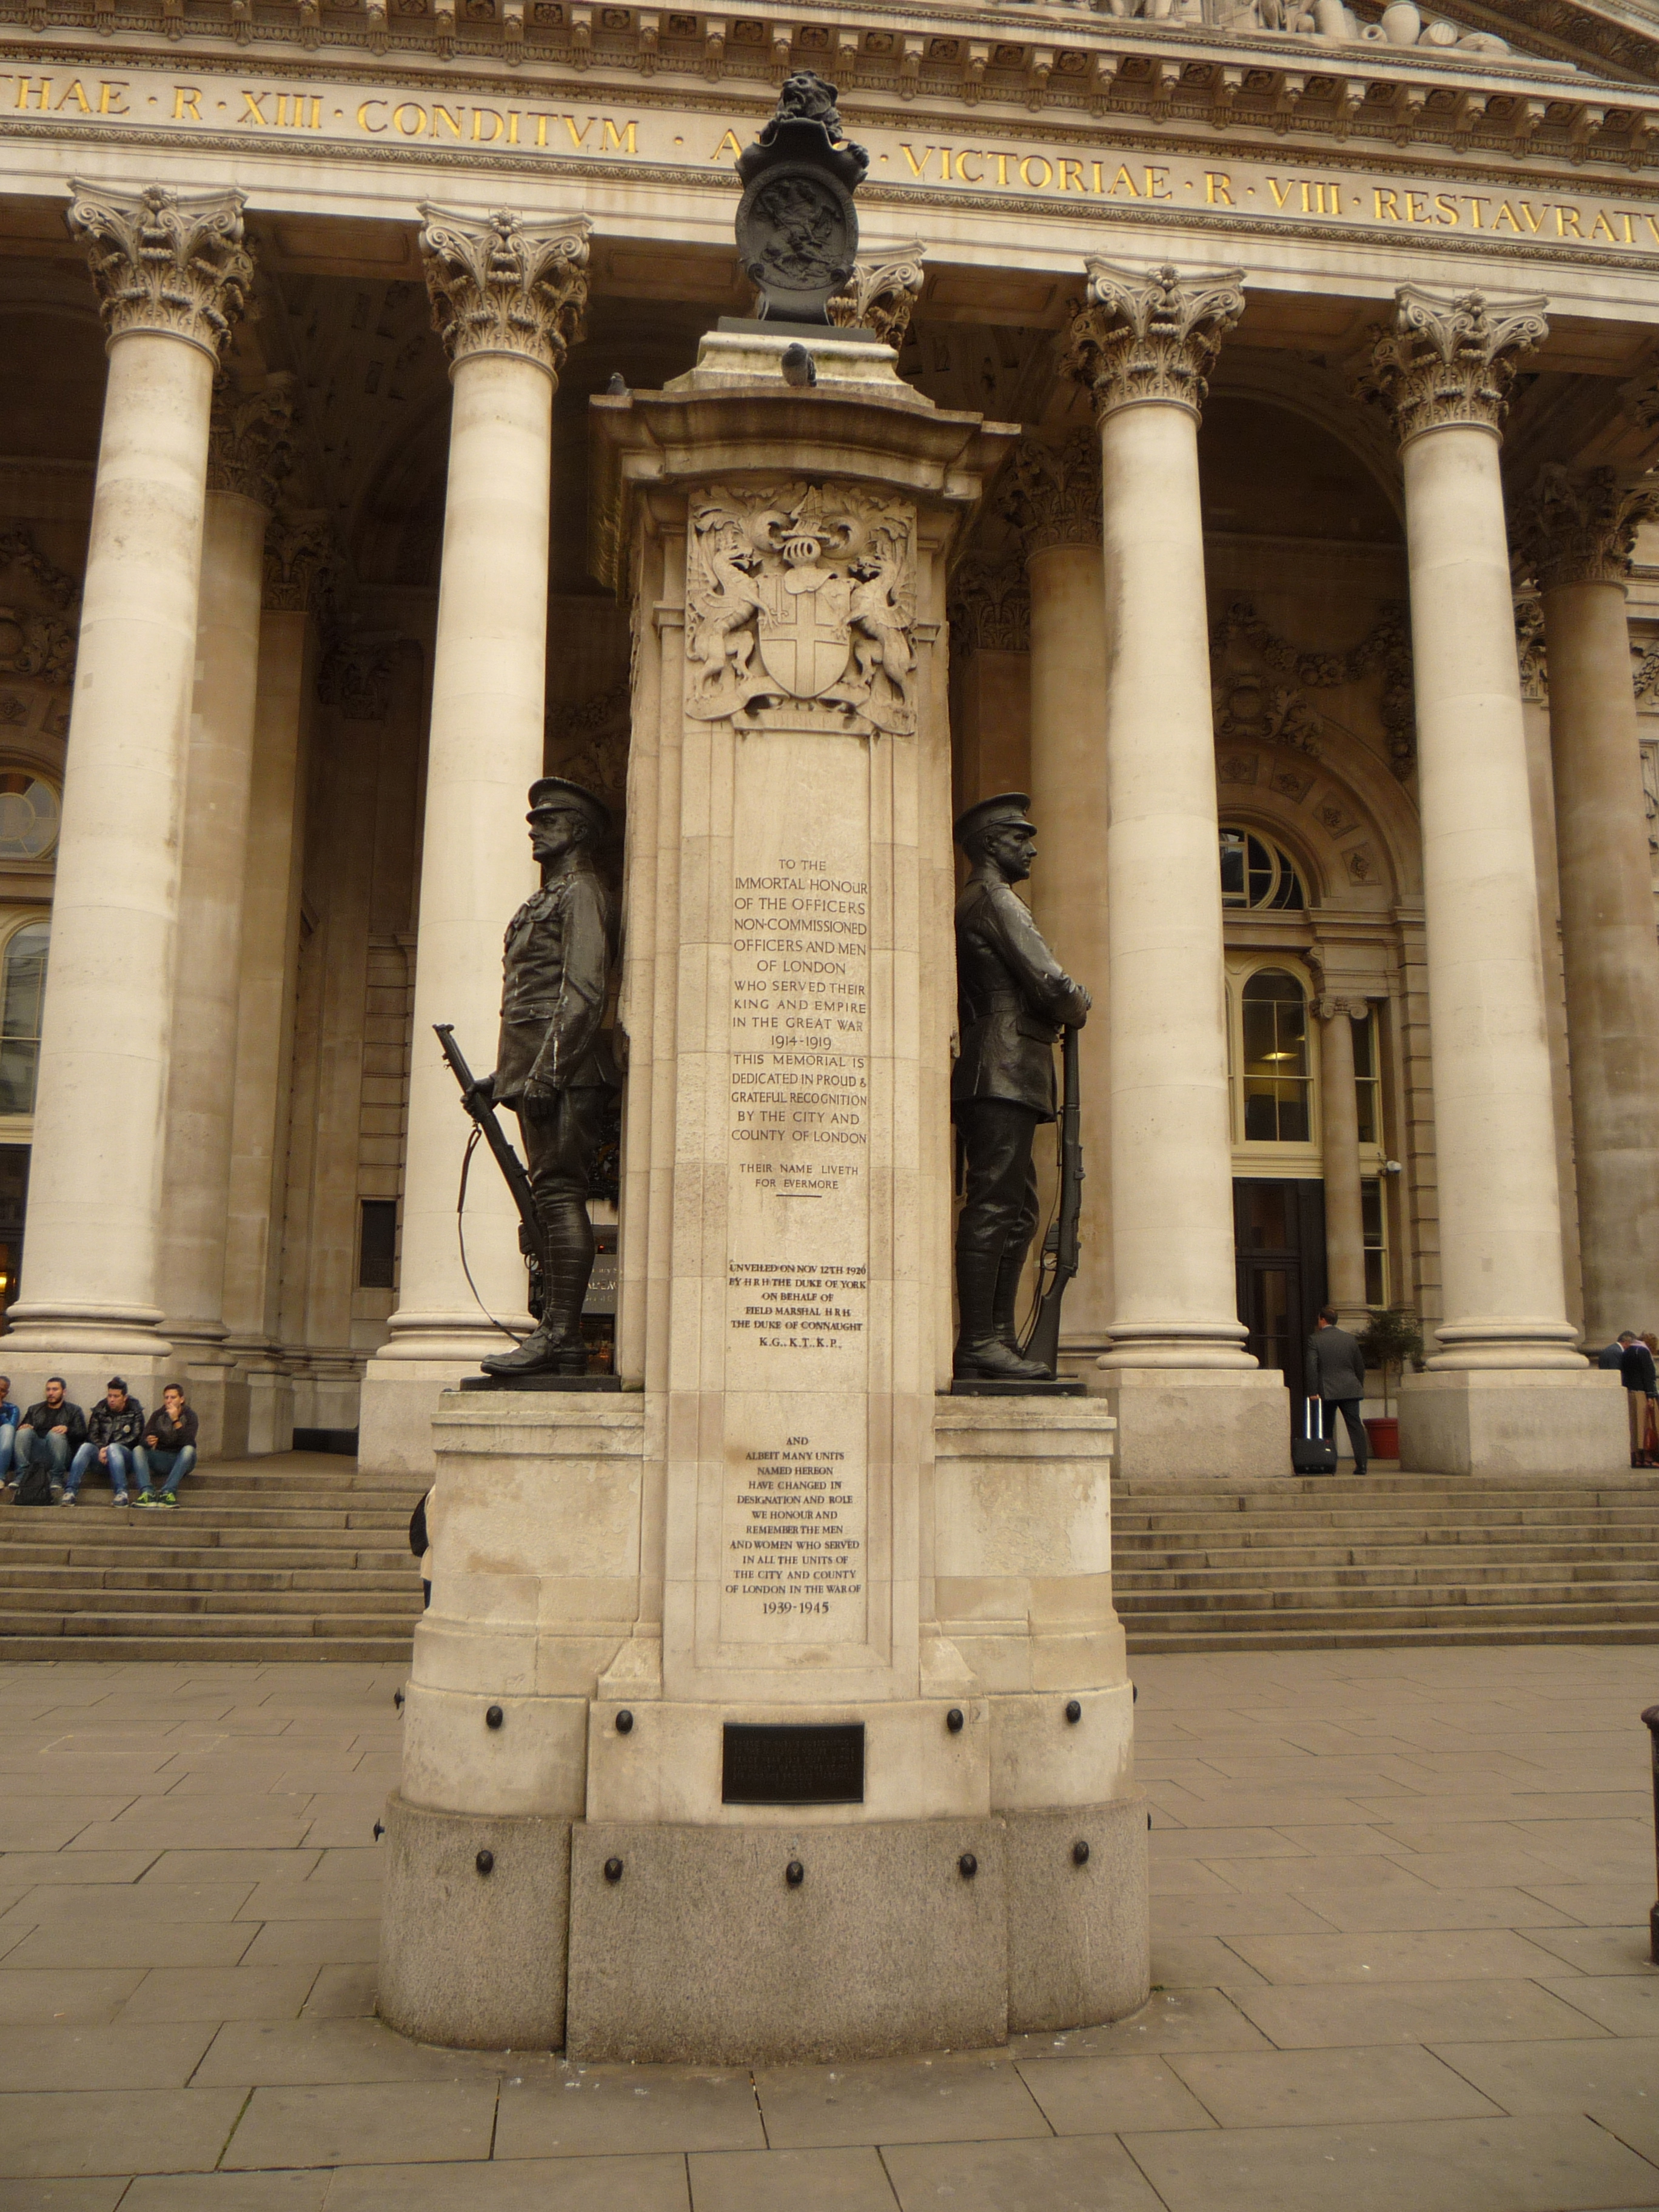

London Troops Memorial at the Royal Exchange

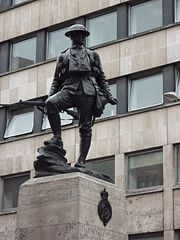
Royal Fusiliers Memorial Holborn Bar
The 3rd London Battalion is listed on the City and County of London Troops Memorial in front of the Royal Exchange, with architectural design by Sir Aston Webb and sculpture by Alfred Drury.[200] The right-hand (southern) bronze figure flanking this memorial depicts an infantryman representative of the various London infantry units.
The battalion is also listed on the pedestal of the Royal Fusiliers War Memorial at Holborn Bar, which is surmounted by a bronze figure of a Fusilier sculpted by Albert Toft.
The 58th Divisional Memorial, depicting a wounded horse sculpted by Henri Gauquie, is at Chipilly. It was paid for from the profits of the divisional entertainment canteen and barber shop.[201]
There is a plaque at St James's Church, Sussex Gardens, Paddington reading: 'TO COMMEMORATE THE ADOPTION/ OF THE 625 LAA REGIMENT R. A./ ROYAL FUSILIERS (T. A.)/ BY THE CITIZENS OF PADDINGTON/ 29 MARCH 1951.'[196]
Battle Honours[]


58th Division's monument at Chipilly
The 3rd London Regiment was awarded the following Battle honours:[2][6] South Africa, 1900–02
Neuve Chapelle, Aubers, Festubert, 1915, Somme, 1916, '18, Albert, 1916, '18, Ginchy, Flers-Courcelette, Morval, Le Transloy, Arras, 1917, Scarpe, 1917, Bullecourt, Ypres, 1917 Langemarck, 1917, Menin Road, Polygon Wood, Passchendaele, Cambrai, 1917, St Quentin, Bapaume, 1918, Villers Bretonneux, Amiens, Hindenburg Line, Épehy, Pursuit to Mons, France and Flanders 1915–18, Gallipoli 1915–16, Egypt, 1915–16.
The honours in bold are those chosen to appear on the Regimental colours. The Royal Artillery does not carry battle honours, so none were awarded to 69th S/L Regiment for World War II.
Notes[]
- ↑ Beckett.
- ↑ 2.0 2.1 2.2 2.3 2.4 2.5 2.6 2.7 2.8 3rd City of London at Regiments.org
- ↑ 3.0 3.1 3.2 3.3 3.4 3.5 Westlake, pp. 168–9.
- ↑ Beckett, Appendix VIII.
- ↑ Beckett, pp. 60, 193–4.
- ↑ 6.00 6.01 6.02 6.03 6.04 6.05 6.06 6.07 6.08 6.09 6.10 Army List, various dates.
- ↑ Beckett, p. 190.
- ↑ Money Barnes, Appendix III.
- ↑ Spiers, p. 198.
- ↑ Grierson, p. 192.
- ↑ Beckett, pp. 135, 185–6.
- ↑ Dunlop, pp. 60–1.
- ↑ Leslie.
- ↑ Grey, pp. xxx–xxxi.
- ↑ Dunlop, Chapter 14.
- ↑ Spiers, Chapter 10.
- ↑ H. Martin, pp. 6–7.
- ↑ Barnes, Appendix IV.
- ↑ London Gazette 20 March 1908
- ↑ 20.0 20.1 20.2 20.3 20.4 20.5 20.6 20.7 Becke, Pt 2a, pp. 141-7.
- ↑ 21.0 21.1 56 Division at Long, Long Trail
- ↑ 56 Division at Regimental Warpath
- ↑ 23.0 23.1 23.2 23.3 23.4 23.5 23.6 23.7 23.8 London Rgt at Long, Long Trail
- ↑ Grey, pp. 1–5.
- ↑ Grimwade, pp. 2–4.
- ↑ D. Martin, pp. 4, 7.
- ↑ Grey, pp. 5-8.
- ↑ Grimwade, pp. 5–7, 14.
- ↑ 29.0 29.1 London Rgt at Regimental Warpath
- ↑ 30.0 30.1 30.2 30.3 30.4 30.5 30.6 Becke, Pt 2b, pp 9–15.
- ↑ Grey, pp. 9–13, 18.
- ↑ Grimwade, pp. 8–14, 18.
- ↑ 33.0 33.1 Overseas Garrisons at Regimental Warpath
- ↑ Grey, pp. 18–22.
- ↑ Grimwade, pp. 18–22.
- ↑ 36.0 36.1 Perry, pp. 85–6.
- ↑ 37.0 37.1 7 Indian Division at Regimental Warpath
- ↑ 38.0 38.1 MacDonald, p. 53.
- ↑ Edmond & Wynne, Vol 1, pp. 89–113.
- ↑ Neuve Chapelle at Long, Long Trail.
- ↑ Neuve Chapelle at WWI Battlefields.
- ↑ Aubers at Long, Long Trail.
- ↑ Edmonds, 1915, Vol II, pp. 21–5, 28–9.
- ↑ Festurbert at Long, Long Trail.
- ↑ Edmonds, 1915, Vol II, pp. 56–8.
- ↑ Edmonds, 1915, Vol II, pp. 259–61.
- ↑ Loos at Long, Long Trail.
- ↑ MacDonald, pp. 56–9.
- ↑ Ward, pp. 3–9.
- ↑ Ward, pp. 18–23.
- ↑ MacDonald, pp. 69–83, 88–92, 97–107, 121.
- ↑ MacDonald, pp. 155, 221, 230.
- ↑ 53.0 53.1 Ward, p. 36.
- ↑ MacDonald, pp. 240–2.
- ↑ Edmonds, 1916, Vol I, pp. 457, 462.
- ↑ MacDonald, pp. 299–302, 363, 384–5, 435.
- ↑ Ward, pp. 36–47.
- ↑ Grimwade, pp. 179–80.
- ↑ Ward, pp. 49–51.
- ↑ Ward, pp. 58–66.
- ↑ Ward, pp. 70–5.
- ↑ Ward, pp. 76–81.
- ↑ Ward, pp. 82–7.
- ↑ Ward, pp. 101–13.
- ↑ Ward, pp. 114–25.
- ↑ Ward, pp. 132–8.
- ↑ Ward, pp. 154–61.
- ↑ Ward, pp. 167–8.
- ↑ Ward, pp. 173–5.
- ↑ Cooper, pp. 184, 193.
- ↑ Ward, pp. 188–209.
- ↑ Grey, p. 279.
- ↑ Grimwade, p. 352.
- ↑ Ward, pp. 214–5.
- ↑ Ward, Appendix.
- ↑ Grimwade, p. 355.
- ↑ MacDonald, p. 242fn.
- ↑ Grimwade, p. 253.
- ↑ Grimwade, pp. 14–7, 86.
- ↑ D. Martin, p. 28.
- ↑ 81.0 81.1 Westlake, Gallipoli, pp. 237–8.
- ↑ D. Martin, pp. 29–30.
- ↑ Becke, Pt 1, p. 119.
- ↑ D. Martin, pp. 30–3.
- ↑ Grey, pp. 76–84.
- ↑ Grimwade, pp. 107–12.
- ↑ Grey, pp. 84–5.
- ↑ Grimwade, pp. 113–4.
- ↑ D. Martin, pp. 33–5.
- ↑ Grey, pp. 159–60.
- ↑ Grimwade, p. 239.
- ↑ D. Martin, p. 35.
- ↑ Grey, pp. 162–9.
- ↑ Grimwade, pp. 241–50.
- ↑ D. Martin, pp. 36–7.
- ↑ Grey, pp. 199–206.
- ↑ Grimwade, pp. 275–9.
- ↑ D. Martin, p. 37.
- ↑ Grey, pp. 207–18.
- ↑ Grimwade, pp. 281–7.
- ↑ Grimwade, pp. 310–4.
- ↑ D. Martin, pp. 60–2.
- ↑ Grimwade, pp. 315–6.
- ↑ D. Martin, pp. 63–5.
- ↑ Grey, pp. 242–9.
- ↑ Grimwade, pp. 317–20.
- ↑ D. Martin, p. 89.
- ↑ Grey, pp. 252–4, 286–90.
- ↑ Grimwade, pp. 321–3, 359–60, 364–7.
- ↑ D. Martin, p. 94–100, 108–10.
- ↑ Blaxland, p. 40.
- ↑ Grimwade, pp. 367–75.
- ↑ D. Martin, pp. 114–6.
- ↑ Blaxland, pp. 60–1.
- ↑ Grimwade, pp. 375–9.
- ↑ D. Martin, pp. 115–8.
- ↑ Grimwade, pp. 380–2.
- ↑ D. Martin, p. 118
- ↑ Grey, p. 309
- ↑ Grimwade, pp. 383–7.
- ↑ D. Martin, pp. 123–4, 130–1
- ↑ Grey, pp. 310–4.
- ↑ Grimwade, pp. 388–91.
- ↑ Blaxland, pp. 126–31.
- ↑ D. Martin, p. 135–46.
- ↑ Grey, pp. 333–7.
- ↑ Grimwade, pp. 418–25.
- ↑ D. Martin, pp. 149–53.
- ↑ Grey, pp. 343–8.
- ↑ Grimwade, pp. 428–37.
- ↑ Blaxland, pp. 173–5.
- ↑ D. Martin, pp. 155–8.
- ↑ Grey, pp. 349–51.
- ↑ Grimwade, pp. 437–9.
- ↑ Blaxland, pp. 191–2.
- ↑ D. Martin, pp. 159–60.
- ↑ Grey, pp. 355–7.
- ↑ Grimwade, pp. 444–8.
- ↑ D. Martin, pp. 165–6.
- ↑ Grey, pp 357–9.
- ↑ Grimwade, pp. 449–55.
- ↑ D. Martin, p. 167.
- ↑ Grey, pp. 372–8.
- ↑ Grimwade, pp. 457–9.
- ↑ D. Martin, pp. 171–4.
- ↑ Blaxland, p. 225.
- ↑ Edmonds & Maxwell-Hyslop, pp. 129-30, 227, 257, 261–3.
- ↑ Grey, pp. 409–13.
- ↑ D. Martin, pp. 177–80.
- ↑ Grey, p. 413–5.
- ↑ Edmonds & Maxwell-Hyslop, p. 416–23.
- ↑ Edmonds & Maxwell-Hyslop, p. 539.
- ↑ Grey, pp. 416–7.
- ↑ D. Martin, p. 185.
- ↑ Grey, pp. 417–8.
- ↑ Grimwade, p. 115–6.
- ↑ Grimwade, p. 117.
- ↑ D.Martin, p. 17.
- ↑ 6th Provisional Brigade War Diary, The National Archives, Kew file WO 95/5458.
- ↑ Porter
- ↑ Becke, Pt 2b, pp. 75–82; 101–5
- ↑ Grimwade, pp. 117–9.
- ↑ 163.0 163.1 163.2 Grimwade, pp. 122–31, 355–8.
- ↑ TF Training Bns at Regimental Warpath.
- ↑ Grey, pp. 92, 104.
- ↑ 166.0 166.1 2 AA Division 1939 at British Military History
- ↑ AA Command 3 September 1939 at Patriot Files.
- ↑ Routledge, Table LX, p. 378.
- ↑ Routledge, pp. 62–3.
- ↑ Routledge, pp. 65–6, 371.
- ↑ 171.0 171.1 Anon, Regimental Badges.
- ↑ 172.0 172.1 172.2 172.3 172.4 Litchfield, p. 174.
- ↑ 173.0 173.1 Farndale, Annex M.
- ↑ 69 S/L Rgt at RA 39–45.
- ↑ Farndale, Annex D.
- ↑ 2 AA Division 1940 at RA 39–45.
- ↑ Routledge, Table LXV, p. 396.
- ↑ Order of Battle of Non-Field Force Units in the United Kingdom, Part 27: AA Command, 12 May 1941, with amendments, The National Archives (TNA), Kew, file WO 212/79.
- ↑ Order of Battle of Non-Field Force Units in the United Kingdom, Part 27: AA Command, 2 December 1941, TNA file WO 212/80.
- ↑ Order of Battle of Non-Field Force Units in the United Kingdom, Part 27: AA Command, 14 May 1942, TNA file WO 212/81.
- ↑ Order of Battle of Non-Field Force Units in the United Kingdom, Part 27: AA Command, 1 October 1942, with amendments, TNA file WO 212/82.
- ↑ Order of Battle of Non-Field Force Units in the United Kingdom, Part 27: AA Command, 13 March 1943, TNA file WO 212/83.
- ↑ 39 S/L Regt War Diary, 1943, TNA file WO 166/11500.
- ↑ 184.0 184.1 184.2 184.3 184.4 7th Bn at The Lancashire Fusiliers
- ↑ Order of Battle of AA Command, 1 August 1943, TNA file WO 212/84.
- ↑ Routledge, p. 401.
- ↑ Routledge, p. 409.
- ↑ 188.0 188.1 Order of Battle of AA Command, 27 April 1944, with amendments, TNA file WO 212/85.
- ↑ Routledge, pp. 99, 399, 411–15, 417.
- ↑ Order of Battle of AA Command, 15 November 1945, TNA file WO 212/86.
- ↑ 191.0 191.1 191.2 191.3 Litchfield, p. 180.
- ↑ 192.0 192.1 192.2 192.3 192.4 192.5 592–638 Rgts RA at British Army 1945 on.
- ↑ 67–102 AA Bdes at British Army 1945 on.
- ↑ AGRAs at British Army 1945 on.
- ↑ Litchfield, Appendix 5.
- ↑ 196.0 196.1 Imperial War Museum National Inventory of War Memorials, ref 11556.
- ↑ 197.0 197.1 Litchfield, p. 178.
- ↑ 198.0 198.1 564–591 Rgts RA at British Army 1945 on.
- ↑ Burke's.
- ↑ UKNIWM Ref 11796
- ↑ D. Martin, pp. 189–90, Appendix 8 and Epilogue.
References[]
- Anon, Regimental Badges and Service Caps, London: George Philip & Sons, 1941.
- Maj R. Money Barnes, The Soldiers of London, London: Seeley Service, 1963.
- Maj A.F. Becke,History of the Great War: Order of Battle of Divisions, Part 1: The Regular British Divisions, London: HM Stationery Office, 1934/Uckfield: Naval & Military Press, 2007, ISBN 1-847347-38-X.
- Maj A.F. Becke,History of the Great War: Order of Battle of Divisions, Part 2a: The Territorial Force Mounted Divisions and the 1st-Line Territorial Force Divisions (42–56), London: HM Stationery Office, 1935/Uckfield: Naval & Military Press, 2007, ISBN 1-847347-39-8.
- Maj A.F. Becke,History of the Great War: Order of Battle of Divisions, Part 2b: The 2nd-Line Territorial Force Divisions (57th–69th), with the Home-Service Divisions (71st–73rd) and 74th and 75th Divisions, London: HM Stationery Office, 1937/Uckfield: Naval & Military Press, 2007, ISBN 1-847347-39-8.
- Ian F.W. Beckett, Riflemen Form: A study of the Rifle Volunteer Movement 1859–1908, Aldershot: Ogilby Trusts, 1982, ISBN 0 85936 271 X.
- Gregory Blaxland, Amiens: 1918, London: Frederick Muller, 1968/Star, 1981, ISBN 0-352-30833-8.
- Bryan Cooper, The Ironclads of Cambrai, London: Souvenir Press, 1967/Pan Books, 1970, ISBN 0-330-02579-1.
- Col John K. Dunlop, The Development of the British Army 1899–1914, London: Methuen, 1938.
- Brig-Gen Sir James E. Edmonds and Capt G.C. Wynne, History of the Great War: Military Operations, France and Belgium, 1915, Vol I, London: Macmillan, 1927/Imperial War Museum & Battery Press, 1995, ISBN 1-870423-87-9.
- Brig-Gen Sir James E. Edmonds, History of the Great War: Military Operations, France and Belgium, 1915, Vol II, London: Macmillan, 1928/Imperial War Museum & Battery Press, 1995, ISBN 0-89839-219-5.
- Brig-Gen Sir James E. Edmonds, History of the Great War: Military Operations, France and Belgium, 1916, Vol I, London: Macmillan,1932/Woking: Shearer, 1986, ISBN 0-946998-02-7.
- Brig-Gen Sir James E. Edmonds & Lt-Col R. Maxwell-Hyslop, History of the Great War: Military Operations, France and Belgium 1918, Vol V, 26th September–11th November, The Advance to Victory, London: HM Stationery Office, 1947/Imperial War Museum and Battery Press, 1993, ISBN 1-870423-06-2.
- Gen Sir Martin Farndale, History of the Royal Regiment of Artillery: The Years of Defeat: Europe and North Africa, 1939–1941, Woolwich: Royal Artillery Institution, 1988/London: Brasseys, 1996, ISBN 1-85753-080-2.
- Maj W.E. Grey, 2nd City of London Regiment (Royal Fusiliers) in the Great War 1914–19, Westminster: Regimental Headquarters, 1929/Uckfield: Naval & Military Press, 2002, ISBN 978-1-843423-69-0
- Capt F. Clive Grimwade, The War History of the 4th Battalion The London Regiment (Royal Fusiliers) 1914–1919, London: Regimental Headquarters, 1922/Uckfield, Naval & Military press, 2002, ISBN 978-1-843423-63-8.
- Lt-Col James Moncrieff Grierson (Col Peter S. Walton, ed.), Scarlet into Khaki: The British Army on the Eve of the Boer War, London: Sampson Low, 1899/London: Greenhill, 1988, ISBN 0-947898-81-6.
- Norman E.H. Litchfield, The Territorial Artillery 1908–1988 (Their Lineage, Uniforms and Badges), Nottingham: Sherwood Press, 1992.
- Alan MacDonald, Pro Patria Mori: The 56th (1st London) Division at Gommecourt, 1st July 1916, 2nd Edn, West Wickham: Iona Books, 2008, ISBN 978-0-9558119-1-3.
- Lyn MacDonald, 1915 The Death of Innocence, 1993 Penguin UK ISBN 9780747204329.
- Lyn MacDonald, Somme, 1983 Penguin UK ISBN 9780241952382.
- David Martin, Londoners on the Western Front: The 58th (2/1st London) Division in the Great War, Barnsley: Pen & Sword Books, 2014, ISBN 978-1-78159-180-2.
- Lt-Col H.R. Martin, Historical Record of the London Regiment, 2nd Edn (nd)
- Brig N.W. Routledge, History of the Royal Regiment of Artillery: Anti-Aircraft Artillery 1914–55, London: Royal Artillery Institution/Brassey's, 1994, ISBN 1-85753-099-3.
- Edward M. Spiers, The Army and Society 1815–1914, London: Longmans, 1980, ISBN 0-582-48565-7.
- Maj C.H. Dudley Ward, The Fifty Sixth Division, 1st London Territorial Division, 1914–1918, London: John Murray, 1921/Uckfield: Naval & Military Press, 2001, ISBN 978-1-843421-11-5.
- Ray Westlake, British Regiments at Gallipoli, Barnsley: Leo Cooper, 1996, ISBN 0-85052-511-X.
- Ray Westlake, Tracing the Rifle Volunteers, Barnsley: Pen and Sword, 2010, ISBN 978 1 84884 211 3.
Online sources[]
- British Army units from 1945 on
- British Military History
- The Long, Long Trail
- Orders of Battle at Patriot Files
- David Porter's work on Provisional Brigades at Great War Forum
- The Regimental Warpath 1914–1918 (archive site)
- Land Forces of Britain, the Empire and Commonwealth (Regiments.org – archive site)
- Royal Artillery 1939–1945
- UK National Inventory of War Memorials
- WWI Battlefields
- Agius Brothers in WW1
- Pro Patria Mori - Gommecourt
The original article can be found at 3rd (City of London) Battalion, London Regiment and the edit history here.