| Australian and New Zealand Mounted Division | |
|---|---|
 Men of the division watering their horses at the foot of Mount Zion, January 1918. | |
| Active | 16 March 1916 – 30 June 1919 |
| Country |
Australia New Zealand Great Britain |
| Allegiance |
|
| Branch | Army |
| Type |
Mounted infantry Horse artillery |
| Role | Manoeuvre warfare |
| Size | Division |
| Part of |
I ANZAC Corps Desert Column Desert Mounted Corps XX Corps |
| Engagements |
Egyptian Revolution of 1919 See battles section for more information |
| Commanders | |
| (1916–17) | Harry Chauvel |
| Ceremonial chief | Edward Chaytor |
| (1918–19) | Granville Ryrie |
| Insignia | |
| Tactical formation sign |
 |
The Australian and New Zealand Mounted Division,[1] (abbreviated to the A. & N. Z. Mounted Division[2] the ANZAC Mounted Division,[3] and Anzac Mounted Division),[4] was a mounted infantry division of the British Empire during the First World War.
The division was raised in March 1916, and assigned to the I ANZAC Corps. On establishment it consisted of five brigades: three Australian light horse, one New Zealand rifles and a British horse artillery brigade. In 1917, one of the Australian brigades was replaced by a British yeomanry brigade. After April 1917, the standard order of battle was reduced to two Australian, one New Zealand and one British (artillery) brigade, although the Imperial Camel Corps Brigade and other British mounted brigades were temporarily attached several times during operations. The division had two wartime commanders, first between 1916 and 1917, the Australian, Major-General Harry Chauvel who had commanded the 1st Light Horse Brigade at Gallipoli. When he was promoted to command the Desert Column - of which the division was part — he was replaced by the New Zealander, Major-General Edward Chaytor, from the New Zealand Mounted Rifles Brigade who remained in command for the remainder of the war. Post-war Brigadier-General Granville Ryrie commanded the division from December 1918 until it was disbanded in June 1919.
The division, as part of the British Empire's Egyptian Expeditionary Force, first served with the I ANZAC Corps, subsequently serving under the command of Eastern Force for most of 1916. The division served under Desert Column from the end of 1916 until mid-1917, when the column was expanded and renamed the Desert Mounted Corps. The division fought and won all the major battles across the Sinai Peninsula during 1916, and the following year, fought from Gaza to Jerusalem in southern Palestine. In 1918, it took part in the Jordan Valley operations, and the advance to Amman and Ziza, when the division formed the main part of Chaytor's Force, captured 10,300 men from the Turkish Fourth Army.[nb 1]
Formation history[]

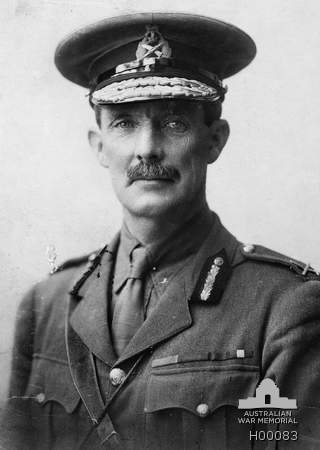
Harry Chauvel at Gallipoli, before being appointed commander of the division.
Prior to formation, units that would form the division's brigades served as part of the Force in Egypt from December 1914,[6] and then in the Gallipoli Campaign.[7] At Gallipoli, the 1st, 2nd and 3rd Light Horse Brigades served dismounted with the New Zealand and Australian Division from May to December 1915. Taking part in the Battle of the Nek.[8][9] The brigades consisted of three regiments, each with an establishment of twenty-five officers and 497 other ranks serving in three squadrons, of six troops.[10][nb 2] The New Zealand Mounted Rifles Brigade also served at Gallipoli before returning to Egypt where the ANZAC Mounted Division was formed in March 1916,[12] as the first mounted or cavalry division, to serve with the Egyptian Expeditionary Force (EEF).[13] Not all the division's troops came from Australia and New Zealand, as the artillery units, with 18-pounders, and the Divisional Ammunition Column were provided by the British Royal Horse Artillery from the Territorial Force. The brigade's four batteries were each allocated to a fighting brigade. The 1st Light Horse Brigade had the Leicestershire Battery; the 2nd Light Horse Brigade, the Ayrshire Battery; the 3rd Light Horse Brigade, the Inverness-shire Battery, and the Somerset Battery was attached to the New Zealand Mounted Rifles Brigade.[14] To replace the 3rd Light Horse Brigade, which had been assigned to the Imperial Mounted Division in January 1917, the British 22nd Mounted Brigade, joined the division from February to July 1917.[15] Serving alongside them were several smaller support units, which included an engineer field squadron, a signal squadron, and a divisional train.[16][17]
The first General Officer Commanding (GOC) Major-General Harry Chauvel, appointed 16 March,[12] was promoted from brigade commander, although he temporarily commanded the 1st Australian Division for a short period at Gallipoli. His Chief-of Staff was Lieutenant-Colonel John Gilbert Browne, 14th (King's) Hussars, a professional from the British Army who had fought in the Second Boer War and, with the British Cavalry Division, on the Western Front in the early stages of the war. The rest of the division's staff were selected on merit for their service at Gallipoli. The same process was applied to select the brigade staff, and regimental and squadron officers, the large majority of whom, had seen prior service at Gallipoli or in the Second Boer War.[18]
Order of battle[]

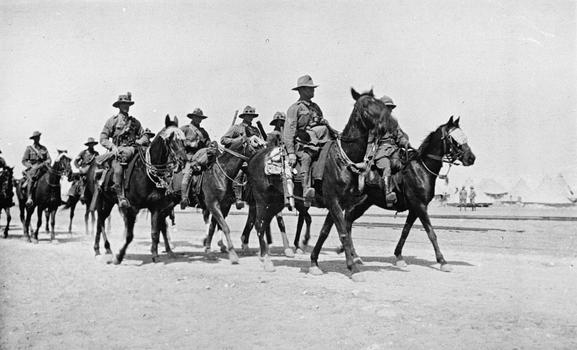
Australian light horse unit at Alexandria Egypt
- Commanders
- Major-General Harry Chauvel (1916–17)
- Major-General Edward Chaytor (1917–18)
- Brigadier-General Granville Ryrie (1918–19)
- 1st Light Horse Brigade (1st Brigade)
- 1st Light Horse Regiment (1st LHR)
- 2nd Light Horse Regiment (2nd LHR)
- 3rd Light Horse Regiment (3rd LHR)
- 1st Machine-Gun Squadron
- 1st Signal Troop
- 2nd Light Horse Brigade (2nd Brigade)
- 5th Light Horse Regiment (5th LHR)
- 6th Light Horse Regiment (6th LHR)
- 7th Light Horse Regiment (7th LHR)
- 2nd Machine-Gun Squadron
- 2nd Signal Troop
- New Zealand Mounted Rifles Brigade (NZ Brigade)
- Auckland Mounted Rifles Regiment (AMR)
- Canterbury Mounted Rifles Regiment (CMR)
- Wellington Mounted Rifles Regiment (WMR)
- 1st New Zealand Machine-Gun Squadron
- New Zealand Mounted Rifles Brigade Signal Troop

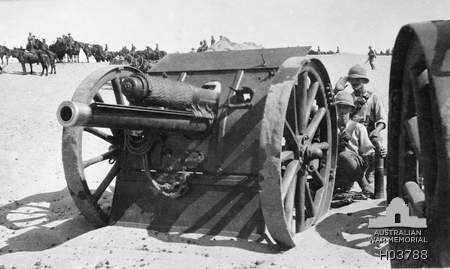
British 18-pounders as used by the division
- 18th Brigade Royal Horse Artillery
- Inverness-shire Battery
- Ayrshire Battery
- Somerset Battery
- 18th Royal Horse Artillery Brigade Ammunition Column
- ANZAC Mounted Division Engineers
- 1st Field Squadron
- 1st Signal Squadron
- ANZAC Mounted Division Medical Services
- 1st Light Horse Field Ambulance
- 2nd Light Horse Field Ambulance
- New Zealand Mounted Field Ambulance
- 7th Sanitary Section
- ANZAC Mounted Division Train
- 32nd Australian Army Service Corps Company
- 33rd Australian Army Service Corps Company
- 34th Australian Army Service Corps Company
- 5th New Zealand Army Service Corps Company
- 26th Depot Supply Unit
- ANZAC Mounted Division Veterinary Services
- 6th Mobile Veterinary Section
- 7th Mobile Veterinary Section
- 2nd New Zealand Mobile Veterinary Section
Service history[]
Sinai[]
On raising, the division was assigned to the I ANZAC Corps, then defending No 2 Section of the Suez Canal. On 15 March, the ANZAC Mounted Division relieved the 1st Australian Division in the front line.[14] Members of the division carried out their first offensive action with the Jifjafa raid between 11 and 14 April 1916, resulting in the first Australian killed in the campaign.[22][23] Later the same month, the 2nd and the NZ Brigades were moved into the Sinai Desert in response to the defeat at Katia of the 5th Mounted Brigade.[24][25] By the end of the month, the division had been established around Romani in the Sinai.[26] Here the brigade machine-gun squadrons were formed, each with eight officers and 222 other ranks,[11] with twelve Maxim guns carried on pack horses. These replaced the two guns that had previously been part of each regiments establishment. In their place the regiments were issued with three Lewis guns, which were in turn replaced the following year by twelve Hotchkiss machine-guns.[27]


Australian Light Horsemen exercising their horses in the Mediterranean 1916. Note rifles were slung over the shoulder and not carried in a rifle scabbard.
On 19 July, Brigadier-General Chaytor was in a reconnaissance aircraft and located between 8–9,000 Turkish soldiers approaching the division's prepared positions.[26] By 3 August, this number had increased to around 18,000 infantrymen with artillery support.[28][nb 3] The following Battle of Romani became the division's first major victory.[30] However this was followed by a defeat, days later, at Bir el Abd.[31]
In September, the division was involved in an unsuccessful surprise attack at Mazar, forty miles (64 km) to the east of Romani. They were discovered en route by German aircraft and the assault, following their orders, became a "reconnaissance in force". Although the attack failed it did convince Turkish commanders to evacuate the position two days later.[32] On 11 November, the division was ordered to move east towards Masaid and El Arish on the coast. The division entered the latter on 21 December to find the Turkish garrison had withdrawn.[33] The next day Lieutenant-General Philip Chetwode, commanding the Desert Column, ordered Chauvel, supported by the Imperial Camel Corps Brigade (ICCB), to attack Magdhaba.[34] Travelling overnight, the majority of the division was in position by dawn 23 December. Using the added strength of the camel brigade, and at times fighting hand to hand, Chauvel's attack on Magdhaba became the division's second victory. Turkish casualties were ninety-seven dead, 300 wounded and 1,282 prisoners, while Chauvel's were twenty-three dead and 124 wounded.[35][nb 4]
On 8 January 1917, the division, still with the ICCB under command, continued the advance towards the pre-war Egypt-Palestine border at Rafa.[37] The twenty-six miles (42 km) from El Arish to Rafa was covered overnight and by 07:00 all was ready for the assault to begin. The Battle of Rafa, although harder fought, became the division's third victory. Total casualties were seventy-one dead and 415 wounded for the division and the 5th Mounted Brigade who were also involved. Against this, Turkish casualties were 200 dead, 168 wounded and 1,434 prisoners.[38]
Gaza[]


Lighthorseman, horse, and their equipment
In February 1917, just before the division moved forward to take part in the battle for Gaza, the British 22nd Mounted Brigade, a yeomanry brigade from the Territorial Force, joined the division.[39] The first reconnaissance of the Turkish position at Gaza was carried out by the 3rd Light Horse Brigade on 25 March. The rest of the Desert Column moved forward that night. British intelligence had estimated the Gaza garrison to be around 4,000 troops, with their nearest reinforcements ten miles (16 km) away. In fact they had closer to 15,000 troops based within seventeen miles (27 km) of Gaza.[40] The division's objective was to circle the town to the east and provide a screen against a counter-attack from the north.[41] At 02:30 on 26 March the division moved out; by 06:00 ground fog which had covered the infantry and mounted advance lifted and they were discovered by an Turkish patrol. The division's nearest troops charged them and came upon an airfield where two German aircraft took off, turned and attacked the mounted troops. The division responded with one squadron per regiment dismounting and returning fire. By sunrise the division was behind the Turkish Lines and engaged in several skirmishes. During the light horse advance to the coast north of Gaza the Turkish GOC responsible for the Gaza defences was taken prisoner.[42] The 53rd (Welsh) Division, had been responsible for the attack on the town, however by 13:00 they had not made much progress and were held down by strong defences. The ANZAC Mounted Division was ordered at 15:15 to prepare for a dismounted assault. Chauvel completed his concentration within an hour. Then, fighting hand to hand and using their bayonets, they got to the outskirts of the town. The NZ and the 2nd Brigades entered the town from the north and west. At 18:00 Lieutenant-General Charles Macpherson Dobell, GOC Eastern Force, and Chetwode agreed to call off the attack due to the believed lack of progress, approaching Turkish reinforcements, and night approaching.[43][44] The error in that decision can perhaps be demonstrated by the lack of any Turkish intervention to the division's regrouping and withdrawal back to their own lines.[45] At 21:30 the Turkish reinforcements were still several miles distant and one group confronted by the 3rd Brigade immediately stopped advancing. In Chetwode's after action report he documents that the time taken for the division to regroup was caused by them retrieving their wounded from inside Gaza.[46] British wireless operators also intercepted a Turkish Army message from Gaza, timed at 19:45, reporting that their position had been lost.[47]
The failure at Gaza resulted in the Turkish Army building a sixteen miles (26 km) long defence line between Gaza and Beersheba defended by between 20–25,000 troops.[48] Dobell's plan for the second battle required his infantry to assault Gaza itself while the mounted forces would operate on their right flank forcing the Turkish troops towards Beersheba, hinder the movement of reinforcements from there to Gaza, and prepare to pursue any retreating Turkish forces.[49][nb 5]
Preliminary manoeuvring began on 16 April with the main attack to start the next day. At 02:00 the division was in position at Shellal.[51] Reconnaissance patrols convinced Chauvel they would be unable to breakthorugh the Ottoman line without infantry support. The main infantry battle began at 07:15 19 April following a two-hour bombardment, with the division deployed to attack Sausage Ridge, on the "extreme right" of the three British infantry division's assault at Gaza.[52] Having suffered "severe casualties" during the infantry attacks while the division was "comparatively inactive" during the day. However during the previous night of 18/19 April, Chauvel, under orders not to make a dismounted attack, moved in the direction of the Hareira Redoubt to protect the army's right.[53] In the morning of 19 April, the 1st and 3rd Brigades advanced without opposition. However by mid afternoon were confronted by around 1,000 Turkish cavalrymen but fought them off with rifle, machine-gun, and artillery fire. However by 20 April the attack had come to a halt in a decisive victory for the Turkish forces. The attack cost the British 5,900 casualties, but only 105 of those from the division,[54] the least of any involved.[55][nb 6]

The second GOC Major-General Edward Chaytor
This second failure did however result, in the recall of Murray and the appointment of General Edmund Allenby to command the EEF. Chauvel had been promoted to command the Desert Column. He was replaced as GOC by Chaytor from the NZ Brigade.[56] Other changes resulted in the division losing the 3rd Light Horse Brigade, to the new Imperial Mounted Division. The Yeomanry Mounted Division was also raised at the same time.[57] This enabled the three divisions to rotate each month, from the front line to resting, to carry out training.[58] During May, the 1st Brigade and divisional engineers were involved in a raid on the Turkish railway line south of Beersheba, while the other two brigades moved forward in support.[59]
Beersheba[]
On 24 October, the 2nd Brigade moved forward to Asluj to screen the advance of the ANZAC Mounted and the Australian Mounted Divisions.[60] On 31 October Beersheba was captured after a series of infantry and mounted attacks. The 1st and the NZ Brigades made a combined attack on Tel el Saba. Finally at 15:00 the New Zealanders were in position to carry out a bayonet charge, capturing 132 prisoners and four machine-guns, while the retreating Turkish soldiers were engaged by the 1st Brigade. Chaytor's troops were now in possession of Tel el Saba, with the 2nd Brigade at Sakati having cut the Hebron road during the morning.[61][62] At 15:30 orders were issued for the final assault on Beersheba, the 1st Brigade being tasked to capture a line from a prominent mound outside to the Beersheba mosque.[63] Beersheba was finally taken following a mounted charge by the 4th Light Horse Brigade.[64]
The next day, on 1 November the division was ordered to push the 1st and the NZ Brigades further north of Beersheba towards Tel el Khuweilfe while the 2nd Brigade moved towards Dhaheriye. The troops moving north skirmished with Ottoman cavalry then occupied a position between the Makhrune well and Towal Abu Jerwal, capturing four machine-guns and 180 prisoners.[65] Overnight the 1st Brigade was ordered towards Tel el Khuweilfe moving between the 2nd Brigade on their right and the 7th Mounted Brigade to the left. When they reached the British line they relieved the yeomanry and at 11:00 fought off a counter-attack by two Turkish infantry companies. They remained in the line until 16:00 when the 53rd (Welsh) Division and the 5th Mounted Brigade relieved them. During the two days of fighting water was still in short supply and each brigade was relieved in turn to march back eleven miles (18 km) to water. This continued until 5 November when the 2nd Brigade and NZ Brigade's were ordered back to Beersheba.[66] By 7 November the 1st and 2nd Brigades were located to the west of Sheria while the NZ Brigade remained temporarily attached to the 53rd (Welsh) Division still fighting at Khuweilfe. Later that day during the breakthrough of the old Gaza to Beersheba line, the ANZAC Mounted Division advanced to Ameida where the 1st Brigade captured an ammunition supply train, a field hospital, a large quantity of stores and 391 prisoners. At 12:30 news of the fall of Gaza reached Chaytor and he was ordered towards Jemmameh, to cut off the retreating Turkish forces, capturing the village of Dilakh, in the process. Here the 2nd Brigade was ordered to attack, so the 5th LHR galloped the one point five miles (2.4 km) through exploding shells to capture part of the village, which they held through the night. The guns shelling them were located at a nearby position and at dawn the following day they secured the rest of the village and captured the guns. Chaytor's plans to advance depended on the Australian Mounted Division moving up to join them, but by 16:30 they were still engaged in fighting at the at Hareira and Sheria and their horses had not been watered for some time.[67] Early 8 November, the 2nd Brigade occupied a line from the Nejile mound to the Wadi Hesi and an hour later the 7th Mounted Brigade, still attached to the division, arrived as reinforcements. As the division advanced they saw retreating Ottoman soldiers and at 15:00 the 1st Brigade captured Jemmameh and its water supply Positioned beyond the village the 5th LHR and 7th LHR were attacked by between 5–7,000 men, supported by artillery. The attack lasted the remainder of the day but petered out overnight.[68] By that evening, 8 November, all the Turkish positions on the Gaza-Beersheba line had been captured and the Turkish Army was withdrawing northwards.[69]
Judean plain[]
Horses queue for water at Jemmameh 8 November 1917
Watering their horses overnight 8/9 November the division was, the only mounted force, ready to move by morning. At 06:00 Chaytor ordered the advance onto the Judean plain, the 1st Brigade on the left rode towards Simsim, the 2nd Brigade on the right towards Bureir, with the 7th Mounted Brigade as reserve. Several large groups of Turkish soldiers were captured without resistance; however, during the day opposition increased as the two withdrawing Turkish armies became more organised. In the face of machine-gun and artillery fire the village of Bureir was captured, along with two howitzers and stores. Continuing their advance the 2nd Brigade bypassed Huleikat, and headed towards Kaukabah, capturing 110 wagons and 390 prisoners. Having outdistanced their lines of communication, the brigade waited for three hours in the village, for their supply trains to reach them, while being shelled. Then, sighting a convoy at Kustine, the brigade galloped through machine-gun and artillery fire to capture another 100 wagons and 300 prisoners. Turkish artillery opened fire on them but the brigade was ordered to hold its ground. Just after dark part of the 7th LHR was attacked by Turkish infantry, however a Turkish speaking light horse officer convinced them they were surrounded and 230 men surrendered. Brigadier-General Granville Ryrie, GOC 2nd Brigade, conscious of his troops exposed position ordered a withdrawal to Es Suafir el Gharbiye, during which they skirmished with Turkish infantry and captured another four howitzers at Ebdis.[70] On 10 November, the 2nd Brigade was relieved by the 75th Division, and moved to Hamame on the coast for three days rest.[71]
On the other flank at 09:00 the 1st Brigade entered Bureir unopposed, continuing on to reach Mejdel at 14:00 capturing 164 prisoners in the process. Beit Duras was held in strength so they headed for the coast, stopping for the night south of Esdud. The next day 10 November they moved on Esdud the ancient Ashdod, only opposed by Turkish cavalry to the north and east of the town, they secured the Esdud stone bridge over the wadi Sukereir in front of the village by 10:00. However they were confronted by a strong Turkish defence line stretching from Beit Duras to El Butani el Gharbiye and to the mouth of the Wadi Sukereir. Not having the numbers to break the line, the brigade dug in to wait for the infantry to catch up.[72] On 11 November, the 1st Brigade left Esdud to secure the area along the Wadi Sukereir between the bridge and the sea. They subsequently located an ample supply of fresh water and a beach suitable for landing supplies from the sea. The 2nd LHR advanced towards the bridge, while the 1st LHR moved to the left and at Burka, established a line of defence along the Wadi el Khubb facing north-east. Under fire, the 2nd LHR crossed the bridge and gradually forced the Turkish rearguard back. By night they had occupied the Tel el Murre mound and established a substantial bridge-head over the Sukereir at the Esdud bridge towards Burkha.[73]


New Zealand Brigade headquarters outside Jaffa
On 12 November infantry from the 156th (Scottish Rifles) Brigade attacked Burkha, with the 1st LHR and 2nd LHR in support to their left, using their machine-guns to enfialde the Turkish rearguard trenches. The next day the 1st and the NZ Brigades followed behind the Yeomanry Mounted Division supporting their advance on Yebna to reached the mouth of the Wadi Rubin.[74] On 14 November the division resumed their advance. The New Zealanders on the left heading towards Jaffa, reached the Wadi Hanein before meeting any opposition. The 1st Brigade, on the right, heading towards Ramleh, reached Deiran unopposed, but did observe Turkish troops heading towards the NZ Brigade. At midday the New Zealanders were engaged with German machine-gun and rifle fire from a strongly defended line at Ayun Kara. During the following Battle of Ayun Kara the WMR put in a bayonet charge, capturing two machine-guns and killing twenty defenders. The AMR to their left could not break through the German rearguard, which was being rapidly reinforced. While they were being shelled at 14:30 the regiment was attacked by 1,500 troops. The AMR commanding officer requested urgent reinforcements, and a squadron from the WMR was sent to assist. By 16:00 the Turkish rearguard had advanced close enough for a bayonet and grenade charge, which the AMR managed to hold, forcing the attackers to withdraw leaving 162 dead and a large number of wounded behind. New Zealand casualties were twenty-one dead, and eighty-eight wounded.[75]
The next day, 15 November, the division's reconnaissance patrols reported the way ahead clear. They resumed their advance led by the 1st Brigade which reached Ramleh at 11:00 unopposed.[76] The 1st LHR moved ahead to reach Lydda three miles (4.8 km) further north, where reports of Turkish soldiers nearby were received. Lieutenant-Colonel Cecil Granville in command ordered two troops to investigate, and forty troopers rode out, to locate, and charged an hostile column while being fired on by artillery and machine-gun fire. They captured four machine-guns, 297 Turkish and two German soldiers, suffering one dead and six wounded.[77] On their left the NZ Brigade reached Rishon LeZion and pressed on towards Jaffa, but was ordered to halt a few miles short of the port by EEF GHQ. The following morning the WMR was ordered to send reconnaissance patrols towards Jaffa. Meeting no resistance the patrols rode into the city, which had been evacuated; Chaytor informing Allenby that the city had been taken. Other reconnaissance patrols were sent to the River Auju which was found to be thirty-five feet (11 m) wide and up to ten feet (3.0 m) deep. Three crossing points were found; a shallow ford near the river mouth, a second crossing near a dam was over a bridge at Khurbet Hadra, and a third crossing was located at a watermill beside Jerisheh. On the opposite bank Turkish infantry could be clearly seen digging defences.[78]
River Auja[]
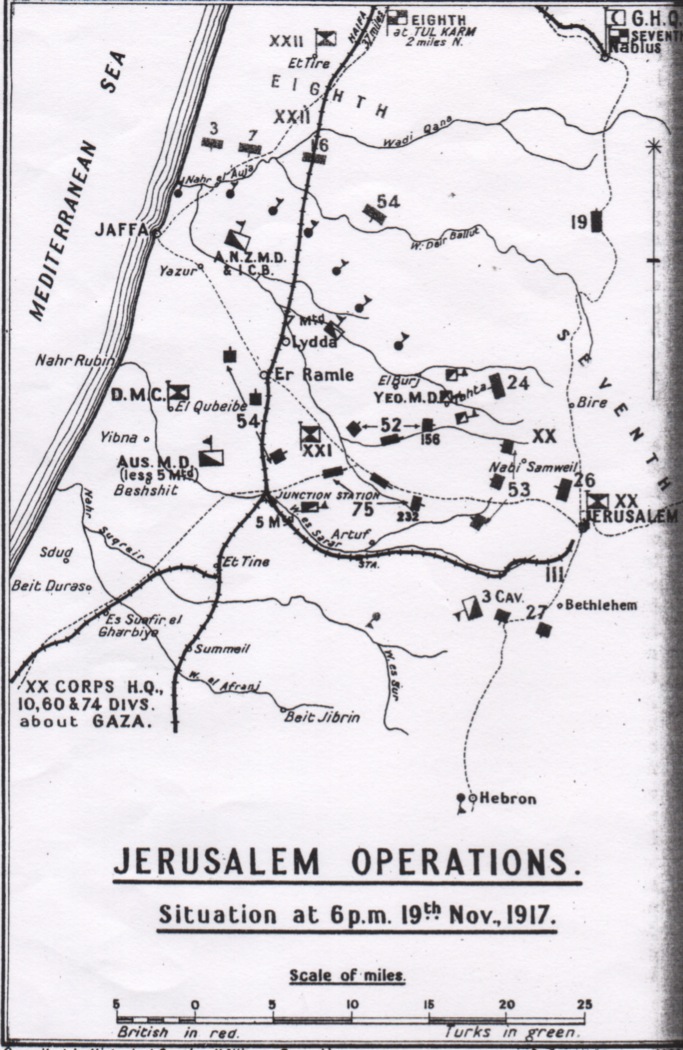

Position of EEF at 18:00 on 19 November
While the main effort of the EEF, headed north-west towards Jerusalem, by 20 November, the division had established a line of observation posts along the River Auja a few miles north of Jaffa. Stretching from the east at Nalin, through Budrus and El Yehudiyeh, then along the higher ground, south of the Sheik Abu ex Zeitun mound and on to the sea. When the 54th (East Anglian) Division and the ICCB arrived the 1st Brigade was sent to the rear, to rest, at Yebna. The next day the NZ Brigade was relieved by the 161st (Essex) Brigade, but remained near the front ready for an assault of the river crossings. During this time mounted patrols advanced to the three crossings and the nearby villages but met with strong resistance. On 24 November, following a bombardment of the Turkish defensive line, the CMR forced a crossing at the river mouth ford, defeating a small party of Turkish soldiers, and occupied Sheikh Muannis.[79][80] They were followed across by the WMR which moved through the CMR to capture the Khurbet Hadrah bridge. Once that was secured they were relieved by an infantry battalion, which took over the defences while a squadron of the CMR guarded the ford and the AMR advanced in front of the infantry holding the bridge. At dawn 25 November a large Turkish force, of around 1,000 men, attacked the AMR which were forced to withdraw back to the infantry positions. At the same time the CMR counter-attacked the Turkish right but the determined Turkish attackers forced the NZ Brigade and infantry back across the Auja.[81][82] On 27 November further Turkish advances forced the 4th (ANZAC) Battalion ICCB and the 2nd Brigade back from their position on the right. Over the next few days trench raids were carried out by both sides. These lasted until 7 December when the division handed over their sector of the front to the 52nd (Lowland) Division. The 1st and 2nd Brigades were withdrawn to the rear, but the NZ Brigade remained at the front in reserve.[83][84]
Jericho[]
In February 1918, the division, less the 2nd Brigade, was attached to the XX Corps for the advance into the Jordan Valley. Holding the right flank, from Bethlehem eastwards, they were tasked with the advance across the Judean Hills, and down into the valley of the Dead Sea. They were to outflank any Turkish defenders confronting the British infantry and capture Jericho.[85]


3rd Light Horse Regiment outside Bethlehem
The British advance started on 14 February, five days later the division was established at El Muntar, six miles (9.7 km) west of the Dead Sea. Early the next day – 20 February – the NZ Brigade conducted dismounted assaults on two hills: Jebel el Kahmum and Tubk el Kaneiterah east of Bethlehem. Both hills were heavily defended and covered by artillery and machine-guns.[86] They found the going heavy and it was not until the hills were outflanked by the 60th (London) Division that the Turkish defenders pulled back. Just after 14:00 the ANZAC and London Divisions were closing in on the Jordan Valley, when a troop from the 1st LHR reach the valley floor. They were soon followed by the remainder of the 1st Brigade with orders to advance north to the Wadi Jofet Zeben. Plans were formed for a joint attack on Nebi Musa, but the Turkish defenders withdrew that night. Instead the 1st Brigade headed for Jericho, and at 08:00 the 3rd LHR entered the town virtually unopposed. The brigade pushed on towards the River Jordan and the bridge at Ghoraniye, and by nightfall the two brigades' and the division's artillery were positioned around the bridge. They were relieved the next day by the infantry and arrived back at Bethlehem in the early hours of 23 February.[87][88] The division left behind in the Jordan Valley the AMR with a subsection of machine guns and an artillery battery, under command of the 60th Division, in a strong position where the road from Jerusalem falls into the Jordan Valley.[89][90][91]
Amman raid[]
The division's next operation was a raid on the village of Amman, thirty miles (48 km) east-north-east of Jericho. The division, with the ICCB under command, would carry out the raid supported by the 60th (London) Division.[92] Heavy rains delayed the raid for several days but by 20 March the weather improved and the level of the flooded River Jordan dropped. On 22 March the infantry forced a crossing of the River Jordan at a ford at Hajla. At 04:00 the next morning the AMR crossed the river, turned north and attacked the rear of the Turkish troops defending the crossing at Ghoraniye. By midday they had secured the crossing, captured four machine-guns and sixty-eight prisoners.[93]


New Zealand Mounted Rifles crossing the River Jordan
The rest of the division crossed the river during the night. The 1st Brigade, providing flank protection for 60th Division, was sent north to locate the track to Es Salt,[94] which is twenty miles (32 km) north-east of Jericho but at an altitude 3,940 feet (1,200 m) higher.[95] The 2nd Brigade, leading the rest of the force, advanced to Amman in the east.[96] At 11:00 several hundred Turkish cavalry were sighted east of the 2nd Brigade. The GOC Ryrie and the 6th LHR attempted to cut them off but they managed to escape in the rugged countryside. At 15:00 the brigade regrouped and set out for the Hekr spring on the plain. Finding the tracks unsuitable for wheeled transport, the division's artillery and supply train had to remain behind. This caused a delay while essential stores were transferred to camels and it was not until 21:30 that the advance resumed, with the men having to dismount and lead their mounts along the tracks at times. Added to that at 02:00 25 March it started to rain heavily again.[97] The first troops reached Ain el Hekr at 04:00 and waited for the rest of the division to arrive; it was not until 19:30 that the 2nd Brigade moved out again. Even on the plain the going was slow, the camels slipping in the rain and wet conditions forcing the horsemen to slow down to keep the force together. Just before dawn the 7th LHR leading met up with the NZ Brigade which had travelled independently via Shunet Nimrin. The NZ Brigade's route had been easier than that used by the main force but was still not suitable for wheeled transport.[98] Chaytor, aware that his men had not rested for three days and nights, postponed the assault for twenty-four hours.[99] Soon after observing a Turkish convoy in the distance the 5th LHR was ordered to attack. The convoy of nineteen lorries, three cars, one armoured car and several other vehicles was captured along with twelve prisoners. Another patrol from the 6th LHR captured sixty-one prisoners at Suweile.[98][nb 7]
That night 26 March Chaytor decided to cut the railway lines north and south of Amman to prevent any escape or reinforcement by rail. The NZ Brigade successfully destroyed a section of rail seven miles (11 km) long to the south. But the 2nd Brigade was confronted by Turkish cavalry and could not reach the northern rail line. Early on 27 March the division set out for Amman, only supported by the four gun lightweight mountain artillery battery from the ICCB.[100][nb 8] In Amman the Turkish Army had 4,000 infantry in well constructed defences dug in along the heights looking down on the division. Supported by fifteen artillery pieces and machine-guns, the NZ Brigade, to the right, were to cross the Wadi Amman and assault the hills between Amman and the train station. The 1st and 2nd Battalions, ICCB would assault Amman from the front while the 2nd Brigade to their left would circle around north and approach Amman from the rear. The NZ Brigade met with heavy machine-gun fire and were not in position to attack until 15:00. The 2nd Brigade dismounted just under two miles (3.2 km) from Amman and approached on foot. Advancing through shell and machine-gun fire the brigade got to within six hundred yards (550 m) of the village before they were forced to withdraw. It was the same with the camel battalions; in the face of heavy machine-gun fire they were also stopped. On the right the NZ Brigade attack also failed, and during the afternoon they observed a train arriving from the south. Later a prisoner confirmed it contained 300 reinforcements. During that night the NZ Brigade had to defend against Turkish bayonet charges.[102][103]


The Imperial Camel Corps Brigade artillery battery that supported the division at Amman
While this was going on at 15:00 the WMR and the 4th (ANZAC) Battalion ICCB were destroying five miles (8.0 km) of rail track and several culverts to the south-east.[104] That night the 5th LHR were sent seven miles (11 km) north of Amman and destroyed a railway bridge. Amman was now cut off from reinforcements by rail but the previous days fighting had convinced Chaytor his force was not strong enough to take Amman by themselves.[105] To their north the 1st Brigade and 60th (London) Division had captured Es Salt and were defending it against counter-attacks. The GOC 60th Division ordered the 181st (2/6th London) Brigade and two batteries of mountain guns to Amman, but they did not arrive until early on 28 March. Now reinforced, Chaytor decided to attack again. The assault began at 13:00 and was again defeated by heavy gunfire.[106][107] On 29 March, having repaired the rail track, a train of Turkish reinforcement arrived at Amman from the north. Chaytor was again ordered to take Amman and decided to try a night attack. At 02:00 30 March the division attacked and had some early success, but by 10:00 it was clear the attack was a failure. Soon after 14:00 it was decided to call off the battle and return across the Jordan.[108]
The division's casualties, including the ICCB, were heavy – 128 dead, 551 wounded and fifty-five missing, which was 248 more than those of the much larger 60th Division.[109][nb 9] The division captured 615 prisoners, ten machine-guns, two field kitchens, twenty-six lorries, five cars, several horse-drawn wagons and the New Zealanders an aeroplane. During the battle the division fired over 587,000 rounds of small arms ammunition (SAA).[111] The riflemen only carried 230 rounds of ammunition, while every Hotchkiss machine-gun had 3,100 ready rounds and the guns in the machine-gun squadrons 5,000 each.[112] At the time the Division Train only carried 120,000 rounds of SAA per brigade, 84,000 rounds for the machine-guns and 12,000 rifle rounds per regiment.[113][nb 10]
Ghoraniye bridge-head[]
On 2 April, Chaytor was given command of the Jordan Valley defences,[111] consisting of the division, the ICCB, two batteries of 4.5-inch howitzers and two heavier 60-pounders. The 1st Brigade, with the 5th LHR attached, was established on the east bank of the Jordan. The ICCB, with the 6th LHR and 7th LHR attached, was strung out at Abu Tellul and along the Wadi Mellahah. Daily the defenders saw Turkish patrols but were not attacked, and the division spent their days digging trenches, stringing barbed wire and sitting machine-guns.[114] The NZ Brigade was further west on the plain between Jericho and the Jordan.[115]
The 5th Light Horse Regiment defending the Ghoraniye bridge-head
Then on 11 April the crossings at Ghoraniye and Musallabeh were attacked by a large Turkish force.[116] At Ghoraniye a patrol from the 2nd LHR discovered a Turkish unit of around 100 men, on the left bank of the Wadi Nimrin at 04:30. By dawn there were 1,000 infantrymen approaching, in waves about 600 yards (550 m) long, on both sides of the wadi.[117] They got to within 100 yards (91 m) of the barbed wire defences before the division's guns opened fire. By now the Turkish force was estimated at 2,000 men. At 13:00 Brigadier-General Charles Frederick Cox GOC 1st Brigade ordered the 1st LHR and 3rd LHR to ride out and encircle them. But their strength, in men and machine-guns, was such that the mounted troopers could not approach them. Sporadic firing continued all night but by 04:00 12 April the Turkish force had withdrawn.[118] Turkish casualties were fifty-one dead, 550 wounded and ninety unwounded prisoners. The brigade had seven dead and seventeen wounded.[119]
At Musallabeh to the north at 04:30 the crossing was subjected to a heavy artillery barrage, with infantry following close behind. At 05:00 the barrage lifted and the Turkish infantry attack the outnumbered ICCB, and attached light horse regiments. For the next three hours at close quarters a fire fight ensued, at times the Turkish soldiers were close enough that the Australians threw stones at them to save ammunition. At 08:00 the attack petered out, but the defenders were still subjected to sniper and artillery fire. They tried another attack in the afternoon but that again failed, and they withdrew leaving 170 dead behind. The ICCB and light horse casualties were eighteen dead and twenty-seven wounded.[120][nb 11]
Es Salt raid[]
On 18 April the division crossed the Jordan to attack the Turkish troops at Shunet Nimrin and the nearby foot-hills. Their orders were "to inflict losses on the enemy and to convey the impression that we are about to advance again to Amman."[122] Supported by artillery and armoured cars, the brigades were confronted by strong Turkish defences and that night withdrew back across the river. The incursion was personally ordered by Allenby, but the result was the Turkish sent reinforcements to the area and a strengthened their defences.[122]


German prisoners taken during the raid escorted by the ANZAC Mounted Division and the Imperial Service Cavalry Brigade.
Two days later Chaytor received orders for another raid across the Jordan on Shunet Nimrin and Es Salt.[123] This time commanded by the Desert Mounted Corps,[121] the division would be joined by the 60th Division, the Australian Mounted Division, the ICCB, the Imperial Service Cavalry Brigade and the Imperial Service Infantry Brigade.[124] The division, less 2nd Brigade, was to support the 60th Division, in a more minor role.[125] The force crossed the River Jordan over the night 29/30 April.[126] The division now under command of 60th Division set out for Shunet Nimrin. The infantry carried out several assaults but could not break the Turkish position. Major-General John Shea GOC 60th Division had intended to use the ANZAC brigades on his flanks. But they were prevented from getting forward by the terrain. All except a squadron from the 6th LHR attached to the 179th (2/4th London) Brigade.[127]
Elsewhere the force was involved in heavy fighting against strong Turkish defences and during a counter-attack lost more than two batteries of artillery, captured by the advancing Turkish soldiers.[128] On 1 May, 60th Division was supposed to attack Shunet Nimrin again but failures elsewhere caused the assault to be cancelled. Instead the Australian Mounted Division positioned itself to attack the Shunet Nimrin from the rear. To assist them the 1st Brigade was sent to cut off any retreat from there northwards. The Australian attack faltered, partly in response to Turkish successes in the west, and by 20:00 they were still stationary. Another assault by 60th Division at 02:00 2 May also failed and by now the British position was turning more to defence than attack. In the three days since crossing the Jordan, the force had been in an almost continuous fight and no supplies had come forward. On 3 May yet another attack by 60th Division failed and the ANZAC Division covering the flanks were confronted by growing numbers of Turkish troops. At 1600 3 May with an acceptance of the need to save his command, Chauvel ordered a withdrawal back over the Jordan.[129] The last unit to cross back across the Jordan was the NZ Brigade, leaving the AMR and the WMR as the east bank guard force.[130]
The operation failed in its objectives, only resulting in 1,000 prisoners taken. Casualties for the two Australian divisions were comparability light at fifty dead and 310 wounded, while 60th Division had 1,116 casualties.[131]
Jordan Valley[]


New Zealand Brigade patrol in the Jordan Valley.
In normal times no one lived in the Jordan Valley during the warmer months of the year and even the residents of Jericho left the village for the cooler hills. The residents claimed it was impossible for Europeans to live there after April.[130] But to prevent the Turkish Army from re-occupying the valley Allenby had to keep a defence force in place.[132]
To that end, the division was given the southern sector to defend which included Ghoraniye and the Dead Sea. They were also reinforced by the Imperial Service Cavalry Brigade and the 181st (2/6th London) Brigade.[133] The infantry were positioned east of the Jordan, defending the Ghoraniye bridge-head.[134] There was little daylight activity during this time, and patrols would normally be sent out at night. Often before returning in the morning they encountered Turkish cavalry, trying to reach the Jordan to water their horses. But to relieve the monotony brigades were sent, in turn, to rest at Bethlehem and given leave in Jerusalem.[135] During this time the division also conducted training camps for non-commissioned officers, Hotchkiss machine-gunners, signallers and all ranks took part in general military training.[136] However, the troops left in the valley were being decimated with "malaria and other diseases".[137]
In June, the 1st Brigade had just finished their rest period at Bethlehem and replaced the 4th Light Horse Brigade at the Musallabeh sector. The brigade deployed with two regiments forward and one in reserve at the Wadi el Auja.[138] By early July they had 3rd LHR on the left, 2nd LHR on the right and the 1st LHR in reserve. The 3rd LHR due to illness and a lack of replacements only had 210 men available and the other regiments were in a similar condition. Since they arrived the brigade had been subjected to Turkish shelling. Then activity increased to such an extent that a Turkish attack was expected at any time.[139] In preparation, extra water and ammunition, enough for two days, was cached in the defence posts.[139] On 13 April Turkish artillery fire on the brigades positions increased and that night movement could be head at the barbed wire defence line. Then at 01:00 14 April the forward troops reported "that the enemy appeared to be massing" soon followed by a report of a "strong body of troops" about 1,000 yards (910 m) to their front. Lieutenant-Colonel George John Bell, commanding 3rd LHR, asked for a protective artillery barrage in front of his position. The Turkish responded with shelling of their own, which lifted at 02:30. In the quiet the regiment heard some commands shouted in German. Then the Turkish artillery laid down another one-hour barrage. When that lifted around 1,000 troops, attacked the brigade's forward defences, in what became known as the battle of Abu Tellul. In the 2nd LHR sector some forward posts were withdrawn, to safer areas. But regimental headquarters was overrun and other positions surrounded. Other troops were overrun but regained their posts by counter-attacking. Further to the west a position held by the regimental adjutant, signals officer, grooms, batmen and signallers, was all that remained between the attacking Germans and the division's artillery batteries. Troops were then withdrawn to a trench line below a crest, so the attacking Germans were easily targeted coming over the skyline and the brigade managed to hold off the attack for the next hour.[140]


Riflemen form the 3rd Light Horse Regiment
Chaytor informed of the attack, sent a squadron from the 4th Brigade, which was still close by, to reinforce the position. Cox commanding 1st Brigade ordered his only reserve, the 1st LHR, to counter-attack the Germans. At 03:30 one squadron and four machine-guns were sent to reinforce the position at Abu Tellul. At dawn it became clear that the main German assault was centred on Abu Tellul, so two more squadrons were sent to assist them. Assembling below the crest, the reinforcements fixed bayonets and counter-attacked the Germans. Who taken by surprise broke and withdrew back to their own trenches. The position at Abu Tellul was now secure but on the other flank, in the west, the German attack was progressing. At 08:00 the last reserve squadron counter-attacked there, forcing the Germans back, capturing 100 prisoners. By 09:00 the brigade was back in control of its previous positions and the NZ Brigade moved to sweep clear 1,000 yards (910 m) to their front. The battle cost the Germans 105 dead, and 358 prisoners, another sixty-seven Turkish prisoners were captured. One group of 100 German Stormtroopers captured were armed with forty-two automatic rifles, their equivalent of the Hotchkiss, almost one between every two men. The brigade casualties were twenty-three dead and forty-six wounded. Ammunition expended by the brigade was 19,000 rifle rounds, 20,000 Hotchkiss and 30,000 machine gun rounds.[141][142]
Chaytor's Force[]
In September 1918, British intelligence reported that the Turkish Fourth Army, comprising 6,000 infantrymen, 2,000 cavalry with 74 artillery pieces, was east of the Jordan confronting the division.[143] Further south at Ma'an there was also the 4–6,000-man II Corps.[144] However Allenby planned the next offensive to take place on the coastal Sharon plain.[145] To accomplish that the EEF had to realign to the left flank.[146] While at the same time convince the opposition that the main attack would take place in the Jordan Valley.[147] To allow this to happen the division remained in the valley as the main component of Chaytor's Force. Which was the division reinforced by 20th (Imperial Service) Infantry Brigade, 38th and 39th Battalions, Royal Fusiliers and 1st and 2nd Battalions, British West Indies Regiment and support troops.[nb 12] Chaytor's Force was responsible for the deception plan.[149] While the EEF moved west, the force built new and larger camps and 15,000 dummy horses. At the same time the infantry battalions marched around the valley, giving the illusion of a much larger force,[150] and false bridges were constructed across the Jordan.[146] Part of Chaytor's orders were to conduct patrols east of the Jordan and, if there was evidence of a Turkish withdrawal, head east and north to seize Amman and the Damieh bridge to block the Fourth Army's retreat.[151]


Galloping New Zealand troops in the Jordan Valley
The force was divided to cover the Jordan Valley. The 2nd and 20th (Imperial Service) Brigades held a line between the Dead Sea along the Jordan to the Auja bridgehead. The NZ Brigade and the other four infantry battalions held the line from Auja to Mellahah and Ahu Tellul, while the 1st Brigade was in reserve at Jericho.[152][153] Over the nights of 17–19 September the divisions patrols crossed east of the river and were involved in several fire fights with the defenders.[154] During daylight on 19 September the two West Indian battalions carried out bayonet charges capturing Turkish positions. An attempt by the Royal Fusiliers however failed to gain any ground. Throughout the next day the Turkish defenders still fought hard against any attack. But on 21 September the AMR advanced to the north and east towards the Damieh bridge and Mafid Jozele, forcing the Turkish troops to withdraw to their reserve line.[155] On 22 September at 03:30 on the left the NZ Brigade and West Indies battalions had reached the Nablus–Damieh road and the Mazar mound was reached an hour later. They next captured El Makhruk, along with a large supply dump, seventy vehicles and 724 prisoners, one of which was the GOC of the Turkish 53rd Division. Moving on, they captured the bridge at Damieh while it was still dark, with a dismounted attack during which one of the West Indies companies charged with them.[156][157] The Fourth Army, leaving small rear guards behind, now started to withdraw from the east bank towards Amman, pursued by the 1st Brigade, a West Indian battalion and the Royal Fusiliers battalions. During this, they became involved in several small fights as they tried to turn the Turkish to their front back towards the river.[158] That night Chaytor issued orders for a general advance the next day. In the south the 2nd Brigade's objectives, were Kabr Mujahid and the Rame mound. The 20th (Imperial Service) Brigade, the Royal Fusiliers battalions and a light horse squadron would take Shunet Ninirin. The 1st Brigade would capture a crossing on the Jordan at Mafid Jozele, forcing the defenders back into the hills. The NZ Brigade were to gallop to Es Salt followed by the West Indies battalions on foot. The division's artillery, supply train and all wheeled vehicles would travel along the track from Shunet Nimrin to Es Salt.[159]
On 23 September Chaytor's Force advanced. By 04:30 2nd Brigade had taken their first objective and continued towards Tel er Rame. Before night they had climbed out of the foot hills and onto the plain. The 1st Brigade forced their crossing and were on route to Es Salt. The 20th Brigade captured Shunet Nimrin and also headed towards Es Salt. The only opposition was in the north where the NZ Brigade were temporarily stopped by a machine-gun post, but by 19:00 had captured Es Salt. Along with 312 prisoners, two machine-guns and three artillery pieces.[160] The 1st and NZ Brigades' now advanced on Suweile. The 2nd Brigade had problems negotiating hill tracks, some of which had been blown in front of them, but reached Ain es Sir at midday. By now, except for one battalion of fusiliers, Chaytor's Force was on the plain around Es Salt, advancing on Amman.[161]
To close the trap on the Fourth Army the AMR sent a squadron through the night, 25 September, to destroy the rail line north of Amman.[162] The rest of the division set out at 06:00 for Amman, with the 2nd and NZ Brigades leading, and the 1st Brigade in reserve.[163] Chaytor, being well aware of the terrain, ordered the division to move slow and if they encountered a strong position, to wait for infantry support before attacking.[161] The NZ Brigade encountered around 200 men and artillery on a ridge position north-west on Amman. The 2nd Brigade moving along the Ain es Sir-Amman road, were slowed down by several machine-gun posts. Over running them they captured 130 prisoners, three artillery pieces, and four machine-guns.[164] At 11:00 a British aircraft dropped a note for Chaytor reporting that the defenders were leaving their trenches. Chaytor ordered a mounted charge by the CMR, but they were stopped by the terrain and machine-gun fire. For the next two hours the brigades gradually fought their way closer to Amman.[165] The break through came when the 7th LHR got to within eighty yards (73 m) of the Turkish trenches. Fixed bayonets and charged, capturing 113 prisoners and seven machine-guns. The NZ Brigade from the north-west had advanced close enough, so that when they crossed the Wadi Amman, they charged and captured the old citadel and the Amman rail station. Within Amman the division captured 2,360 prisoners, six artillery pieces and several machine-guns.[166]


Some of the prisoners taken by the 2nd Light Horse Brigade during September 1918
About 120 miles (190 km) to the south there was still the Turkish II Corps, around 5–6,000 strong, defending Ma'an, from the Arab forces. To hinder their retreat north the 2nd Brigade was sent to cut the rail line to the south of Amman and the 1st Brigade to capture Wadi el Hammam and its water supplies. The rest of the force prepared a defence line between Shunet Nimrin, Es Salt, and Suweile.[166] On 26 September 3 LHR captured 100 pro Turkish Arabs, then reaching Ez Zerka discovered ninety-five sick or wounded Turkish soldiers and an artillery piece. The next day, the 1st Brigade outflanked Wadi el Hammam and captured 453 prisoners and three machine-guns, and also closed the eastern road north from Ma'an. The next day, 2nd Brigade moved south along the rail tracks and reached Leban where a prisoner disclosed that the 6,000-man Ma'am garrison were about sixteen miles (26 km) to the south. Early on 28 September they were located by British aircraft, digging trenches, to the south of Kastal. The 5th LHR were sent to reconnoitre the position, which was surrounded by the Beni Sakhr tribe, who were harassing the defenders, galloping around the trenches and firing their guns in the air. Lieutenant-Colonel Donald Charles Cameron commanding 5th LHR approached the Turkish commander about their surrender, who was in agreement but disinclined to relinquish their weapons with the Arab force present.[167][168] When Chaytor was informed of their predicament he ordered the remainder of the 2nd Brigade south to assist. When Cameron reported to Ryrie, commanding the 2nd Brigade, that the situation was becoming "critical", he ordered the brigade to gallop, leaving their slower pack horses behind. The brigade arrived just before nightfall.[169] But by this time the Turkish had opened fire on the Arabs. Ryrie conferred with the Arab chiefs who wanted to make a joint assault on the position. Instead fearing the Arab intention if the Turkish surrendered, he camped inside the Turkish position for the night.[170] The next morning, at 08:00, the NZ Brigade arrived and Turkish force, thirteen artillery pieces, thirty machine-guns, a train with three steam engines and 5,000 men went into captivity. In the nine days since operations started Chaytor's Force had taken 10,300 prisoners, captured fifty-seven artillery pieces, 132 machine-guns, eleven railway engines and 106 lorries. His casualties were twenty-seven dead, 105 wounded and seven men missing.[171][nb 13]
Disbandment[]


Parade by the 2nd Light Horse Regiment Brisbane Australia 1919
The next month the EEF, in the west, advanced into Syria captured Damascus, and then Aleppo.[174] At the end of October the Armistice of Mudros was agreed between the British and Ottoman Empires.[175] During this time the division was withdrawn back to Jerusalem and then Richon.[176] At the end of hostilities sickness caught up with the men and there were 900 "stretcher cases" laid up and several men died of disease.[177] Two regiments the 7th LHR and the CMR were selected to be part of the force, commanded by the 28th Division, that occupied the Dardanelles and Constantinople, landing on the Dardanelles peninsula 5 December.[178][179] In December 1918, Ryrie GOC 2nd Brigade, as a brigadier-general, assumed command of the division.[20] Then in early 1919, while the division was based around Rafa preparing to return home, a revolt broke out in Egypt. The 1st LHR and 2nd LHR had already sailed for Australia in March.[180] The rest of the division had returned most of their equipment to the stores and were waiting for transport ships to return them home. There were no battles during the revolt, just rioting which the division was deployed to counter. Within a month the revolt was over and the embarkation of the division resumed. The 3rd LHR left in May, the NZ Brigade had left by July and the rest of the division had followed by the end of that summer.[180][181][182] The ANZAC Mounted Division officially ceased to exist 30 June 1919.[183]
It was a different story for the division's horses. Immediately after the war, they were taken to the Imperial Remount Depot, located at Moascar in Egypt. The riding horses were eventually reissued, when required, to units of the British Empire. There was, however, no need for the heavier pack and draught horses, so these were shipped to France and sold.[184]
Battles[]
- 1916
- Jifjafa, Romani, Bir el Ard, Magdhaba
- 1917
- 1918
- Jericho, Amman, Shunet Nimrin and Es Salt, Jordan Valley
References[]
- Footnotes
- ↑ At the time of the First World War, the modern Turkish state did not exist, and instead it was part of the Ottoman Empire. While the terms have distinct historical meanings, within many English-language sources the term "Turkey" and "Ottoman Empire" are used synonymously, although many academic sources differ in their approaches.[5] The sources used in this article predominately use the term "Turkey".
- ↑ Powles gives the New Zealand regiments as twenty-four officers and 499 other ranks.[11]
- ↑ New Zealand History gives the number as 16,000.[29]
- ↑ New Zealand History gives the number as twenty-two dead.[36]
- ↑ This battle was the first one after the issue of Hotchkiss Machine-guns to the regiments.[50]
- ↑ The next lowest numbers of casualties was 345 for the Imperial Camel Corps Brigade. The highest being 2,971 for the 54th (East Anglian) Division.[50]
- ↑ Powles claims there were nineteen lorries and one car abandoned by the Es Salt garrison fleeing from 60th Division.[99]
- ↑ Mountain artillery guns had a high angle of fire and were light, easily dismantled, to be carried by man or animal.[101]
- ↑ Preston gives the casualty total for the whole operation as 1,600 dead, wounded and missing.[110]
- ↑ Prior to the second battle of Gaza the train carried 250,000 rounds of small arms ammunition per brigade, which was considered a "ridiculous over-large amount".[113]
- ↑ Powles gives the division's casualties as twenty-six killed and sixty-five wounded, and at a "rough estimate" 2,500 for the Turkish.[121]
- ↑ Also included was a transport echelon of 300 donkeys, seventeen tractors, thirty-four trucks, five ammunition lorries and fourteen supply lorries.[148]
- ↑ Preston claims 11,000 prisoners,[172] while Powles' figures are slightly different, listing 10,332 prisoners, 57 artillery pieces, 132 large machine-guns, fifteen smaller machine-guns, eleven railway engines, 106 railway trucks and carriages, and 142 vehicles of all descriptions.[173]
- Citations
- ↑ Falls 1930 Vol. 1 p. 156
- ↑ Bou, p.150
- ↑ "WWI, Sinai, Palestine and Syria". Australian Army. http://www.army.gov.au/Our-history/History-in-Focus/WWI-Sinai-Palestine-and-Syria. Retrieved 28 October 2013.
- ↑ "Official History of Australia in the War of 1914–1918; Volume VII – The Australian Imperial Force in Sinai and Palestine, 1914–1918 (10th edition, 1941) Contents page". Australian War Memorial. http://www.awm.gov.au/histories/first_world_war/AWMOHWW1/AIF/Vol7/. Retrieved 29 October 2013.
- ↑ Fewster, Basarin, Basarin pp.xi–xii
- ↑ "1st Light Horse Regiment". Austrailian War Memorial. http://www.awm.gov.au/units/unit_10549.asp. Retrieved 29 October 2013.
- ↑ "5th Light Horse Regiment". Australian War Memorial. http://www.awm.gov.au/units/unit_10557.asp. Retrieved 29 October 2013.
- ↑ "1st Light Horse Brigade". Australian War Memorial. http://www.awm.gov.au/units/unit_10549.asp. Retrieved 14 October 2013.
- ↑ "2nd Light Horse Brigade". Australian War Memorial. http://www.awm.gov.au/units/unit_10551.asp. Retrieved 14 October 2013.
- ↑ Gullett, p.54
- ↑ 11.0 11.1 Powles, p.5
- ↑ 12.0 12.1 Gullett, p.57
- ↑ Badsey, p.250
- ↑ 14.0 14.1 Gullett, p.68
- ↑ Perry, pp.51–52
- ↑ Preston, p.331
- ↑ Powles, p.12
- ↑ Gullett, p.59
- ↑ Dolev, p.206
- ↑ 20.0 20.1 "Major General the Honourable Sir Granville Ryrie". Australian War Memorial. http://www.awm.gov.au/collection/ART03556/. Retrieved 21 October 2013.
- ↑ Wilson, Chapter Two (no page numbers)
- ↑ Gullett, p.71
- ↑ Gullett, p.72
- ↑ Gullett, p.89
- ↑ Powles, p.14
- ↑ 26.0 26.1 Gullett, p.91
- ↑ Gullett, p.120
- ↑ Gullett, p.141
- ↑ "Battle of Romani, Sinai Campaign". New Zealand History. http://www.nzhistory.net.nz/war/sinai-campaign/romani. Retrieved 14 October 2013.
- ↑ Gullett, p.159
- ↑ "Battle of Romani". The Long Long Trail. http://www.1914-1918.net/romani.html. Retrieved 27 October 2013.
- ↑ Gullett, pp.197–199
- ↑ Gullett, pp.206, 209
- ↑ Gullett, p.214
- ↑ Gullett, pp.216–227
- ↑ "Battle of Magdhaba". New Zealand History. http://www.nzhistory.net.nz/war/sinai-campaign/magdhaba. Retrieved 14 October 2013.
- ↑ Gullett, p.230
- ↑ Gullett, pp.231–243
- ↑ Perry, p.51
- ↑ Gullett, pp.263–265
- ↑ Powles, p.87
- ↑ Gullett, pp.266–269
- ↑ Gullett, pp.271–282
- ↑ Powles, p.94
- ↑ Gullett, p.284
- ↑ Gullett, p.286
- ↑ Gullett, p.289
- ↑ Gullett, p.298
- ↑ Gullett, p.301
- ↑ 50.0 50.1 Gullett, p.325
- ↑ Gullett, p.303
- ↑ Gullett, pp.304–316
- ↑ Gullett, pp.328–329
- ↑ Gullett, pp.330–334
- ↑ Powles, p.105
- ↑ Gullett, p.335
- ↑ Powles, p.109
- ↑ Gullett, p.344
- ↑ Gullett, pp.351–352
- ↑ Gullett, pp.373–378
- ↑ Gullett, pp.389–391
- ↑ Falls 1930 Vol. 2 p. 55
- ↑ Gullett, p.392
- ↑ Preston, p.30
- ↑ Gullett, pp. 408–9, 412
- ↑ Gullett, pp.415–418
- ↑ Gullett, pp.437–438
- ↑ Gullett, pp.439–441
- ↑ Powles, p.145
- ↑ Gullett, pp.449–453
- ↑ Gullett, p.457
- ↑ Gullett, pp.456–457
- ↑ Gullett, pp.466–467
- ↑ Gullett, pp.467–471
- ↑ Gullett, pp.474–475
- ↑ Gullett, pp.476–477
- ↑ Gullett, pp.480–481
- ↑ Gullett, pp.481–482
- ↑ Powles, p.161
- ↑ Gullett, p.497
- ↑ Powles, p.162
- ↑ Gullett, p.498
- ↑ Powles, p.166
- ↑ Gullett, pp.499–503
- ↑ Gullett, p.526
- ↑ Powles, p.176
- ↑ Gullett, pp.538–541
- ↑ Powles, p.185
- ↑ Falls 1930 Vol. 2 p. 309
- ↑ Moore 1921, p. 103
- ↑ Powles 1922 p. 184
- ↑ Powles, p.191
- ↑ Gullett, pp.552–554
- ↑ Gullett, p.556
- ↑ Powles, p.193
- ↑ Gullett, pp.556–558
- ↑ Gullett, pp.559–560
- ↑ 98.0 98.1 Gullett, pp.560–563
- ↑ 99.0 99.1 Powles, p.199
- ↑ Gullett, p.563
- ↑ Bailey, p.113
- ↑ Gullett, pp.564–566
- ↑ Powles, pp.200–201
- ↑ Powles, p.202
- ↑ Gullett, p.567
- ↑ Powles, p.203
- ↑ Gullett, pp.568–570
- ↑ Gullett, pp.573–577
- ↑ Gullett, p.584
- ↑ Preston, p.151
- ↑ 111.0 111.1 Powles, p.216
- ↑ Gullett, p.505
- ↑ 113.0 113.1 Preston, p.328
- ↑ Gullett, p.586
- ↑ Powles, p.217
- ↑ Powles, p.218
- ↑ Gullett, p.588
- ↑ Gullett, p.590
- ↑ Gullett, p.591
- ↑ Gullett, pp.591–592
- ↑ 121.0 121.1 Powles, p.220
- ↑ 122.0 122.1 Gullett, p.596
- ↑ Gullett, p.599
- ↑ Preston, pp.154–155
- ↑ Gullett, pp.601–602
- ↑ Preston, p.157
- ↑ Gullett, pp.608–609
- ↑ Gullett, pp.621–622
- ↑ Gullett, pp.624–630
- ↑ 130.0 130.1 Powles, p.222
- ↑ Gullett, p.634
- ↑ Gullett, p.638
- ↑ Gullett, p.639
- ↑ Gullett, p.640
- ↑ Gullett, pp.646–647
- ↑ Gullett, p.622
- ↑ Gullett, p.655
- ↑ Gullett, p.662
- ↑ 139.0 139.1 Gullett, p.663
- ↑ Gullett, pp.665–667
- ↑ Gullett, pp.667–669
- ↑ Powles, pp.231–232
- ↑ Gullett, p.681
- ↑ Preston, p.241
- ↑ Gullett, p.683
- ↑ 146.0 146.1 Powles, p.234
- ↑ Gullett, p.685
- ↑ Perrett, p.36
- ↑ General Edmund Allenby (4 February 1922). "Supplement to the London Gazette, 4 February, 1920". London Gazette. http://www.london-gazette.co.uk/issues/31767/supplements/1530/page.pdf. Retrieved 29 August 2012.
- ↑ Gullett, p.686
- ↑ Gullett, p.690
- ↑ Powles, p.235
- ↑ Gullett, pp.713–714
- ↑ Gullett, p.714
- ↑ Gullett, pp.715–716
- ↑ Powles, p.247
- ↑ Gullett, pp.716–717
- ↑ Gullett, p.717
- ↑ Gullett, p.718
- ↑ Gullett, pp.718–719
- ↑ 161.0 161.1 Gullett, p.719
- ↑ Powles, p.249
- ↑ Powles, p.250
- ↑ Gullett, pp.720–721
- ↑ Gullett, p.721
- ↑ 166.0 166.1 Gullett, p.723
- ↑ Powles, pp.254–255
- ↑ Gullett, pp.724–725
- ↑ Gullett, pp.725–726
- ↑ Gullett, p.726
- ↑ Gullett, p.727
- ↑ Preston, p.245
- ↑ Powles, p.257
- ↑ Gullett, p.776
- ↑ Gullett, p.779
- ↑ Gullett, p.780
- ↑ Gullett, p.781
- ↑ Gulllett, p.786
- ↑ Powles, p.263
- ↑ 180.0 180.1 Gullett, p.792
- ↑ Gullett, p.793
- ↑ Powles, p.284
- ↑ "General Staff, Headquarters ANZAC Mounted Division, •AWM4, 1/60/40 – June 1919". Australian War Memorial. http://www.awm.gov.au/collection/records/awm4/1/60/. Retrieved 23 October 2013.
- ↑ "They shot the horses – didn't they?". Australian War Memorial. http://www.awm.gov.au/wartime/44/page54_bou/. Retrieved 22 October 2013.
- Bibliography
| Wikimedia Commons has media related to ANZAC Mounted Division. |
- Badsey, Stephen (2008). Doctrine and Reform in the British Cavalry 1880–1918. Birmingham Studies in First World War History. Birmingham: Ashgate Publishing. ISBN 0754664678.
- Bailey, Jonathan B A (2004). Field Artillery and Firepower. Annapolis, Maryland: Naval Institute Press. ISBN 1591140293.
- Bou, Jean (2009). Light Horse: A History of Australia's Mounted Arm. Australian Army History Series. Cambridge: Cambridge University Press. ISBN 0521197082.
- Dolev, Eran (2007). Allenby's Military Medicine, Life and Death World War I Palestine. Volume 6 of International Library of Colonial History. London: I.B.Tauris. ISBN 1845112903.
- Fewster, Kevin; Basarin, Vecihi; Basarin, Hatice Hurmuz (2003). Gallipoli: The Turkish Story. Crows Nest, New South Wales: Allen and Unwin. ISBN 1-74114-045-5.
- Gullett, Henry Somer (1923). The Australian Imperial Force in Sinai and Palestine, 1914–1918. Official History of Australia in the War of 1914–1918. Volume VII. Sydney: Angus and Robertson. OCLC 59863829.
- Perrett, Bryan (1999). Megiddo 1918: The Last Great Cavalry Victory. Oxford: Osprey Publishing. ISBN 9781855328273.
- Perry, F.W. (1992). Order of Battle of Divisions Part 5A. The Divisions of Australia, Canada and New Zealand and Those in East Africa. Newport: Ray Westlake Military Books. ISBN 1-871167-25-6.
- Powles, C. Guy; A. Wilkie (1922). The New Zealanders in Sinai and Palestine. Official History New Zealand's Effort in the Great War. Volume III. Auckland: Whitcombe & Tombs. OCLC 2959465.
- Preston, Richard (1921). The Desert Mounted Corps: An Account of the Cavalry Operations in Palestine and Syria, 1917–1918. Boston: Houghton Mifflin Company. ISBN 9781847347558.
- Wilson, Graham (2012). Bully Beef and Balderdash, Australian Army History Collection. Big Sky Publishing Series. Newport, New South Wales: Big Sky Publishing. ISBN 1921941561.
The original article can be found at ANZAC Mounted Division and the edit history here.