

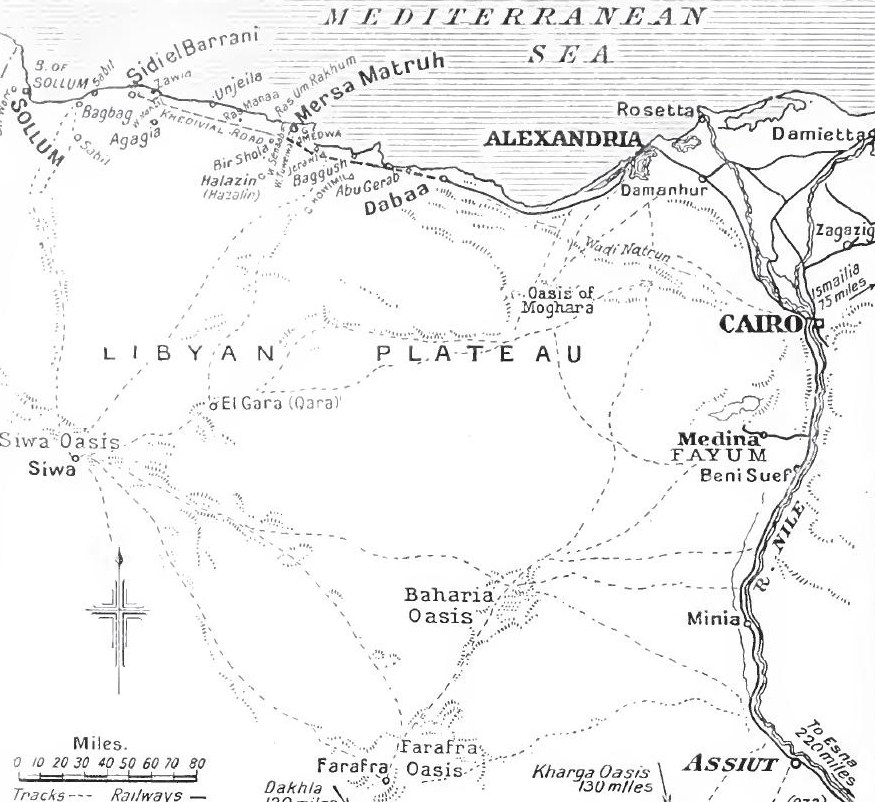
The Action of Agagia (also Agagiya, Aqqaqia or Aqaqia) east of Sidi Barrani in Egypt on 26 February 1916, during the Senussi Campaign between German and Ottoman instigated Senussi and British forces. On 11 December 1915, a British column had been attacked at Duwwar Hussein along the Matruh–Sollum track. In the Affair of Wadi Senba, the Senussi were defeated and two days later, a Senussi attack at Wadi Hasheifiat was repulsed. The British returned to Matruh until 25 December, then surprised the Senussi at the Affair of Wadi Majid but the Senussi got away. At the Affair of Halazin on 23 January, the Senussi were defeated and again slipped away. In February 1916, the Western Frontier Force (Major-General William Peyton), was reinforced and a British column under Lukin advanced west along the coast, to re-capture Sollum in February and en route, a Senussi encampment at Agagiya was spotted by aircraft. On 26 February, the column attacked the Senussi at Agagiya and captured Jaafar Pasha, commander of the Senussi forces on the coast. As the Senussi retreated, they were cut off by a Dorset Yeomanry cavalry charge; the Yeomen lost half their horses and about a third of the riders but dispersed the column, caused about 500 casualties and took 39 prisoners, then captured the Senussi baggage train and pursued the survivors into the desert. Sollum was re-occupied the by British on 14 March 1916, which ended the coastal campaign.
Background[]
Senussi[]
The Senussi were a religious sect mainly of Libyan nomads, who had fought the Italians in Libya during the Italo-Turkish War (29 September 1911 – 18 October 1912). Britain declared war on the Ottoman Empire on 5 November 1914 and in the summer of 1915, Turkish envoys, including Nuri Bey, brother of Enver Pasha and Jaafar Pasha, negotiated an agreement with the Grand Senussi, Sayyid Ahmed ash-Sharif, to attack the British in Egypt from the west, during the Ottoman offensive through Palestine against the Suez Canal, known as the Raid on the Suez Canal. By late 1915, many of the British forces in Egypt had been sent to Gallipoli and Mesopotamia, leaving western Egypt garrisoned by the Egyptian coastguard. The Ottomans and Germans delivered modern weapons by submarine to the Senussi. German and Turkish officers were also transported by submarine and landed on 19 May 1915 to the west of Sollum and set up headquarters at Siwa.[1] The Senussi raised 5,000 infantry and other irregular troops, equipped with Ottoman artillery and machine-guns, for campaigns along the coast against Sollum, Mersa Matruh and Da'aba on the way to Alexandria and from Siwa through the "band of oases" (Bahariya, Farafra, Dakhla and Kharga 100 miles (160 km) west of the Nile). The Senussi crossed the Libyan–Egyptian border on 21 November 1915 to begin the coastal campaign.[2]
Western Frontier Force[]
The Western Frontier Force (WFF) under Major-General Alexander Wallace, comprised the 1/6th Royal Scots, 2/7th and 2/8th Middlesex Regiment, Territorial infantry battalions, the 15th Sikhs, three cavalry regiments raised from rear details of Yeomanry and Australian Light Horse units, who fought at Gallipoli as infantry, Royal Naval Air Service (RNAS) armoured cars, the 1/1st Nottinghamshire Royal Horse Artillery (RHA) and two aircraft of 17 Squadron Royal Flying Corps (RFC).[3] Wallace suffered from an old wound and was relieved by Major-General William Peyton and the WFF was reinforced with the 1st South African Brigade (Brigadier-General H. T. Lukin) and a detachment of Egyptian engineers on 4 February. The WFF eventually received 2,000 camels, which made the force capable of advancing a greater distance and maintaining itself in the desert.[4]
Coastal campaign[]

On 6 November 1915, U–35 sank HMS Tara, the coastguard gun-boat Abbas and badly damaged Nur el Bahr in the Bay of Sollum. On 14 November, the Senussi attacked Sollum and an Egyptian post was attacked 30 miles (48 km) east of Sollum on 20 November. The British withdrew from Sollum to Mersa Matruh, 120 miles (190 km) east, which had better facilities for a base and the Western Frontier Force (Major-General Alexander Wallace) was created.[5] On 11 December, a British column at Duwwar Hussein was attacked along the Matruh–Sollum track and in the Affair of Wadi Senba, drove the Senussi out of the wadi.[6] The reconnaissance continued and on 13 December, at Wadi Hasheifiat the British were attacked again and after a delay, forced the Senussi to retreat. The British returned to Matruh until 25 December, then made a night advance to surprise the Senussi. At the Affair of Wadi Majid, the Senussi were defeated again but were able to withdraw to the west.[7] Air reconnaissance found more Senussi encampments at Halazin, which was attacked on 23 January, in the Affair of Halazin. The Senussi fell back skilfully and then attempted to envelop the British, who were pushed back on the flanks as the centre advanced and defeated the main body of Senussi, who were again able to withdraw.[8]
Prelude[]
British offensive preparations[]
The WFF advanced along the coast from Mersa Matruh to Sidi Barrani, to re-capture Sollum on the Libyan–Egyptian frontier but as a deception it was rumoured that the WFF was about to retreat from Mersa Matruh. A supply column was sent 130 kilometres (80 mi) to Unjeila (about half-way to Sidi Barrani), with 800 camels carrying 28 day's rations for 1,400 men, 200 horses and the camels, arriving on 16 February; after three days a wheeled convoy followed. On 20 February, Lukin advanced towards Unjeila with orders to reach Sidi Barrani quickly, with the 1st and 3rd South African Infantry battalions, the Dorset Yeomanry, Bucks Hussars, 6th Royal Scots, most of the Notts Battery of the 1/1st Nottinghamshire RHA and a field ambulance.[9] During the march, air reconnaissance discovered a Senussi encampment at Agagia, 24 kilometres (15 mi) south-east of Sidi Barrani. The force arrived on 22 February and local Bedouin reported that Nuri and Jaafar were at Agagia. On 23 February, a contingent of guards was left at Unjeila and the rest marched 19 kilometres (12 mi) to Shammas and next day moved on 26 kilometres (16 mi) to Wadi Mehtila, 13 kilometres (8 mi) north-east of Agagia. Lukin planned to rest the force on 25 February and then make a night advance, to attack the Senussi encampment at dawn.[10]
Senussi defensive preparations[]
Jaafar attempted to forestall the British and at 5:30 p.m. on 25 February, attacked the encampment supported by two field guns and a machine-gun. The guns were silenced by the British artillery and the Senussi were driven off; expecting more attacks, Lukin abandoned the night march. Next day, the Yeomanry reconnoitred at 5:00 a.m. and discovered that the Senussi were still at Agagia with no outposts, occupying sand hills with about 1,500 men, three guns and five machine-guns. The defensive position had an area of about 1.6 by 3.2 kilometres (1 mi × 2 mi) and was entrenched among sand dunes on a low plateau, with barbed wire at some points. An attack from the north would have to advance over ground offering no cover.[11]
Battle[]
Lukin received the Yeomanry report and at 9:30 a.m. advanced from the camp and sent the Dorset Yeomanry (Lieutenant-Colonel H. M. W. Souter) to cut off the Senussi retreat, by moving round the west of the Senussi position to some sand hills, from which the Senussi could be observed. The Yeomanry dismounted and assisted by two armoured cars, which inhibited Senussi machine-gun fire, advanced to pin down the Senussi. The infantry advanced with the 3rd South African Battalion forward and the 1st South African Battalion in support. By 11:00 a.m., the troops had moved 8.9 kilometres (5.5 mi) and deployed and at 11:20 a.m. came under fire. The battalion advanced in line with the men at a two-pace interval, machine-guns on the flanks and covering fire from the Notts Battery. The Senussi replied with artillery, machine-guns and rifles, from covered positions invisible to the South Africans. Losses mounted as the advance closed up to the sand hills and Jaafar sent a counter-attack against the South African left flank. A company of the 1st South African Battalion moved to the flank and repulsed the attack, at which Lukin ordered a general attack.[12]
The infantry rushed the Senussi front line on the fringe of the sand hills and then had a running fight as the Senussi made a fighting retreat through the dunes and managed to delay the South African advance to the southern end of the sand hills until 3:15 p.m., when the South Africans found that the Senussi had gone. The Dorset Yeomanry waited for the fugitives to move a distance from the trenches and wire around the sand hill position and moved about 910 metres (1,000 yd) west of the Senussi line of retreat. The Senussi were seen at 2:00 p.m. strung out over 1.6 kilometres (1 mi) of desert, with camels and baggage in front. The column was protected by Bedouin and Muhafizia armed with machine guns formed flank- and rear-guards. The Yeomanry dismounted to rest the horses and study the ground, which had a slight rise towards the Senussi column.[13]
After the rest, the Yeomanry attacked in two lines at a steady gallop, receiving return fire from the Senussi, which was accurate at first, got wilder and then ceased.[13] When the Yeomanry were 46 metres (50 yd) from the rear-guard, which was about 150-strong, they charged with swords drawn, at which the rear-guard broke ranks and the Bedouin scattered. Souter was shot off his horse and fell near Jaafar and the attack hesitated but the machine-gun section arrived and continued the rout. Jaafar and two Ottoman officers were captured and a pursuit was conducted into the desert, where "considerable numbers" of Senussi were killed with swords. In the aftermath, 39 prisoners were taken, the Senussi tents were burned and camels rounded up.[14]
Aftermath[]
Analysis[]
After burying the dead and resting the survivors, Lukin advanced to Sidi Barrani and entered unopposed on 28 February. Sollum was reoccupied by British forces after an approach march of 390 kilometres (240 mi) on 14 March, having been hastily evacuated by the Senussi. Jaafar Pasha was taken to Cairo and having been deprived of his leadership, the Senussi revolt collapsed. The Senussi never again withstood a British attack and although the campaign lasted for several more months, desert conditions were more of an obstacle to British operations than Senussi resistance.[15]
Casualties[]
The Senussi had an estimated 500 casualties and 39 men were captured, along with 60 camels loaded with dates and 40,000 rounds of ammunition. British casualties were 184 men, of whom the Dorset Yeomanry lost 32 killed and 26 wounded.[14]
Footnotes[]
- ↑ Evans-Pritchard 1949, p. 121.
- ↑ Carver 2003, p. 186.
- ↑ Bostock 1982, p. 28.
- ↑ Macmunn & Falls 1928, pp. 123–129.
- ↑ Macmunn & Falls 1928, pp. 106–107.
- ↑ Skinner & Stacke 1922, p. 210.
- ↑ Macmunn & Falls 1928, pp. 110–113, 113–118.
- ↑ Macmunn & Falls 1928, pp. 119–123.
- ↑ Macmunn & Falls 1928, pp. 123–126.
- ↑ Macmunn & Falls 1928, pp. 125–129.
- ↑ Macmunn & Falls 1928, p. 126.
- ↑ Macmunn & Falls 1928, p. 127.
- ↑ 13.0 13.1 Macmunn & Falls 1928, pp. 127–128.
- ↑ 14.0 14.1 Macmunn & Falls 1928, p. 128.
- ↑ Macmunn & Falls 1928, pp. 129, 132.
References[]
- Bostock, Harry P. (1982). The Great Ride: The Diary of a Light Horse Brigade Scout World War I. Perth: Artlook Books. OCLC 12024100.
- Carver, M. (2003). The National Army Museum Book of The Turkish Front 1914–1918: The Campaigns at Gallipoli, in Mesopotamia and in Palestine. London: Pan Macmillan. ISBN 0-283-07347-0.
- Evans-Pritchard, E. E.. The Senussi of Cyrenaica (1954 ed.). Oxford: Clarendon. OCLC 317457540.
- Macmunn, G; Falls, C. (1996). Military Operations: Egypt and Palestine, From the Outbreak of War with Germany to June 1917. I. Nashville, TN: Battery Press. ISBN 0-89839-241-1.
- Rolls, S. C. (1937). Steel Chariots in the Desert. The Story of an Armoured-car Driver with the Duke of Westminster in Libya and in Arabia with T. E. Lawrence.. London: Jonathan Cape. OCLC 752787276.
- Skinner, H. T.; Fitz M. Stacke, H. (1922). History of the Great War Based on Official Documents: Principal Events 1914–1918. London: HMSO. OCLC 17673086. https://ia700407.us.archive.org/32/items/principalevents100grea/principalevents100grea.pdf. Retrieved 7 February 2014.
Further reading[]
- Jones, H. A. (2002). The War in the Air, Being the Story of the Part Played in the Great War by the Royal Air Force. History of the Great War Based on Official Documents By Direction of the Historical Section of the Committee of Imperial Defence. V (Imperial War Museum and N & M Press ed.). London: Clarendon Press. ISBN 1-84342-416-9. https://ia601607.us.archive.org/13/items/warinairbeingsto05rale/warinairbeingsto05rale.pdf. Retrieved 29 March 2015.
- McGuirk, R. (2007). The Sanusi's Little War: The Amazing Story of a Forgotten Conflict in the Western Desert, 1915–1917. London: Arabian Publishing. ISBN 0-95447-727-8. OCLC 156803398.
- The Union of South Africa and the Great War 1914–1918: Official History (IWM and N & M Press ed.). Pretoria: Government Print and Stationery Office. 2010. ISBN 1-845748-85-9. OCLC 16795056.
- Woodward, D. (2006). Hell in the Holy Land: World War I in the Middle East. Lexington, Ky: University Press of Kentucky. ISBN 0-81317-144-X.
External links[]
| Wikimedia Commons has media related to Action of Agagia. |
- Bridport News: Queen’s Own Dorset Yeomanry led charge at battle of Agagia
- The Western Campaign/Agagia Campaign 1915
The original article can be found at Action of Agagia and the edit history here.