

The Actions of St Eloi Craters were local operations carried out in the Ypres Salient of Flanders, during the First World War by the German 4th Army and the British Second Army from 27 March – 16 April 1916. Sint-Elooi (commonly called St Eloi in English) is a village about 5 km (3.1 mi) south of Ypres in Belgium. The British dug six galleries under no man's land and placed large explosive charges under the German defences and blew the mines at 4:15 a.m. on 27 March 1916. Troops of the 27th Division attacked and captured all but craters 4 and 5. The 46th Reserve Division counter-attacked but craters 4 and 5 were lost to the British on 30 March. British attacks continued into early April and then the Canadian Corps took over with the 2nd Canadian Division, despite the disadvantage of relieving troops in the middle of a military operation.
The Canadians inherited positions in a deplorable state, the British having attacked to press their advantage, rather than consolidated the captured ground and on the night of 5/6 April a German methodical attack (Gegenangriff) recovered the ground and captured craters. It was difficult for Canadian runners to take messages back reporting the situation and for several days the Canadian and British staffs were ignorant of which craters had been captured, the topography having been changed so much by the mine detonations. There were 17 craters, the new ones superimposed on the old, the ground around full of shell-holes and part-demolished trenches; if people raised their heads in daylight, they were sniped, which made it impossible to orientate. craters 2, 3, 4 and 5 were the biggest but fresh troops easily mistook one pair of craters for another.
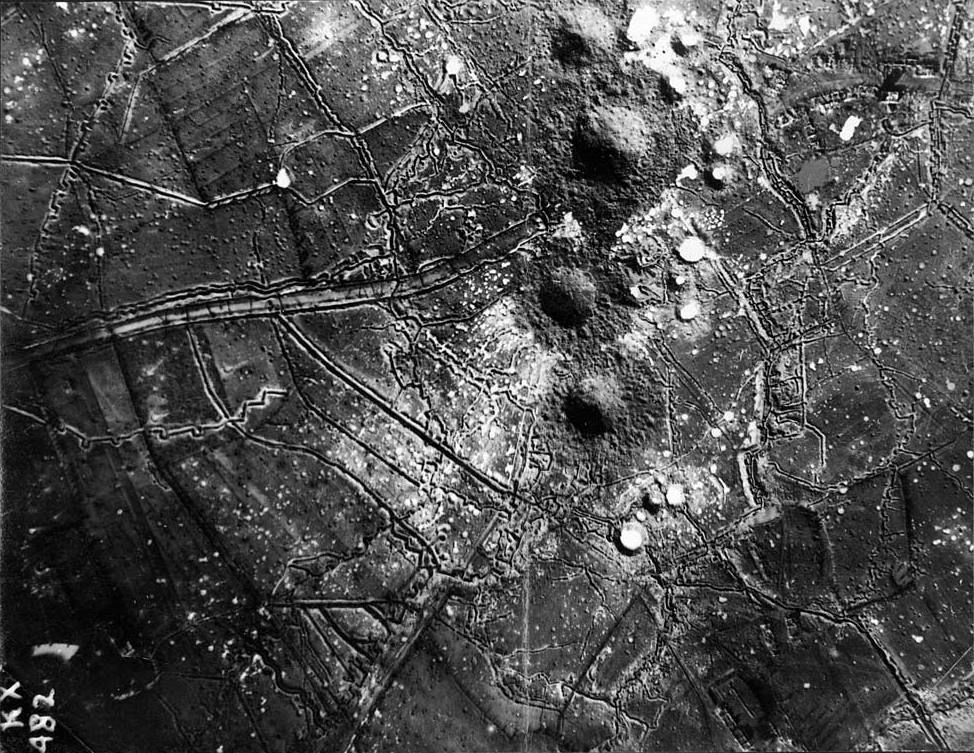
The Canadians counter-attacked several times then concentrated on consolidating the front line, ready for another attempt but the constant rain, oozing mud and incessant artillery-fire exhausted troops quickly, requiring battalions to be relieved after a couple of days. As Canadian attacks dwindled, the Germans did the same but kept the area under constant bombardment. The Canadian and British staffs were still ignorant of the German capture of craters 4 and 5 due to conflicting reports from troops unable to check their position except for a reconnaissance by a Canadian Major on 10 April, who found that the Germans were in crater 4 and an improvement in the weather on 16 April that enabled the RFC to photograph the area and reveal that the Germans were in craters 2, 3, 4 and 5 and a trench round the front lips. Plans for more British attacks were cancelled and for two weeks both sides exchanged artillery-fire; after 19 April a lull began.
The mud and poor weather had imposed unprecedented misery on the infantry but it was shown that with sufficient preparation, a measure of surprise and discretion over timing, a limited objective could be captured on the Western Front. The British had attacked with tired troops and had not achieved all of the objectives and a second attempt was at the cost of quick consolidation. Against an attack on a narrow front where the defender had good observation over the area, the ground could not be held and at St Eloi, the German defenders had a full view of the British positions. It was an open question as to what width of front to attack, narrow enough to guarantee success, yet wide enough to force the Germans to disperse their artillery-fire so that captured ground could be held.
Background[]
Ypres district[]

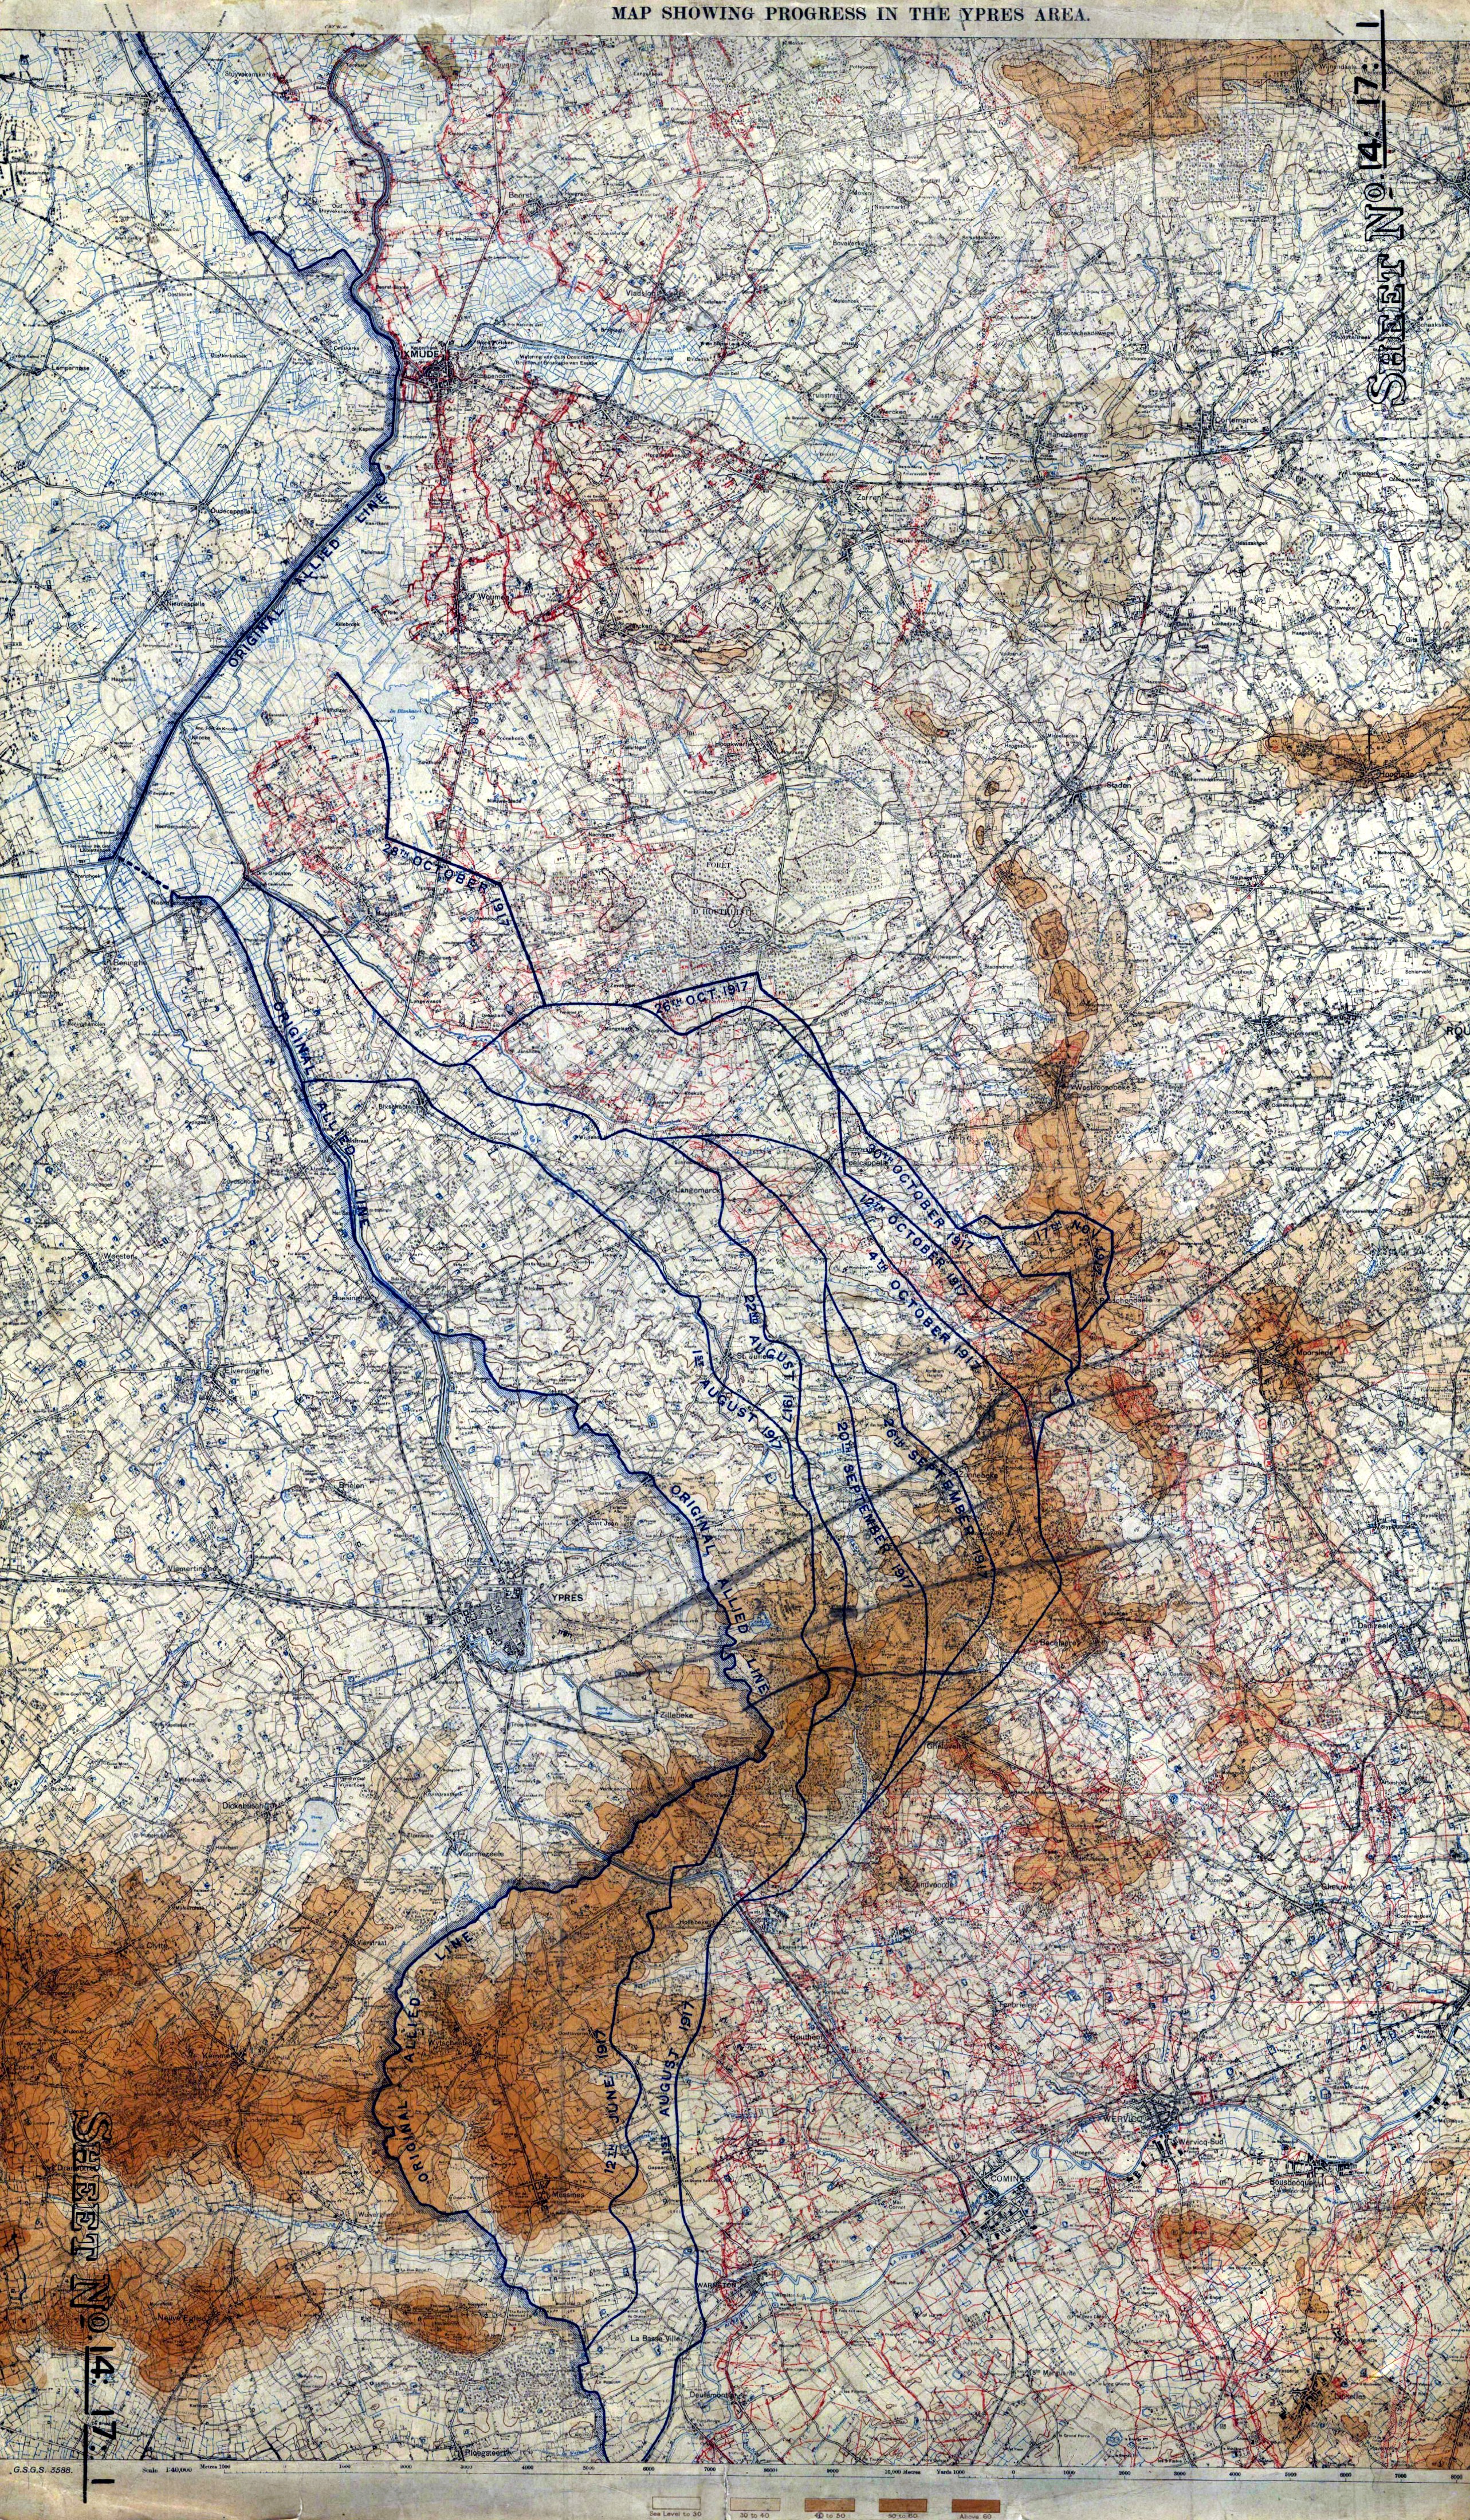
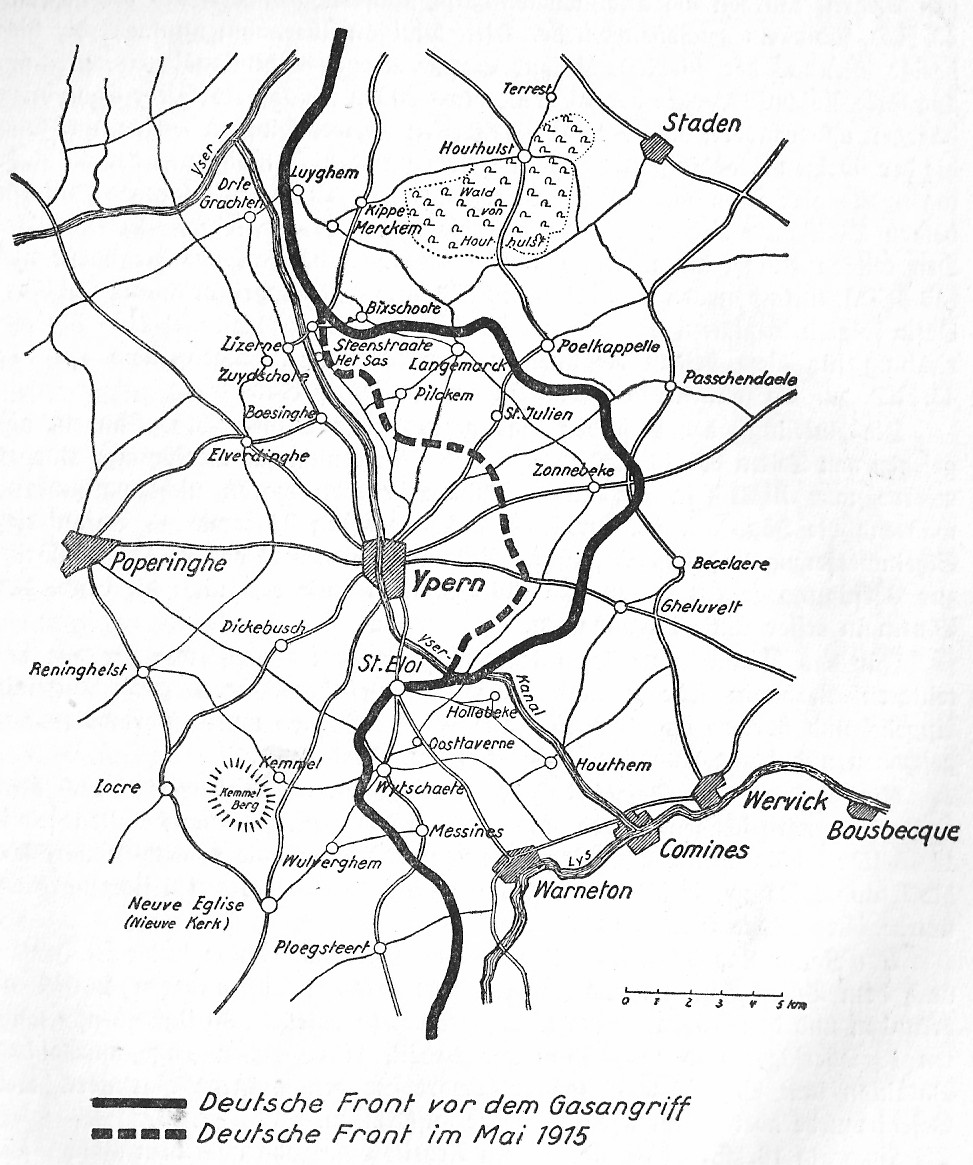
Ypres lies at the junction of the Ypres–Comines Canal and the Ieperlee. The city is overlooked by Kemmel Hill in the south-west and from the east by low hills running south-west to north-east with Wytschaete (Wijtschate), Hill 60 to the east of Verbrandenmolen, Hooge, Polygon Wood and Passchendaele (Passendale). The high point of the ridge is at Wytschaete, 7,000 yd (6,400 m) from Ypres, while at Hollebeke the ridge is 4,000 yd (3,700 m) distant and recedes to 7,000 yd (6,400 m) at Polygon Wood. Wytschaete is about 150 ft (46 m) above the plain; on the Ypres–Menin road at Hooge, the elevation is about 100 ft (30 m) and 70 ft (21 m) at Passchendaele. The rises are slight apart from the vicinity of Zonnebeke, which has a gradient of 1:33.[1]
From Hooge and to the east, the slope is 1:60 and near Hollebeke, it is 1:75; the heights are subtle but have the character of a saucer lip around Ypres. The main ridge has spurs sloping east and one is particularly noticeable at Wytschaete, which runs 2 mi (3.2 km) south-east to Messines (Mesen), with a gentle slope to the east and a 1:10 decline to the west. Further south is the muddy valley of the Douve river, Ploegsteert Wood (Plugstreet to the British) and Hill 63. West of Messines Ridge is the parallel Wulverghem (Spanbroekmolen) Spur; the Oosttaverne Spur, also parallel, is to the east. The general aspect south of Ypres is of low ridges and dips, gradually flattening to the north into a featureless plain.[1]
In 1914, Ypres had 2,354 houses and 16,700 inhabitants inside medieval earth ramparts, faced with brick and a ditch on the east and south sides. Possession of the higher ground to the south and east of the city, gives ample scope for ground observation, enfilade fire and converging artillery-fire. An occupier also has the advantage of artillery deployments and the movement of reinforcements and supplies being screened from view. The ridge had woods from Wytschaete to Zonnebeke, giving good cover, some being of notable size like Polygon Wood and those later named Battle Wood, Shrewsbury Forest and Sanctuary Wood.[2]
The woods usually had undergrowth but the fields in gaps between the woods were 800–1,000 yd (730–910 m) wide and devoid of cover. Roads in this area were usually unpaved, except for the main ones from Ypres, with occasional villages and houses. The lowland west of the ridge was a mixture of meadow and fields, with high hedgerows dotted with trees, cut by streams and ditches emptying into the canals. The Ypres–Comines Canal is about 18 ft (5.5 m) wide and the Yperlee about 36 ft (11 m); the main road to Ypres from Poperinge to Vlamertinge is in a defile, easily observed from the ridge.[2]
1915[]
January 1915 was a month of rain, snow and floods, made worse for both sides by artillery-fire and sniping and the need for constant trench repairs. The British front was extended when the 27th Division and the 28th Division arrived in France and took over from the French XVI Corps. The British divisions had only 72 18-pounders between them and had to hold the front line with far more men to compensate, the French being able to defend an outpost line with 120 75 mm, 24 90 mm and six 120 mm guns. On 21 February, the Germans blew a mine in Shrewsbury Forest north of Klein Zillebeke, captured an area of 100 yd × 40 yd (91 m × 37 m) and inflicted 57 casualties. Constant underground fighting began in the Ypres Salient at Hooge, Hill 60, Railway Wood, Sanctuary Wood, St Eloi and the Bluff. The British formed specialist tunnelling companies from soldiers who had been miners and tunnellers in civilian life, which began to reach France at the end of February.[3] German troops attacked the 28th Division near St Eloi on 4 February and held the captured ground for several days. Further south, the 27th Division was attacked from 14–15 February and on 28 February, the 27th Division made a successful local attack along with Canadian troops.[4]
British tunnelling companies[]
There was no British army mining organisation in 1914, except for a short course for Royal Engineers but after the First Battle of Ypres in 1914, siege warfare and mining began and the British realised that the Field and Siege Companies RE were in too great a demand to provide men for mining. On 3 December, Lieutenant-General Henry Rawlinson asked for a specialist battalion of sappers and miners and on 28 December the War Office was requested to send 500 clay kickers, civilian specialists in tunnelling through clay. The British Expeditionary Force (BEF) was ordered to form Brigade Mining Sections with miners and tunnellers already in the army. In February 1915, it was decided to form eight tunnelling companies from civilians recruited in Britain and transfers from the army. Another twelve companies were formed later in 1915, one in 1916, a Canadian Tunnelling Company was formed in December 1915, two more arrived in France in March 1916 and a New Zealand and three Australian tunnelling companies arrived in May.[5]
Counter-mining activity by the Tunnelling Companies RE began at St Eloi in the spring of 1915. Much of the mining in this sector was done by the 177th Tunnelling Company and the 172nd Tunnelling Company.[6] The Ypres area has a shallow soil layer of loam or sand above waterlogged semi-liquid sand and patches of sand and clay called slurry. Beneath the second layer is a thick seam of blue clay. The early mining took place above the blue clay which put very heavy pressures of water and wet sand on the underground works. In August the digging of galleries had begun to be ready by the end of June 1916. Both sides spent 1915 mining and counter-mining, the British springing 13 mines and 29 camouflets against 20 German mines and 2 camouflets.[7] In September, Brigadier-General George Fowke the Engineer in Chief, proposed a mining offensive in the blue clay 60–90 ft (18–27 m) underground. Since the Germans were on the higher ground, galleries could be driven horizontally into the blue clay from shafts about 300–400 ft (91–122 m) back from the front line.[8] By January 1916, the 172nd Tunnelling Company had sunk shafts into the blue clay and began to dig galleries 80–120 ft (24–37 m) under the German front position.[9] After the Second Army offensive in the summer of 1916 was postponed the mining offensive was made even more ambitious, with a plan to mine Messines Ridge.[10]
Action of St Eloi[]
On 14 March 1915, the Germans attacked St Eloi after springing two mines and captured the village, trenches nearby and the Mound, a spoil heap about 30 ft (9.1 m) high and 0.5 acres (0.20 ha) in area, on the west side of a rise, south of the village. The 80th Brigade of the 27th Division had fought hand-to-hand with the attackers but could not counter-attack, because of a lack of close reserves and German artillery barrages isolating the attack front. Just after midnight, two battalions managed to counter-attack and retook the village and the lost trenches. The Mound was not regained as the Germans had managed to consolidate and retained the advantage of observation from it. Another German attack on 17 March was a costly failure and on 14 April, after a four-day bombardment, the Germans blew another mine at 11:15 p.m. and commenced a systematic bombardment, against which the British artillery replied but no infantry attack followed.[11]
Prelude[]
British offensive preparations[]


After the German attack at the Bluff, the V Corps commander, Lieutenant-General Herbert Plumer, decided that it would be more advantageous to make a retaliatory attack at St Eloi, about 1 mi (1.6 km) to the west. Since an attack on 14 March 1915, the Germans had held a salient 600 yd (550 m) wide and 100 yd (91 m) deep around the Mound, against which an attack had been planned in November 1915. The salient was on a slight spur that ran down from the higher ground around Ypres, which gave a commanding view over the British lines. An attack on the Mound required mines to be sunk much deeper and work by the 172nd Tunnelling Company had begun in August 1915.[6] Three shafts were dug 50–60 ft (15–18 m) deep and by November, when the Germans blew a mine at the Bluff, a line of shallow galleries had been dug. Work on the deep mines continued for a possible operation in February 1916; eventually it was decided to dig six galleries from the deep shafts. After another German mine explosion at the Bluff in January, work on the shallow mines was stopped and all efforts were made to finish the deep galleries at St Eloi.[7]
German miners could be heard above the deep galleries, which showed that the galleries had been advanced under the German lines but the British deep mines, D1, D2, H1, H4 and F appeared to be safe from discovery. Work was stopped on mine I, the furthest west, which was thought to be most vulnerable to exposure and on 10 March 1916, the Germans blew a camouflet which collapsed 20 ft (6.1 m) of the gallery. The British blew their own camouflet on 24 March, which collapsed more of the gallery and a charge was placed 240 ft (73 m) along, even though the German trenches were 420 ft (130 m) away. F gallery was dug at 38 ft (12 m) and then stopped, when it ran into German defensive mines about 100 ft (30 m) from the German lines. Work still went on in the higher galleries and the British tunnellers entered two German galleries and demolished them. There were four central galleries, two laid from shaft D and two from shaft H. Mines 1–6 contained 1,800 lb (820 kg), 31,000 lb (14,000 kg), 15,000 lb (6,800 kg), 13,500,000 lb (6,100,000 kg) 12,000 lb (5,400 kg) and 600 lb (270 kg) of ammonal.[12] (For most of the time, the British preparations were obstructed by an efficient German counter-mining effort but the British carried away excavated earth in sacks by hand, dumped it in dips unseen and then camouflaged the dumps.)[13] From Kemmel Hill, a hollow south of St Eloi could be observed and was thought to be a German assembly area. No artillery-fire was directed on the area but a code word was arranged at which the guns were to open rapid fire.[14]
German defensive preparations[]
The 46th Reserve Division (Generalleutnant von Wasielewski), part of the XXIII Reserve Corps (General Hugo von Kathen) which had been in the Ypres area since late 1914, took over from the 123rd Division on 23 March, with both brigades in the line, the 92nd Brigade and the attached 18th Reserve Jäger Battalion taking over at St Eloi. The German mines in the area had become waterlogged and dilapidated but the 123rd Division engineers had been confident that a British mine attack was unlikely and air reconnaissance had revealed no obvious preparations for an attack. More artillery positions had been detected near Kruisstraat and Dickebusch Lake and huts had been built near Wulverghem and Vierstraat but this had not been seen as suspicious. During the night of 25/26 March, the III Battalion, Reserve Infantry Regiment 216 (RIR 216) was relieved by the 18th Reserve Jäger Battalion, with I Battalion, RIR 216 in close reserve. On the afternoon of 26 March a listening post overheard British troops discussing mines to be fired at St Eloi but a careful inspection by German tunnellers found no cause for alarm. As a precaution, the 18th Reserve Jäger Battalion thinned its front line to keep more troops in the support trenches and it was a quiet night.[15]
Battle[]
27–29 March[]
27th Division[]


.jpg)
The first shells passed overhead and the mines were fired at 4:15 a.m. on 27 March, it "appeared as if a long village was being lifted through flames into the air" and "there was an earth shake but no roar of explosion".[16] The detonation obliterated the Mound and the trenches rocked and heaved, burying about 300 men of Reserve Jäger Battalion 18 (RJB 18), which had partly withdrawn into the reserve line as a precaution. The British heavy artillery fired a barrage along the flanking trenches and behind the salient, varying the area periodically. Infantry advanced quickly ignoring the half-minute delay for flying débris and found that mines 2, 3, 4 and 5 had gone off under the German front and support lines, demolishing the defences. Mine 1 had exploded in no man's land on the right flank forming a crater to defend the flank mine 6 had done the same on the left flank and also blown up a German grenade throwing post. The Royal Northumberland Fusiliers advanced and lost only one man before reaching the German wire and found that the German survivors were ready to surrender.[17]
The Royal Fusiliers were hit by machine-gun fire from the left flank as they climbed the parapet, a German counter-barrage on the front line began only 40 seconds after the Northumberland Fusiliers attacked and continued nearly all day.[17] The Royal Fusiliers only reached part of a German trench south of craters 4 and 5 on the right flank and the junction with the Northumberland Fusiliers but left a gap. The Royal Fusiliers were at crater 6 and an older crater to the east, the topography of the area having changed so much, that it was hard to orientate. Consolidation was slowed by the German artillery-fire and working and carrying parties of the 1st Royal Scots Fusiliers and the 12th West Yorkshire from the 9th Brigade had many casualties. The Germans deep drainage system had gone up with the mines and the trenches began to flood as intermittent showers turned into a downpour and the troops were replaced frequently; despite their tiredness, battalions were poached from resting brigades to make up the numbers. Over the night of 27/28 March the 13th King's, 2nd Royal Scots and the 8th East Yorkshire from the 8th Brigade relieved the 1st Northumberland Fusiliers, 4th Royal Fusiliers and the 1st Royal Scots Fusiliers. On the night of 28/29 March the exhaustion of the troops led to the 2nd Suffolk and 10th Royal Welch Fusiliers relieving two more 8th Brigade battalions and a company of the 18th Canadian Battalion from the 4th Canadian Brigade relieved the 12th West Yorkshire, the last of the 9th Brigade battalions. (In the morning an apparent German counter-attack turned out to be a surrender attempt.)[18]
46th Reserve Division[]


Early in the morning of 27 March, German troops near St Eloi heard noises underground and then British mines exploded. The ground around the craters of mines 2, 3, 4 and 5 was lost immediately but the British failed to take craters 4 and 5. The German infantry were not able to mount an immediate counter-attack amid the confusion and the quantity of British artillery-fire. After dark, counter-attacks were made from both flanks and repulsed; Kathen suspended the attacks and ordered forward every spare man from the 46th Reserve Division and parties from the 45th Reserve Division and 123rd Division, to dig another front position, which was done under British artillery-fire. On 30 March, patrols from II Battalion, RIR 216 scouted craters 4 and 5 but counter-attacks on 31 March, by II Battalion and III Battalion against the British trenches covering craters 2 and 3 failed. The intense British artillery-fire was taken to be the preliminary of another attack and an extra battalion was sent to reinforce the 46th Reserve Division but craters 4 and 5 were captured. The advance of reserves to reinforce the defenders was stopped by British artillery fire and the confusion caused by the mine explosions.[14]
30 March – 3 April[]
A force from the 1st Gordon Highlanders, 12th West Yorkshire and the 3rd Division Grenade School staff was picked to capture the parts of the objective not taken during the attack on 27 March and it was discovered that the Germans held craters 4 and 5, which had been fortified by a belt of barbed wire and machine-guns. Troops from II Battalion, RIR 216 had taken over crater 5 that day and it had been connected to the main German defences by a communication trench. The British attack was called off and an attempt made to cut off the German party in the crater which failed but crater 4 was found to be empty and was occupied with a machine-gun on each flank. The Germans attacked crater 2 on 31 March but were repulsed despite the sketchy defences of the crater. Haldane inspected part of the front, finding it waist deep in water and gave orders for another attack against crater 5 and the remaining objectives on 3 April. The attack began after a hurricane bombardment from 1:30–2:00 a.m. on 3 April by the 8th King's Own in the dark and a thick fog and reached the objectives, finding the Germans unable to resist except at crater 5 and a party demanded their surrender at dawn at which 82 officers and men gave up, having been isolated and without food for three days. Haldane made another inspection to make sure of the line held and found that the crater in the place where the Mound had been was a good observatory but was protected only by a thin line of defences and it would be a race to improve them before the Germans could counter-attack.[19]
4–5 April[]


Before 27 March, Plumer intended that the Canadians should take over the sector as soon as the attack was complete but the Canadian Corps commander, Lieutenant-General Edwin Alderson preferred to carry out the attack or wait until the front had settled before taking over. The tiredness of the 3rd Division meant that the Canadians were sent to take over while the front was still unsettled and the 2nd Canadian Division (Major-General Richard Turner) had to relieve the 3rd Division on the night of 3/4 April before the captured ground had been consolidated and the German defences opposite had not been identified. Fifty men per company of the 6th Canadian Brigade wore the new Brodie helmet and took over from the 76th Brigade by 2:48 a.m., the British battalions being so depleted that only companies were needed to take over but the relief cost twelve hours of consolidation. The 3rd Division infantry went into reserve and the artillery stayed on until the night of 12 April, then lent its trench mortars and the 24 Lewis gun teams to the 2nd Canadian Division artillery. At noon on 4 April, the Canadian Corps took over from V Corps with the three Canadian divisions, the 1st Canadian Division having taken relieved the 50th (Northumbrian) Division on 3 April and the 3rd Canadian Division the 24th Division, the Canadian Corps holding the line from St Eloi, across the Ypres–Comines Canal to the II Corps north of Hooge.[20][lower-alpha 1]
The 27th Canadian Battalion took over in front of the craters with parties from the 31st Canadian Battalion in craters 5 and 6 and beyond crater 7 up to the canal, taking three Germans prisoner on craters 5 and 6. The mines, artillery bombardments and inclement weather had demolished parapets, cut the wire and even well built trenches had collapsed. The shallow ditches and captured trenches facing the wrong way had no drainage and few dugouts, all waterlogged and incapable of resisting shell-splinters. There were no communication trenches and the four largest craters had to be by-passed, supply parties being tied together to pull out those who got stranded in flooded shell-holes. Wounded and dead lay everywhere and the relief parties could only find posts, some connected by shallow trenches. The Canadian commander recommended digging a temporary defence line along the west lips of the craters rather than the longer line in front, on a forward facing slope, easily watched from the ridges above, when a counter-attack was expected from the direction of the Bluff. The 6th Canadian Brigade, 2nd Canadian Pioneer Battalion and large working parties from the 4th and 5th Canadian brigades began to sandbag the defences and repair the drainage but the water was thick mud and oozed back when it was thrown out. German guns bombarded the area every 30 minutes from the front and flanks, which made it impossible to consolidate the craters for 24 hours but the support and old front line were much improved. Lack of rest and inability to carry food forward, led to a decision to swap the 27th Canadian Battalion with the 29th Canadian Battalion on the night of 5/6 April.[22]
Night 5/6 April[]


.jpg)
German preparations for a set-piece attack (Gegenangriff) by the I Battalion, RIR 216 and I Battalion, RIR 214, took until 6 April.[23] At 11:00 p.m. on 5 April, an intense German bombardment began (less gas shell, because of unfavourable wind) and continued until 2:00 a.m. The bombardment resumed at 3:00 a.m., just after the Canadian work details had withdrawn. The bombardment with artillery and trench mortars lasted for thirty minutes and destroyed much of the work of consolidation, the wire being swept away and two of four Lewis guns being knocked out. The British artillery barraged the German communication trenches and avenues of advance but the German infantry managed to get through.[24] The British artillery began to barrage lines of approach and communication trenches but German infantry found ways through and broke into the centre of the Canadian position, where the defenders had been killed by the bombardment. The Germans began to roll up the remaining defences and captured craters 2, 3 and 4, where there were 28th Canadian Battalion parties of 5–6 men, there to divert German artillery-fire. The parties were overwhelmed but at crater 5 the Canadians were able to hold out for a while and the attack on crater 6 and the line beyond was repulsed by the 31st Canadian Battalion. A rocket was sent up from crater 3 (the site of the Mound) and the German artillery began a barrage around the craters and across British communication trenches, which prevented reinforcements from moving up.[22]
The Germans began to dig in, not needing to take cover, having the protection of the barrage. The British were ignorant of the situation at the front and prevented the British artillery from firing at the crater area, the barrage behind them continuing. Runners eventually got back but reported by mistake that the Canadians were still in craters 4 and 5, because the landscape had changed so much. Craters 2, 3, 4 and 5 had been lost and craters 1, 6 and 7 were still held along with the trenches linking them. In the centre, where 500 yd (460 m) were two companies in communication trenches and the remaining positions before Voormezeele. Bombers of the 28th and 31st Canadian battalions in craters 6 and 7 thought they were in 4 and 5. The ground was a sea of 17 craters, the new craters superimposed on the old ones, full of shell-holes and part-demolished trenches; if people raised their heads in daylight, they were sniped, which made it impossible to orientate. craters 2, 3, 4 and 5 were the biggest but the newer troops in the area easily mistook one pair of craters for another.[25][lower-alpha 2] All the ground lost on 27 March was recaptured by 6:00 a.m., dug in machine-guns defeated British counter-attacks.[23]
6–19 April[]

.jpg)
Bombers of the 18th and 29th Canadian battalions, with two companies of the 28th Canadian Battalion, counter-attacked but failed to recapture craters 2, 3, 4 and 5 and during the night of 6/7 April, the 27th and the 29th Canadian battalions were relieved by the 21st Canadian Battalion. Turner said that they could either evacuate the area to make it untenable by artillery-fire or counter-attack on a wider front and consolidate the captured ground. An attack on a broader front would reduce the density of German counter-bombardment that the Germans could achieve. Since the area was thoroughly disturbed, surprise was impossible and with the offensive on the Somme looming, there was no time for a proper set-piece attack. Under the impression that only craters 2 and 3 had been lost, Plumer ordered the 2nd Canadian Division to hold its positions and recapture the craters. On the night of 7/8 April, the 6th Canadian Brigade was relieved by the 4th Canadian Brigade, which brought the 19th and 18th Canadian battalions forward. Bombers of the 18th, 19th and 21st Canadian battalions attacked craters 2 and 3 on the nights of 8/9 and 9/10 April but were repulsed, as were German attacks on craters 6 and 7.[27]
On the next couple of nights the 21st Canadian Battalion was relieved by the 20th and the 18th Canadian Battalion by the 25th in the centre and the commander of the 5th Canadian Brigade took over. More reliefs took place with the 22nd and 26th Canadian battalions replacing the 20th and 19th Canadian battalions. On 12 April, Plumer and Turner decided to concentrate on improving the front line; the frequent battalion reliefs were necessary due to fatigue and lack of sleep under constant bombardment, with no cover amidst mud and waterlogged shell holes. The Germans made occasional bomb attacks, intermittently bombarded the British lines during the day and fired Shrapnel shell bombardments at night, to catch working parties. During the night of 14/15 April, the 24th Canadian Battalion relieved the 25th and an officer crawled round the craters, reporting that the four along the old German front line were occupied. On 16 April, the weather improved enough for air reconnaissance by the RFC and photographs showed that the Germans had dug a trench to the west of the craters. Plans for more attacks were cancelled and on the night of 17/18 April, the 5th Canadian Brigade was relieved by the 6th Canadian Brigade. For the next two weeks, both sides exchanged artillery-fire and the British front line, support trenches and communication trenches were demolished; the new trench covering the Germans in craters 2, 3, 4 and 5 was not as badly damaged, because the British heavy artillery was subject to ammunition rationing. On 19 April, the Germans took craters 6 and 7 but patrols found that they were left unoccupied and an attack on crater 1 was defeated.[27]
A new artillery scheme had been devised by the II Wing Royal Flying Corps (RFC) and the Second Army in February 1916. When the message General Artillery Action was received, RFC squadrons were to stop routine operations and commence artillery co-operation and reconnaissance of corps and army areas, until the signal Situation Normal was received. The first operation of the scheme occurred on 12 February and from 27–29 March General Artillery Action was in force for 1 Squadron and 6 Squadron, whose crews conducted many artillery-observation sorties for counter-battery fire and at 9:00 a.m., on 27 March, aircraft of 5 Squadron photographed the new craters. Despite the winter weather, 6 Squadron managed to conduct counter-battery sorties until 6 April and for the rest of the fighting at the craters, the RFC squadrons mostly flew artillery-observation sorties.[28]
Aftermath[]
Analysis[]
| Month | Total |
|---|---|
| December | 5,675 |
| January | 9,974 |
| February | 12,182 |
| March | 17,814 |
| April | 19,886 |
| May | 22,418 |
| June | 37,121 |
| Total | 125,141 |
The mud and poor weather had imposed unprecedented misery on the infantry and after 19 April, a lull began and both sides were content to let the area quieten. With sufficient preparation, a measure of surprise and discretion over timing, a limited objective could be captured on the Western front. The British had attacked with a tired and depleted division and had not achieved all of the objectives, making a second attempt necessary, at the cost of foregoing a quick, thorough consolidation. Against an attack on a narrow front where the defender had good observation over the area, the ground could not be held and at St Eloi, the German defenders had a full view of the British positions. It was an open question as to the width of front to attack, narrow enough to guarantee success, yet wide enough to force the Germans to disperse their artillery-fire so that captured ground could be held. The fighting at St Eloi was one of nine sudden attacks for local gains made by the Germans or the British between the appointment of Sir Douglas Haig as commander in chief of the BEF and the beginning of the Battle of the Somme. After the Second Battle of Ypres (22 April – 25 May 1915) and the Battle of Loos (25 September – 13 October). [30]
The BEF was at a tactical disadvantage against the German army, on lower, boggy ground, easily observed from German positions. When the BEF took over more of the Western Front from the French, it was to be held lightly with outposts, while a better line was surveyed further back. The survey revealed that the French gains of 1915 would have to be abandoned, a proposal that the French rejected out of hand. For political reasons, giving up ground around Ypres in Belgium was also unacceptable and to reach better positions, only an advance could be contemplated. Since the French and British anticipated early advances in 1916, there seemed little point in improving defences, at a time when the Germans were building more elaborate fortifications, except at Verdun. Rather than continue the informal truces that had developed between French and German trench garrisons, the British kept an active front and five of the German local attacks in the period were retaliation for three British set-piece attacks.[31]
In early 1916, the Germans had an advantage in trench warfare equipment, being equipped with more and better hand grenades, rifle grenades and trench mortars. It was easier for the Germans to transfer troops, artillery and ammunition along the Western Front than the Franco-British, who had incompatible weapons and ammunition and a substantial cadre of German pre-war trained officers, NCOs and soldiers remained. The British wartime volunteers gained experience in minor tactics but success usually came from machine-guns and the accuracy and quantity of artillery support, not individual skill and bravery; in the air the RFC overcame the Fokker Scourge and underground, the BEF tunnellers overtook the Germans in technology and ambition. When the Bluff was captured, the British retook it; Mount Sorrel and Tor Top were retaken by the Canadians and British successes at St Eloi and Vimy Ridge were short-lived. Constant local fighting was costly but it enabled the mass of inexperienced British troops to gain experience, yet had the front been less densely occupied, more troops could have had more training; the wisdom of each policy was debated at the time and since.[32]
Casualties[]
On 27 March, the 9th Brigade lost 117 men killed, 607 wounded and 126 missing, taking 201 prisoners from RJB 18.[33] In the 2nd Canadian Division to 16 April, there were 1,373 casualties, 617 of them from the 6th Canadian Brigade. From 27–29 March, the 46th Reserve Division casualties were 1,122; about 300 men of the 547 reported missing believed to have been buried in the mine blasts. The 46th Reserve Division casualties in the 6 April attack were 66 killed, 299 wounded and 118 missing, mostly buried.[34]
Subsequent operations[]


An elaborate trench network was dug around the St Eloi craters by the Germans, with a front line west of the craters and a reserve line to the east; the 46th Reserve Division held the new line until it was moved south to the Somme in August.[23] In March 1916, 172nd Tunnelling Company handed its work at St Eloi over to the 1st Canadian Tunnelling Company and mining operations at St Eloi continued.[35][6] The largest mine at St Eloi was begun by the Canadian tunnellers on 16 August 1915, with a deep shaft named Queen Victoria, dug near Bus House Cemetery behind a farm-house called Bus House by the British troops (50°48′46.8″N 2°53′13.6″E / 50.813°N 2.887111°E). From there, the gallery was extended to the area of the mine chamber and the chamber was set 42 metres (138 ft) below ground, at the end of a gallery 408 metres (1,339 ft) long and charged with 43,400 kilograms (95,600 lb) of ammonal by 11 June 1916.[6][36]
For the Battle of Messines in 1917, the British began a mining offensive against the German lines to the south of Ypres. Twenty-six deep mines were dug by Tunnelling companies RE, most of which were detonated simultaneously on 7 June 1917, creating 19 large craters. The joint explosion of the mines in the Battle of Messines ranks among the largest non-nuclear explosions ever. When the large St Eloi deep mine was fired by the 1st Canadian Tunnelling Company on 7 June 1917, it destroyed craters D2 and D1 from 1916 but the double crater H4 and H1 can still be seen[37] (see image). The detonation was followed up by the 41st Division, which captured the German lines at St Eloi.[38]
Memorials[]
On a small square in the centre of Saint-Eloi stands the 'Monument to the St Eloi Tunnellers' which was unveiled on 11 November 2001. The brick plinth bears transparent plaques with details of the mining activities by the 172nd Tunnelling Company and an extract from the poem Trenches: St Eloi by the war poet T. E. Hulme (1883–1917). There is a flagpole with the British flag next to it, and in 2003, a field gun was added to the memorial.[39]
Gallery[]
")
")
")
")
")
See also[]
- Battle of Messines (1917)
- Mines in the Battle of Messines (1917)
- List of Canadian battles during the First World War
- St. Eloi Mountain, Canada
Notes[]
- ↑ Keeping the Canadian Corps and Anzac Corps as homogeneous units helped create an esprit de corps not possible in the rest of the BEF or in the French and German armies, where the division was the main tactical unit; divisional reliefs were easier but continuity was lost.[21]
- ↑ Until 5 April there were reports that the Canadians were in craters 4 and 5 and from 6–14 April, conflicting reports, a Canadian officer inspecting the line on 10 April, reporting that he had been fired on from crater 4.[26]
Footnotes[]
- ↑ 1.0 1.1 Edmonds 1925, pp. 128–129.
- ↑ 2.0 2.1 Edmonds 1925, pp. 129–131.
- ↑ Edmonds & Wynne 1995, pp. 28–29.
- ↑ Edmonds & Wynne 1995, pp. 30–31.
- ↑ Edmonds & Wynne 1995, pp. 32–33.
- ↑ 6.0 6.1 6.2 6.3 Holt & Holt 2014, p. 248.
- ↑ 7.0 7.1 Edmonds 1993, pp. 177–178.
- ↑ Edmonds 1991, pp. 35–37.
- ↑ Jones 2010, pp. 101–103.
- ↑ Edmonds 1991, p. 36.
- ↑ Edmonds & Wynne 1995, pp. 31, 163.
- ↑ Edmonds 1993, pp. 179, 182.
- ↑ Jones 2010, pp. 104–105.
- ↑ 14.0 14.1 Edmonds 1993, p. 192.
- ↑ Edmonds 1993, pp. 191–192.
- ↑ Jones 2010, p. 106.
- ↑ 17.0 17.1 Edmonds 1993, pp. 182, 192.
- ↑ Edmonds 1993, pp. 183–184.
- ↑ Edmonds 1993, pp. 184–185.
- ↑ Edmonds 1993, pp. 185–186.
- ↑ Edmonds 1993, p. 186.
- ↑ 22.0 22.1 Edmonds 1993, pp. 186–188.
- ↑ 23.0 23.1 23.2 Edmonds 1993, p. 193.
- ↑ Edmonds 1993, p. 188.
- ↑ Edmonds 1993, pp. 188–189.
- ↑ Edmonds 1993, p. 189.
- ↑ 27.0 27.1 Edmonds 1993, pp. 189–190.
- ↑ Jones 2002, pp. 191–192.
- ↑ Edmonds 1993, p. 243.
- ↑ Edmonds 1993, pp. 191, 155.
- ↑ Edmonds 1993, pp. 155–156.
- ↑ Edmonds 1993, pp. 156–157.
- ↑ Edmonds 1993, p. 183.
- ↑ Edmonds 1993, pp. 191–193.
- ↑ Jones 2010, p. 146.
- ↑ Turner 2010, p. 44.
- ↑ Photo gallery: Battle of Messines Ridge, access date 16 February 2015.
- ↑ ASE 2015.
- ↑ Holt & Holt 2014, p. 184.
References[]
- Edmonds, J. E. (1925). Military Operations France and Belgium, 1914: Antwerp, La Bassée, Armentières, Messines and Ypres October–November 1914. History of the Great War Based on Official Documents by Direction of the Historical Section of the Committee of Imperial Defence. II. London: Macmillan. OCLC 220044986.
- Edmonds, J. E.; Wynne, G. C. (1995). Military Operations France and Belgium, 1915: Winter 1915: Battle of Neuve Chapelle: Battles of Ypres. History of the Great War Based on Official Documents by Direction of the Historical Section of the Committee of Imperial Defence. I (Imperial War Museum and Battery Press ed.). London: Macmillan. ISBN 978-0-89839-218-0.
- Edmonds, J. E. (1993). Military Operations France and Belgium, 1916: Sir Douglas Haig's Command to the 1st July: Battle of the Somme. History of the Great War Based on Official Documents by Direction of the Historical Section of the Committee of Imperial Defence. I (Imperial War Museum and Battery Press ed.). London: Macmillan. ISBN 978-0-89839-185-5.
- Edmonds, J. E. (1991). Military Operations France and Belgium, 1917: 7 June – 10 November: Messines and Third Ypres (Passchendaele). History of the Great War Based on Official Documents by Direction of the Historical Section of the Committee of Imperial Defence. II (Imperial War Museum and Battery Press ed.). London: HMSO. ISBN 978-0-89839-166-4.
- Holt, Tonie; Holt, Valmai (2014). Major & Mrs Holt's Battlefield Guide to the Ypres Salient & Passchendaele. Barnsley: Pen & Sword Books. ISBN 978-0-85052-551-9.
- Jones, H. A. (2002). The War in the Air, Being the Story of the Part Played in the Great War by the Royal Air Force. II (Naval & Military Press ed.). London: Clarendon Press. ISBN 978-1-84342-413-0. https://ia801609.us.archive.org/29/items/warinairbeingsto02rale/warinairbeingsto02rale.pdf. Retrieved 11 December 2016.
- Jones, Simon (2010). Underground Warfare 1914–1918. Pen & Sword Military. ISBN 978-1-84415-962-8.
- Turner, Alexander (2010). Messines 1917: The Zenith of Siege Warfare. Campaign. Oxford: Osprey. ISBN 978-1-84603-845-7.
Further reading[]
Books
- Barton, Peter et al. (2004). Beneath Flanders Fields: The Tunnellers' War 1914−1918. Staplehurst: Spellmount. ISBN 978-1-86227-237-8.
- Edmonds, J. E. (1993). Military Operations France and Belgium, 1916: Sir Douglas Haig's Command to the 1st July: Battle of the Somme. History of the Great War Based on Official Documents by Direction of the Historical Section of the Committee of Imperial Defence. I (Imperial War Museum and Battery Press ed.). London: Macmillan. ISBN 978-0-89839-185-5.
- Nicholson, G. W. L. (1962). "Canadian Expeditionary Force 1914–1919". Ottawa: Queen's Printer and Controller of Stationary. pp. 137–145. OCLC 557523890. http://www.cmp-cpm.forces.gc.ca/dhh-dhp/his/docs/CEF_e.pdf. Retrieved 10 December 2016.
Websites
- "Action of St. Eloi". the action of st eloi 1915 com. http://www.theactionofsteloi1915.com. Retrieved 2015-12-04.
External links[]
| Wikimedia Commons has media related to Category:The Actions of St Eloi Craters. |
The original article can be found at Actions of St Eloi Craters and the edit history here.