
.jpg)
A German barrage falling on Allied trenches at Ypres, probably during the second battle in 1915.
A barrage is a method of delivering massed artillery fire from a few or many batteries. Individual guns or howitzers are aimed at points, typically 20 - 30 yards apart, along one or more lines that can be from a few hundred to several thousand yards long. The lines are usually 100 yards apart and fire is lifted from one line to the next. The guns, etc., usually fired at a continuous steady rate using high explosive or shrapnel shells. Barrage fire may be defensive to deny or hamper enemy passage through an area or offensive to provide covering fire that neutralises the enemy in an area through which friendly forces are advancing. Defensive barrages are usually static (or standing or box). Offensive barrages move forward in front of the advancing troops, the pattern of barrage movement may be creeping, rolling or block. Barrage fire is not aimed at specific targets, it is aimed at areas in which there are known or expected targets. It contrasts with a concentration, in which the guns aim at a specific target in an area typically 150 to 250 metres diameter.
The barrage was developed by the British in the Second Boer War. It came to prominence in World War I, notably its use by the British Expeditionary force and particularly from late 1915 onwards when the British realised that the neutralising effects of artillery to provide covering fire were the key to breaking into defensive positions. By late 1916 the creeping barrage was the standard means of deploying artillery to support an infantry attack, with the infantry following the advancing barrage as closely as possible. Its employment in this way recognised the importance of artillery fire in neutralising, rather than destroying, the enemy. It was found that a moving barrage immediately followed by the infantry assault could be far more effective than weeks of preliminary bombardment.
Barrages remained in use in World War II and later, but only as one of a variety of artillery tactics made possible by improvements in predicted fire, target location and communications.
Development[]
The moving barrage was developed during the Boer War, one of several tactical innovations instituted under command of General Redvers Bullers.[1] It was a response to Boer defensive positions, notably at Turgela Heights, and effective long range rifle fire.
Artillery usually fired over open sights at visible targets, until the Second Boer War when indirect fire started to be used. The largest unit accustomed to firing at a single target was the regiment or brigade, of up to about 25 guns. Trench warfare led to a necessity for indirect firing through the use of observers, more sophisticated artillery fire plans and an increasingly scientific approach to gunnery. Gunners had to use increasingly complicated calculations to lay the guns. Individual guns were aimed so that their fall of shot was co-ordinated with others to form a pattern; in the case of a barrage, the pattern was a line. The term “barrage” was first used in World War I in English in the orders for the battle of Neuve Chapelle in 1915.[2]
A lifting barrage was a development in which the barrage lifted periodically to a target further back, such as a second line of trenches. This was countered by the defenders infiltrating troops and machine guns into no-man's land or the areas between their own trench lines, so it was found necessary to comb the entire area of the advance with artillery fire. A creeping barrage (also called a walking barrage[3])
Moving barrage[]
A moving barrage or creeping barrage was a barrage that lifted in small increments, usually 100 yards every few minutes, so that it moved forward slowly, keeping pace with the infantry.[4] British practice evolved to normally fire at two lines simultaneously. Eventually three patterns of advancing the barrage developed. In a creeping barrage fire moved from one line to the next. In a block barrage the 'block' moved as block to the next lines that were not previously engaged. In a rolling barrage the fire on the line nearest to own troops moved to the first unengaged line furthest from own troops.[5]
By late 1917 the technique of a creeping barrage had been perfected and could be made to move in complicated ways, with the barrage wheeling or even combing back and forth across the same ground to catch the defenders re-emerging after the barrage had passed,[6] but it was still governed by a timetable. The British developed the "quick barrage", a standardised barrage pattern that could be ordered by radio without advance plotting of the fireplan on a map.[7]
Up to 10% were expected to be killed or wounded by short-falling shells when it was first used.
Standing and box barrages[]
A standing barrage was static. A standing barrage might be defensive, to inhibit the movement of enemy troops and break up attacks. A creeping barrage could be made to stand on a static line for a time before it moved on, perhaps waiting for the infantry to form up behind it, or to catch up, or perhaps it would stand on the line of known enemy defences, to do more damage and sap enemy morale. The fireplan for the Battle of Messines on 17 June 1917 called for most of the 18-pounder field guns to fire a creeping barrage of shrapnel immediately ahead of the advance, while the other field guns and 4.5 inch howitzers fired a standing barrage some 700 yards (640 m) further ahead. The standing barrage was aligned with known German positions, and lifted to the next target when the advance reached within 400 yards (370 m) of it. As each objective was taken by the infantry, the creeping barrage would pause 150 to 300 yards (140 to 270 m) ahead of them and become a standing barrage, protecting the newly-gained positions from counterattack while the infantry consolidated. During this time the pace of fire slackened to one round per gun a minute, enabling the guns and the crews a respite, before resuming full intensity as the barrage moved on. The heavy and super-heavy artillery fired on German rear areas, and over 700 machine guns participated in the barrage plan using indirect fire over the heads of their own troops.[8]
In a box barrage three or four barrages formed a box—or more often three sides of a box—around a position to isolate it. Standing or box barrages were often used for Defensive Fire tasks, in which the barrage was pre-registered in a position agreed with the defending infantry commander, to be called down in the event of an enemy attack on his positions. A box barrage could also be used to prevent the enemy from reinforcing a position to be attacked. In a trench raid of March 1917, 1st Battalion the Buffs were supported first by a creeping barrage, then by a box barrage once they were in the enemy trenches, to prevent German reinforcement or counterattack, plus dummy bombardments on other sections of the line to confuse the enemy.[9]
Advantages and drawbacks[]
It was soon appreciated how important it was for the attacking troops to follow the barrage closely (leaning on the barrage), without allowing time for the defenders to recover from the shock of bombardment and emerge from their dug-outs; the French reckoned they should be suffering 10% of their casualties from their own artillery if they were close enough to the barrage.[10] Ideally the attackers should be into the enemy positions before the defenders have time to recover their composure after the terror of an intense bombardment, emerge from shelters and man their firing positions. On the first day of the Somme, and in the later French Nivelle Offensive on the Chemin des Dames, the barrage outpaced the infantry, allowing the defenders to recover and emerge from their dug-outs, with disastrous results for the attackers.[11] By the end of World War I it was realised that the important effect of the barrage was to demoralise and suppress the enemy, rather than physical destruction; a short, intense bombardment immediately followed by infantry assault was more effective than the weeks of grinding bombardment used in 1916.
A creeping barrage could maintain the element of surprise, with the guns opening fire only shortly before the assault troops moved off. It was useful when enemy positions had not been thoroughly reconnoitered, as it did not depend on identifying individual targets in advance.[12] On the other hand it was wasteful of ammunition and guns, as much of the fire would inevitably fall on ground containing no enemy.
The World War I barrage with programmed lifts had the effect of confining the infantry advance to the artillery schedule, and of requiring the use of linear tactics, restricting infantry manoeuvre. Infiltration tactics later proved more effective than advancing in rigid lines, and the infiltration phase of German stormtrooper attacks could not use a creeping barrage; but the opening phase of Operation Michael was still supported by a massive creeping barrage, containing a heavy mix of gas shells.[13] The importance of the barrage was such that traditional infantry tactics, such as reliance on the infantry's own firepower to support its movement, were sometimes forgotten.[14] In the featureless Western Desert in World War II, one benefit of the barrage was that it enabled the infantry to conform their line to the barrage, ensuring that their line of advance was correct.[15] By 1943 the barrage was considered to dissipate firepower and to constrain the infantry into advancing in rigid lines.[16] A barrage could severely churn up the ground, especially in soft going, and impede the progress of the attacking troops.[17]
World War I[]

Men of the Australian Heavy Artillery capping 8 inch shells with '106' (instantaneous) fuses.
A creeping barrage was first used in a small section of the line at the battle of Loos in 1915, but the infantry did not advance behind it. The first day of the battle of the Somme saw the first attempt at a large-scale creeping barrage which had been planned in anticipation of the infantry's anticipated ability to advance relatively unhampered across the battlefield due to a heavy, week long preparatory bombardment. For example, on XV Corps front, the barrage was programmed to lift 50 yards (46 m) every minute. Complications arose however in British protocols to prevent friendly-fire casualties which at the time dictated that shellfire was to be kept over one hundred yards away from their own uncovered infantry. In many cases no-man's land was narrower than the allowable 'safe' distance and as such the barrage did not protect the men as they went 'over the top' and advanced towards the German trenches. Further, as the British infantry was slowed far beyond the expected pace of advance across no-man's land, all along the Somme front it proved impossible for the infantry to keep up with the pace of the barrage.[18] However, the tactic was further refined as the Battle of the Somme wore on and by September 1916 the creeping barrage became a standard tactic for infantry attacks, and soon spread to the French army, enabling the French recapture of Fort Vaux at Verdun in November 1916. By the later stages of the Battle of the Somme, the British had improved the accuracy of and confidence in their artillery fire and had learned the lessons of keeping infantry close to the barrage: the BEF circulated an aerial observer's report commending a "most perfect wall of fire" followed up within 50 yards (46 m) by the infantry of 50th Division, enabling them to take a village with little opposition. A report said "Experience has shown that it is far better to risk a few casualties from an occasional short round from our own artillery than to suffer the many casualties which occur when the bombardment is not closely followed up".[19] The creeping barrage was used during the Action of Tell 'Asur on 12 March 1918 in the Sinai and Palestine Campaign.[20] Six months later, it was used with devastating effect during the Battle of Megiddo (1918) when 18-pdr and Royal Horse Artillery formed a creeping barrage which fired in front of the advancing infantry up to their extreme range while 4.5-inch howitzers fired beyond the barrage, while heavy artillery were employed in counter battery work.[21] The creeping barrage moved at a rate of between 50 yards (46 m), 75 yards (69 m) and 100 yards (91 m) per minute.[22]

.jpg)
Planning map for an Allied creeping barrage at the First Battle of Passchendaele.
At first, British creeping barrages consisted only of shrapnel shells, but an equal mix of HE was soon added, in some cases later supplemented by smoke shells. The creeping barrage would advance at a rate of 100 yards every one to six minutes, depending on terrain and conditions; although six minutes was found to be too slow.[23] By the Battle of Arras in 1917 the creeping barrage was huge and complex, with five or six lines of fire covering a depth of 2,000 yards (1,800 m) ahead of the infantry. Predicted fire was used, so that the barrage opened without preliminary target registration shots. Back barrages were fired, in which rearmost lines of the barrage reversed direction, and machine gun barrages were introduced. False barrages attempted to deceive the enemy about Allied intentions or to force him to reveal his positions.[24] The creeping barrage was used to great effect in the Canadian success at Vimy Ridge where the men had been extensively trained to move forward in the 'Vimy Glide' - a 100 yd per three minute pace which kept the infantry directly behind the barrage.[25] The opening attack of the Battle of Passchendaele was covered by a barrage of shrapnel and HE on a colossal scale, fired by over 3,000 British guns and howitzers: one 18-pounder for every 15 yards (14 m) of front, and a heavy howitzer for every 50 yards (46 m), with yet more guns in the French sector. The British barrage advanced 100 yards (91 m) every four minutes, with the infantry following as close as 50 yards (46 m) from the bursting shells. One battery's programme required 45 lifts. As each objective was reached, the barrage settled 500 yards (460 m) beyond the new position, combing back and forth to disrupt expected German counter-attacks, while some of the artillery moved forward to support the next phase of the advance.[26]
On the Eastern Front, German Colonel Georg Bruchmüller developed a form of double creeping barrage, with the first line of the barrage consisting of gas shells. His ideas were applied on the Western Front in the Spring Offensive of 1918.[27]
The day of the lengthy large-scale preliminary barrage had largely passed by the end of World War I, at least in Western nations, with the realisation that best results were achieved by neutralising the enemy rather than attempting his physical destruction, and that short, concentrated bombardments, including creeping barrages, were more effective in neutralising the enemy than extended bombardment. Once open warfare returned after the breaking of the Hindenburg Line in September 1918 the British fired far fewer creeping barrages, using more lifts and concentrations instead.[28] Attacks by tanks do not need the same form of artillery support, and the single barrage along the entire front of the advance had even been abandoned by the battle of Cambrai in 1917. More sophisticated fire control enabled infantry to call down artillery fire in direct support, or targeting of identified enemy positions.[29] Nevertheless, barrages remained in use. On 31 August 1918 the attack of the US 32nd Division was preceded by a walking barrage. After first passing over the German line, the barrage returned twice more, attempting to catch the defenders returning to their firing positions from their dugouts, or to keep them underground when the real assault went in.[30]
World War II[]
The barrage remained in use in World War II, but was no longer the dominant artillery plan. In the absence of the huge set-piece infantry assaults of World War I, barrages were on a smaller scale. For the opening of the battle of El Alamein, for example, a barrage was considered by Montgomery's planners, but rejected in favour of fierce concentrations on known or suspected targets in turn. Along a 12,000 yard front, 456 guns were considered insufficient for a true creeping barrage (at Neuve Chapelle there had been one gun for every four yards of front).[15] But creeping and rolling barrages were used in some divisional sectors and in later phases of the Alamein battle. For Operation Supercharge on 1–2 November 1942, the attack in the 2nd New Zealand Division sector was preceded by a creeping barrage of 192 guns along a 4,000 yard front, firing on three lines. There was almost one 25-pounder for every 20 yards of front, plus two medium regiments thickening the barrage.[31]
While artillery tactics had been subjected to considerable evolution between the Wars, the British Gunnery School at Larkhill developed the most significant techniques for rapidly controlling and coordinating artillery fire. The impact of this was first felt in the Western Desert campaign. In World War I it had become essential to plot the location of all guns accurately, but the British would now survey in all their guns to one reference point; that made it possible for every artillery piece within range to join a fireplan in a very few minutes (provided they were in communications), rather than over several hours or days.
By the fighting in Tunisia, more guns were available and the defenders were more concentrated than in the Western Desert. The artillery plan for the British attack at Wadi Akarit in April 1943 involved eight barrages in three phases ahead of the advances of 50th and 51st Divisions. They included a standing barrage to mark the start line in the dark and enable the infantry to form up in the right alignment; a barrage that wheeled left during the advance; and an on-call creeping barrage. Nevertheless, attacks rarely relied solely on a barrage for artillery support: at Wadi Akarit pre-arranged concentrations on likely targets were called down by observers in the course of the assault.[32]
Nevertheless, it remained in use in the Italian Campaign. In the assault on the Hitler Line on 23 May 1944, 810 guns were amassed for the attack of I Canadian Corps. Three hundred of them fired on the first line of a 3,200 yard wide barrage, beginning three minutes before the infantry moved off and lifting at a rate of 100 yards in five minutes. It was due to pause for an hour at the first objective, then lift at 100 yards per three minutes to the further objectives, but the timing was disrupted by heavy resistance and defensive artillery fire. The operation was later criticised for concentrating on too narrow a front, constrained by the need for enough guns to produce a dense barrage.[33]

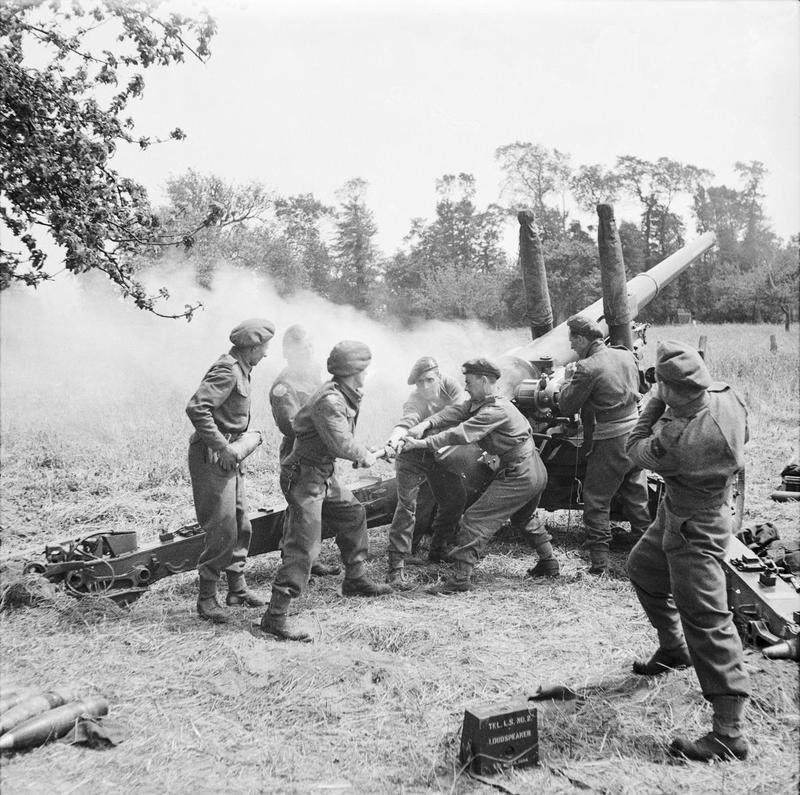
British 4.5 inch gun in action near Tilly-sur-Seulles, Normandy, 1944.
In the assault crossing of the Senio in 1945, dummy barrages were used to confuse the enemy, either misleading them as to the line of attack or drawing them out of shelters as the barrage passed, expecting an infantry assault, only to catch them with a renewed barrage or air attacks. On Monte Sole, US artillery fired probably its heaviest barrage of the war, 75,000 shells in a half hour to clear the advance of the South Africans.[34] In Normandy, a creeping barrage fired from 344 guns preceded the opening attacks of 15th (Scottish) Infantry Division in Operation Epsom on 26 June 1944.[35]
For the opening of Operation Veritable, the push to the Rhine, the fire of 1,050 field and heavy guns was supplemented by 850 barrels of pepper-pot barrage: other weapons – mortars, machine guns, tanks, anti-tank guns, anti-aircraft guns and rockets – supplementing the field guns. The true barrage of the British XXX Corps began at 09.20, building in intensity over the next hour, 500 guns shooting at a line 500 yards deep. The barrage included smoke shells to screen the attackers forming up behind the barrage. From 10.30 the barrage was pure high explosive and began to roll forward. A 300 yard lift was made every 12 minutes, the lifts being signalled to the infantry by yellow smoke shells, and the barrage paused for ½ hour at each defensive line. 2,500 shells were fired per km2 per hour until the barrage stopped at 16.30.[36] The barrage remained in Soviet doctrine in World War II, where the creeping barrage by massed guns was the standard accompaniment to an infantry assault. The Soviet artillery lacked the sophisticated communications nets necessary for more subtle tactics, but had plenty of guns. Some 7,000 guns and mortars were massed for the counterattack at Stalingrad, and huge bombardments remained standard for the rest of the war.[37]
Korean War and after[]
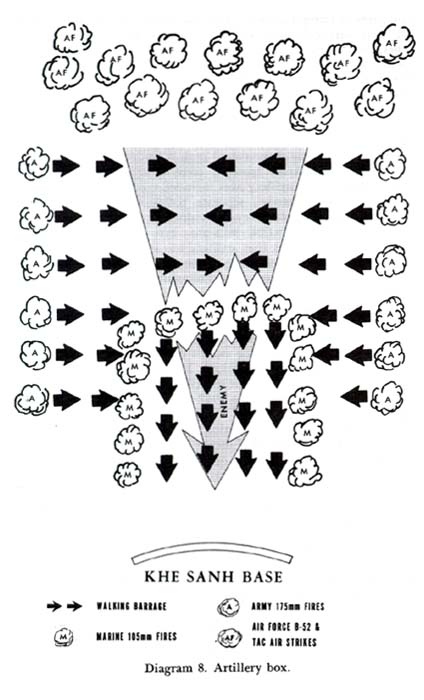

Illustration of a complex walking barrage, used during defence of Khe Sanh, Vietnam.
The barrage continued in use into the Korean War. At the Battle of Pork Chop Hill, UN forces employed on-call, pre-registered defensive fires called flash fire to defend its outposts, in which artillery laid down a box barrage in a horseshoe-shaped pattern around the outpost. It was still in use in the Vietnam War.
In the 1982 Falklands War, the assault of 42 Commando Royal Marines on Mount Harriet was preceded by an accurate walking barrage from supporting artillery, firing some 100 metres ahead of the advancing Marines. Later phases of the attack used a pepperpot barrage, including Milan anti-tank missiles.[38]
General use of the word[]
The word barrage, imported from the French for "barrier" around 1915, has a very specific meaning in military circles: it denotes the artillery tactic of coordinated bombardment as a static or moving barrier, as described in this article. The word has also entered the general language, where it has come to mean any intense sequence of words or missiles – such as a barrage of questions.
Nowadays, any form of artillery fire of more than one round may be described as a barrage in general language. Even military historians use it in a non-technical sense, referring to any intense artillery fire. As an example: on April 29, 2007, Reuters reported “US Launches Barrage in Southern Baghdad”,[39] but instead of the mass destruction and killing one would expect from a barrage in the military sense, it appears that about 24 rounds were fired[citation needed], probably against point targets. This was a barrage in the general sense of ‘artillery bombardment’, but not in the military sense. As is usually the case with language, the intended meaning was clear from the context.
See also[]
Notes[]
- ↑ Pakenahm, p 345
- ↑ Hogg, p 13
- ↑ "Artillery Terms and Tactics". Vietnam Veterans Home Page. 1999-09-01. Archived from the original on 14 February 2008. http://web.archive.org/web/20080214184222/http://www.vietvet.org/arty.htm. Retrieved 2008-01-01.
- ↑ Hogg, pp 25-26
- ↑ http://members.tripod.com/~nigelef/fireplan.htm#BARRAGE%20LAYOUTS Retrieved on 19 November 2007
- ↑ Hogg, p 30
- ↑ http://members.tripod.com/~nigelef/fireplan.htm#FIRE%20PLAN%20DESIGN Retrieved on 19 November 2007
- ↑ Steel, Nigel; Hart, Peter (2001). Passchendaele—The Sacrificial Ground. Cassel. pp. 45 & 54. ISBN 978-1-4072-1467-2.
- ↑ M Connelly, Steady The Buffs!: A Regiment, a Region, and the Great War, Oxford University Press, 1996, p
- ↑ Hogg, p 21
- ↑ Hogg, p 26
- ↑ Murphy, W E, 2nd New Zealand Divisional Artillery, New Zealand Historical Publications Branch, Wellington, 1966, p403, extract available online at http://www.nzetc.org/tm/scholarly/tei-WH2Arti-c12-1.html Retrieved on 27 October 2007
- ↑ D T Zabecki, The German 1918 Offensives: A Case Study of The Operational Level of War, Taylor & Francis, 2005, p 44, 70, 140
- ↑ Griffith, p 67
- ↑ 15.0 15.1 Hogg, p 66
- ↑ Maj-Gen Francis Tuker, commanding 4th Indian Division, cited by Bidwell, p58
- ↑ Hogg, pp 32 % 147
- ↑ Don Farr, The Silent General: Horne of the First Army, Helion, 2007, p 86
- ↑ Griffith, pp 65–66 & 143
- ↑ Falls 1930 Vol. 2, pp. 323–6
- ↑ Falls 1930 pp. 470–1
- ↑ Falls 1930 Vol. 2 pp. 480–1, 485
- ↑ Griffith, pp 141 & 146
- ↑ Griffith, pp 85 & 144
- ↑ Hogg, p 28
- ↑ Steel, Nigel; Hart, Peter (2001). Passchendaele—The Sacrificial Ground. Cassel. pp. 84 & 94. ISBN 978-1-4072-1467-2.
- ↑ D T Zabecki, The German 1918 Offensives: A Case Study of The Operational Level of War, Taylor & Francis, 2005, p 56
- ↑ Griffith, pp 141 and 147
- ↑ Hogg, pp 32-33
- ↑ The United States in the First World War: An Encyclopedia, Ed. Anne C. Venzon, Garland Publishing, 1999, p 645
- ↑ Murphy, W E, 2nd New Zealand Divisional Artillery, New Zealand Historical Publications Branch, Wellington, 1966, pp402-404, extract available online at http://www.nzetc.org/tm/scholarly/tei-WH2Arti-c12-1.html Retrieved on 27 October 2007
- ↑ Bidwell, pp54-58
- ↑ Hogg, pp 108-109
- ↑ Hogg, pp 114-117
- ↑ Reynolds, Michael, Sons of the Reich: The History of II SS Panzer Corps in Normandy, Arnhem, the Ardennes and on the Eastern Front. Casemate Publishers and Book Distributors, 2002, pp 19-20
- ↑ Hogg, pp 144-148
- ↑ Hogg, pp 87-92
- ↑ "Battles of the Falklands Conflict:Mount Harriet - 11/12 June 1982". Royal Air Force. 2004-10-01. Archived from the original on 16 January 2008. http://web.archive.org/web/20080116194109/http://www.raf.mod.uk/falklands/harriet1.html. Retrieved 2008-01-20.
- ↑ "U.S. launches artillery barrage in Baghdad". Reuters. April 29, 2007. http://uk.reuters.com/article/topNews/idUKWRI92044020070429. Retrieved 2008-01-01.
References[]
- Hogg, Ian V, Barrage: the Guns in Action, Macdonald, 1971
- Bidwell, Shelford, Artillery Tactics 1939-45, Almark, 1976
- Blackburn, George G., The Guns of Normandy, The Guns of Victory, and Where the Hell are the Guns McClellandStewart, 1995-97.
- Griffith, Paddy, Battle Tactics of the Western Front: British Army's Art of Attack, 1916-18, Yale, 1996
- Pakenham, Thomas, The Boer War, Weidenfeld and Nicholson, London, 1979, ISBN 0 297 77395
- "Artillery in World War II—The field artillery organisation, tactics, gunnery methods and regiments of the Royal Artillery and the artilleries of British Commonwealth". http://nigelef.tripod.com/index.htm. Retrieved 2 January 2010. A large and detailed site on Royal Artillery methods in World War II
- US Launches Barrage in Southern Baghdad Reuters, 29 April 2007. Example of misuse of term barrage. Retrieved on 24 October 2007.
- Falls, Cyril; A. F. Becke (maps) (1930). Military Operations Egypt & Palestine from June 1917 to the End of the War. Official History of the Great War Based on Official Documents by Direction of the Historical Section of the Committee of Imperial Defence. 2 Part II. London: HM Stationary Office. OCLC 256950972.
External links[]
- British Artillery in WWII Fire Planning detailed account of barrage techniques on a site devoted to technicalities of British artillery. Retrieved on 19 November 2007.
- Historical Artillery and Mortar Tactics an excellent summary of artillery tactics, mainly World War II, including details of the fire pattern sizes used by different guns and units making up the barrage
- Artillery Terms and Tactics glossary of Vietnam era US artillery terminology
- 2nd New Zealand Divisional Artillery: Planning Supercharge detailed account of a barrage plan
- New York Times extracts 19 July 1918 reporting Pershing's communique including references to several tactical uses of barrages by US and German forces Retrieved on 6 November 2007
The original article can be found at Barrage (artillery) and the edit history here.