The Battle of Bita Paka (11 September 1914) was fought south of Kabakaul, on the island of New Britain, and was a part of the invasion and subsequent occupation of German New Guinea by the Australian Naval and Military Expeditionary Force shortly after the outbreak of the First World War. Similar to New Zealand's operation against German Samoa in August, the main target of the operation was a strategically important wireless station—one of several used by the German East Asiatic Squadron—which the Australians believed to be located in the area. The powerful German naval fleet threatened British interests and its elimination was an early priority of the British and Australian governments during the war.
After an unopposed landing, a mixed force of German reservists and half-trained Melanesian police mounted a stout resistance and forced the Australians to fight their way to the objective. After a day of fighting during which both sides suffered casualties, Australian forces captured the wireless station. The battle was Australia's first major military engagement of the war and the only significant action of the campaign; in its aftermath the remaining German forces on New Britain fled inland to Toma. Following a brief siege there the German garrison capitulated, ending resistance to the Australian occupation of the island.
Background[]
Terrain[]

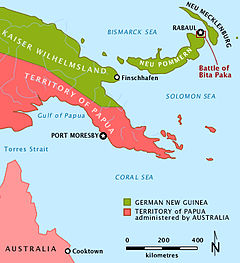
Location of Bita Paka, 1914. The highlighted area is shown in the map below.
German New Guinea consisted of north-eastern New Guinea and several nearby island groups that are now part of Papua New Guinea. First established in 1884, the main part of the colony was Kaiser-Wilhelmsland, in north-eastern New Guinea. The islands to the east were known as the Bismarck Archipelago and consisted of Neu-Pommern (now New Britain) and Neu-Mecklenburg (now New Ireland). With the exception of German Samoa, all German islands in the Pacific were administratively part of German New Guinea: the German Solomon Islands (Buka, Bougainville and several smaller islands), the Carolines, Palau, the Marianas (except for Guam), the Marshall Islands and Nauru.[1] Although a relatively minor colony, it covered an extensive land area, totalling around 249,500 square kilometres (96,300 sq mi).[2]
While the western half of New Guinea had been administered by the Netherlands since 1828, the eastern half was not annexed by any European power until the 1880s. In 1883, fearful of growing foreign influence—particularly the influence of Germany—the British colony of Queensland annexed the south-eastern part of New Guinea, against the wishes of the British government.[3] This initiated German interest in the remaining third of the island and on 3 November 1884, the German flag was raised over Kaiser-Wilhelmsland, the Bismarck Archipelago (formerly New Britain) and the German Solomon Islands.[4] On 17 May 1885, the German Emperor granted an Imperial charter to the newly founded Neuguinea-Kompanie (New Guinea Company) for this annexation, which was further extended to the Solomon Islands on 13 November 1886.[5]
On 1 April 1899, the German government took formal control, establishing a protectorate. A treaty with Spain, signed on 30 July, ensured German control over several other island groups in the Pacific, and these were added to the protectorate of German New Guinea.[6] The economic life of German New Guinea's small population of European and Asian settlers, as well as that of its Melanesian population, relied heavily on the export of copra and the import of goods and services.[7] It remained a modest outpost, and by August 1914 only 1,273 Europeans lived in the colony, while there was also a small but significant number of Japanese, Chinese and Malays.[8]
Prelude[]
Planning and preliminary operations[]
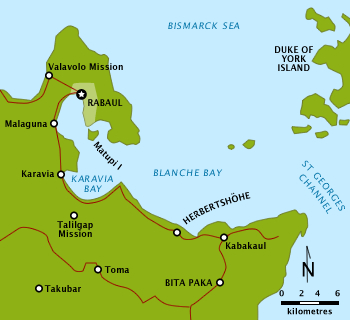

Vicinity of Rabaul, Blanche Bay and Bita Paka on the Gazelle Peninsula, New Britain.
Following Britain's declaration of war on Imperial Germany on 4 August 1914 at the outbreak of the First World War, Australia and the other members of the British Empire were automatically involved, with Prime Minister Joseph Cook stating on 5 August that "...when the Empire is at war, so also is Australia."[9] Within days, Brigadier General William Bridges and his staff officer, Major Cyril Brudenell White, had completed plans for the creation of the Australian Imperial Force (AIF). White proposed an expeditionary force of 18,000 men, including 12,000 Australians and 6,000 New Zealanders. Cook subsequently approved the proposal, although he increased the offer to 20,000 men to serve in any destination desired by the British government. On 6 August 1914, London cabled its acceptance of the force and asked that it be sent as soon as possible. Recruiting offices opened on 10 August and by the end of 1914, 52,561 volunteers had been accepted, despite strict physical fitness guidelines.[10]
Meanwhile, after an additional British request for assistance on 6 August 1914, the Australian government hurriedly prepared another expeditionary force to destroy the German wireless stations at Yap in the Caroline Islands, Nauru, and Rabaul in New Britain.[11] As with the New Zealand military operation against German Samoa, which was completed in late August, the targets were strategically important wireless stations used by the German East Asiatic Squadron, under the command of Count Maximilian von Spee. The existence of the powerful German fleet—including the modern cruisers SMS Scharnhorst and SMS Gneisenau—in the Pacific at the outbreak of the war worried the British Admiralty and the Australian government, and the elimination of its radio network was a key priority. Although the location of the German fleet was unknown, it was suspected they may have been hiding in the excellent natural harbour at Rabaul.[12]
While the Australian Naval and Military Expeditionary Force (AN&MEF) was being raised for this task, as a prelude to an amphibious landing on the Gazelle Peninsula in New Britain, ships of the Australian Squadron conducted a reconnaissance of the area, subsequently entering Blanche Bay on 12 August, while several destroyers also entered Simpson Harbour. Landing parties went ashore to demolish the telephones in the post offices in Rabaul and at the German gubernatorial capital of Herbertshöhe (present-day Kokopo), located 20 miles (32 km) to the south-east. Enquiries were also made about the location of the radio station, although no information was forthcoming. After threatening to bombard the nearby settlements if the radio station continued to transmit, the Australian warships withdrew.[13]
Opposing forces[]

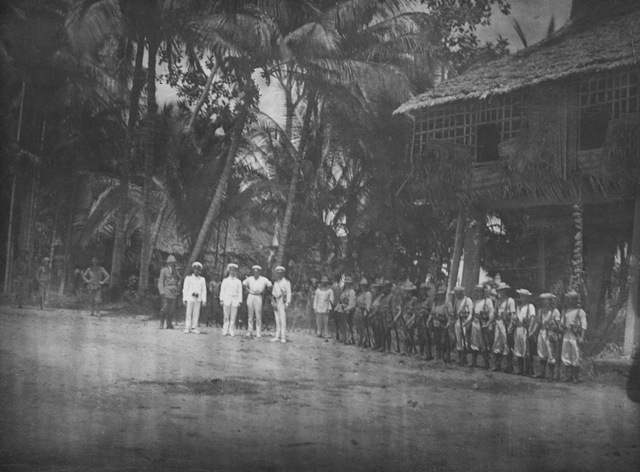
.jpg)
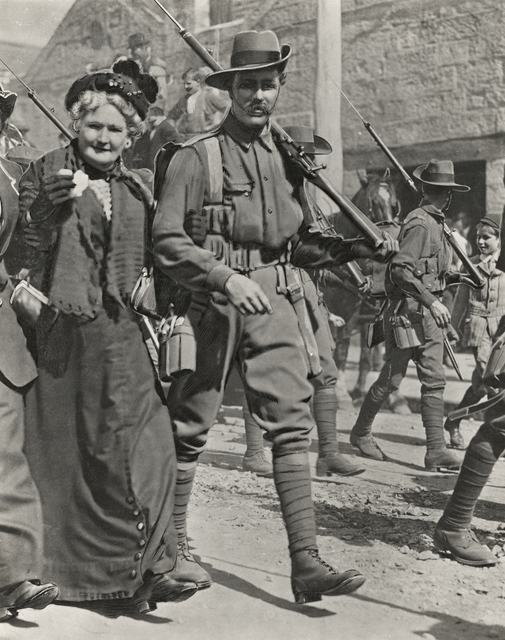
A platoon of German reservists, shortly before the arrival of the AN&MEF.
The AN&MEF comprised one battalion of infantry of 1,000 men hurriedly enlisted in Sydney, plus 500 naval reservists and ex-sailors who would serve as infantry.[14] Another battalion of militia from the Queensland-based Kennedy Regiment—which had been dispatched to garrison Thursday Island—also contributed 500 volunteers.[15] Under the command of Colonel William Holmes, the force departed Sydney aboard HMAS Berrima and halted at off Townsville until a New Zealand force, escorted by the battlecruiser HMAS Australia, cruiser HMAS Melbourne and the French cruiser Montcalm, occupied Samoa on 30 August.[14] The AN&MEF then moved to Port Moresby, where it met the Queensland contingent already aboard the transport Kanowna. The force sailed for German New Guinea on 7 September, although Kanowna was left behind when her stokers refused to work.[16] The militia were also left in Port Moresby after Holmes decided they were not sufficiently trained or equipped to be committed to the anticipated fighting.[14][17]
At the outbreak of war, German New Guinea was only lightly defended; even after all available reservists had reported for duty and the Melanesian police had been armed, the total strength was only 61 German officers and non-commissioned officers, and about 240 Melanesian police. To compound the defenders' problems, most of the Germans were reservists with either limited experience or who had served in the military many years earlier.[18] The Bita Paka radio station itself was occupied by eight Germans and 60 Melanesians, under the command of Hauptmann (Captain) Hans Wuchert. Wuchert's force was assigned to defend against any hostile landing at a point near the coast, and was authorised to withdraw halfway between Toma and Bita Paka to Tobera if necessary, but only after demolishing the radio station. A company of 10 Germans and 140 Melanesians was also stationed at Herbertshöhe, commanded by Leutnant (Lieutenant) Mayer, while a squad of Melanesians at Toma under Leutnant Robert von Blumenthal ("Lord Bob") was charged with digging in and improving defences. Section outposts were established at various locations and monitored the coast from St. George's Channel to Rabaul. Despite the limits of manpower, such arrangements proved effective and the reconnaissance of the Australian Squadron on 12 August had been quickly detected, with German forces subsequently directed towards the coast to repel any invasion.[19]
Battle[]
Initial landings[]


.jpg)
The Australian Squadron entering Simpson Harbour, September 1914.
Off the eastern tip of New Guinea, Berrima rendezvoused with Australia and the light cruiser HMAS Sydney plus a number of destroyers, while Melbourne was detached to destroy the wireless station on Nauru. Melbourne arrived there on 9 September only to find that the radio station had already been disabled by its staff, with Nauru surrendering without opposition. The task force reached Rabaul on 11 September, where they found the port to be free of German forces. Sydney and the destroyer HMAS Warrego landed small parties of naval reservists at the settlements of Kabakaul and at Herbertshöhe. These parties were reinforced firstly by sailors from Warrego and later by infantry from Berrima.[20] Two parties were subsequently landed, one under Sub-Lieutenant C. Webber and the other commanded by Lieutenant Commander J.F. Finlayson. In accordance with German plans, the Australians encountered no opposition at Herbertshöhe, with the German company stationed there having withdrawn to Takubar—between Herbertshöhe and Kabakaul—in the early morning. At 07:00, the Australians raised the Union Jack over the settlement.[21]
The Australians believed there were probably two radio stations, one under construction 4 miles (6.4 km) directly inland from Herbertshöhe and the other directly inland from Kabakaul, at Bita Paka. Finlayson remained at Herbertshöhe in order to guard the stores being landed from Sydney, while Webber's party began an advance from Herbertshöhe inland along the Toma road.[22] Another party under the command of Lieutenant Rowland Bowen would advance towards Bita Paka, 7 kilometres (4.3 mi) to the south. The party, consisting of two officers and 25 naval reservists was subsequently landed at Kabakaul. Also included were about 15 other personnel to provide medical support and maintain communications.[23]
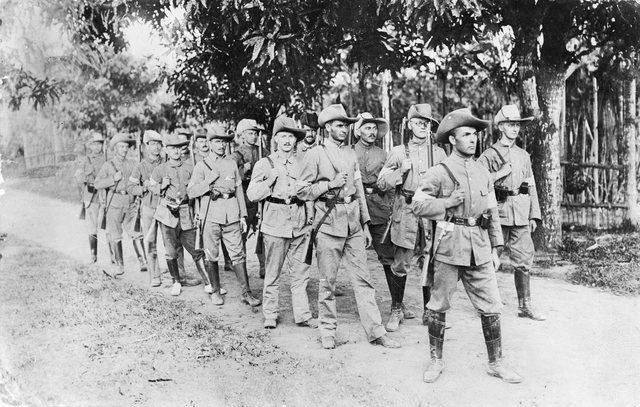
Advance inland[]
The advance inland began along the fringe of the dense jungle-edged road to the radio station, with the Australians attempting to avoid the road wherever possible.[20] By 09:00 they had penetrated about 2,000 yards (1,800 m) and with the scrub becoming denser, the scouts pushed away from the road to work their way around the obstacle. They suddenly surprised a group of about 20 Melanesian soldiers led by three German reservists, who were apparently laying an ambush on the road for the advancing Australians. They opened fire, wounding one German in the hand and capturing him, and scattering the Melanesians. By means of a ruse Wuchert and Mayer were also captured, depriving the defenders of two important commanders, while several significant maps also fell into Australian hands at this time.[24]
Realising that his advance was going to be contested, Bowen requested reinforcements. Consequently, as an interim measure, 59 men from Warrego and Yarra were landed under Lieutenant G.A. Hill, until infantry could arrive from Berrima, which was still steaming towards Kabakaul from Karavia Bay.[25] Meanwhile, Bowen pushed on and the Australians were again fired upon by the well concealed Germans and their Melanesian troops, as well as by snipers in the treetops. By 09:30 the situation had become grave, and the Australians suffered their first casualty of the war, with Able Seaman Billy Williams mortally wounded.[26] Also among the casualties was the medical officer, who died of his wounds in the afternoon after being evacuated to Berrima.[27]
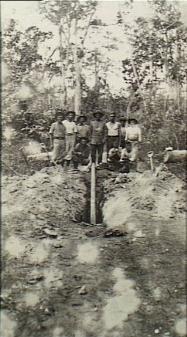

.jpg)
Australian soldiers dig up a German pipe mine on the Bita Paka Road.
The reinforcements landed earlier from the destroyers reached Bowen by 10:00 however, and the situation was stabilised. The advance was subsequently resumed, but the Australians had not gone more than 500 yards (460 m) when they encountered a strongly held German trench dug across the road.[23] Working together, Hill and Bowen attempted to outflank the Germans, during which Bowen was shot and badly wounded by a sniper, leaving Hill in command.[28] Berrima subsequently landed reinforcements, including a half-battalion commanded by Lieutenant Commander Charles Elwell, as well as a machine-gun section and medical detachment. Among the reinforcements was the battalion commander, Commander J.A.H. Beresford, and the intelligence officer.[26]
Fighting for the wireless station[]
Elwell advanced inland rapidly and was soon also engaged, losing one killed and two wounded in a brief skirmish.[29] During the advance the Australians had also uncovered and defused a large pipe mine the Germans had buried under a narrow track and set to detonate using a command wire. These mines had been laid beneath the road with wires leading to an electric battery and a firing key at the bottom of a lookout tree.[30] By 13:00 however, Hill's position was reached and the Australians—now under Elwell's overall command—launched another flanking attack on the main trench blocking the road. Despite suffering heavy casualties they pressed their attack, forcing the defenders to surrender after charging the trench with fixed bayonets. A German officer and 20 Melanesians were captured. Four Australians were killed, including Elwell who died leading the charge with his sword drawn, and another five were wounded.[23]
Now under the command of Hill, and accompanied by two German prisoners acting as interpreters, the Australians proceeded down the road under a flag of truce and persuaded the garrisons of two more trenches to surrender, but not before another skirmish in which the Germans counter-attacked, wounding three more Australians, one fatally. During the firefight one of the unarmed German interpreters was killed by the Australians, as were several of the Melanesians. The advance continued and another group of defenders was encountered and disarmed by nightfall.[23] By 19:00 the Australians reached the radio station which was found abandoned; the mast had been dismantled, although the instruments and machinery remained intact. The surviving defenders had abandoned the defences and withdrawn.[31]
Aftermath[]
Casualties[]


.jpg)
Holmes and two unidentified officers at the wireless station at Bita Paka after its capture.
During the fighting at Bita Paka, six Australians were killed and five wounded, while casualties among the defenders included one German and about 30 Melanesians killed, and one German and 10 Melanesians wounded; 19 Germans and 56 Melanesians were captured.[32] Later it was alleged that the heavy losses among the Melanesian troops were the result of the Australians bayoneting a number that they had captured.[32][33] While the casualties suffered by the Australians were light in the context of later operations, they were disproportionately heavy given the modest territorial and strategic gains and were further compounded by the disappearance of the submarine AE1 during a patrol off Rabaul on 14 September, with all 35 men aboard.[34] After their defeat the remaining German forces and the civil administration withdrew 19 miles (31 km) inland to Toma, believing they would have time to regroup before the Australians arrived.[35]
The German governor—Eduard Haber—continued to hold out for several days hoping that the German East Asiatic Squadron would arrive to relieve them.[35] Unknown to the Germans, however, an Australian advanced party consisting of a half-battalion of 200 men and a 12-pounder naval field-gun had followed them, moving along the Toma road. The Australians surrounded the town and proceeded to bombard it; meanwhile HMAS Encounter arrived on station and fired several shells at a ridge nearby.[36] This show of firepower scattered the Melanesian police and was sufficient to start negotiations, with Toma subsequently occupied. Haber visited Holmes in Herbertshöhe on 15 September, signing terms two days later. All military resistance subsequently ceased and the remaining 40 German soldiers and 110 Melanesians surrendered on 21 September, leaving no effective opposition to the Australian occupation of the territory.[35][Note 1]
Capture of German New Guinea[]
The German colony at Madang on Kaiser-Wilhelmsland (the New Guinea mainland) was occupied on 24 September, although the German armed merchant raider SMS Cormoran—which was lurking nearby—escaped undetected. Over the next two months the remaining outposts were also occupied.[37] Meanwhile, the German East Asiatic Squadron steamed across the Pacific before surprising and sinking a British force off Coronel on 1 November. After rounding Cape Horn into the Atlantic and attempting a raid on the Stanley naval station, the squadron was itself destroyed by a more powerful British force during the Battle of the Falkland Islands on 8 December 1914.[38] Later it was alleged that widespread looting and destruction of civilian property by Australian troops occurred during this period.[39] Indeed, ill-discipline among the Australian force appears to have been an issue—perhaps due to the haste with which the AN&MEF had been raised and the poor character of some of those that were enlisted.[40] Claims in the Australian media of criminal behaviour caused considerable controversy at the time, and later led to a parliamentary enquiry. In the end a number of soldiers were court martialled and imprisoned for looting and theft, although more serious allegations, including rape, also arose.[41][Note 2]

Raising the Australian flag in Angoram, 16 December 1914
Following the capture of the remaining German possessions in the region, the AN&MEF provided occupation forces for the duration of the war.[42] Holmes subsequently established a military government which continued until 1921, after which Australia received a mandate from the League of Nations to govern the territory.[43] The Australian military administration continued the exploitative economic policies of the previous German colonial administration, and official policy was to continue the status quo, including the use of indentured Melanesian labour on plantations, the levy of the "native head tax" and official floggings, or corporal punishment.[44] Equally, despite previously being protected by the German colonial administration in 1914, the hunting of the native bird of paradise, crowned pigeon and white heron for the lucrative trade in their feathers and skin, was officially condoned and a custom tax levied on their export.[45][Note 3] Under the terms of the German surrender, Haber was allowed to return to Germany, while German civilians could remain as long as they swore an oath of neutrality. Those who refused were later transported to Australia, where they could freely travel back to Germany.[34][Note 4]
On 9 January 1915,[46] Holmes handed over command of the AN&MEF to Brigadier General Sir Samuel Pethebridge, the former Secretary of the Department of Defence.[47] Holmes returned to Australia and re-enlisted in the AIF, as did most of his men.[46] They were replaced by the 3rd Battalion, known as the "Tropical Force" because it had been specially enlisted for service in the tropics.[47] Pethebridge established the administrative structures that remained through the period of military occupation.[48] Although required by international law to follow the German forms of government, the territory gradually acquired the appearance of a British colony.[49] As a result of the peace settlement under the Treaty of Versailles in 1919, Germany lost all of its colonial possessions, including German New Guinea. The colony became the Territory of New Guinea, a League of Nations Mandate Territory under Australian administration. It remained as such until 1949, when it was merged with the Australian territory of Papua to become the Territory of Papua and New Guinea, which eventually became modern Papua New Guinea. Although interrupted by Japanese occupation during the New Guinea campaign (1942–1945) in the Second World War, Australian administration over the territory lasted until 1975, when Papua New Guinea gained its independence.[50]
Assessment[]
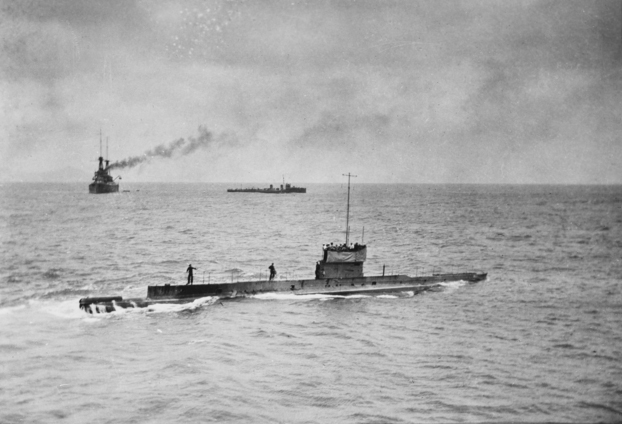

AE1 off Rossel Island on 9 September 1914
Ultimately the Australian operation on New Britain achieved its objectives, with the AN&MEF destroying the wireless station before seizing the colony, reducing a strategic German possession in the Pacific and thereby denying its use to support their naval forces in the region. Yet although successful, it had not been well-managed, and the Australians had been effectively delayed by a few reserve officers and a half-trained Melanesian police force.[32] They finally prevailed because of their unexpected ability to fight in close terrain, while their outflanking of the German positions had unnerved their opponents.[50] The Battle of Bita Paka was Australia's first major military engagement of the war, yet it soon became little more than a sideshow in a conflict which grew to assume much greater proportions. Later, many men of the AN&MEF volunteered for the AIF and served in Egypt, Gallipoli, Sinai and Palestine and on the Western Front. A large number became casualties, including Holmes, who was killed in action in 1917.[51][52]
Apart from the very real human suffering of the Melanesian troops killed or wounded at Bita Paka, the reduction in German prestige due to the capture of German New Guinea, and the economic and property losses experienced by some German colonists during the occupation, the battle ultimately held little significance for Germany either. The fighting yielded few tactical lessons given the very different nature of the fighting there to that of the mass industrialised warfare which both the Germans and Australians experienced in Europe. Meanwhile, just as many Australians felt that "the real war was in Europe", so would have most Germans as the campaign became subsumed by the global conflict of the First World War. It is largely forgotten today as a result.[51]
See also[]
Notes[]
- Footnotes
- ↑ One German officer—Hauptmann Hermann Detzner—and about 20 Melanesian police managed to evade capture in the interior of New Guinea for the entire war. Unknown to Detzner, the war had commenced whilst he was on a surveying expedition to map the border with Australian-held Papua. He later claimed to have penetrated the interior of Kaiser-Wilhelmsland (the German portion of New Guinea) in his 1920 book, "Vier Jahre unter Kannibalen" ("Four Years among Cannibals"). However these claims were disputed by various German missionaries, and Detzner recanted most of his claims in 1932. See Meade 2005, pp. 75–80.
- ↑ The enquiry by Judge Murray, the Lieutenant-Governor of Papua, into allegations of looting of German, Chinese and Japanese properties, and of the manner in which the Melanesians were treated during the period of military administration in German New Guinea was completed after the war in 1919. See "Serious Charges by German. "Slave Hunts Among Natives". Comment by Minister". Melbourne. 14 November 1919. pp. 7. http://trove.nla.gov.au/ndp/del/article/4654923. Retrieved 24 December 2009.
- ↑ As many as 100,000 birds were subsequently killed before they were again protected in 1923, more than double the number killed during the German bird of paradise boom before they were protected in 1914. See Hiery 1995, pp. 47–50.
- ↑ Hiery suggests the German colonial policies in the Pacific were liberal when compared to the subsequent policies initiated by the Australians, Japanese and New Zealand administrators that replaced them. He argues that the German administrators had allowed for the conservation or adaptation of traditional lifestyles, in contrast to the later Australian administration.
- Citations
- ↑ MacKenzie 1941, pp. 1–6.
- ↑ "Deutsch-Neuguinea: Kaiser-Wilhelms-Land und die Inselwelt im Stillen Ozean – deutsche Kolonie 1885–1919" (in German). 2000. http://www.deutsche-schutzgebiete.de/deutsche-kolonien.htm. Retrieved 4 November 2009. gives the figure of 249,500 square kilometres (96,300 sq mi), while MacKenzie 1941, p.8 cites 92,000 square miles (240,000 km2).
- ↑ MacKenzie 1941, p. 2.
- ↑ MacKenzie 1941, pp. 21–22.
- ↑ MacKenzie 1941, p. 22.
- ↑ MacKenzie 1999, p. 3.
- ↑ Rowley 1958, p. 7.
- ↑ Rowley 1958, p. 56.
- ↑ Odgers 1994, p. 58.
- ↑ MacDougall 1991, p. 30.
- ↑ Grey 2008, p. 86–87.
- ↑ Grey 1999, p. 82.
- ↑ Mackenzie 1941, p. 38.
- ↑ 14.0 14.1 14.2 Grey 2008, p. 87.
- ↑ Mackenzie 1941, pp. 23–35.
- ↑ Mackenzie 1941, p. 32.
- ↑ Mackenzie 1941, p. 31.
- ↑ Mackenzie 1941, p. 48.
- ↑ Mackenzie 1941, p. 49.
- ↑ 20.0 20.1 Mackenzie 1941, p. 53.
- ↑ Mackenzie 1941, pp. 50–52.
- ↑ Mackenzie 1941, pp. 52–53.
- ↑ 23.0 23.1 23.2 23.3 Coulthard-Clark 1998, p. 96.
- ↑ Mackenzie 1941, p. 55–56.
- ↑ MacKenzie 1941, pp. 56–57.
- ↑ 26.0 26.1 Mackenzie 1941, p. 58.
- ↑ MacKenzie 1941, p. 59.
- ↑ Mackenzie 1941, p. 60.
- ↑ Mackenzie 1941, p. 61.
- ↑ Mackenzie 1941, p. 62.
- ↑ Mackenzie 1941, pp. 66–67.
- ↑ 32.0 32.1 32.2 Coulthard-Clark 1998, p. 97.
- ↑ Hiery 1995, p.25, 33 and 277.
- ↑ 34.0 34.1 Bean 1946, p. 37.
- ↑ 35.0 35.1 35.2 Odgers 1994, p.42.
- ↑ Bean 1946, p. 36.
- ↑ Bean 1946, p. 38.
- ↑ Grey 1999, pp. 82–83.
- ↑ Hiery 1995, pp. 45–47.
- ↑ Marre 2009, p.5.
- ↑ "Australians at Rabaul. Serious Allegations. Charges against officers. "Loot, Plunder and Rapine". Debate in Parliament". Melbourne. 23 April 1915. pp. 8. http://trove.nla.gov.au/ndp/del/article/1511819. Retrieved 23 December 2009.
- ↑ Mackenzie 1941, pp. 105–126.
- ↑ Dennis et al 2008, p. 235.
- ↑ Mackenzie 1941, pp. 219–233. See also Hiery 1995.
- ↑ Hiery 1995, pp. 47–50.
- ↑ 46.0 46.1 MacKenzie 1941, p. 189.
- ↑ 47.0 47.1 MacKenzie 1941, pp. 154–155.
- ↑ MacKenzie 1941, p. 342.
- ↑ MacKenzie 1941, p. 364.
- ↑ 50.0 50.1 Grey 1999, p. 83.
- ↑ 51.0 51.1 Beaumont 1995, p. 8.
- ↑ MacKenzie 1941, p. 24.
References[]
- Bean, Charles (1946). Anzac to Amiens. Canberra, Australian Capital Territory: Australian War Memorial. OCLC 28535580.
- Beaumont, Joan; ed (1995). Australia's War 1914–18. St Leonards, New South Wales: Allen and Unwin. ISBN 1-86373-461-9.
- Coulthard-Clark, Chris (1998). Where Australians Fought: The Encyclopaedia of Australia's Battles (First ed.). St Leonards, New South Wales: Allen and Unwin. ISBN 1-86448-611-2. OCLC 39097011.
- Coulthard-Clark, Chris (2001). The Encyclopaedia of Australia's Battles (Second ed.). Sydney, New South Wales: Allen and Unwin. ISBN 1-86508-634-7. OCLC 48793439.
- Dennis, Peter; Grey, Jeffrey; Morris, Ewan; Prior, Robin; and Jean Bou (2008). The Oxford Companion to Australian Military History (Second ed.). Melbourne, Victoria: Oxford University Press. ISBN 978-0-19-551784-2.
- Grey, Jeffrey (1999). A Military History of Australia (Second ed.). Port Melbourne, Victoria: Cambridge University Press. ISBN 0-521-64483-6.
- Grey, Jeffrey (2008). A Military History of Australia (Third ed.). Port Melbourne, Victoria: Cambridge University Press. ISBN 978-0-521-69791-0.
- Hiery, Herman (1995). The Neglected War: The German South Pacific and the Influence of World War I. Honolulu, Hawaii: University of Hawaii Press. ISBN 0-8248-1668-4.
- MacDougall, Anthony (1995). Australians at War: A Pictorial History. Noble Park, Victoria: The Five Mile Press. ISBN 1-86503-865-2.
- MacKenzie, Seaforth (1941). The Australians at Rabaul: The Capture and Administration of the German Possessions in the South Pacific. Official History of Australia in the War of 1914–1918, Volume X. (Tenth ed.). Canberra, Australian Capital Territory: Australian War Memorial. OCLC 494426919. http://www.awm.gov.au/histories/first_world_war/volume.asp?levelID=67896.
- Marre, Adam (2009). "Searching for Bitapaka: Creating Voices for History's Silenced". pp. 2–13. ISSN 1833-3419. Archived from the original on 25 January 2010. http://web.archive.org/web/20100125092408/http://www.limina.arts.uwa.edu.au/. Retrieved 23 December 2009.
- Meade, Kevin (2005). Heroes Before Gallipoli: Bita Paka and that One Day in September. Milton, Queensland: John Wiley & Sons Australia. ISBN 1-74031-117-5.
- Odgers, George (1994). 100 Years of Australians at War. Sydney, New South Wales: Lansdowne. ISBN 1-86302-669-X.
- Rowley, Charles (1958). The Australians in German New Guinea 1914–1921. Carlton, Victoria: Melbourne University Press. OCLC 378150.
Coordinates: 4°25′0″S 152°19′0″E / 4.416667°S 152.316667°E
The original article can be found at Battle of Bita Paka and the edit history here.