The Battle of Calabria, (known to the Italian Navy as the Battle of Punta Stilo) was a naval battle during the Battle of the Mediterranean in World War II. It was fought between the Italian Royal Navy (Regia Marina) and the British Royal Navy and the Royal Australian Navy. The battle occurred 30 miles to the east of Punta Stilo, the "toe" of Italy (Calabria), on 9 July 1940. It was one of the few pitched battles of the Mediterranean campaign during World War II involving large numbers of ships on both sides. Both sides claimed victory, but in fact the battle was a draw and everyone returned to their bases as soon as possible. After the battle the Allies claimed to have achieved some sort of "moral ascendancy" over the Italian Navy; conversely, the Italian propaganda depicted the clash as a victory of their own.
Background[]
When Italy entered World War II, their forces in Libya were ill-equipped for offensive operations, and the Italian fleet was forced to start large supply convoys in order to bring them up to fighting condition.[1]
On 6 July a convoy of four merchant ships left Naples on their way to Benghazi, while attempting to fool the Allies into thinking they were making for Tripoli. That evening two torpedo-boats from Catania and another freighter met them off Messina and the next day their escort force joined the convoy from Taranto after being informed that the Allies had recently left port in Alexandria. The transports carried 2190 troops, 72 M11 tanks, 232 vehicles, 10,445 tons of supplies and 5720 tons of fuel. The convoy's escort consisted of three groups; eight destroyers and four torpedo boats directly protecting the cargo ships, a second group sailed 35 miles to the east consisting of six heavy cruisers and another four destroyers. Finally, the main battle group consisted of two battleships (Giulio Cesare and Conte di Cavour), eight light cruisers and another 16 destroyers.[2] A substantial number of the Italian destroyers didn't take part in the battle due to mechanical problems and the need to refuel.[3]
Meanwhile, the Allies were involved in a similar convoy action. The fleet sailed from Alexandria bound towards Malta where the destroyers would deliver supplies and a limited number of specialist reinforcements. Two convoys were arranged to take off fleet stores and civilians from Malta to Alexandria. Two groups of merchantmen sailed, a fast convoy at 13 knots and slow one at 9 knots. Protecting them were three groups of ships, one with five cruisers and a destroyer, Force A, another, Force B, with the battleship Warspite and five destroyers and the main battle group, Force C, with the battleships Royal Sovereign and Malaya, the aircraft carrier Eagle and eleven destroyers.[4] One of them, HMS Imperial, had to return to Alexandria with a burst steam pipe on the early hours of 8 July.[5]
At 14:40 on 8 July two Italian Cant Z.506 from Tobruk spotted the British fleet and shadowed it for nearly four hours. Admiral Campioni ordered his fleet to defend the convoy by turning eastward and preparing for action. The Italian Supreme Command, however, was reluctant to risk its warships in a night time encounter, and they ordered the fleet to avoid contact.[6] During the initial positioning the Italians suffered technical problems on three destroyers and two light cruisers, so these ships, with several additional destroyers, were detached to refuel in Sicily. In order to make up for these "losses", another destroyer group was summoned from Taranto. At this point, the Italian fleet had 16 destroyers.[3][7]
Meanwhile the Allies were having problems as well. From 10:00 to 18.40, 72 land-based bombers of the Italian Royal Air Force (Regia Aeronautica) from the mainland attacked their fleet. Unlike the dive-bombers favored by the Germans, Italian bombers operated in formations at high altitudes during the early stages of the war, about twelve-thousand feet. While scores of bombs were dropped by the Italians, a single hit on the HMS Gloucester represented the outcome of two major attacks.[8] This was a serious hit on the bridge, killing the captain, six officers and eleven ratings. In addition, three officers and six ratings were wounded. The forward fire control and the steering equipment was destroyed, and for the rest of the battle, she would be commanded from the emergency station.[6][9]
At 15:10 on 8 July, Cunningham's fleet steamed toward Taranto, in order to cut Italian's return route. At dusk, Cunningham changed course from 310º to 260º and slowed the fleet speed. During the first hours of 9 July, they took a 305º course, to avoid the Italian air recce while keeping their fleet between the Italian squadron and the Gulf of Taranto.[10] By 12:30, the Italian Supreme Command was clueless about the situation of the British fleet. Campioni told his fleet to scramble by 14:00 about 60 miles south east of Cape Spartivento in search of the enemy. Campioni eventually received reports of the British position at 13:30, and six Ro.43 floatplanes launched shortly after by the Italian cruisers spotted the British warships 30 miles closer than supposed.[7]
Battle[]
Cruiser engagement[]
At noon on 9 July the two fleets were 90 miles apart. Vice Admiral Cunningham could not close the distance to engage with the significantly slower Royal Sovereign and Malaya (18 knots vs 28 knots) and took Warspite in on its own. Meanwhile, at 13:15, Eagle launched several unsuccessful sorties by Fairey Swordfish against the Italian heavy cruisers, which they took for battleships.[7] At 13:10, the Italian Supreme Command had instructed Campioni to engage one of the two enemy forces facing him, but in fact they had planned to keep the action close to Italy and were deliberately moving north in order to draw the Allies closer to their airbases. By 14:00, however, Cunningham's plans to cut off the Italian fleet from Taranto had succeeded.[3]
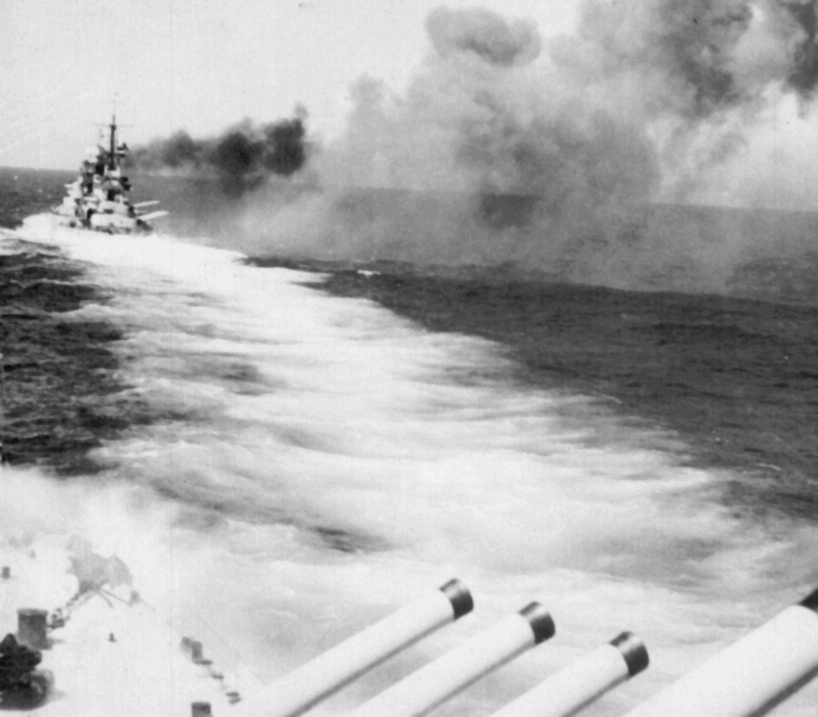
The Allied cruiser group was spread out in front of Warspite and at 15:15 they caught sight of the Italian main battle force and the two groups opened fire at 21,500 metres. Italian rangefinding was better than the Allied, and within three minutes they had found the distance even though they were firing at extreme range. Although the Allies' rangefinding was not as good and they had trouble with their rounds falling short, the Allied gunlaying was better and they were able to place their rounds in much tighter groups. Generally the gunnery of the two forces was fairly well matched. After only a few minutes the range was down to 20,000 metres and the Allied guns became useful. However, by 15:22, the Italian fire came dangerously close to the Allied cruisers and Vice Admiral John Tovey decided to disengage.[11] At this point splinters from a 6" shell fired by the cruiser Giuseppe Garibaldi[12][13] hit HMS Neptune, damaging her catapult and the reconnaissance aircraft beyond repair.[14][15] The cruisers continued to open the range and by 15:30 fire ceased.[11]
Battleship engagement[]
One group of Italian light cruisers, mistaken for the heavy cruisers of the Zara class, was on the Allied side of the battle line and was soon within range of the charging Warspite. Once again the Allied rounds fell short, and neither of her targets, Alberico da Barbiano and Alberto di Giussano, received any damage in the initial salvos. However by this time Warspite was also out of position, and she circled in place in order to allow Malaya to catch up. Meanwhile, Royal Sovereign was still well to the rear.[16]
The Italian commander decided to take on Warspite, and started moving his two battleships into position. At 15:52 Giulio Cesare opened fire at a range of 26,400 metres. Conte di Cavour did not fire, a decision many have questioned. Italian strategy was to have only one ship targeted at a time, as it was learned during the Battle of Jutland that with more than one ship firing at a single target it became very difficult for the rangefinding parties to tell which rounds were theirs. Conte di Cavour had been assigned to Malaya and Royal Sovereign, which were further back and did not enter the engagement.[17]
Warspite, not aware of the Italian firing patterns, split her guns between the two ships. During the exchange one of Giulio Cesare's rounds fell long and caused splinter damage to Warspite's escorting destroyers (Hereward and Decoy) which had formed up on the far side of the action.[18] At 15:54 Malaya started firing, well out of range, hoping to cause some confusion on the Italian ships. Meanwhile the Italian heavy cruisers came into action and started firing on Warspite at 15:55 but had to break off as the Allied cruisers returned.[16]
At 15:59 two shells from Giulio Cesare fell very close to Warspite. Almost immediately after one of Warspite's 15-inch (381 mm) rounds hit the rear deck of Giulio Cesare, setting off the stored ammunition for one of her 37 mm anti-aircraft guns. Two seamen were killed and several wounded. The fumes from the burning ammunition were sucked down into the engine room, which had to evacuate and shut down half of the boilers. Giulio Cesare's speed quickly fell off to 18 knots and Conte di Cavour took over. Giulio Cesare and Warspite were well over 24,000 metres (26,000 yards) apart at the time of the hit, which was one of the longest-range naval artillery hits in history.[Note 1]
It would appear that Warspite was in an excellent position to deal some serious blows to the slowing Giulio Cesare, but she once again executed another tight turn to allow Malaya to catch up. With her guns suddenly silenced during the turn, rangefinders on Malaya discovered what the Italians had been intending to avoid, that her rounds were falling 2,700 yards short of Giulio Cesare and they had been watching Warspite's rounds, not their own.[16]
At 16:01 the Italian destroyers generated smoke and the battleships got under cover. There is some debate about this point today, the Allied position being that the battleships were leaving battle, the Italian that they were attempting to make a torpedo attack with their destroyers from within the smoke.[16]
Final actions[]
At 15:58 Fiume re-opened fire on her counterpart in the Allied line, Liverpool and soon two groups of Italian cruisers: Zara, Bolzano and Pola had opened fire. The Gorizia and Trento followed soon and enter in combat range with the main Allied cruiser battle group. Firing continued as both groups attempted to form up and at 16:07 the Italian cruiser Bolzano was hit three times by 6" shells from HMS Neptune, temporarily locking her rudder and suffering two fatalities at the torpedo room. A near miss on the destroyer Vittorio Alfieri caused minor damage.[20]
Meanwhile the mechanics on Giulio Cesare were able to repair two of the four damaged boilers, allowing the battleship to reach 22 knots.[21] Admiral Campioni, considering the possibilities of his remaining battleship, Conte di Cavour against three enemy battleships and an aircraft carrier, decided to withdraw the battleships towards Messina.[22] Cesare was out of action for 30 days.[20]
Over the next hour both fleets attempted to make long-range torpedo runs with their destroyer groups without success.[23] At 16:40, the Italian air force made an attack with 126 aircraft, reporting damage on Eagle, Warspite and Malaya; because of some misunderstanding, 50 of the Italian aircraft also attacked the Italian ships, without damage. The battle ended at 16:50 with both sides withdrawing.[24]
One final victim was the destroyer Leone Pancaldo, sent to Augusta in Sicily, which was hit by a torpedo launched from a Swordfish at 09:40 the next day and sank in shallow water.[15][20] (She was refloated and returned to service in December 1941.[25])
Aftermath[]
After the battle both fleets turned for home. This allowed the Italians to claim a victory of sorts, as their cargo ships were already past the action by this time and sailed safely for Libya.[26] Meanwhile, the Allied ships also reached Alexandria along with their escort. Although the battle was indecisive, Allied sources claimed that the Royal Navy asserted an important "moral ascendancy" over their Italian counterpart.[27]
One question is why the Italians did not send their two remaining battleships of the Vittorio Veneto class at Taranto, both almost ready for action and only a few hours from the scene. Both capital ships were still undergoing trials, and the Littorio had suffered an electrical mishap on one of her main turrets. Littorio and Vittorio Veneto would have tipped the balance of fire well onto the Italian side.[28]
Even without these ships the fleets were fairly even. The Italian superiority in aircraft due to the nearby land-based aircraft of the Italian Royal Air Force (Regia Aeronautica) was ineffective. In fact they played almost no part at all, with the exception of the damage to Gloucester,[6] yet their battle reports were inflated to the point of claiming damage to half of the Allied fleet.[29]
Overall, Allied gunnery proved superior, while the Italian salvoes were too widely dispersed due to technical reasons, not to be overcome until the end of the conflict.[30]
Order of battle[]
Allies[]
![]()
Force A was made up of the 7th Cruiser squadron and HMAS Stuart under Admiral Tovey; Force B commanded by Vice Admiral Andrew Cunningham who was the Commander in Chief of the entire Mediterranean Fleet; and Force C commanded by Vice-Admiral Sir Henry Pridham-Wippell.
- 3 battleships: Warspite, Malaya, and Royal Sovereign.
- 5 light cruisers: Orion, Neptune (damaged), HMAS Sydney,[31] Gloucester (damaged), and Liverpool.
- 1 aircraft carrier: Eagle.
- 16 destroyers: Nubian, Mohawk, Hero, Hereward (damaged), Decoy (damaged), HMAS Stuart,[32] Hyperion, Hostile, Hasty, Ilex, Dainty, Defender, Juno, Janus, HMAS Vampire,[33] and HMAS Voyager.[34]
The destroyer HMS Escort was sunk in the Western Mediterranean where Force H was providing a feint and demonstration against Sardinia to distract the Italian fleet from the sailing of the Allied convoys. She was torpedoed on 11 July by the Italian submarine Marconi during Force H's return passage.[35]
Regia Marina[]
![]() Italian force commanded by Vice Admiral Inigo Campioni.
Italian force commanded by Vice Admiral Inigo Campioni.
- 2 battleships: Conte di Cavour and Giulio Cesare (damaged).
- 6 heavy cruisers: Zara, Fiume, Gorizia, Pola, Bolzano (damaged), and Trento.
- 8 light cruisers: Eugenio di Savoia, Duca d'Aosta, Muzio Attendolo, Raimondo Montecuccoli, Alberico da Barbiano, Alberto di Giussano, Duca degli Abruzzi, and Giuseppe Garibaldi.
- About 16 destroyers, among which Vittorio Alfieri, Artigliere, Lanciere, Leone Pancaldo, Dardo, Sestri Ponente, Freccia, Saetta and Strale.
Notes[]
- ↑ The German battleship Scharnhorst achieved a hit on the British aircraft carrier HMS Glorious at approximately the same range the previous month.[19]
References[]
- ↑ Greene & Massignani, p. 65
- ↑ Greene & Massignani, p. 67
- ↑ 3.0 3.1 3.2 Greene & Massignani, p. 72
- ↑ Greene & Massignani, p. 66
- ↑ HMS Imperial ( D 0 9 )
- ↑ 6.0 6.1 6.2 Greene & Massignani, p. 68
- ↑ 7.0 7.1 7.2 Greene & Massignani, p. 70
- ↑ Miller, War at Sea, pg. 113
- ↑ HMS Gloucester – Town-type Light Cruiser
- ↑ Greene & Massignani, pp. 68–69
- ↑ 11.0 11.1 Action off Calabria – Initial skirmish
- ↑ Action of Calabria by Christian D'Adamo
- ↑ Jordan, John (2008). Warship 2008. Conway maritime press, p. 32. ISBN 1-84486-062-0
- ↑ Smith, Peter Charles (1980). Action imminent: three studies of the naval war in the Mediterranean theatre during 1940. Kimber, p. 66. ISBN 0-7183-0197-8
- ↑ 15.0 15.1 Cunningham, Admiral Sir Andrew B. (28 April 1948). "REPORT OF AN ACTION WITH THE ITALIAN FLEET OFF CALABRIA, 9th JULY, 1940." (pdf). London Gazette. HMSO. http://ibiblio.org/hyperwar/UN/UK/LondonGazette/38273.pdf. Retrieved 30 July 2010.
- ↑ 16.0 16.1 16.2 16.3 D'Adamo, Cristiano. "Action off Calabria – The battleships enter the fight". regiamarina.net. http://www.regiamarina.net/detail_text_with_list.asp?nid=35&lid=1&cid=4. Retrieved 13 March 2011.
- ↑ O'Hara, p. 40.
- ↑ Jordan, John (2008). Warship 2008. Conway maritime press, p. 34. ISBN 1-84486-062-0
- ↑ DiGiulian, Tony. "German 28 cm/54.5 (11") SK C/34". Navweaps.com website. Archived from the original on 19 December 2010. http://web.archive.org/web/20101219104929/http://navweaps.com/Weapons/WNGER_11-545_skc34.htm. Retrieved 2010-12-23.
- ↑ 20.0 20.1 20.2 Action off Calabria – Cruisers and destroyers
- ↑ Capital Ship Surface Actions World War 2, by Terry A. Gardner, EMC(SW) USNR ret
- ↑ Greene & Massignani, p. 75
- ↑ Greene & Massignani, pp. 74–75
- ↑ Greene & Massignani, p. 77
- ↑ Whitley, M J (2000). Destroyers of World War Two: An International Encyclopedia. London: Arms & Armour Press. p. 164. ISBN 1-85409-521-8.
- ↑ Sadkovich, James (1990).Reevaluating major naval combatants of World War II. Greenwood Press, p. 137. ISBN 0-313-26149-0
- ↑ Hill, J. R. and Ranft, Bryan (2002). The Oxford illustrated history of the Royal Navy. Oxford University Press, p. 358. ISBN 0-19-860527-7
- ↑ Greene & Massignani, p. 69
- ↑ Knox, MacGregor (1986). Mussolini unleashed, 1939–1941: politics and strategy in fascist Italy's. Cambridge University Press, p. 146. ISBN 0-521-33835-2
- ↑ Greene & Massignani, p. 79
- ↑ "HMAS Sydney (II)". Royal Australian Navy. Archived from the original on 7 May 2010. http://web.archive.org/web/20100507014243/http://www.navy.gov.au/w/index.php/HMAS_Sydney_(II). Retrieved 23 August 2008.
- ↑ "HMAS Stuart (I)". Royal Australian Navy. Archived from the original on 13 June 2011. http://web.archive.org/web/20110613222240/http://www.navy.gov.au/w/index.php/HMAS_Stuart_(I). Retrieved 23 August 2008.
- ↑ "HMAS Vampire (I)". Royal Australian Navy. Archived from the original on 13 June 2011. http://web.archive.org/web/20110613222309/http://www.navy.gov.au/w/index.php/HMAS_Vampire_(I). Retrieved 23 August 2008.
- ↑ "HMAS Voyager (I)". Royal Australian Navy. Archived from the original on 13 June 2011. http://web.archive.org/web/20110613221931/http://www.navy.gov.au/w/index.php/HMAS_Voyager_(I). Retrieved 23 August 2008.
- ↑ G. Hermon Gill "Royal Australian Navy, 1939–1942" (1957)
Sources[]
- Green, Jack & Massignani, Alessandro (1998). The Naval War in the Mediterranean, 1940–1943, Chatam Publishing, London. ISBN 1-885119-61-5
- Miller, Nathan: War at Sea: A Naval History of World War II, Oxford University Press, Oxford, 1995. ISBN 0-19-511038-2 (Pbk.).
- O'Hara, Vincent P. (2009). Struggle for the Middle Sea: The Great Navies at War in the Mediterranean Theater, 1940–1945. Annapolis, Maryland: Naval Institute Press. ISBN 978-1-59114-648-3.
External links[]
- Naval-History.Net
- Despatch by Admiral Sir Andrew B. Cunningham
- Order of Battle – Battle off Punto Stilo/Calabria, 9 July 1940
Coordinates: 37°40′N 17°20′E / 37.667°N 17.333°E
The original article can be found at Battle of Calabria and the edit history here.