The Battle of Cocos was a single-ship action that occurred on 9 November 1914, after the Australian light cruiser HMAS Sydney responded to an attack on a communications station at Direction Island by German light cruiser SMS Emden.
After the retreat of the German East Asia Squadron from south-east Asia, Emden remained behind to function as a commerce raider. During a two-month period, the German cruiser captured or sank 25 civilian vessels, shelled Madras, and destroyed two Allied warships at Penang. In early November, Emden's commanding officer, Karl von Müller, decided to attack the communications station at Direction Island, in the Cocos (Keeling) Islands, to hamper Allied communications and frustrate the search for his ship. Around the same time, the first convoy of Australian and New Zealand soldiers bound for Europe sailed from Albany, Western Australia, with Sydney, under the command of John Glossop, and three other warships escorting.
During the night of 8–9 November, Emden reached the islands, and sent a shore party to disable the wireless and cable transmission station on Direction Island. The station was able to transmit a distress call before it was shut down; this was received by the nearby convoy, and Sydney was ordered to investigate. Sydney spotted the island and Emden at 09:15, with both ships preparing for combat. The longer range of Emden's guns meant she was able to fire first, but the German ship was unable to inflict disabling damage to the Australian cruiser before Sydney closed into range and opened up with her more powerful main guns. At 11:20, the heavily damaged Emden beached herself on North Keeling Island. The Australian warship broke to pursue Emden's supporting collier, which scuttled herself, then returned to North Keeling Island at 16:00. At this point, Emden's battle ensign was still flying: usually a sign that a ship intends to continue fighting. After no response to instructions to lower the ensign, Glossop ordered two salvoes shot into the beached cruiser, after which the Germans lowered the flag and raised a white sheet. Sydney had orders to ascertain the status of the transmission station, but returned the next day to provide medical assistance to the Germans.
Of the Emden's crew, 134 were killed and 69 wounded, compared to only 4 killed and 16 wounded aboard Sydney. The German survivors were taken aboard the Australian cruiser, which caught up to the troop convoy in Colombo on 15 November, then transported the prisoners to Malta and handed them over to the British Army. An additional 50 German personnel from the shore party, unable to be recovered before Sydney arrived, commandeered a schooner and escaped from Direction Island, eventually arriving in Constantinople.
Ships[]
HMAS Sydney[]


.jpg)
HMAS Sydney
Sydney was a Town class light cruiser, of the Chatham subclass.[1] She had a standard displacement of 5,400 tons.[1] The cruiser was 456 feet 9.75 inches (139.2 m) long overall and 430 feet (130 m) long between perpendiculars, with a beam of 49 feet 10 inches (15.19 m), and a draught of 19 feet 8 inches (5.99 m).[1] A combined coal- and oil-fuelled boiler system allowed the ship to reach speeds over 25 knots (46 km/h; 29 mph).[2]
The cruiser's main armament consisted of eight BL 6-inch Mark XI guns in single mountings, firing 100-pound (45 kg) shells.[3][4] Secondary and anti-aircraft armament consisted of a single 3-inch quick-firing high-angle anti-aircraft gun and ten 0.303-inch machine guns (eight Lewis guns and two Maxim guns).[4] Two 21-inch torpedo tubes were fitted, with a payload of seven torpedoes carried.[4] Two hydraulic-release depth charge chutes were carried for anti-submarine warfare.[4] A single 12-pounder 8-cwt field gun and four 3-pounder Hotchkiss saluting guns rounded out the armament.[4]
Sydney was laid down by the London and Glasgow Engineering and Iron Shipbuilding Company at Glasgow, Scotland, on 11 February 1911.[4] The ship was launched on 29 August 1912 by the wife of Admiral Sir Reginald Henderson.[4] Sydney was completed on 26 June 1913, and commissioned into the RAN that day.[4] At the time of the battle, Captain John Glossop was in charge of the ship.[5]
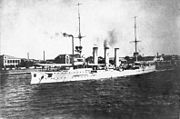
SMS Emden[]

SMS Emden
Emden was a Dresden class cruiser. The ship had a displacement of 3,364 tons at normal load, was 118 metres (387 ft) long, had a beam of 13.4 metres (44 ft), and a draught of 5.3 metres (17 ft).[citation needed] The light cruiser had a maximum speed of 24.5 knots (45.4 km/h; 28.2 mph).[6] The ship was armed with ten 10.5 cm (4.1 in) SK L/40 guns in single mountings, and carried two torpedo tubes.[citation needed]
Emden was built in Danzig by Kaiserliche Werft Danzig.[6][7] The ship was laid down on 6 April 1906, launched on 26 May 1908, and commissioned on 10 July 1909.[7] At the time of the battle, the cruiser was under the command of Karl von Müller.[8]
Background and leadup[]
Prior to World War I, Emden was operating as part of the German East Asia Squadron. Shortly after the war began, the threat of the Australian battlecruiser HMAS Australia, plus the likelihood that Japan would join the Allies, prompted the German squadron to head into the Pacific Ocean,[9] as the first stage of a retreat to Germany.[10] Unlike the rest of the force, Emden was ordered to head into the Indian Ocean and commence a raiding campaign, as she was the most modern vessel in the East Asia Squadron.[11] Over the next two months, the German ship captured or sank 25 civilian vessels, shelled Madras, and destroyed the Russian protected cruiser Zhemchug and the French destroyer Mousquet at Penang.[8][12] During these two months, none of Emden's personnel were killed.[13] At some point during the deployment, a fake fourth funnel was erected to disguise Emden as a British cruiser, specifically HMS Yarmouth.[13] Military historian George Odgers described Emden's activities as "one of the most daring careers of maritime destruction in naval history".[12] Aware of the increasing efforts to find his ship, von Müller selected the wireless station at Direction Island as his next target, with the hope that, in addition to hampering communications between Australia and the United Kingdom, disabling it would frustrate efforts to coordinate the search for Emden (which by this point included sixteen warships from five Allied nations), and direct them away from the Aden-India shipping route, which was where he intended Emden to operate next.[5][13]
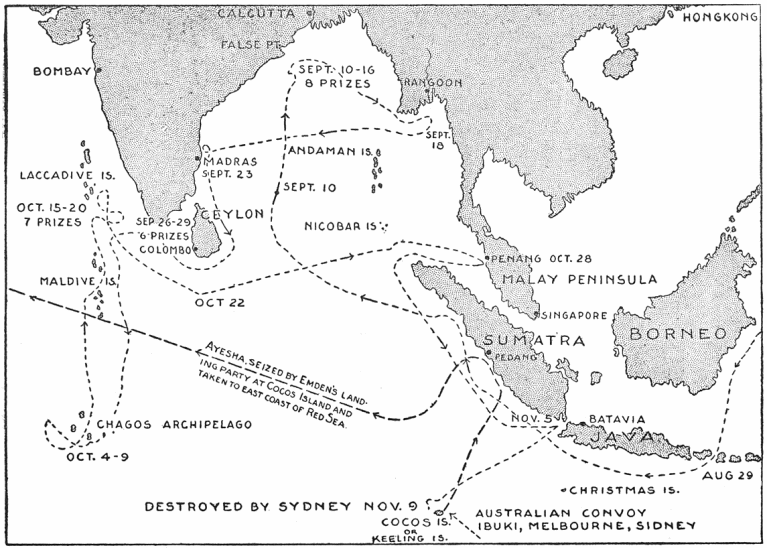

A map showing Emden's route while operating as a commerce raider
In October 1914, Sydney and sister ship HMAS Melbourne were assigned to escort the first convoy of Australian and New Zealand soldiers heading for Egypt.[4] Originally, the Japanese cruiser Nisshin was to be part of the convoy force, but she ran aground on 12 October, and Sydney was assigned instead.[14] The two cruisers sailed to Albany, Western Australia, where they met the 36-ship convoy and the other two escorts, British armoured cruiser HMS Minotaur and Japanese battlecruiser Ibuki.[4] Sydney, Melbourne, Minotaur, and the 36 merchant ships departed from Albany on 1 November, heading for Colombo; Ibuki had diverted to Fremantle to collect another two transports, and caught up two days later.[4][15] On 8 November, Minotaur left the convoy with orders to support operations against German South-West Africa, as the destruction of the South Atlantic Squadron at the Battle of Coronel left both the expedition and the Union of South Africa exposed to naval attack.[16] After the cruiser's departure, Melbourne was assigned as lead ship of the convoy.[16]
Battle[]
Wireless station capture[]
During the night of 8 November, Emden sailed to Direction Island.[5] At 05:30 on 9 November, lookouts at the Direction Island cable and wireless station spotted Emden sitting offshore.[4] The station's director observed that the extra funnel was false, and when a steam pinnace was deployed to tow two boats (carrying a 50-strong landing party led by Emden's first officer, Hellmuth von Mücke) towards shore, he ordered the station to begin transmitting distress calls.[5][17] Both wireless and cable transmissions were made: Emden was able to jam the wireless signal shortly after it began, while the cable distress call continued until an armed party burst into the transmission room.[4][5]
After taking control of the station and its 34 staff, German personnel smashed the transmitting equipment and severed two of the station's three undersea cables, plus a dummy cable.[4][5][Clarification needed] They also felled the main wireless mast; although taking care at the request of the staff to avoid damaging the station's tennis court, the mast landed on a cache of Scotch whisky.[4] The station was placed under German martial law.[4] The distress signal had been received by Melbourne around 06:30, and although the cruiser initially turned to investigate, her commanding officer remembered his responsibility to the convoy, and instead ordered Sydney to detach.[4][5][18] Emden heard Melbourne's wireless signal, and began to prepare for combat.[4] A smoke signal was sent up by the ship to recall the landing party.[19]
Combat[]
At 09:15, Sydney spotted Direction Island and the attacking ship; although at the initial glance, those aboard the Australian cruiser could not determine if she was Emden or Königsberg, which was also believed to be at large.[18] Confident of being faster than either ship, Sydney slowed and began preparing for combat.[18] Emden sighted Sydney around the same time, but von Müller assumed that the Australian convoy was further south, and that the approaching warship was HMS Newcastle or another vessel of similar vintage.[18] The appearance of an Allied cruiser forced Emden to make for open waters, abandoning the attack party despite their best efforts to catch up.[18][20]
Emden was the first to fire at 09:40; the 30-degree elevation of her main guns allowed her to out-range Sydney.[21][22] The Germans' third salvo struck Sydney from a range of 10,000 yards (9,100 m), with one shell exploding in the Australian ship's gunnery control room.[19] Von Müller recognised that his success in the battle required Emden to do as much damage as possible before the other ship retaliated, but despite the heavy rate of fire from the Germans over the next ten minutes (at points reaching a salvo every six seconds), the high angle of the guns and the narrow profile presented as Sydney closed meant that only fifteen shells hit the Australian warship; only five of these exploded.[23] Damage was sustained to the Australian cruiser's forward range-finder and a mess deck inside the forecastle, while other shells ignited cordite charges stored ready next to one of the guns.[3] Four sailors were killed, and another sixteen wounded; the only casualties aboard Sydney during the entire engagement.[21][24]
As Sydney closed to 9,500 yards (8,700 m), she commenced firing.[19][21] This was hampered with the loss of the gunnery control room, with each mounting being targeted and fired locally.[19] The first two salvoes missed, but two shells from the third struck.[21] Having found the range, the RAN cruiser began firing for effect.[21] While firing, Sydney closed to 5,500 yards (5,000 m) and launched torpedoes, which missed.[19] Heavy and accurate fire damaged or destroyed Emden's wireless equipment, steering gear, both rangefinders, and voicepipes to the turrets.[3][21] The forward funnel collapsed overboard, then the foremast fell and crushed the fore-bridge.[21] A shell from Sydney landed in the aft ammunition room of Emden, and the Germans had to flood it or risk a massive explosion.[25]
By this point, smoke from battle damage had begun to obstruct the ships' views of each other.[25] The damage to Emden had severely compromised her ability to fire effectively, and Glossop brought Sydney to about 5,500 yards (5,000 m).[25] At this range, a torpedo was fired at the German cruiser, then the Australian ship sped up and turned to starboard so one of the guns that had yet to fire could engage.[25] Emden matched Sydney's turn, but by this point, the second funnel had been blasted off, and there was a fire in the engine room.[25] In addition, about half of the cruiser's personnel had been killed or wounded, and the abandoning of the attack party on Direction Island meant there were no reserves to replace them.[25] By 11:00, only one of Emden's guns was still firing.[22]

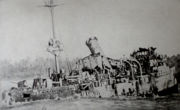
Emden beached on North Keeling Island
As the third funnel went overboard, Emden found herself closer to North Keeling Island, and von Müller ordered the ship to beach herself on North Keeling Island to hopefully prevent further loss of life.[22][25] Emden ran aground at around 11:20, at which point, Sydney ceased fire.[19][22]
After Emden's beaching[]
Sydney then turned to pursue and capture Emden's supporting collier, Buresk.[21] The cruiser caught up shortly after 12:00 and fired a warning shot, but on closing with Buresk, Sydney found the collier had already commenced scuttling.[21][22] Sydney recovered the boarding party and the crew from Buresk, fired four shells to hasten the collier's sinking, then once she had submerged, turned back towards North Keeling Island.[26]
The Australian cruiser reached Emden around 16:00.[26] The Germans' battle ensign was still flying, generally a sign that a ship intends to continue fighting.[21][27] Sydney signalled "Do you surrender?" in international code by both lights and flag-hoist.[26][27] The signal was not understood, and Emden responded with "What signal? No signal books".[27] The instruction to surrender was repeated by Sydney in plain morse code, then after there was no reply, the message "Have you received my signal?" was sent.[26][27] With no response forthcoming, and operating under the assumption that Emden could still potentially fire, launch torpedoes, or use small arms against any boarding parties, Glossop ordered Sydney to fire two salvoes into the wrecked ship.[27][28] This attack killed 20 German personnel.[27] The ensign was pulled down, and a white sheet was raised over the quarter-deck as a flag of surrender.[28]
Glossop had orders to ascertain the status of the transmission station, and left with Sydney to do so, after sending a boat with Buresk's crew to Emden with a message that they would return the next day.[22] In addition to checking on Direction Island, there was also the potential that Emden and Königsberg had been operating together and that the second ship would approach to recover the attack party from the island, or go after the troop convoy; consequently, Sydney could not render assistance to Emden's survivors until such threats had passed.[22][29] It was too late to make a landing on Direction Island, so the cruiser spent the night patrolling the islands, and approached the wireless station the next morning.[29] On arrival, the Australians learned that the Germans had escaped the previous evening in a commandeered schooner.[29] Sydney embarked the island's doctor and two assistants, then headed for North Keeling Island.[29]
Aftermath[]
After Sydney contacted the convoy to report her success against Emden, the soldiers aboard the troopships were granted a half-day holiday from duties and training to celebrate.[30] Von Muller surrendered to Glossop on the quarterdeck.[30][Clarification needed] Although accepting the surrender, Glossop allowed von Muller to keep his sword.[30]
During the battle, 130 personnel aboard Emden were killed, and 69 were wounded.[21] Four of the latter died from wounds.[21] Transferring the German survivors aboard Sydney took about five hours, with the difficulty of transferring so many wounded, rough seas, and overcrowding aboard the Australian cruiser.[31] The two Australian medical officers aboard Sydney and the medical staff from Direction Island worked from 18:00 on 10 November to 04:30 the next morning to clear the most pressing needs for medical attention, with Emden survivors prioritised.[31] Most of 11 November was spent treating less pressing cases; the Direction Island staff left the ship around midday, and Emden's ship's surgeon, who had previously been unable to assist because of the shock and stress of caring for so many wounded from the battle's end until Sydney returned, had recovered enough by this point to assist as an anaesthetist.[32]
On 12 November, the auxiliary cruiser Empress of Russia arrived, and all except the most seriously wounded prisoners were transferred over.[31] Sydney caught up to the convoy at Colombo on 15 November.[33] There were no celebrations of Sydney's success as the cruiser entered harbour: Glossop had requested that the sailors and soldiers aboard the warships and transports refrain from cheering, out of respect for the German wounded being carried aboard.[30][34] The survivors from Emden were later transported to Malta, and placed in the custody of the British Army.[21]
Strategic situation[]


The wreck of Emden, some years after the battle
After Emden's defeat, the only German warship in the Indian Ocean basin was SMS Königsberg; the cruiser had been blockaded in the Rufiji River in October, and remained there until her destruction in July 1915.[35] Australia was no longer under direct threat from the Central Powers, and many of the RAN ships which had been designated for the nation's defence could be safely deployed to other theatres.[35][36]
Over the next two years, troop convoys from Australia and New Zealand to the Middle East could sail without naval escort, further freeing Allied resources.[36] The state of affairs persisted until the raider SMS Wolf began operations in the region in 1917.[citation needed]
Sydney[]
After competing escort duties, the Australian ship was deployed to the North America and West Indies Station for eighteen months, then spent the rest of the war attached to the British Grand Fleet.[37] Sydney remained in service until 1928, and was broken up for scrap in 1929.[21] For the battle, Sydney was awarded the battle honour "Emden 1914".[38] This was the first honour for a single ship action awarded to a RAN vessel, and one of only three awarded to any British Commonwealth ship during the 20th century.[38] Glossop was appointed a Companion of the Order of the Bath.[39]
Emden[]
Von Muller was awarded the Iron Cross, First Class.[39] The Kaiser announced the construction of a new Emden,[when?] which would bear an Iron Cross on her bow.[39] A Königsberg class cruiser laid down in 1914 was named SMS Emden on completion in 1916, and built with an Iron Cross mounted on her stem-head.[40]
Shortly after the battle, the auxiliary cruiser Empress of Japan visited the wreck to recover the signal logs.[41] In 1915, a Japanese company proposed that the ship be repaired and refloated, but an inspection by HMAS Protector concluded that surf damage to Emden made such an operation unfeasible.[41] By 1919, there were reports that the wreck had disappeared;[41] Emden had broken up from the battle damage, and was pulled out by water currents before sinking in shallow waters.[citation needed]
Landing party[]
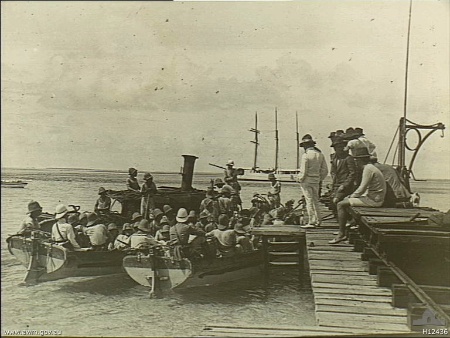

The German sailors at the Direction Island Jetty, about to head to Ayesha (background)
After being abandoned, the German shore party commandeered the 97-ton schooner Ayesha and roughly half Direction Island's food supply.[20] They left Direction Island on the evening of 9 November.[20] The schooner initially sailed to Padang, where they were escorted into port on 27 December by the Dutch destroyer Lynx and only allowed to remain under strict terms, so the Netherlands could maintain their stance of neutrality.[42] With the threat that Ayesha would be seized by Dutch authorities, von Mücke took the schooner out during the night of 28 December, and headed for a rendezvous point he had announced to the German merchant vessels sheltering at Padang.[42] On 14 December, the freighter Choising arrived at the rendezvous, and the Germans were welcomed aboard.[42] Choising delivered them to Hodeida on 8 January 1915.[42] Unable to travel overland, the Germans acquired several dhows[citation needed] and sailed up the Red Sea to Jiddah, then crossed overland to Mecca.[42] From here, von Mücke and his sailors used the Hejaz Railway to travel to Constantinople, reported to the German admiral stationed there, then continued on to Germany itself.[21][27][42][42]
In 2010, German director Berengar Pfahl began work on Die Manner der Emden (The Emden Men), a film based on the story of the 50 German sailors left behind on Direction Island and their voyage home.[43] Much of the filming occurred in Sri Lanka, with the luxury yacht Raja Laut used to represent the schooner Ayesha.[43] Die Manner der Emden was originally to be released in February 2012,[43] but was delayed until June 2012.[citation needed]
See also[]
- How We Fought the Emden and The Exploits of the Emden - two silent films depicting the battle and the events leading up to it
Citations[]
- ↑ 1.0 1.1 1.2 Cassells, The Capital Ships, p. 138
- ↑ Cassells, The Capital Ships, pp. 138–9
- ↑ 3.0 3.1 3.2 Jose, The Royal Australian Navy 1914–1918, p. 183
- ↑ 4.00 4.01 4.02 4.03 4.04 4.05 4.06 4.07 4.08 4.09 4.10 4.11 4.12 4.13 4.14 4.15 4.16 4.17 Cassells, The Capital Ships, p. 139
- ↑ 5.0 5.1 5.2 5.3 5.4 5.5 5.6 Stevens, in Stevens, The Royal Australian Navy, p. 39
- ↑ 6.0 6.1 Jose, The Royal Australian Navy 1914–1918, p. 165
- ↑ 7.0 7.1 Grönner, Die deutschen Kriegsschiffe 1815–1945, p. 133
- ↑ 8.0 8.1 Stevens, in Stevens, The Royal Australian Navy, p. 38
- ↑ Stevens, in Stevens, The Royal Australian Navy, pp. 33–4
- ↑ Frame, No Pleasure Cruise, p. 106
- ↑ Stevens, in Stevens, The Royal Australian Navy, p. 34
- ↑ 12.0 12.1 Odgers, Diggers, p. 65
- ↑ 13.0 13.1 13.2 Frame, No Pleasure Cruise, p. 110
- ↑ Jose, The Royal Australian Navy 1914–1918, p. 158
- ↑ Jose, The Royal Australian Navy 1914–1918, p. 161
- ↑ 16.0 16.1 Jose, The Royal Australian Navy 1914–1918, p. 180
- ↑ Cassells, The Capital Ships, pp. 139–40
- ↑ 18.0 18.1 18.2 18.3 18.4 Jose, The Royal Australian Navy 1914–1918, p. 181
- ↑ 19.0 19.1 19.2 19.3 19.4 19.5 Frame, No Pleasure Cruise, p. 111
- ↑ 20.0 20.1 20.2 Cassells, The Capital Ships, p. 140
- ↑ 21.00 21.01 21.02 21.03 21.04 21.05 21.06 21.07 21.08 21.09 21.10 21.11 21.12 21.13 21.14 Cassells, The Capital Ships, p. 141
- ↑ 22.0 22.1 22.2 22.3 22.4 22.5 22.6 Stevens, in Stevens, The Royal Australian Navy, p. 40
- ↑ Jose, The Royal Australian Navy 1914–1918, pp. 182–3
- ↑ Jose, The Royal Australian Navy 1914–1918, p. 182
- ↑ 25.0 25.1 25.2 25.3 25.4 25.5 25.6 Jose, The Royal Australian Navy 1914–1918, p. 184
- ↑ 26.0 26.1 26.2 26.3 Jose, The Royal Australian Navy 1914–1918, p. 188
- ↑ 27.0 27.1 27.2 27.3 27.4 27.5 27.6 Frame, No Pleasure Cruise, p. 113
- ↑ 28.0 28.1 Jose, The Royal Australian Navy 1914–1918, p. 189
- ↑ 29.0 29.1 29.2 29.3 Jose, The Royal Australian Navy 1914–1918, p. 190
- ↑ 30.0 30.1 30.2 30.3 Odgers, Diggers, p. 66
- ↑ 31.0 31.1 31.2 Jose, The Royal Australian Navy 1914–1918, p. 191
- ↑ Jose, The Royal Australian Navy 1914–1918, pp. 190–1
- ↑ Jose, The Royal Australian Navy 1914–1918, pgs. 192, 204
- ↑ Jose, The Royal Australian Navy 1914–1918, p. 192
- ↑ 35.0 35.1 Odgers, Diggers, p. 67
- ↑ 36.0 36.1 Stevens, in Stevens, The Royal Australian Navy, p. 41
- ↑ Cassells, The Capital Ships, pgs. 139, 141
- ↑ 38.0 38.1 Cassells, The Capital Ships, pgs. 143, 247
- ↑ 39.0 39.1 39.2 Frame, No Pleasure Cruise, p. 115
- ↑ Gardiner & Gray (eds.), Conway's All the World's Fighting Ships: 1906–1921, p. 162
- ↑ 41.0 41.1 41.2 Jose, The Royal Australian Navy 1914–1918, p. 207
- ↑ 42.0 42.1 42.2 42.3 42.4 42.5 42.6 Jose, The Royal Australian Navy 1914–1918, p. 206
- ↑ 43.0 43.1 43.2 Fernando, World locations made in Lanka
References[]
- Books
- Cassells, Vic (2000). The Capital Ships: their battles and their badges. East Roseville, NSW: Simon & Schuster. ISBN 0-7318-0941-6. OCLC 48761594.
- Frame, Tom (2004). No Pleasure Cruise: the story of the Royal Australian Navy. Crows Nest, NSW: Allen & Unwin. ISBN 1-74114-233-4. OCLC 55980812.
- Gardiner, Robert; Gray, Randal, eds (1985). Conway's All the World's Fighting Ships: 1906–1921. Annapolis: Naval Institute Press. ISBN 0-87021-907-3. OCLC 12119866.
- Grönner, Erich (1982) (in German). Die deutschen Kriegsschiffe 1815–1945. I. Bernard & Graefe. ISBN 3-7637-4800-8. OCLC 157015400.
- Jose, Arthur W. (1941) [1928]. The Royal Australian Navy 1914–1918. The Official History of Australia in the War of 1914–1918. IX (9th ed.). Sydney, NSW: Angus and Robertson. OCLC 215763279. http://www.awm.gov.au/histories/first_world_war/volume.asp?levelID=67895. Retrieved 22 March 2010.
- Odgers, George (1994). Diggers: The Australian Army, Navy and Air Force in Eleven Wars. 1. London: Lansdowne. ISBN 978-1-86302-385-6. OCLC 31743147.
- Stevens, David (2001). "World War I". In Stevens, David. The Royal Australian Navy. The Australian Centenary History of Defence. III. South Melbourne, VIC: Oxford University Press. ISBN 0-19-555542-2. OCLC 50418095.
- News articles
- Fernando, Susitha R. (3 August 2011). "World locations made in Lanka". The Sunday Times. Sri Lanka. http://sundaytimes.lk/110703/Magazine/sundaytimestvtimes_1.html. Retrieved 18 January 2012.
External links[]
- "Cocos" – a weblog positing diary entries from HMAS Sydney sailor Richard Horne, including a first-hand account of the Battle of Cocos
Coordinates: 11°50′S 96°49′E / 11.833°S 96.817°E
The original article can be found at Battle of Cocos and the edit history here.