| Battle of Naseby | |||||||
|---|---|---|---|---|---|---|---|
| Part of English Civil War | |||||||
 Battle memorial, and beyond the fields of Broad Moor, the site of the Battle | |||||||
| |||||||
| Belligerents | |||||||
| Parliamentarian New Model Army | Royalists | ||||||
| Commanders and leaders | |||||||
|
Sir Thomas Fairfax Oliver Cromwell |
King Charles I Prince Rupert of the Rhine | ||||||
| Strength | |||||||
|
~13,500: 6,000 horse 7,000 foot 500 dragoons |
~7,400: 4,100 horse 3,300 foot[1] | ||||||
| Casualties and losses | |||||||
| 400 killed & wounded |
1,000 killed 5,000 captured | ||||||
The Battle of Naseby was the key battle of the first English Civil War. On 14 June 1645, the main army of King Charles I was destroyed by the Parliamentarian New Model Army commanded by Sir Thomas Fairfax and Oliver Cromwell.
The campaign
At the beginning of 1645, most of King Charles's advisers urged him to attack the New Model Army while it was still forming. However, Prince Rupert of the Rhine, who had recently been appointed General of the Army and therefore the King's chief military adviser, proposed instead to march north to recover the North of England and join forces with the Royalists in Scotland under Montrose. This course was adopted, even though the King's army had to be weakened by leaving a detachment (including 3,000 cavalry) under Lord Goring, the Lieutenant General of Horse, to hold the West Country and maintain the Siege of Taunton, in Somerset.
At the same time, after the New Model Army had abandoned an attempt to relieve Taunton, Parliament's Committee of Both Kingdoms had directed Fairfax, its commander, to besiege Oxford, the King's wartime capital.[2] Initially, Charles welcomed this move, as Fairfax would be unable to interfere with his move north. Then at the end of May he was told that Oxford was short of provisions and could not hold out long. To distract Fairfax, the Royalists stormed the Parliamentarian garrison at Leicester on 31 May. Having done so, Prince Rupert and the King's council reversed their former decision and marched south to relieve Oxford.[3] They sent messages ordering Goring to rejoin them, but Goring refused to leave the West Country.
Parliament had indeed been alarmed by the loss of Leicester, and Fairfax was now instructed to abandon the siege of Oxford and engage the King's main army. He accordingly marched north from Oxford on 5 June. His leading detachments of horse clashed with Royalist outposts near Daventry on 12 June, alerting the King to his presence. On 13 June, the Royalists, who were now making for Newark (Nottinghamshire) so as to receive reinforcements, were at Market Harborough (Leicestershire).
Fairfax was eager to engage them, and held a council of war, during which Oliver Cromwell, who had recently been re-appointed Lieutenant General, arrived with some cavalry reinforcements.[4] The New Model Army moved in pursuit of the Royalist army, and late in the day Commissary General Henry Ireton (Cromwell's son in law and second in command of the cavalry) attacked a Royalist outpost at Naseby, 6 miles (9.7 km) to the south of the main body of the King's army. The King now had to accept battle, or retreat with Fairfax in close pursuit. Early on 14 June, ignoring Rupert's advice and urged on by Secretary of State Lord Digby, the King was persuaded that any retreat would lower morale and took the former course.
The battle
First contact
The morning of 14 June was foggy, preventing the opposing armies from sighting each other at first. The Royalist army occupied a strong position on a ridge between the villages of Little Oxenden and East Farndon about two miles south of Market Harborough[5] The Royalist scoutmaster Sir Francis Ruce was sent out to find the Parliamentarian army and rode south for two to three miles but saw no sign of it, perhaps through negligence.[6] Rupert himself moved forward and saw some Parliamentarian cavalry, apparently retiring. He was determined to secure the commanding Naseby ridge and ordered the Royalist army to advance.
Fairfax initially considered occupying the northern slopes of Naseby ridge. Cromwell believed that this position was too strong, and that the Royalists would refuse battle rather than attack it. He is said to have sent a message to Fairfax, saying, "I beseech you, withdraw to yonder hill, which may provoke the enemy to charge us".[7] Fairfax agreed, and moved his army back slightly.
The Royalists did not see Fairfax's position until they reached the village of Clipston, just over a mile north of Naseby ridge. It was clearly impossible for the Royalists to withdraw to their original position without being attacked by the Parliamentarian cavalry while on the line of march and therefore at a disadvantage. Rupert deployed the army to its right, where the ground appeared to be more favourable for his own cavalry[8] and prepared for battle.
Deployments
Royalists
The Royalist army occupied a front of about a mile and a half, between the Clipston-Naseby track on the left and the Sulby Hedges on the right. Their right wing consisted of between 2,000 and 3,000 cavalry under Rupert and his brother Prince Maurice. The centre was organised as three infantry tertias (brigades) commanded by Lord Astley, with a regiment of horse under Colonel Howard in support. On the left were 1,500 "Northern Horse" (cavalry recruited from the northern counties of England, who continued to fight even after their homes were overrun by Scottish Covenanters and Parliamentarians) commanded by Sir Marmaduke Langdale. The King commanded a small reserve, consisting of his own and Prince Rupert's regiments of foot and his Lifeguard of Horse.
Parliamentarians
Fairfax had drawn up his army on the ridge a mile north of Naseby, although some of it was behind the crest on the reverse slope. Commissary-General Ireton's wing of five and a half regiments of cavalry was on the left. The infantry under Sergeant-Major General Sir Philip Skippon was in the centre with five regiments in the front line and three in support. A forlorn hope of 300 musketeers was deployed to the front, and two companies of Colonel Edward Harley's regiment[9] were in reserve. A Parliamentarian engraving of the battle[10] shows 11 pieces of artillery, in the intervals between the infantry regiments. They played little part in the battle; their first salvos went high, and the Royalist and Parliamentarian infantry were subsequently too closely engaged for the guns to be used. Cromwell's wing, with six and a half regiments of cavalry, was on the right.[11]
The Parliamentarian army occupied a front about two miles long. They outflanked the Royalist left, but their own left flank rested, like the Royalists' right flank, on the Sulby Hedges. At the last minute, as the Royalists began to advance, Cromwell sent a regiment of dragoons under Colonel John Okey into the Sulby Hedges, where they could fire into the flank of Rupert's cavalry.
Action

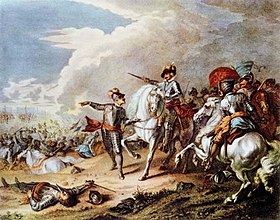
Battle of Naseby, hand-coloured copper engraving by Dupuis after Parrocel, 1727 (for Rapins History, v.2, p. 527)
The Royalist centre attacked first, Rupert keeping his own wing of cavalry in hand so that the horse and foot could hit the enemy simultaneously.[12] Skippon's infantry moved forward over the crest of the ridge to meet the Royalist foot. There was time for only one volley of musketry before both sides were fighting hand-to-hand, the veteran Royalist infantry using their swords and the butt ends of their muskets. Sir Edward Walker, King Charles's Secretary of War, stated "The Foot on either side hardly saw each other until they were within Carabine Shot, and so made only one Volley; our falling in with Sword and butt end of the Musquet did notable Execution, so much as I saw their Colours fall and their Foot in great Disorder."[13] Sir Philip Skippon was wounded by a bullet which splintered his armour and struck him under the ribs, although he stayed on the field to prevent panic spreading. Even so, the Parliamentarians were hard-pressed and forced back.
On the Parliamentarian left, the opposing wings of horse paused briefly to dress ranks before charging into each other.[14] Ireton's own regiment repulsed their Royalist opposite numbers, but Ireton then led at least part of them to the aid of the beleaguered Parliamentarian infantry. His troopers were driven off by Royalist pikemen, and Ireton himself was unhorsed, wounded in the leg and face and taken prisoner.[15] At the same time, the second line of Royalist cavalry broke most of the Parliamentarian horsemen. Some of Ireton's regiments, on the far left, were saved from destruction by the fire from Okey's dragoons, but the others broke and fled, some of them not stopping until they reached Northampton, 15 miles (24 km) away. The entire Royalist right wing had been committed to defeat Ireton, and none were left in reserve.[16] Rupert either neglected or was unable to rally the Cavalier horsemen, who galloped off the battlefield in pursuit of the fleeing Parliamentarians.
Meanwhile, the Parliamentarian right wing of horse under Oliver Cromwell and the Royalist Northern Horse faced each other, neither willing to charge to the aid of their infantry while the other could threaten their flank. Eventually after half an hour, the Royalist cavalry began to charge and Cromwell's troops moved to meet them. Langdale's men were not only outflanked and outnumbered two to one, but forced to charge up a slope broken up by bushes and a rabbit warren. After a brief contest they were routed.[17]
Unlike Rupert, Cromwell had roughly half of his wing uncommitted, as only the front line of Cromwell's wing had taken part in the defeat of Langdale. He sent only four divisions (roughly two regiments) after Langdale, and turned his reserves against the left flank and rear of the Royalist centre.[16] At about the same time, Okey's dragoons mounted their horses and charged from the Sulby hedges against the right wing of the Royalist infantry, as did some of Ireton's regiments which had partly rallied.
Some of the trapped Royalist infantry began to throw down their arms and call for quarter; others tried to conduct a fighting retreat. One regiment, apparently Prince Rupert's Bluecoats, stood their ground and repulsed all attacks. One eyewitness said "The Blue regiment of the Kings stood to it very stoutly, and stirred not, like a wall of brasse...".[18] Eventually, Fairfax led his own Regiment of Foot and his Regiment and Lifeguard of horse against them from all sides. The Bluecoats' resistance was broken and Fairfax is said to have taken their standard in person.[19] Archaeological evidence (recovered musket balls etc.) suggests that this episode took place in the vicinity of Long Hold Spinney, about 1 kilometre (0.62 mi) behind the Royalist position at the start of the battle.[20]
At some stage, the King attempted to lead his Lifeguard of Horse to the rescue of his centre or in a counter-attack against Cromwell's troopers, but was prevented from doing so by a Scottish nobleman, the Earl of Carnwath, who seized his bridle, swore at him and said, "Would you go upon your death?" Seeing the King swerve away from the enemy, his Lifeguard also retreated in disorder for several hundred yards.[17]
Behind the Parliamentarian lines, Rupert's men had reached Naseby and the Parliamentarian baggage. The Parliamentarian camp guards refused to surrender, and Rupert eventually rallied his men and led them back to the battlefield. It was too late by this time to save the remnants of the Royalist infantry, and Rupert could not induce his men to make another charge. Fairfax halted and reorganised his lines, and when he resumed his advance, Rupert's cavalry rode off the field.[21]
Fairfax's forces pursued Royalist survivors fleeing north towards Leicester. Archaeological evidence suggests that fugitives and Royalist baggage guards tried to rally on the slopes of Castle Yard (also known as Wadborough Hill), a wooded eminence which once had a motte and bailey castle, about 1.5 miles (2.4 km) behind the Royalist position at the start of the battle.[20] Many Royalists were butchered when they mistakenly followed what they thought was the main road to Leicester into the churchyard in the village of Marston Trussell, and were unable to escape their pursuers. Parliamentarian troops also hacked to death at least 100 women camp-followers in the apparent belief they were Irish, though they were probably Welsh whose language was mistaken for Irish.[22] This massacre was without precedent in a war where atrocities against civilians were rare and strongly discouraged, and the reason for it remains a mystery.[23] Wedgwood suggests that the soldiers were intent on plunder rather than killing but were enraged when the women, possibly armed with cooking knives, resisted them.[23]
Aftermath
Fairfax recovered Leicester on 18 June. He immediately led his army southwest to relieve Taunton and capture the Royalist-held West Country.
The main Royalist military force had been shattered at Naseby. The King had lost his veteran infantry (including 500 officers), all his artillery, and many arms. He lacked the resources to create an army of such quality again, and after Naseby it simply remained for the Parliamentarian armies to wipe out the last pockets of Royalist resistance.
The Parliamentarians had also captured the King's personal baggage, with correspondence which showed he intended to seek support from the Irish Catholic Confederation through the Cessation Treaty, and Catholic nations in Europe. By publishing this correspondence, entitled The King's Cabinet Opened,[24] Parliament gained much support in favour of fighting the war to a finish. Within a year, the First Civil War ended in a Parliamentarian military victory.
In fiction
- The battle features in the earlier part of Rosemary Sutcliff's historical fiction Simon.
- Ann Turnbull's historical novel Alice in Love and War illustrates the parliamentarians' attack and slaughter of the unarmed female camp-followers.
- It also serves as the historical background to a series of murders in the episode The Dark Rider of the TV-series Midsomer Murders.
- Colonel Beverley the father of the orphaned family in Captain Marryat's The Children of the New Forest was killed at Naseby.
Images of the battlefield
")
See also
- The ship Naseby of the Commonwealth of England was named after the battle.
- English Civil War
- Wars of the Three Kingdoms
- Naseby
Notes
- ↑ Young & Holmes (2000), figures from Clarendon, p.238
- ↑ Rogers, 1968, p.226
- ↑ Rogers (1968), pp.227-228
- ↑ Rogers (1968), p.229
- ↑ Rogers (1968), p.230
- ↑ Young & Holmes, p.240
- ↑ Martin Marix Evans, Naseby 1645: The Triumph of the New Model Army (2007), 56
- ↑ Rogers (1968), p.232
- ↑ Harley's regiment was commanded at Naseby by its Lieutenant Colonel, Pride.
- ↑ J. Streeter in "Anglia Rediviva", displayed in the frontispiece of "Battles and Generals of the Civil War", H.C.B. Rogers
- ↑ Rogers, pp.233-234
- ↑ Young & Holmes, p.246
- ↑ Roberts, p.90
- ↑ Rogers (1968), p.237
- ↑ Rogers (1968), p.238
- ↑ 16.0 16.1 Roberts, p.209
- ↑ 17.0 17.1 Young & Holmes, p.247
- ↑ Foard,(1995) p.271. From "The Kingdomes Weekly Intelligencer, 10th-17th June
- ↑ Young & Holmes, p.248
- ↑ 20.0 20.1 Battlefields Trust site
- ↑ Rogers (1968), p.239
- ↑ Wedgwood, C.V. The King's War Fontana reissue 1966 p.428
- ↑ 23.0 23.1 Wedgwood p.637
- ↑ Raymond, Joad (2006). Pamphlets and Pamphleteering in Early Modern Britain. Cambridge University Press. ISBN 978-0-521-02877-6.
References
- Foard, Glenn (1995). Naseby The Decisive campaign. Pen & Sword Military. ISBN 1-84415-132-8.
- Roberts, Keith (2005). Cromwell's War Machine: The New Model Army 1645-1660. Pen & Sword Books. ISBN 1-84415-094-1.
- Rogers, H.C.B. (1968). Battles and Generals of the Civil Wars. Seeley Service & Co..
- Stoyle, Mark (2005). Soldiers and Strangers. An Ethnic History of the English Civil War. Yale: Yale University Press. ISBN 0-300-10700-5.
- Young, Peter (1985). Naseby 1645: The Campaign and the Battle. London: Century Publications. ISBN 0-7126-0489-8.
- Young, Peter; Richard Holmes (2000). The English Civil War:A Military History of the Three Civil Wars, 1642-1651. Ware, Hertfordshire: Wordsworth Editions. ISBN 1-84022-222-0.
External links
| Wikisource has the text of the 1911 Encyclopædia Britannica article Naseby. |
Coordinates: 52°24′56″N 0°59′43″W / 52.41561°N 0.99529°W
The original article can be found at Battle of Naseby and the edit history here.