
The Battle of Porton Plantation (8–10 June 1945) took place at Porton Plantation,[Note 1] near the village of Soraken on Bougainville Island, in the Solomon Islands archipelago during World War II. Involving forces from Australia, New Zealand and Japan, the battle was part of the wider Bougainville campaign, which had begun in late 1943 and lasted until the end of the war in August 1945.
The fighting occurred after a company-sized Australian force made an amphibious landing north of the Porton Plantation jetties in an attempt to outflank the Japanese positions on the Ratsua front, which were holding up the advance of the 26th and the 31st/51st Battalions from the 11th Brigade. The Australians landed unopposed and established a small perimeter, however a number of their landing craft ran aground and they were unable to bring their heavy weapons and support elements ashore. Troops from the Japanese 87th Naval Garrison Force quickly surrounded the beachhead and, as their supply situation grew desperate, the Australians were forced to withdraw. In the course of their evacuation by sea another landing craft ran aground. Over the next two days several unsuccessful rescue attempts were made until eventually, in the early morning of 11 June, the last Australian survivors were picked up.
The battle was a victory for the Japanese and it proved instrumental in helping them to regain the initiative in the northern sector of Bougainville. As a result, shortly afterwards the Australian forces on Bougainville changed the focus of their operations to the southern sector of the island where they were able to advance along the coastal plain towards the main Japanese position at Buin. Since the end of the war, there has been considerable criticism of the planning undertaken by the Australians prior to the operation, and it has been argued that the operation failed due to poor intelligence and lack of resources and was ultimately unnecessary.
Background[]
On 22 November 1944, the Australian II Corps under Lieutenant General Stanley Savige took over responsibility for Allied operations on Bougainville from the US XIV Corps and throughout November and December Australian units began relieving the Americans who were then redeployed on subsequent operations in the Philippines.[3] Although Japanese forces on Bougainville actually numbered around 40,000 men at the time,[4] Allied intelligence failed to determine this accurately, estimating that there were only about 17,500 defenders. As a result of this error, Australian planning staff believed that they were opposed by a roughly equal-sized force and the Australian corps commander, Savige, consequently decided that he would pursue an aggressive offensive campaign to clear the Japanese from Bougainville.[5] The majority of the Japanese force was believed to be concentrated in the south and as a result the main effort of the Australian plan was focused upon driving towards Buin. Supporting operations were also conducted along two other fronts. In the north, it was planned that the Japanese would be forced into the narrow Bonis Peninsula and contained there while, in the centre, the seizure of Pearl Ridge would give the Australians control of the east–west avenues of approach, as well as affording them protection against further counter-attacks and opening the way for a drive to the east coast.[6]
In late December the 11th Brigade, under the command of Brigadier John Stevenson, took over control of the northern sector of the island from the 7th Brigade, which was transferred to the southern sector to take part in the main offensive. Throughout January the brigade advanced north along the coast from Kuraio Mission, clearing the main settlements while sending patrols inland in an effort to flush out the Japanese from the high features in an effort to draw them into fighting in the open.[7] In mid-January the lead Australian battalion, the 31st/51st Battalion, under the command of Lieutenant Colonel Joseph Kelly, came up against a strong Japanese position at Tsimba Ridge[Note 2] and over the course of three weeks fought to gain control of the feature. The Australians lost 23 killed and 53 wounded while the Japanese had at least 66 men killed.[8]
Prelude[]
North-west Bougainville.
Following the fighting on Tsimba Ridge, the 31st/51st was relieved by the 26th Battalion, and the Australians continued to advance north towards Soraken. In April, the 26th was relieved by the 55th/53rd Battalion which advanced north to Ratsua,[Note 3] from where the Australians planned to move along the Bonis Peninsula. By late May, however, casualties amongst the 55th/53rd meant that they had to be withdrawn from the line, and the 26th Battalion was moved back up to replace them, along with the 31st/51st.[9] At the start of June the Australians were stretched out across a 5-mile (8.0 km) line between Ratsua to Ruri Bay.[10]
On 4 June, the 31st/51st Battalion began patrolling operations around Buoi Plantation. Two companies, 'B' and 'D', were committed to these operations with 'B' Company focusing upon the north-eastern part of the plantation, while 'D' Company patrolled to their east.[11] Over the next three days a number of clashes followed in which the Australians suffered one man killed, while the Japanese lost 10.[11] Australian intelligence suggested that the Japanese had concentrated strongly along the approaches to the peninsula, and in order to deal with these positions it was decided that an amphibious landing would be made at the jetties around Porton Plantation, 3.1 miles (5.0 km) to the north of Ratusa,[10] to outflank them and launch an attack from the rear, while the main force pushed north from the Ratsua front to establish a new position along a line between Porton and Chindawon.[9][12] On the evening of 5 June, the Australian battalion commander outlined his plan and in the afternoon of the following day rehearsal landings were undertaken. Final preparations were made on the night of 6/7 June and continued throughout the next day.[13]
The Australian landing force consisted of 190 men embarked on six landing craft. The bulk of the force was made up of infantry from 'A' Company and a platoon from 'C' Company, 31st/51st Battalion under the command of Captain Henry Downs. Artillery support was provided by the 11th and 12th Batteries of the 4th Field Regiment and the 2nd Mountain Battery,[14] while additional supporting units included engineers from the 16th Field Company and 42nd Assault Landing Craft Company, medical support from the 19th Field Ambulance and logistics support from the 223rd Supply Platoon.[15] Although aerial reconnaissance indicated that there were strong Japanese fortifications in the area, initially no air support was allocated to the operation,[16] with requests for preliminary air strikes being denied by II Corps.[17] The Japanese force in the immediate vicinity initially consisted of about 100 men from the Imperial Japanese Navy's 87th Naval Garrison Force which had been formed from men drawn from the 211th Pioneer Unit interspersed with regular naval personnel.[18] However, over the course of the battle the strength of the Japanese force grew to between 400 to 500 men.[19][20] The Japanese force was commanded by the senior naval officer at Buka, Captain Eikichi Kato,[21] whose 87th Naval Garrison Force had taken over responsibility for the defence of the Tarlena area[Note 4] when the Imperial Japanese Army's 38th Independent Mixed Brigade was transferred south to the Numa Numa area.[22]
Battle[]
At 3:57 am on 8 June the first wave of Australian troops landed on the beach in three landing craft. They came ashore unopposed and after advancing about 100 yards (91 m) inland established a small perimeter around the beachhead in the tree line surrounding the plantation.[13][23] A series of forward positions were then established a further 50 yards (46 m) inland.[13] Instead of pushing his rifle platoons further inland, however, Downs decided that he would wait for the second wave to arrive. This ultimately proved critical as it allowed the Japanese commander, Kato, time to respond to the landing.[24] As the three landing craft of the first wave withdrew, another three landing craft came in with reinforcements, heavy weapons and other support elements, however, they ran aground on a coral reef and the men aboard were forced to wade ashore. Although one of these craft was later able to float free, two of the others remained stuck. A short time later they began to take fire from Japanese machine-guns, which stopped the Australians from unloading their equipment.[25][26]
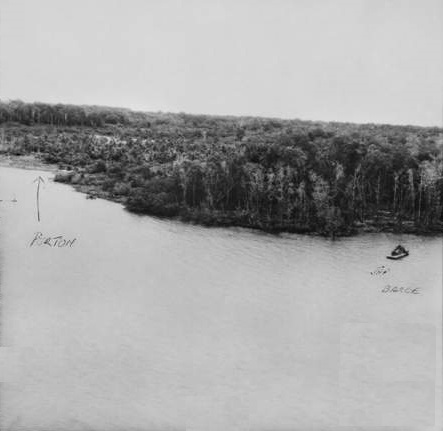

An aerial photograph showing the landing beach at Porton Plantation in May 1945.
Lacking organic indirect fire support as all the mortars had been in the landing craft that were in the second wave,[26] Downs established communications with the artillery, and a barrage was brought down on suspected Japanese positions by the artillery forward observation officer, Lieutenant David Spark,[14] with the assistance of a Royal Australian Air Force (RAAF) Boomerang that was on station overhead to provide aerial observation.[24] By dawn, Downs' company was taking sporadic fire from Japanese pill boxes, and they began patrolling forward of their perimeter to locate these positions. These patrols were unable to progress very far before they were forced back by Japanese fire, which confirmed how bad the company's position was.[27] They determined that they had landed about 270 yards (250 m) north of where they had been supposed to land,[14] and inside an "arc of enemy trenches and pill-boxes with a radius of about 400 yards"[26] that effectively boxed them in.[27]
Throughout the day the defenders began pressing against the Australian forward positions and engaging them with mortar fire as more reinforcements were brought up.[28] Shortly after the landing, Kato was able to concentrate a force of about 100 Japanese defenders in the immediate vicinity,[26] however, throughout the day he was able to bring in further reinforcements and by nightfall there were approximately 300 Japanese around the Australian perimeter. In order to respond, an attempt was made by the Australians to bring in reinforcements of their own and supplies by sea. Due to the low tide and heavy fire from the beach, the attempt failed, as did two subsequent attempts,[29] as the Japanese commander pre-empted their arrival and set up ambushes along the approaches north and south of the landing beach.[30] While the fighting was going on around Porton, the 26th Battalion and the rest of the 31st/51st Battalion attempted to break through to the Australian company from Ratsua. They were unable to penetrate the Japanese lines,[31] however, as they came up against Japanese defenders that were determined to resist because they were unable to withdraw any further along the peninsula.[32]
By the morning of 9 June, the supply situation for Downs' company had become critical and 11th Brigade headquarters decided that it would be best to evacuate the beach. Up until that point casualties had been relatively light with only four killed and seven wounded, but the Japanese force, which had increased overnight to between 400 to 500 men as reinforcements arrived by barges and trucks from the Buka Passage area,[33][34] launched a strong attack aimed at destroying the Australian force, attacking from three sides of the perimeter. In order to defend themselves the Australians called down heavy artillery fire from the battery of 25-pounders that was supporting them from its position on the Soraken peninsula.[33][35] As the fighting intensified, some of the artillery shells were brought down as close as 25 yards (23 m) from their own troops. Air support was also called in, with 16 RAAF Boomerangs and Royal New Zealand Air Force Corsairs attacking Japanese positions around the perimeter.[36] As a result of these attacks, the Australians were able to hold off the Japanese attacks until 4:30 pm when three assault landing craft arrived from Soraken to take them off the beach,[37] and ferry them out to two larger vessels that were waiting further out to sea.[38]
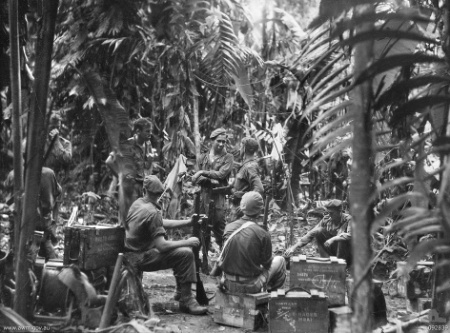

Men from the 31st/51st Battalion about to go out on patrol towards Porton Plantation from the Ratsua front, 9 June 1945.
Amid a torrent of Japanese fire, the Australians broke contact and made for the landing craft, bringing the wounded out with them. The embarkation took only five minutes, but as the vessels attempted to depart two of them, overloaded with about 60 men on board, ran aground and stuck fast.[39] In an effort to lighten the load, a number of men volunteered to leave the craft, which enabled one of the vessels to float free.[36] The other, however, remained stuck. Coming under attack from the Japanese, some of whom waded out and attacked the men in the vessel with grenades, the casualties mounted, with a number of men, including Downs, being either killed or lost overboard and subsequently listed as missing, presumed killed.[39]
As rations and water dwindled, a number of unsuccessful attempts were made on 10 June to rescue the men in the stranded barge with support from artillery and aircraft. While Corsairs flew close support missions, Beaufort and Mitchell bombers dropped life rafts but the survivors were unable to reach them due to machine-gun fire.[40][41] Further casualties occurred when, in the early morning of 11 June, a Japanese soldier managed to reach the vessel and fired upon the occupants with a machine-gun, killing two and wounding a number of others before he was killed himself. Shortly after this a Japanese anti-tank gun fired two shells at the landing craft, destroying its stern. Further shots were prevented when Australian artillery ranged in on the gun, having been directed by Captain John Whitelaw,[36] an artillery observer on one of two landing craft that had been despatched with canvas assault boats, crewed by engineers from the 16th Field Company.[42]
Launching 150 yards (140 m) from the stranded craft, three assault boats set out and over the course of two hours ferried the survivors back to the landing craft, which then set out for Soraken, arriving there at 4:30 am on 11 June.[21] A number of other men swam over 5,500 yards (5,000 m) through the shark-infested waters to Torokori Island,[36][40] while others were either rescued at sea or managed to link up with the Australians along the Ratsua front, who had been attempting to break through to them but found themselves checked 500 yards (460 m) from them,[43] by sneaking through the Japanese lines from the rear.[21][27]
Aftermath[]
Following the failure of the landing at Porton Plantation, the planned Australian advance into the Bonis Peninsula was called off. The Australian high command decided to refocus their efforts upon the drive towards Buin in the south and as a result the effort in the north was reduced to that of a holding action as further resources were transferred out of the sector.[44] The 23rd Brigade under Brigadier Arnold Potts took over control of the sector, and for a period of four weeks along the Ratsua front the 8th and 27th Battalions carried out patrolling operations before the Australians decided to withdraw to the Buoi Plantation in mid-July,[45] by which time the Japanese forces in the area, boosted by their victory at Porton, had begun to seize the initiative through the use of harassment tactics.[46] Following this a number of small-scale actions continued along the front until offensive action was discontinued on 11 August 1945.[47]


Australian wounded are evacuated during the Battle of Porton Plantation, 12 June 1945.
Since the end of the war, the conceptual validity and strategic necessity of the Australian landing has been called into question. A number of aspects of the planning undertaken by 11th Brigade staff and the 31st/51st Battalion's commander have been criticised,[48] particularly in relation to a failure of intelligence to adequately identify the risks posed by the nearby reefs, as well as a failure to heed the concerns of a number of officers involved in the planning stage of the operation.[49] Arguments were made that the landing was hastily planned, under-resourced and inadequately supported, and that it was part of a strategically unnecessary campaign.[50][51] The Japanese might also have gained prior knowledge of the attack. In the aftermath of the fighting, General Thomas Blamey, commander-in-chief of the Australian Military Forces during the war, visited Kelly at his headquarters around Ratsua and upon interviewing him, stated to the II Corps commander, Savige, that he felt that Kelly had erred in conducting rehearsals of the barge landings during the planning stage within view of Japanese positions.[17]
The Battle of Porton Plantation was ultimately a defeat for the Australians, as the landing was repulsed and the Japanese remained in possession of the beachhead, albeit at significant cost.[52] During the course of the landing and the subsequent withdrawal, the Australians suffered 23 killed or missing, presumed dead, and 106 wounded,[21] while the Japanese lost 26 killed.[53][Note 5] Both sides seem to have overestimated the casualties that they inflicted, with the Australians believing that they had killed between 147 to 197 Japanese,[21] and the Japanese estimating Australian losses to have been around 60 killed and 100 wounded.[53]
Following the withdrawal, the 31st/51st Battalion continued fighting along the Ratsua front before being relieved on 28 June by the 8th Battalion and being withdrawn to Torokina, where they remained until the end of the war.[52] Upon the end of hostilities, a reconnaissance party including a number of officers from the 31st/51st Battalion returned to the area and found that the Japanese defenders had buried the Australians that had died on the beach and had constructed a memorial to them, reading: "The Australian soldiers buried here died by the sea".[54] For its part in the landing, the 31st/51st Battalion received the battle honour of "Bonis–Porton".[55][56] Today, this honour is held by both the 31st Battalion, Royal Queensland Regiment and the 51st Battalion, Far North Queensland Regiment, the successor units of the 31st/51st Battalion.[57][58] The following decorations were awarded to members of the Australian forces that took part in the battle: one Distinguished Conduct Medal, two Military Crosses, four Military Medals, and three Mentioned in Despatches.[59] Porton Training Depot in Cairns, Australia was named after this battle.[58]
Notes[]
- Footnotes
- Citations
- ↑ Davidson 2005, p. vii.
- ↑ 2.0 2.1 2.2 2.3 Tanaka 1980, p. 296.
- ↑ Keogh 1965, p. 416.
- ↑ Grey 2008, p. 191.
- ↑ Johnston 2007, p. 30.
- ↑ Johnston 2007, pp. 30–31.
- ↑ Long 1963, p. 122.
- ↑ Long 1963, p. 125.
- ↑ 9.0 9.1 Maitland 1999, pp. 120–121.
- ↑ 10.0 10.1 Lawie 2001, p. 44.
- ↑ 11.0 11.1 Burla 2005, p. 166.
- ↑ James 2005, p. 175.
- ↑ 13.0 13.1 13.2 Burla 2005, p. 167.
- ↑ 14.0 14.1 14.2 Burke 2006, p. 6.
- ↑ Davidson 2005, p. 172.
- ↑ Charlton 1983, p. 56.
- ↑ 17.0 17.1 James 2005, p. 191.
- ↑ Burla 2005, p. 165.
- ↑ Long 1963, pp. 210–215.
- ↑ Burla 2005, pp. 168–171.
- ↑ 21.0 21.1 21.2 21.3 21.4 Long 1963, p. 215.
- ↑ Tanaka 1980, p. 297.
- ↑ Long 1963, pp. 210–211.
- ↑ 24.0 24.1 James 2005, p. 179.
- ↑ Maitland 1999, p. 121.
- ↑ 26.0 26.1 26.2 26.3 Long 1963, p. 211.
- ↑ 27.0 27.1 27.2 James 2005, p. 180.
- ↑ Davidson 2005, p. 66.
- ↑ Long 1963, p. 212.
- ↑ James 2005, p. 183.
- ↑ "31st/51st Battalion (Kennedy and Far North Queensland Regiment), World War II". Australian War Memorial. http://www.awm.gov.au/units/unit_11316.asp. Retrieved 4 May 2009.
- ↑ James 2005, p. 192.
- ↑ 33.0 33.1 Lawie 2001, p. 45.
- ↑ James 2005, pp. 181–183.
- ↑ Davidson 2005, p. 62.
- ↑ 36.0 36.1 36.2 36.3 Burke 2006, p. 7.
- ↑ Davidson 2005, p. 86.
- ↑ James 2005, p. 184.
- ↑ 39.0 39.1 Long 1963, p. 213.
- ↑ 40.0 40.1 Lawie 2001, p. 47.
- ↑ Burla 2005, p. 174.
- ↑ Long 1963, p. 214.
- ↑ Hughes 1993, pp. 253–254.
- ↑ Long 1963, pp. 234–235.
- ↑ Long 1963, p. 235.
- ↑ James 2005, p. 196.
- ↑ Long 1963, p. 237.
- ↑ James 2005, pp. 191–192.
- ↑ Davidson 2005, pp. 31–39.
- ↑ Davidson 2005, pp. 140–146.
- ↑ 51.0 51.1 Charlton 1983, p. 57.
- ↑ 52.0 52.1 Davidson 2005, p. 140.
- ↑ 53.0 53.1 Long 1963, p. 216.
- ↑ Davidson 2005, p. 150.
- ↑ Maitland 1999, p. 145.
- ↑ "Bonis–Porton". Australian War Memorial. http://www.awm.gov.au/units/event_458.asp. Retrieved 29 October 2009.
- ↑ Burla 2005, p. 362.
- ↑ 58.0 58.1 "History of 51 Far North Queensland Regiment". Department of Defence. Archived from the original on 1 August 2008. http://web.archive.org/web/20080801144220/http://www.army.gov.au/51fnqr/history.html. Retrieved 23 January 2011.
- ↑ Davidson 2005, p. 171.
References[]
| Wikimedia Commons has media related to Battle of Porton Plantation. |
- Burke, Arthur (2006). "Porton, One Beach Too Far – Bougainville 1945". Military Historical Society of Australia. pp. 5–8. ISSN 0048-8933.
- Burla, Robert (2005). Crossed Boomerangs: The History of All the 31 Battalions. Loftus, New South Wales: Australian Military Publications. ISBN 978-1-876439-67-5.
- Charlton, Peter (1983). The Unnecessary War: Island Campaigns of the South-West Pacific 1944–45. Crows Nest, New South Wales: Macmillan Australia. ISBN 0-333-35628-4.
- Davidson, Audrey (2005). Porton: A Deadly Trap. Brisbane, Queensland: Boolarong Press. ISBN 0-646-44766-1.
- Grey, Jeffrey (2008). A Military History of Australia (3rd ed.). Melbourne: Cambridge University Press. ISBN 978-0-521-69791-0.
- Hughes, William (1993). At War With the 51st Infantry Battalion and 31/51st Infantry Battalion (AIF) from 1940 to 1946. Brisbane, Queensland: Church Archivist Press. ISBN 978-0-949122-29-2.
- James, Karl (2005). The Final Campaigns: Bougainville 1944–1945 (PhD thesis). School of History and Politics, University of Wollongong. OCLC 225536344. http://ro.uow.edu.au/theses/467.
- Johnston, Mark (2007). The Australian Army in World War II. Botley, Oxford: Osprey Publishing. ISBN 978-1-84603-123-6.
- Keogh, Eustace (1965). The South West Pacific 1941–45. Melbourne, Victoria: Grayflower Productions. OCLC 7185705.
- Lawie, Donald (2001). "Ordeal at Porton". Australian War Memorial. pp. 45–47. ISSN 1328-2727.
- Long, Gavin (1963). The Final Campaigns. Australia in the War of 1939–1945, Series 1—Army. Volume VII (1st ed.). Canberra: Australian War Memorial. OCLC 1297619. http://www.awm.gov.au/histories/second_world_war/volume.asp?levelID=67909.
- Maitland, Gordon (1999). The Second World War and its Australian Army Battle Honours. East Roseville, New South Wales: Kangaroo Press. ISBN 0-86417-975-8.
- Tanaka, Kengoro (1980). Operations of the Imperial Japanese Armed Forces in the Papua New Guinea Theater During World War II. Tokyo, Japan: Japan Papua New Guinea Goodwill Society. OCLC 9206229.
Coordinates: 5°32′2.32″S 154°45′49.38″E / 5.5339778°S 154.7637167°E
The original article can be found at Battle of Porton Plantation and the edit history here.