
The Battle of Pozières was a two-week struggle for the French village of Pozières and the ridge on which it stands, during the middle stages of the 1916 Battle of the Somme. Though British divisions were involved in most phases of the fighting, Pozières is primarily remembered as an Australian battle. The fighting ended with the Allied forces in possession of the plateau north and east of the village, in a position to menace the German bastion of Thiepval from the rear. The cost had been enormous for both sides and in the words of Australian official historian Charles Bean, the Pozières ridge "is more densely sown with Australian sacrifice than any other place on earth."
Prelude[]
The village of Pozières, on the Albert–Bapaume road, lies atop a ridge approximately in the centre of what was the British sector of the Somme battlefield. Close by the village is the highest point on the battlefield. [Note 1] Pozières was an important German defensive position, the fortified village was an outpost to the second defensive trench system which had become known to the British as the O.G. Lines. This German second line extended from beyond Mouquet Farm in the north, ran behind Pozières to the east, then south towards the Bazentin ridge and the villages of Bazentin le Petit and Longueval. On 14 July, during the Battle of Bazentin Ridge, this southern section of the German second line was captured by the British Fourth Army of Lieutenant General Sir Henry Rawlinson. The possibility of "rolling up" the German second line by turning north now presented itself if Pozières could be captured.[3]
The British Commander-in-Chief, General Sir Douglas Haig, lacked the ammunition to immediately execute another broad-front attack after 14 July.[4] Believing that Pozières and Thiepval would become untenable for the Germans as the British continued their eastward momentum, Haig ordered Rawlinson to concentrate on the centre between High Wood and Delville Wood as well as the villages of Guillemont and Ginchy. Meanwhile the plan was to maintain the pressure and take Pozières by a "steady, methodical, step-by-step advance".[5] Between 13 and 17 July, the Fourth Army made four, small-scale attacks against Pozières with no success and high casualties. In this period the village was subjected to a heavy bombardment and reduced to rubble. On two occasions the attacking infantry got into the trench that looped around the south and western edge of the village, known as "Pozières trench" but both times were driven out. Attempts to get east of the village by advancing up the O.G. Lines also failed.
Battle[]
Taking Pozières[]
Rawlinson planned to deliver another attack on a broad front on 18 July involving six divisions between the Albert-Bapaume road in the north and Guillemont in the south. Haig decided to transfer responsibility for Pozières to the Reserve Army of Lieutenant General Hubert Gough which had been holding the line north of the road since shortly after the opening of the offensive on 1 July. The attack was postponed until the night of 22–23 July. To Gough's army were attached the three Australian divisions of I Anzac Corps, which had begun moving from the Armentières sector. The Australian 1st Division reached Albert on 18 July and despite the postponement of the offensive, Gough, who had a reputation as a "thruster", told the division's commander, Major General Harold Walker, "I want you to go in and attack Pozières tomorrow night". Walker, an experienced English officer who had led the division since Gallipoli, would have none of it and insisted he would attack only after adequate preparation. Consequently the attack on Pozières once more fell in line with the Fourth Army's attack on the night of 22–23 July. The plan called for the Australian 1st Division to attack Pozières from the south, advancing in three stages half an hour apart, while north of the Albert-Bapaume road, the British 48th (South Midland) Division (British X Corps) would attack the German trenches west of the village.[6] The village and surrounding area was defended by elements of the German 117th Division. Early on 22 July the Australian 9th Battalion attempted to improve its position by advancing up the O.G. Lines towards the road but was repulsed. The preparation for the attack involved a thorough bombardment of the village and the O.G. Lines lasting several days. The bombardment included phosgene and tear gas. The infantry were scheduled to go in at 12:30 a.m. on 23 July, the attack being made by the Australian 1st and 3rd Brigades. The infantry had crept into no man's land, close behind the bombardment and when it lifted the German trenches were rushed. The first stage took the Pozières trench that ringed the village to the south.[7]


.jpg)
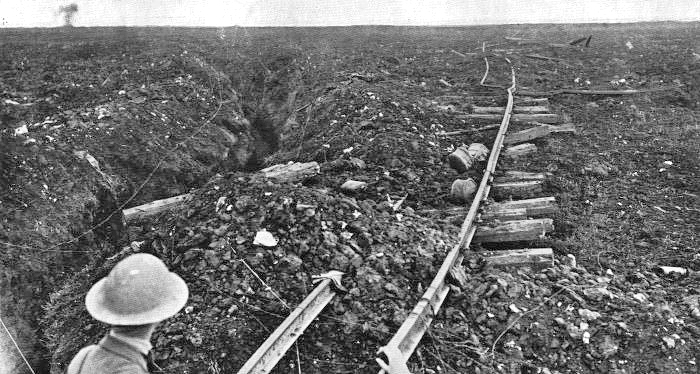
The second stage saw the Australians advance to the edge of the village, amongst what remained of the back gardens of the houses lining the Albert-Bapaume road. The third stage brought the line to the Albert–Bapaume road. The few survivors from the German garrison retreated to the northern edge of the village or into the O.G. Lines to the east. It was also intended that the O.G. Lines would be captured as far as the road, but here the Australians failed, partly due to strong resistance from the German defenders occupying deep dugouts and machine gun nests, and partly due to the confusion of a night attack on featureless terrain, the weeks of bombardment had reduced the ridge to a field of craters and it was virtually impossible to distinguish where a trench line had run. The failure to take the O.G. Lines made the eastern end of Pozières vulnerable and so the Australians formed a flank short of their objectives. On the western edge of the village, the Australians captured a German bunker known as "Gibraltar".[Note 2] During 23 July, some Australians went prospecting across the road. They captured a number of Germans and with minimal effort occupied more of the village. That night the 8th Battalion of the Australian 2nd Brigade, which had been in reserve, moved up and secured the rest of the village. The attack of the 48th Division on the German trenches west of Pozières achieved some success. However, the main attack by the Fourth Army between Pozières and Guillemont was a costly failure.
Holding Pozières[]

.jpg)
Success on the Somme came at a cost which at times seemed to surpass the cost of failure, and for the Australians, Pozières was such a case. As a consequence of being the sole British gain on 23 July, Pozières became a focus of attention for the Germans. Forming as it did a critical element of their defensive system, the German command ordered that it be retaken at all costs. Three attempts were made on 23 July but each was broken up by the British artillery or swept away by machine gun fire. Communication was as difficult for the Germans as it was for the British, and it was not until 7:00 a.m. 24 July that they received their confirmation that Pozières had been lost. With British activity now declining elsewhere on its front, the German IV Corps, on whose sector Pozières lay, was able to concentrate most of its artillery against the village and its approaches. Initially the bombardment was methodical and relentless without being intense. Known trenches and strongpoints, such as the "Gibraltar" bunker, received shell after shell. The western approach to the village, which led from Casualty Corner near the head of Sausage Valley, received such a concentration of shellfire that it was thereafter known as "Dead Man's Road". The German bombardment intensified on 25 July in preparation for their next counter-attack to retake the village.[9] By this stage artillery from all around was able to join in. The German IX Corps had now taken over this sector and the commander cancelled the planned counter-attack, choosing to concentrate on the defence of the O.G. Lines which were the next objective of the British. The bombardment reached a crescendo on 26 July. By 5:00 p.m. the Australians, believing an attack was imminent, appealed for a counter-barrage. In addition to the batteries of I Anzac and British II Corps, the guns of the two neighbouring British corps also joined in. This in turn led the Germans to believe the Australians were preparing to attack and so they increased their fire yet again. It was not until midnight that the shelling subsided. At its peak, the German bombardment of Pozières was the equal of anything yet experienced on the Western Front and far surpassed the worst shelling previously endured by an Australian division. The Australian 1st Division suffered 5,285 casualties on its first tour of Pozières. When the survivors were relieved on 27 July, one observer, Sergeant E.J. Rule said:
- "They looked like men who had been in Hell... drawn and haggard and so dazed that they appeared to be walking in a dream and their eyes looked glassy and starey."
The O.G. Lines[]
On 24 July, once Pozières had been secured, General Gough pushed for immediate moves against the O.G. Lines north and east of the village. The first task was to take the lines up to the Albert–Bapaume road; the original, unobtained objectives. Attacking in the dark, only the Australian 5th Battalion found either of the O.G. trenches and it was counter-attacked by the German 18th Reserve Division. Simultaneously on the Australian's right, the British 1st Division made an attempt to capture Munster Alley, the section of the Switch Line where it intersected the O.G. Lines. A tumultuous bombfight developed but only a small section of trench was held.
Before it was withdrawn, the Australian 1st Division had attempted to prepare a jumping-off line for the assault on the O.G. Lines. The Australian 2nd Division took over the sector on 27 July and General Gough, eager for progress, pressed for an immediate attack. The division's commander, General Gordon Legge, lacked the experience and confidence of General Walker and succumbed to pressure from Gough. On the night of 28–29 July, in conditions far less favourable than those experienced by the 1st Division on the night of 22–23 July, the 2nd Division was expected to attack. The remorseless German bombardment made effective preparations virtually impossible. The dust raised by the shelling prevented the Australian artillery observers from directing their field guns which were tasked with cutting the barbed wire entanglements. An attack by the British 23rd Division on Munster Alley dragged in the Australian 5th Brigade — the ensuing bombfight saw the British and Australian infantry expend over 15,000 grenades.[10] The main attack went ahead, scheduled to start at 12:15 a.m. on 29 July but the Australian 7th Brigade was late in reaching its start line and its movement was detected by the German defenders; when the attack commenced, the Australians were met by a hail of machine gun fire. South of the road the 5th Brigade remained pinned down, unable to even get started. On their left, north of the road, the 7th Brigade encountered uncut wire. On the northern flank some minor progress was made by the 6th Brigade but everywhere else the attack was a failure. Including the attack and the preceding day of preparation the 2nd Division lost over 3,500 men; the 7th Brigade had to be withdrawn to reserve, so great were its losses.
General Haig was disparaging of the division's failure, telling Lieutenant General William Birdwood, the I Anzac Corps commander, "You're not fighting Bashi-Bazouks now." General Legge and the I Anzac staff resolved to do the job properly. To avoid the confusion of a night advance, the plan was to attack at 9:15 p.m. just before dark at which time the crest of the ridge and the mound of the Pozières windmill would still be discernible. However, to attack at dusk meant assembling by day which was only possible to do in the protection of trenches. Therefore a system of approach and assembly trenches had to be dug at night. Whenever the Germans detected digging parties, they mistook them for troops assembling to attack and called down a barrage. Originally the attack was to be made at dusk on 2 August but the trenches were as yet incomplete, the digging either being disrupted or the completed trenches demolished by shellfire. The attack was first postponed to 3 August and then to 4 August when the trenches were finally deemed ready. This careful planning and preparation delivered success and when the 2nd Division went in, both O.G. Lines were captured. South of and astride the Albert–Bapaume Road the O.G. Lines had been so thoroughly obliterated by prolonged shelling that the Australians ended up advancing beyond their objectives. From their vantage in the O.G. Lines on the eastern edge of the Pozières ridge, the Australians now looked over green countryside, the village of Courcelette close by and the woods around Bapaume five miles (8 km) away. The German commander ordered "At any price Hill 160 Pozières ridge must be recovered."
Final counter-attack[]
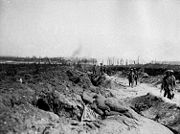
By 5 August the brigades of the Australian 2nd Division were exhausted and were to be relieved by the Australian 4th Division. While the relief was underway on the night of 5–6 August the Australians were subjected to an extreme bombardment, because the salient they occupied could be shelled by the Germans from all directions, including from Thiepval which lay to the rear. On the morning of 6 August a German counter-attack tried to approach the O.G. Lines but was met by machine gun fire and forced to dig in. The bombardment continued through the day, by the end of which most of the 2nd Division had been relieved. From its twelve days in the line, the division had suffered 6,848 casualties. At 4:00 a.m. on 7 August, shortly before dawn, the Germans launched their final counter-attack. On a front of 400 yards (370 m) they overran the thinly occupied O.G. Lines, catching most of the Australians in shelters in the old German dugouts and advanced towards Pozières. For the Australians, the crisis had arrived. At this moment, Lieutenant Albert Jacka, who had won the Victoria Cross at Gallipoli, emerged from a dugout where he and seven men of his platoon had been isolated, and charged the German line from the rear. His example inspired other Australians scattered across the plateau to join the action and a fierce, hand-to-hand fight developed. Jacka was badly wounded but as support arrived from the flanks, the Australians gained the advantage and most of the surviving Germans were captured. No more attempts to retake Pozières were made.
Aftermath[]
Analysis[]


.jpg)


.jpg)


Since taking over the Pozières sector, General Gough's plan had been to drive a wedge behind (east of) the German fortress of Thiepval. Having secured Pozières and the neighbouring section of the O.G. Lines, the attack now moved to the next phase; a drive north along the ridge towards the German strongpoint of Mouquet Farm which protected the rear of Thiepval. I Anzac Corps would carry the advance along the ridge while, on their left, British II Corps would keep in line, systematically reducing the Thiepval salient. Initially the task fell to the Australian 4th Division, which had already suffered 1,000 casualties resisting the final German counter-attack, but both the Australian 1st and 2nd Divisions would be called on again, followed once more by the 4th Division. When the Australians' ordeal on Pozières ridge was over in September, they were replaced by the Canadian Corps who would hold this sector for the remainder of the Somme fighting. The O.G. Lines east of the village became the Canadian start line for the Battle of Flers–Courcelette.
After the battle it became apparent that General Birdwood had lost much of his Gallipoli popularity through his failure to oppose Gough's impetuous desire for "quick results" and his "lack of thought" at Pozières. Soon after, Australian troops rejected his personal appeal for the introduction of conscription, voting against this recommendation largely because of their reluctance to see additional men subjected to the horrors of piecemeal attacks.[11] The Australians had suffered heavy losses; they had lost as many men in the Battle for Pozières in six weeks as they had in the whole Gallipoli Campaign.[12] One of the Official British Historians strongly praised the independent initiative shown by small sub-units of men in clearing the enemy from positions in the village, but at the same time attributed much of the severity of losses to Australian inexperience and their "reckless daring."[13]
Casualties[]
In the fighting around Pozières the 48th Division lost 2,844 casualties from 16–28 July and 2,505 more from 13 August.[14] The 1st Australian Division lost 7,700 men, the 2nd Australian Division had 8,100 casualties and the 4th Australian Division lost 7,100 men.[15] From 27 July – 13 August the 12th Division had 2,717 losses.
See also[]
Victoria Cross[]
- Private John Leak 9th Battalion, 3rd Brigade, 1st Australian Division.[16]
- Lieutenant Arthur Blackburn, 10th Battalion, 3rd Brigade, 1st Australian Division.[16]
Notes[]
- ↑ This high point was known to the Australians as "Hill 160" or "The Windmill." The Germans, recognising the tactical importance of the point, had recoded it as Die Windmühle after a seventeenth-century windmill that existed on the site before the commencement of the battle.[1]While the Somme terrain is only gently undulating, any slight elevation aided observation for artillery.[2]
- ↑ The "Gibraltar Bunker" was known as Das Blockhaus by the German forces and was the only structure in the area remaining after the bombardment.[8]
Footnotes[]
- ↑ Middlebrook 1972, p. 351.
- ↑ Bean 1929, pp. 455, 465.
- ↑ Bean 1929, p. 454.
- ↑ Bean 1929, p. 486.
- ↑ Bean 1929, p. 465.
- ↑ Keegan 1998, p. 319.
- ↑ Liddle 2001, pp. 78–79.
- ↑ Miles 1938, p. 146.
- ↑ Liddle 2001, p. 78.
- ↑ Bean 1929, p. 613.
- ↑ Liddell Hart 1970, p. 327.
- ↑ Cave 2004, p. 43.
- ↑ Jones 1928, p. 153.
- ↑ Miles 1938, pp. 155, 226.
- ↑ Bean 1929, p. 862.
- ↑ 16.0 16.1 Miles 1938, p. 143.
References[]
- Bean, C.E.W. (1929). Official History of Australia in the War of 1914–1918: 'Volume III – The Australian Imperial Force in France: 1916. OCLC 271462387. http://www.awm.gov.au/histories/first_world_war/volume.asp?levelID=67889. Retrieved 5 August 2013.
- Cave, N; Barker, M (2004). Thiepval Exhibition Centre Guidebook (1st ed.). London: Frank Sanderson Publishing. OCLC 819812656.
- Jones, H. A. (1928). The War in the Air: Being the Story of the Part Played in the Great War by the Royal Air Force. Vol. 2 (Naval & Military Press 2006 ed.). Oxford: Clarendon Press. ISBN 1-84734-205-1.
- Keegan, John (1998). The First World War. London: Random House. ISBN 0-09-180178-8.
- Liddell Hart, B. H. (1970). History of the First World War (3rd 1973 ed.). London: Book Club Associates. OCLC 819218074.
- Liddle, P. H. (2001). The 1916 Battle of the Somme: A Reappraisal. Hertfordshire: Wordsworth. ISBN 1-84022-240-9.
- Middlebrook, M. (1971). The First Day on the Somme (1972 ed.). London: Penguin Books. ISBN 0-14-139071-9.
- Miles, W. (1938). Military Operations France and Belgium, 1916 Vol II: 2nd July 1916 to the End of the Battles of the Somme (Battery Press 1992 ed.). London: Macmillan. ISBN 0-901627-76-3.
Further reading[]
- Bean, C. E. W. (1946). Anzac to Amiens: A Shorter History of the Australian Fighting Services in the First World War. Canberra: Australian War Memorial. OCLC 816503198. http://www.awm.gov.au/histories/first_world_war/volume.asp?levelID=67901. Retrieved 5 August 2013.
- Beckett, I. F. W. (2007). The Great War, 1914–1918 (2nd ed.). Harlow: Pearson Education Ltd. ISBN 978-1-4058-1252-8.
- Hart, P. (2006). The Somme. London: Cassell. ISBN 978-0-304-36735-1.
- Renz, I.; Krumeich, G.; Hirschfeld, G (2006). Die Deutschen an der Somme 1914–1918. Krieg, Besatzung, Verbrannte Erde (Pen & Sword 2006 as Scorched Earth: The Germans on the Somme 1914–18 ed.). Berlin: Klartext-Verlagsges. ISBN 1-84415-973-6.
- Philpott, W. (2009). Bloody Victory: The Sacrifice on the Somme and the Making of the Twentieth Century (1st ed.). London: Little, Brown. ISBN 978-1-4087-0108-9.
- Prior, R; Wilson, T (2005). The Somme (1st ed.). New Haven: Yale University Press. ISBN 0-300-10694-7.
- Sheldon, J. (2005). The German Army on the Somme 1914–1916 (Pen & Sword Military 2006 ed.). London: Leo Cooper. ISBN 1-84415-269-3.
- United States Army, American Expeditionary Forces, Intelligence Section (1920). Histories of Two Hundred and Fifty-One Divisions of the German Army which Participated in the War (1914–1918). Washington: Government Print Office. ISBN 5-87296-917-1. http://ia700401.us.archive.org/3/items/cu31924027835317/cu31924027835317.pdf. Retrieved 12 July 2013.
External links[]
- Documentary film on the Battle of Pozières on australianscreen online
- Australian Official History, chapters XIV–XX
| Wikimedia Commons has media related to Battle of Pozières. |
The original article can be found at Battle of Pozières and the edit history here.