The Battle of Rafa, also known as the Action of Rafah, fought on 9 January 1917, was the third and final battle to complete the recapture by British forces of the Sinai Peninsula during the Sinai and Palestine Campaign of the First World War. In this battle, the Desert Column of the Egyptian Expeditionary Force (EEF) attacked an entrenched Ottoman Army garrison at El Magruntein to the south of Rafa, close to the frontier between the Sultanate of Egypt and the Ottoman Empire, to the north and east of Sheikh Zowaiid. The attack marked the beginning of fighting in the Ottoman territory of Palestine.
After the British Empire victories at the Battle of Romani in August 1916 and the Battle of Magdhaba in December, the Ottoman Army had been forced to retreat back to the southern edge of Palestine as the EEF pushed eastwards supported by extended lines of communication. This advance depended on the construction of a railway and water pipeline. With the railway reaching El Arish on 4 January 1917, an attack on Rafa by the newly formed Desert Column became possible. During the day-long assault, the Ottoman garrison defended El Magruntein's series of fortified and strategically strong redoubts and trenches on rising ground surrounded by flat grassland. They were eventually encircled by Australian Light Horsemen, New Zealand mounted riflemen, mounted Yeomanry, cameliers and armoured cars. In the late afternoon, the New Zealand Mounted Rifles Brigade captured the central redoubt and the remaining defences were occupied shortly afterwards.
Background[]

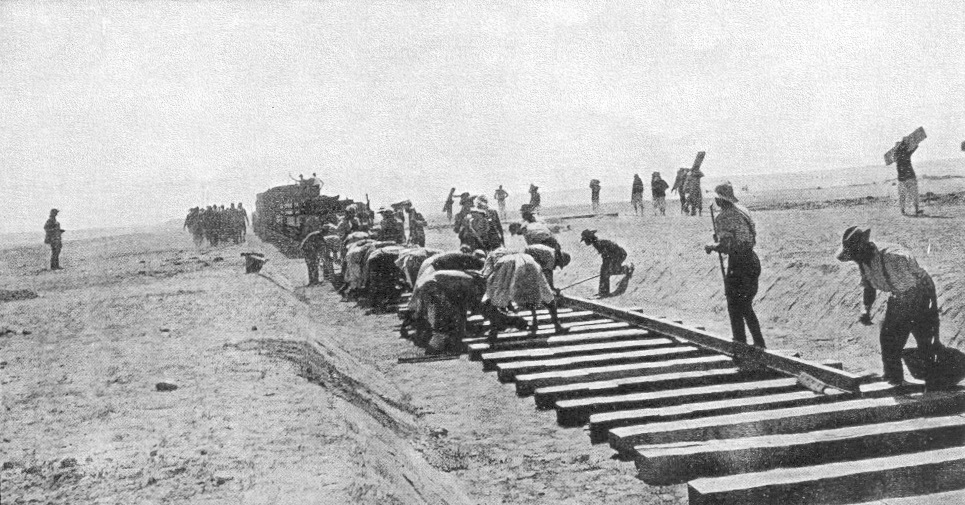
Laying the railway across the Sinai
Following their victory at the Battle of Romani on 4 August 1916, the Anzac Mounted Division with the 5th Mounted Brigade attached and supported by infantry, went onto the offensive. Their advance depended on the construction of the railway and water pipeline. With the railhead about 40 miles (64 km) away, on 23 December 1916 the Anzac Mounted Division, less the 2nd Light Horse Brigade but with the Imperial Camel Corps Brigade attached, secured the British occupation of El Arish during day-long fighting at the Battle of Magdhaba.[1][2][3] Meanwhile, the 52nd (Lowland) Division of infantry, having marched from Romani, established garrison in El Arish and began to fortify the town on the Mediterranean Sea, 30 miles (48 km) from the railhead.[1][2]
El Arish was 90 miles (140 km) by road from the nearest base at Kantara on the Suez Canal, but during the following fortnight, from the arrival of the British Royal Navy on 22 December, quickly followed with the first stores on 24 December, this important Egyptian Expeditionary Force (EEF) forward base grew quickly as 1,500 tons of supplies arrived by ship. Supplies of all kinds were unloaded by the Egyptian Labour Corps and distributed by the Egyptian Camel Transport Corps. These vitally important supply activities at El Arish were protected by the infantry garrison and ground based artillery, supported by the Navy. On 4 January 1917 the first construction train arrived at El Arish, but it was some time before the railway, with its vast supply capacity for the development of infrastructure and supply of large garrisons, was fully developed.[1][2][4][5]


Ottoman Military Town of Hafir el Aujah, the Principal Desert Base
General Sir Archibald Murray, the commander of the EEF, was keen to complete the advance across the north of the Sinai, to put pressure on the southern Ottoman Army. Believing an attack would compel Ottoman forces to abandon their desert bases and outposts on the Egyptian Sinai Peninsula, he ordered the advance from El Arish to Rafa, a distance of 27 miles (43 km), to begin as soon as possible.[6][7]
Prelude[]


Map of the Sinai and the Suez Canal zone in 1917 shows the railway had reached Bir el Mazar
On 28 December Major General Harry Chauvel, commanding Anzac Mounted Division, ordered the 1st Light Horse Brigade to reconnoitre Bir el Burj 12 miles (19 km) along the road from El Arish towards Rafa. The road was found to be suitable for cars and artillery, and a further reconnaissance by the same brigade two days later to Sheikh Zowaiid, 20 miles (32 km) from El Arish reported rolling stretches of pasture, crops and poppies. A small advance guard moved 10 miles (16 km) further, to within sight of the main Rafa defences at El Magruntein, reporting "great activity."[8]
The weather cleared on 5 January, allowing an Australian patrol of the No. 1 Squadron, Australian Flying Corps (AFC), to observe 2,000 or 3,000 Ottoman soldiers digging defences south of Rafa in the area of El Magruntein. British air patrols, two days later, found Ottoman garrisons in strength at El Kossaima and Hafir el Auja in the central, northern Sinai, which could threaten the right flank of the advancing EEF or reinforce Rafa.[6] While the British air patrols were away on 7 January, German airmen took advantage of the growing EEF concentration of formations and supply dumps to bomb El Arish during the morning and evening. The next day the Australian No. 1 Squadron's patrols were in the air all day covering preparations for the attack on Rafa.[6]
Lieutenant General Philip Chetwode, commanding Desert Column, rode out of El Arish at 16:00 on 8 January towards Rafa where a 2,000-strong Ottoman garrison was based. Chetwode's mounted force was the same as Chauvel commanded during the Battle of Magdhaba in December, with the addition of the 5th Mounted Brigade (which had been garrisoning El Arish) and No. 7 Light Car Patrol consisting of 4 gun cars and 3 stores cars.[5][9] Risking an aerial attack during daylight hours, the force began the 30 miles (48 km) journey before sunset to ensure there was enough time for the force to reach El Magruntein. For the first few miles they trekked over heavy sand dunes, which were difficult to negotiate for the doubled teams of horses pulling the guns and ammunition wagons. Once the great shallow trough, worn down by traffic since ancient times, along the Old Road or Pilgrims' Way appeared, the guns and ammunition wagons travelled on the firm middle way while the mounted units rode on either side. The vanguard of the column reached Sheikh Zowaiid at about 22:00; Desert Column bivouacked near the crossroads to the west of the village. Here the first grass the horses had seen since leaving Australia was found on the edge of the fertile maritime plain, 16 miles (26 km) north of El Arish.[5][10]
The plan for the attack at Rafa the next morning, 9 January, was a repetition of Chauvel's successful encirclement attack at Magdhaba. The regiments and motor cars would surround the Ottoman garrison position, gallop up under fire, then dismounted to attack the defenders, in their formidable treble system of trenches and field-works around the earthwork redoubts on the knoll.[6]
Attack force[]
The mounted units of Desert Column, which moved out to the attack commanded by Chetwode were:
- Anzac Mounted Division, commanded by Chauvel, composed of the 1st and 3rd Light Horse Brigades, the New Zealand Mounted Rifles Brigade and the Inverness, Leicester and Somerset Territorial Royal Horse Artillery batteries;
- 1st, 2nd and 3rd Battalions Imperial Camel Corps Brigade with the Hong Kong and Singapore Mountain Battery;
- 5th Mounted Brigade with a battery of the Honourable Artillery Company (18–pounders);
- No. 7 Light Car Patrol consisting of six Ford Light Armoured Motorcars (LAM) equipped with machine-guns.[11][12][13]
No. 1 Squadron Australian Flying Corps, which had been based at Mustabig during the El Arish, Magdhaba operations, moved forward to 5 miles (8.0 km) west of El Arish to support the attack.[14]
Ottoman defenders[]
Rafa was defended by the Ottoman 31st Infantry Regiment (3rd Division) supported by one mountain gun battery.[15] It had been reported by British aerial reconnaissance that this force was between 2,000 and 3,000 strong.[14] They were strongly entrenched in four main positions on the high ground about Hill 255, known as El Magruntein. The central redoubt, which rose about 200 feet (61 m) above to dominate the surrounding grassland, was supported by three systems of redoubts identified as A, B and C systems. These redoubts were linked and supported by trenches on the slopes spreading out towards the southeast, south and southwest. The strong, well prepared and well sited redoubts and trench systems provided all-round defence with a clear view of a battlefield devoid of cover for some 2,000 yards (1,800 m). The only slight weakness was to the rear of the position in the northeast.[16][17][18]
Battle[]
Desert Column began the final approach to attack Rafa on 9 January 1916 without any reserve ammunition for the artillery, rifles and machine guns. The Column's commander, Chetwode, had ordered all wheeled vehicles, excepting the guns, to remain at Sheikh Zowaiid. His brigadiers complied with the order, but only under protest by all.[5][19] It had been the intention of Desert Column Headquarters that the reserve ammunition would be sent onward after daylight. For some reason, this did not occur, resulting in a critical failure of the ammunition supply during the battle. In many cases, supplies rushed forward, but failed to reach the units requiring them on the firing line.[20]
Boundary pillars on Egyptian Sinai-Ottoman Palestine frontier
At 01:00 the 1st Light Horse and the New Zealand Mounted Rifles Brigades led Desert Column. Half a mile (0.80 km) from Sheikh Zowaiid, they encountered a hostile Bedouin camel patrol which was captured. At 06:15 the Auckland Mounted Rifle Regiment (New Zealand Mounted Rifles Brigade) was first to reach the boundary pillars on the Egyptian and Ottoman frontier, moving from the African continent onto Asia. These two brigades rode to a position from which to attack the Rafa defences, from the south, east and north. They were followed at 02:30 by the remainder of the Anzac Mounted Division, part of the 5th Mounted Brigade, the Imperial Camel Brigade, and six Ford motor cars of the 7th Light Car Patrol. Two troops of the Worcester Yeomanry, (5th Mounted Brigade) remained at Sheikh Zowaiid to protect the ammunition column, while a squadron followed the caravan road towards Rafa.[19][21][22]
Map of deployments for Rafah attack
By 06:45 the Anzac Mounted Division headquarters was established 4.5 miles (7.2 km) west of Karm Ibn Musleh on the frontier to the south of Rafa and El Magruntein. The 1st and 3rd Light Horse Brigades and the artillery, took positions to the south to guard against the Ottoman garrison retreating to the southeast, with the Imperial Camel Corps Brigade located three quarters of a mile (1.21 km) to the west. The New Zealand Mounted Rifles Brigade was about 1 mile (1.6 km) to the north with the 5th Mounted Brigade forming Desert Column's reserve.[23] By 07:00 a patrol of the Wellington Mounted Rifles Regiment had cut the telegraph line running east from Rafa towards Shellal and Gaza, isolating the Rafa garrison. Chauvel had reconnoitred the El Magruntein defences and the British Empire horse artillery batteries had begun firing on the redoubts at El Magruntein.[24][25]
Just after 08:00 the New Zealand Mounted Rifles Brigade circled northwards, moving into position for their attacks on the C4 and C5 groups of redoubts and trenches, while the 1st Light Horse Brigade moved into position to attack the C3, C2 and C1 groups. After these objectives were captured, the two brigades were to attack the central redoubt. Meanwhile, three battalions of the Imperial Camel Brigade were ordered to attack the D group of fortifications. The 3rd Light Horse Brigade formed the Anzac Mounted Division's reserve.[26]
The divisional artillery had selected their targets. The Leicester, Inverness and Somerset Batteries Royal Horse Artillery were to cross fire with "B" Battery Honourable Artillery Company to produce a concentrated artillery attack for half an hour from 09:30 to 10:00. Under cover of this barrage, by 09:45 the attacking troops had approached to within 2,000 yards (1,800 m) of the Ottoman entrenchments.[24]
Attack begins[]
Powles' map showing the attacks on Rafa and El Magruntein
As the 1st Light Horse Brigade advanced from the direction of El Gubba, westward towards El Magruntein and the "C" group of redoubts, they encountered heavy machine gun and shrapnel fire from German and Ottoman guns. To the south, the Imperial Camel Brigade advanced towards the B4 redoubt, and at 10:30 the 5th Mounted Brigade was ordered "to demonstrate against the works further west." When they arrived at a plateau 2,500 yards (2,300 m) from El Magruntein, the Warwickshire Yeomanry regiment on the right was ordered to attack the B1 and B2 redoubts, while the Gloucestershire Yeomanry were "sent to the left along the edge of the sand-dunes" to attack the right of the A1 redoubt, the most westerly of the defences. The troops dismounted to begin their attack 2,000 yards (1,800 m) from their objectives, but were targeted "at once" by heavy machine gun fire and shrapnel from two guns.[27]
By 10:00 the attack from the north, led by the Auckland Mounted Rifle Regiment and supported by two machine guns, with the Canterbury Mounted Rifle Regiment on their right, had ridden into Rafa as they circled around El Magruntein. Here, they quickly captured the village along with six German and two Ottoman officers, 16 other ranks and 21 Bedouins. Two troops were sent to watch for the approach of Ottoman reinforcements; one troop to the north towards Khan Yunis and one to the east towards Shellal.[27][28][29]
With the Ottoman garrison defending El Magruntein cut off from the north and east by the New Zealand Mounted Rifles Brigade, orders were issued for all Desert Column reserves to be committed and the attack "pressed home."[27] By 11:00 the attacking force was deployed from right to left: the Canterbury and Auckland Mounted Rifles Regiments, two squadrons of the 1st Light Horse Regiment, one squadron of the 2nd Light Horse Regiment, the 3rd Light Horse Regiment (1st Light Horse Brigade), the 10th Light Horse Regiment (3rd Light Horse Brigade), the 1st Battalion Imperial Camel Corps Brigade and the "Warwick and Gloucester Yeomanry." They were supported by the Inverness Battery covering the New Zealanders, the Leicester and Somerset Batteries covering the Australians and the Hong Kong Battery covering the Camel Corps battalion, while the HAC battery shelled the "C" group of redoubts from a distance of three quarters of a mile (1.21 km).[30]
Chaytor, commanding the New Zealand Mounted Rifles Brigade, moved his headquarters up to the boundary post 1 mile (1.6 km) southeast of Rafa, immediately behind the Auckland Mounted Rifle Regiment. Half an hour later, the attack was seen to be steadily progressing all along the line.[31] By 12:15 the Wellington Mounted Rifle Regiment had come up to the front line, between the Canterburys on the right, and the Aucklanders on the left, within 600 yards (550 m) of El Magruntein, while the 2nd Battalion of the Camel Brigade advanced to extend the line held by the 1st Battalion of the Camel Brigade. Shortly afterwards, the Canterbury Mounted Rifles Regiment found touch with the left of the 5th Mounted Brigade, completing the cordon around the Ottoman Army entrenchments. To the left of the 5th Mounted Brigade, the 7th Light Car Patrol reached the Rafa road, where they found cover from which to direct fire on the A1 and A2 redoubts 1,600 yards (1,500 m) away. Meanwhile, the batteries had pushed forward about 1,500 yards (1,400 m) from their previous positions. "B" Battery HAC stopped firing on the "C" group of redoubts, to commence firing at a range of 1,600 yards (1,500 m) on the A1 and A2 redoubts, in support of the 5th Mounted Brigade.[30]
Ammunition shortages[]
Main Ottoman defensive position and trenches
The Ottoman defenders continued to hold very strong defensive positions, with each redoubt ideally placed to provide supporting fire for other redoubts. In most places the dismounted attackers were utterly exposed to this fire.[Note 1] A constant stream of fire was maintained on the Ottoman parapets to keep the defenders suppressed and unable to take aim while the attack continued. Little by little the cordon slowly drew tighter under intense fire over the bare, gently-sloping grasslands. However, between about 12:15 and 14:15 progress slowed.[6][30]
By early to mid-afternoon supplies of ammunition had begun to run low. Although Chauvel called for further effort, the mistake of leaving the ammunition vehicles behind was paid, as the attack wavered.[32][33] The New Zealand Mounted Rifles Brigade ran out of ammunition for four of its machine guns and the Inverness Battery ran out of shells and had to withdraw.[33][34][35][Note 2]
At 14:30 Chauvel ordered a fresh effort against the C group of redoubts, to begin at 15:30, while a sustained artillery barrage was to continue on these redoubts until then.[30] However, 15 minutes later, an Ottoman machine gun officer and three German soldiers, captured by the troop of the Wellington Mounted Rifles Regiment keeping watch towards Shellal, stated that their 160th Regiment had left Shellal on the Wadi Ghuzzeh when the attack began, to reinforce the Rafa garrison. Shellal was between 10 and 13 miles (16 and 21 km) or about three and a half hours away.[35] This was confirmed when two battalions were seen advancing in artillery formation, over the ridges west of Shellal towards Rafa. An additional 500 soldiers were seen approaching Rafa from the direction of Khan Yunus by the same mounted rifle regiment's northern guard.[28][36]
We were quite stuck up in the open, about 400 yards (370 m) from the trenches, about 15:00, and I ordered the New Zealanders to work round the rear and assault the principal work.
—Chetwode, commanding Desert Column[37]
Final assaults[]
The general assault, launched at 15:30, was supported by all available guns. It made slow progress against the stubborn Ottoman defenders, who were supported by bombing from German planes, while the advanced guard of Ottoman reinforcements, from Khan Yunus in the north and Shellal in the east, were attacking the two troops of the Wellington Mounted Rifles Regiment.[30][35] Four guns of the Canterbury Mounted Rifles Regiment, on the right flank, were moved to a trench before being moved forward to the sunken road. From there they maintained effective overhead covering fire, until the assaulting troops were within a few yards of the trenches. These guns were also well positioned to provide cover if pressure by the Ottoman reinforcements from Khan Yunus and Shellal proved too strong for the two troops of Wellingtons, or if the New Zealand Mounted Rifles Brigade was forced to retire to the coast.[38]
After steady, methodical and persistent work, by 16:00 a cloud of smoke hung over the central redoubt from rifle and machine gun fire. The covering fire was so effective that the Ottoman defenders had extreme difficulty aiming and firing their rifles and machine guns. It then became possible for the attacking forces to cover the last 600–800 yards (550–730 m) of smooth grassy slope in two rushes.[32][36][38]
At about 16:30 the New Zealand Mounted Rifles Brigade launched its final assault on the central redoubt from the northwest, the north and the northeast, without artillery support. Instead, they made determined use of machine guns on the firing line, crossing fire to get better targets, and cooperating with the machine guns of the 1st Light Horse Brigade to cover the advance to within 400 yards (370 m) of the main Ottoman position. They captured the central redoubt in a final bayonet charge, at the run, many of them firing as they ran. From their captured position in the dominating central redoubt, they were able to enfilade other redoubts still held by Ottoman defenders.[32][36][38]
With the New Zealanders holding the dominant redoubt, the 1st and the 3rd Light Horse Brigades were able to advance and capture the remaining redoubts on their fronts. As the 3rd Battalion of the Imperial Camel Brigade approached the B group of trenches, a white flag appeared, and the B2 and the central work of B group were occupied by 16:50. They captured five officers and 214 other ranks while the Warwickshire Yeomanry captured the B1 redoubt and another 101 prisoners.[39] These successful attacks were supported by aircraft, which bombed the redoubts and trenches. The aircraft had recently been fitted with wireless (they had to drop messages during the Magdhaba attack in December), and during the afternoon reported progress to Desert Column headquarters.[40][41][42] The New Zealanders remained close to the main redoubt system while prisoners were collected and sent to Sheikh Zowaiid and the four captured guns were taken away.[43][44] Chetwode reported to the commander of Eastern Force Lieutenant General Charles Macpherson Dobell that the work of all troops engaged had been excellent, and the part played by the New Zealand Mounted Rifles Brigade had been outstanding.[45]
Casualties[]
Prisoners on the road to El Arish from Rafa
Desert Column suffered three times the losses previously endured at Magdhaba.[45] The 487 casualties included 124 New Zealanders: 71 killed, 415 wounded and one missing.[46][47][48]
The mainly Ottoman prisoners, which included some German machine gunners, totalled between 1,472 and 1,635, with 162 of them wounded.[43][49][50] About 200 Ottoman soldiers were killed on the battlefield.[51][52]
Aftermath[]
Ambulance Wagons returning from Rafa to Sheikh Zowaiid
After establishing a strong rearguard position manned by two light horse regiments, commanded by Lieutenant Colonel Leslie Cecil Maygar, it was necessary for the bulk of Desert Column to return to Sheikh Zowaiid for water and rations, arriving about midnight.[53][54] Two light horse regiments remained to stand guard, while the battlefield was cleared by the light horse field ambulances, their stretcher bearers working into the night. The 3rd Light Horse Field Ambulance, covered by the 8th Light Horse Regiment (3rd Light Horse Brigade), remained on the battlefield, as all available ambulance carts and empty wagons were sent up from Sheikh Zowaiid to help transport the wounded to hospital.[44][54][55]
Some 100 or more wounded, British and Turk, lay in the 3rd Light Horse Field Ambulance advanced dressing-station, with few blankets, no food, and no lights, all these conveniences having, in the confusion, gone back to Sheikh Zowaiid on the equipment camels. The 5th Mounted Field Ambulance, with a large number of wounded, was in a similar plight. No. 1 Welsh Ambulance Convoy, long overdue, had not arrived – the convoy had indeed received such alarming reports from retiring parties, that it had returned to Sheikh Zowaiid. All telephonic communication had accidentally been cut off, the Turks were close at hand, the night was a bitter one. Cold, hungry, and hourly expecting capture, the wounded suffered severely.
—R. M. Downes, Australian Army Medical Services, 1914–18[47]
The Anzac Mounted Division Field Ambulance had been reorganised before the battle, and the 10 pairs of litters, 15 pairs of cacolets, 12 sand-carts, 12 cycle stretchers and six sledges, capable of carrying 92 patients at a time, worked to transport the wounded.[56] While, in the morning, the 8th Light Horse Regiment was attacked by Ottoman cavalry and camel units which the light horsemen forced to withdraw leaving 14 prisoners. The whole of the 3rd Light Horse Brigade returned to the battlefield on 10 January with the 7th Light Car Patrol and wagons to collect captured material.[57]
The Turkish held off, but it was not until early next morning that, on the arrival of the 3rd Light Horse Brigade at Sheikh Zowaiid, the Welsh ambulance convoy received orders to return to Magruntein. At 8 a.m. the wounded were sent to Sheikh Zowaiid, and early the same afternoon all the sandcarts of the 52nd Division arrived from El Arish and evacuated them to the receiving station there. Some of these sandcarts went out close to Rafa to bring in a number of wounded Turks who had been missed, and arrived back at Sheikh Zowaiid at 5.30 a.m. on January 11 without molestation, although the rearguard had come in. After treatment and a night’s rest at Sheikh Zowaiid the remainder of the wounded were evacuated in the 1st Light Horse Field Ambulance transport and two Welsh ambulance convoys to El Arish, where they arrived at 6 p.m. Thence they were taken away to Kantara on January 12 by ambulance train, which now came within three miles of El Arish.
—R. M. Downes, Australian Army Medical Services, 1914–18[47]
El Arish bombed[]
During the night of 19 January, with the benefit of a full moon, German and Ottoman aircraft carried out the biggest aerial bombing raid yet, inflicted on the EEF's fast growing, important forward base of El Arish. As well as dropping bombs, these aircraft, probably the powerful new Taube Albatros D.III, swooped down firing machine gun bullets into the camp. Casualties, particularly in the horse lines, which were an obvious target from the air, were considerable.[58][59][60]
Murray's plans[]
The campaign across the Sinai desert, which had begun in August, ended with the expulsion of the Ottoman Empire from Egyptian territory. With the victory at Rafa, the steady progress of the railway and pipeline, and the build up of supplies at El Arish, the EEF was able to build a firm base from which to advance into Ottoman territory. But to do so would require the capture of Gaza; the First Battle of Gaza was fought in March 1917.[50][52][61]
On 19 January aerial reconnaissance found the Ottoman Army had evacuated El Kossaima and the strength of the main desert base at Hafir el Auja had decreased.[62] However, it was thought that Ottoman garrisons would continue to hold onto the Nekhl area in the center of the Sinai Peninsula, including the villages of Bir el Hassana, Gebel Helal, Gebel Yelleg and Gebel el Heitan. To address the problem of Ottoman Army units in the rear of the advancing EEF, a Raid on Nekhl was carried out by two columns of light horse and yeomanry. The two columns moved out from Serapeum, near Ismailia on the Suez Canal, with three aircraft in support to attack Nekhl 60 miles (97 km) to the east. However, on 17 February when the columns were approaching the area, reconnaissance aircraft found the Ottoman garrisons had retired.[63]
Notes[]
- ↑ While fighting on foot, one quarter of the light horsemen, riflemen and yeomanry were holding the horses; a brigade then became equivalent in rifle strength to an infantry battalion. [Preston 1921 p.168]
- ↑ Major Wilkie, Quartermaster of the Wellington Mounted Rifle Regiment, remained at Sheikh Zowaiid with the supply convoys. But during the early hours of the battle, he was so concerned by the small amounts of .303 small arms ammunition (SAA), (used by both rifles and machine guns) his regiment had gone into battle with, that he went forward to Rafa. There he heard that his regiment was calling for ammunition. He seized a cable wagon, emptied out the signalling gear and wire, filled it with boxes of SAA and galloped across to the New Zealand Mounted Rifles Brigade in time for the general assault on the redoubt, materially assisting in the final success.[Powles 1922, pp. 77–8]
Citations[]
- ↑ 1.0 1.1 1.2 Downes 1938, p. 593
- ↑ 2.0 2.1 2.2 Carver 2003, p. 194
- ↑ Bruce 2002 p. 84
- ↑ Gullett 1941, p. 229
- ↑ 5.0 5.1 5.2 5.3 Falls 1930 Vol. 1 pp. 263, 271
- ↑ 6.0 6.1 6.2 6.3 6.4 Cutlack 1941, pp. 49–51
- ↑ Falls 1930 Vol. 1 p. 271
- ↑ Falls 1930 Vol. 1 pp. 262–3
- ↑ Gullett 1941, p. 230
- ↑ Powles 1922, p. 68
- ↑ Gullett 1941, pp. 230–2
- ↑ Powles 1922, p. 65
- ↑ Coulthard-Clark 1998, p. 123
- ↑ 14.0 14.1 Cutlack 1941 p. 50
- ↑ Falls 1930 Vol. 1 p. 377
- ↑ Bruce 2002, pp. 85 & 86
- ↑ Gullett 1941, pp. 230, 234
- ↑ Powles 1922, pp. 64–5
- ↑ 19.0 19.1 Powles 1922, pp. 66–9
- ↑ Powles 1922, pp. 77–8
- ↑ Gullett 1941, pp. 231–232
- ↑ Falls 1930 Vol. 1 pp. 263–4
- ↑ Falls 1930 Vol. 1 p. 264
- ↑ 24.0 24.1 Falls 1930 Vol. 1 p. 265
- ↑ Gullett 1941, p. 233-234
- ↑ Powles 1922, p. 71 and map pp. 80–1
- ↑ 27.0 27.1 27.2 Falls 1930 Vol. 1 p. 266
- ↑ 28.0 28.1 Powles 1922 map pp. 80–1
- ↑ Gullett 1941, p. 234
- ↑ 30.0 30.1 30.2 30.3 30.4 Falls 1930 Vol. 1 p. 267
- ↑ Powles 1922, pp. 71–2
- ↑ 32.0 32.1 32.2 Bruce 2002, pp. 86–7
- ↑ 33.0 33.1 Hill 1978, p. 93
- ↑ Gullett 1941, pp. 235, 237–238
- ↑ 35.0 35.1 35.2 Powles 1922, pp. 74–5
- ↑ 36.0 36.1 36.2 Falls 1930 Vol. 1 p. 268
- ↑ Chetwode quoted in Pugsley 2004, p. 136
- ↑ 38.0 38.1 38.2 Powles 1922, pp. 75–6
- ↑ Falls 1930 Vol. 1 pp. 268–9
- ↑ Cutlack 1941 pp. 49–51
- ↑ Falls 1930 Vol. p. 254
- ↑ Anzac Mounted Division War Diary Appendix 24, pp. 3–8 AWM4-1-60-10
- ↑ 43.0 43.1 Hill 1978 pp. 93–4
- ↑ 44.0 44.1 Powles 1922, pp. 76–7
- ↑ 45.0 45.1 Falls 1930 Vol. 1 p. 270
- ↑ Bruce, 2002, p. 87
- ↑ 47.0 47.1 47.2 Downes 1938, pp. 596–7
- ↑ Pugsley 2004, pp. 135–6
- ↑ Carver 2003, p.195
- ↑ 50.0 50.1 Powles 1922, pp. 76–7, 79
- ↑ Bruce 2002 p.87
- ↑ 52.0 52.1 Dennis et al. 2008, p. 405
- ↑ Powles 1922, p. 76
- ↑ 54.0 54.1 Gullett 1941, p. 242
- ↑ Falls 1930 Vol. 1 p. 269
- ↑ Falls 1930 Vol. 1 p. 274
- ↑ Falls 1930 Vol. 1 pp. 269–70
- ↑ Cutlack 1941, p. 52
- ↑ McPherson 1983, pp. 184–6
- ↑ Wavell 1968, p. 70
- ↑ Bruce 2002, p. 87
- ↑ Cutlack, 1941, p. 51
- ↑ Cutlack 1941, pp. 53–55
References[]
- The Official Names of the Battles and Other Engagements Fought by the Military Forces of the British Empire during the Great War, 1914–1919, and the Third Afghan War, 1919: Report of the Battles Nomenclature Committee as Approved by The Army Council Presented to Parliament by Command of His Majesty. London: Government Printer. 1922. OCLC 29078007.
- Bruce, Anthony (2002). The Last Crusade: The Palestine Campaign in the First World War. London: John Murray. ISBN 978-0-7195-5432-2.
- Carver, Michael, Field Marshal Lord (2003). The National Army Museum Book of The Turkish Front 1914–1918 The Campaigns at Gallipoli, in Mesopotamia and in Palestine. London: Pan Macmillan. ISBN 978-0-283-07347-2.
- Coulthard-Clark, Chris (1998). Where Australians Fought: The Encyclopaedia of Australia's Battles. St Leonards, Sydney: Allen and Unwin. ISBN 978-1-86448-611-7.
- Cutlack, Frederic Morley (1941). The Australian Flying Corps in the Western and Eastern Theatres of War, 1914–1918. Official History of Australia in the War of 1914–1918. Volume VIII (11th ed.). Canberra: Australian War Memorial. OCLC 220900299. http://www.awm.gov.au/histories/first_world_war/volume.asp?levelID=67894.
- Dennis, Peter; Jeffrey Grey, Ewan Morris, Robin Prior with Jean Bou (2008). The Oxford Companion to Australian Military History (2nd ed.). Melbourne: Oxford University Press, Australia & New Zealand. OCLC 489040963.
- Downes, Rupert M. (1938). "The Campaign in Sinai and Palestine". In Butler, Arthur Graham. Gallipoli, Palestine and New Guinea. Official History of the Australian Army Medical Services, 1914–1918. Volume 1 Part II (2nd ed.). Canberra: Australian War Memorial. pp. 547–780. OCLC 220879097. http://www.awm.gov.au/histories/first_world_war/volume.asp?levelID=67898.
- Falls, Cyril; G. MacMunn (1930). Military Operations Egypt & Palestine from the Outbreak of War with Germany to June 1917. Official History of the Great War Based on Official Documents by Direction of the Historical Section of the Committee of Imperial Defence. Volume 1. London: HM Stationary Office. OCLC 610273484.
- Grainger, John D. (2006). The Battle for Palestine, 1917. Woodbridge: Boydell Press. ISBN 978-1-84383-263-8.
- Gullett, Henry S. (1941). The Australian Imperial Force in Sinai and Palestine, 1914–1918. Official History of Australian in the War of 1914–1918. Volume VII (11th ed.). Canberra: Australian War Memorial. OCLC 220900153. http://www.awm.gov.au/histories/first_world_war/volume.asp?levelID=67893.
- Hill, A. J. (1978). Chauvel of the Light Horse: A Biography of General Sir Harry Chauvel, GCMG, KCB. Melbourne: Melbourne University Press. OCLC 5003626.
- Keogh, E. G.; Joan Graham (1955). Suez to Aleppo. Melbourne: Directorate of Military Training by Wilkie & Co.. OCLC 220029983.
- Powles, Charles Guy; A. Wilkie (1922). The New Zealanders in Sinai and Palestine. Official History New Zealand's Effort in the Great War. Volume III. Auckland: Whitcombe & Tombs. OCLC 2959465. http://nzetc.victoria.ac.nz/tm/scholarly/tei-WH1-Sina-t1-body-d3.html.
- Powles, Charles Guy (1928). Chapter X. — Of the Battle of Rafa and the First Crossing of the Boundary into Palestine. The History of the Canterbury Mounted Rifles 1914–1919. Whitcombe and Tombs. OCLC 21614924. http://www.nzetc.org/tm/scholarly/tei-WH1CMRi-t1-body-d10.html.
- Preston, R. M. P. (1921). The Desert Mounted Corps: An Account of the Cavalry Operations in Palestine and Syria 1917–1918. London: Constable & Co. OCLC 3900439.
- Pugsley, Christoper (2004). The Anzac Experience: New Zealand, Australia and Empire in the First World War. Auckland: Reed Books. ISBN 978-0-7900-0941-4.
The original article can be found at Battle of Rafa and the edit history here.