

The Battle of Spion Kop (Dutch language: Slag bij Spionkop
- Afrikaans language
- Slag van Spioenkop) was fought about 38 km (24 mi) west-south-west of Ladysmith on the hilltop of Spioenkop(1) along the Tugela River, Natal in South Africa from 23–24 January 1900. It was fought between the South African Republic and the Orange Free State on the one hand and British forces during the Second Boer War during the campaign to relieve Ladysmith and resulted in a British defeat.
Planning and crossing the Tugela[]
General Sir Redvers Buller, VC, commander of the British forces in Natal, was attempting to relieve a British force besieged in Ladysmith. The Boers under General Louis Botha held the Tugela River against him. Although Botha's men were outnumbered, they were mostly equipped with modern Mauser rifles and up-to-date field guns, and had carefully entrenched their positions. In late December, 1899, Buller made a frontal assault on the Boer positions at the Battle of Colenso. The result was a heavy British defeat.[3]
Over the next few weeks, Buller received further reinforcements, and also acquired sufficient carts and transport to operate away from the railway line which was his main supply line. Buller devised a new plan of attack to relieve Ladysmith. His army was to launch a two-pronged offensive designed to cross the Tugela River at two points and create a bridgehead.[4] They would then attack the defensive line that blocked Buller's advance to Ladysmith. The area was only 20 miles (32 km) from Ladysmith. Buller delegated control of his main force to General Sir Charles Warren, to cross at Trichardt's drift. Buller would then send a second smaller force, under Major General Neville Lyttelton to attack east of Warren's force as a diversion at Potgieter's drift. Once across the Tugela the British would attack the Boer defensive positions and then cross the open plains to relieve Ladysmith.[5]
Warren's force numbered 11,000 infantry, 2,200 cavalry, and 36 field guns.[6] On the 11th they marched westward to cross the Little Tugela and take up position in front of Potgieter's Ferry.[7] However their march was easily visible to the Boers, and so slow (due in part to the massive baggage trains necessary to British officers at the time - Warren's included a cast iron bathroom and well-equipped kitchen) that by the time they arrived at the Tugela, the Boers had entrenched a new position covering it. On the 18th British mounted troops under the Earl of Dundonald enterprisingly reached the extreme Boer right flank, from where there was little to stop them riding to Ladysmith, but Warren recalled them to guard the force's baggage.[8] Once all his force had crossed the river, Warren sent part of an infantry division under Lieutenant General Francis Clery against the Boer right flank positions on a plateau named Tabanyama. The Boers had once again entrenched a new position on the reverse slopes of the plateau, and Clery's attack made no progress. Meanwhile the secondary British attack by Lyttelton at Potgieter's drift had yet to commence in full.[9]
The Kop[]

Battle of Spion Kop map

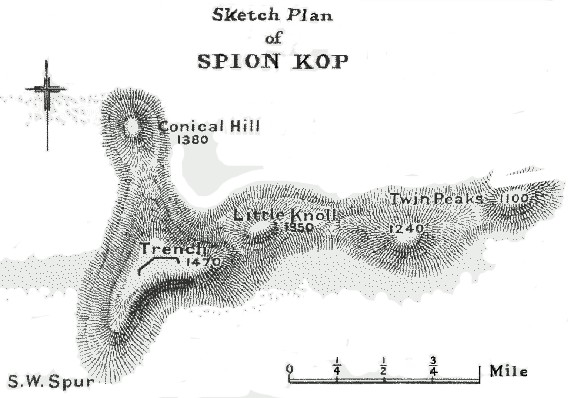
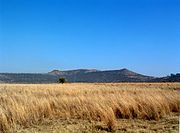
Spion Kop
Spion Kop, just northeast of Warren's force, was the largest hill in the region, being over 1,400 feet (430 m) in height (relative height from the ground). It lay almost exactly at the centre of the Boer line. If the British could capture this position and bring artillery to the hill then they would command the flanks of the surrounding Boer positions.[9] On the night of 23 January, Warren sent the larger part of his force under Major General Edward Woodgate to secure Spion Kop. Lieutenant Colonel Alexander Thorneycroft was selected to lead the initial assault. (Thorneycroft was one of six "special service" officers, among whom were also Robert Baden-Powell and Herbert Plumer, despatched to South Africa shortly before the war to recruit local irregular corps. Thorneycroft's Mounted Infantry were raised in Natal and numbered 360.)
The British climbed up the hill at night and in dense mist.[10] They surprised the small Boer piquet and drove them off the Kop at bayonet point. Of the 15 men in the Boer piquet, one was mortally wounded and his grave lies on the hill to this day.[11] Ten British soldiers were wounded in the charge.[1] The surviving Boers retreated down the hill to their camp waking up their fellow Boers by screaming "Die Engelse is op die kop!" ('The English are on the hill!). A half-company of British Sappers began to entrench the position with a mere 20 picks and 20 shovels (while almost 1,000 soldiers stood around idle) and Major General Woodgate notified General Warren of the successful capture of the hilltop.[12] As dawn broke, the British discovered that they held only the smaller and lower part of the hilltop of Spion Kop, while the Boers occupied higher ground on three sides of the British position. The British had no direct knowledge of the topography of the summit and the darkness and fog had compounded the problem. To make matters worse, the British trenches were inadequate for all defensive purposes. Because the summit of the kop was mostly hard rock, the trenches were at most 40 centimetres (16 in) deep and provided an exceptionally poor defensive position - the British infantry in the trenches could not see over the crest of the plateau and the Boers were able to fire down the length of the crescent-shaped trench from the adjacent peaks. The Boer Generals were not unduly concerned by the news that the British had taken the Kop. They knew that their artillery on Tabanyama could be brought to bear on the British position and that rifle fire could be brought to bear from parts of the Kop not yet occupied by the British.[4] However, the Boer Generals also knew that sniping and artillery alone would not be sufficient to dislodge the British - and the Boer position was desperately vulnerable. If the British immediately established positions on Conical Hill and Aloe Knoll (the two unoccupied kopjes on the kop itself) they could bring their artillery to bear on Tabanyama, threatening the key Boer positions there. More importantly, there was a risk that the British would storm Twin Peaks (Drielingkoppe) to the eastern end of Spion Kop. If Twin Peaks fell, the British would be able to turn the Boers' left flank and annihilate the main Boer encampment. The Boer Generals realised that Spion Kop would have to be stormed quickly if disaster were to be averted.
The Boers began to bombard the British position, dropping shells from the adjacent plateau of Tabanyama at a rate of ten rounds per minute. Meanwhile, Commandant Hendrik Prinsloo of the Carolina Commando captured Aloe Knoll and Conical Hill with some 88 men, while around 300 Burghers, mainly of the Pretoria Commando, climbed the Kop to launch a frontal assault on the British position. Prinsloo told his men: "Burghers, we're now going in to attack the enemy and we shan't all be coming back. Do your duty and trust in the Lord."[13] Minutes later, hundreds of Boers swarmed in to attack the British positions at the Spion Kop crestline, much to the surprise of the British because it was very unusual for the Boers to launch a daytime massed attack that quickly resulted in vicious, close-quarters combat which was not custom to the Boers style of warfare. The British Lee-Metford and Lee-Enfield rifles were no less deadly than the Boer Mauser rifles however as both sides exchanged fire at close range, as well as engaged in hand-to-hand combat with the British wielding fixed bayonets and the Boers wielding hunting knives and their own rifles which they used as bludgeons. After suffering serious losses, the Boer assault carried the crest line after several minutes of brutal hand-to-hand combat, but could advance no further.


British soldiers lie dead on the battlefield after the Battle of Spion Kop, 24 January 1900
A kind of stalemate now settled over the Kop. The Boers had failed to drive the British off the Kop, but the surviving men of the Pretoria and Carolina Commando now held a firing line on Aloe Knoll from where they could enfilade the British position and the British were now under sustained bombardment from the Boer artillery. The British had failed to exploit their initial success, and the initiative now passed to the Boers. Morale began to sag on both sides as the extreme heat, exhaustion and thirst took hold. On one hand the Boers on the Kop could see large numbers of Burghers on the plains below them who refused to join the fight. The sense of betrayal, the bloody failure of the frontal assault, the indiscipline inherent in a civilian army and the apparent security of the British position proved too much for some Boers, who began to abandon their hard-won positions. On the other hand the bombardment began to take its toll on the British. Major General Woodgate fell about 08:30, mortally wounded by a shell splinter.[1] In quick succession, Colonel Blomfield of the Lancashire Fusiliers took command but was wounded soon after Woodgate's death, while the sappers' officer, Major H.H.Massy, and Woodgate's Brigade Major, Captain N.H. Vertue, were killed.[14] Officers and men from different units were intermingled, and the British were now leaderless, confused and pinned down by the heavy Boer artillery and rifle fire. The British artillery, positioned lower down the slopes of Spion Kop, were unable to hit back at the Boer guns.[1]
Colonel Malby Crofton of the Royal Lancasters took charge and semaphored a plea for help, "Reinforce at once or all is lost. General dead."[15] After that the stunned colonel failed to exercise any leadership. Thorneycroft seems to have taken charge, leading a spirited counterattack that failed in the face of withering fire. Warren had already dispatched Major General John Talbot Coke's brigade of two regular battalions and the Imperial Light Infantry (raised in Durban) to reinforce the summit. However, he refused to launch an attack on Tabanyama and barred his guns from firing on Aloe Knoll, believing this to be part of the British position. At 11:40, Buller, who could see that things were not going well, suggested to Warren that Thorneycroft be appointed commander on the Kop. The first runner to Thorneycroft was shot dead before he could utter a word. Finally, a second runner brought the news, "You are a general!"[16]


A Boer sniper killed in the Battle of Spion Kop


Dead British soldiers lying in trenches after the Battle of Spion kop, near Ladysmith, Natal
Winston Churchill was a journalist stationed in South Africa and he had also been commissioned as a Lieutenant in the South African Light Horse by General Buller after his well-publicised escape from Boer captivity. Churchill acted as a courier to and from Spion Kop and General Buller's HQ and made a statement about the scene: "Corpses lay here and there. Many of the wounds were of a horrible nature. The splinters and fragments of the shells had torn and mutilated them. The shallow trenches were choked with dead and wounded." About 13:00, the situation proved too much for some men of the Lancashire Fusiliers who attempted to surrender. Thorneycroft personally intervened and shouted at the Boers who advanced to round up prisoners, "I'm the Commandant here; take your men back to hell sir! I allow no surrenders."[16] Luckily for Thorneycroft, the first of the British reinforcements arrived at this moment. A vicious point-blank firefight ensued but the British line had been saved. At 14:30, Thorneycroft sent Warren a plea for reinforcements and water. Meanwhile, Coke never reached the summit. He saw Thorneycroft's message for help but then did nothing to assure the lieutenant colonel of his nearby presence or support. The Middlesex Regiment and the Imperial Light Infantry, under Colonel Hill, who was senior to Thorneycroft in the Army List and who also believed he was overall commander on the Kop, held the British right for two and a half hours until a second crisis occurred when they too began to give way. The Cameronians (Scottish Rifles) arrived at this point, and drove the Boers back with a bayonet charge. The fighting on the British right now became a stalemate.[17]
In the morning, Warren had asked for reinforcements from Lyttelton's division, even though he had eleven battalions of his own to draw upon. Without asking Buller, Lyttelton sent two battalions toward Spion Kop. One battalion, the King's Royal Rifle Corps turned aside to attack Twin Peaks. After losing Lieutenant Colonel Riddell killed and 100 other casualties, the Rifles cracked the thin Boer line and carried the double summit at 17:00.[1]
The aftermath[]

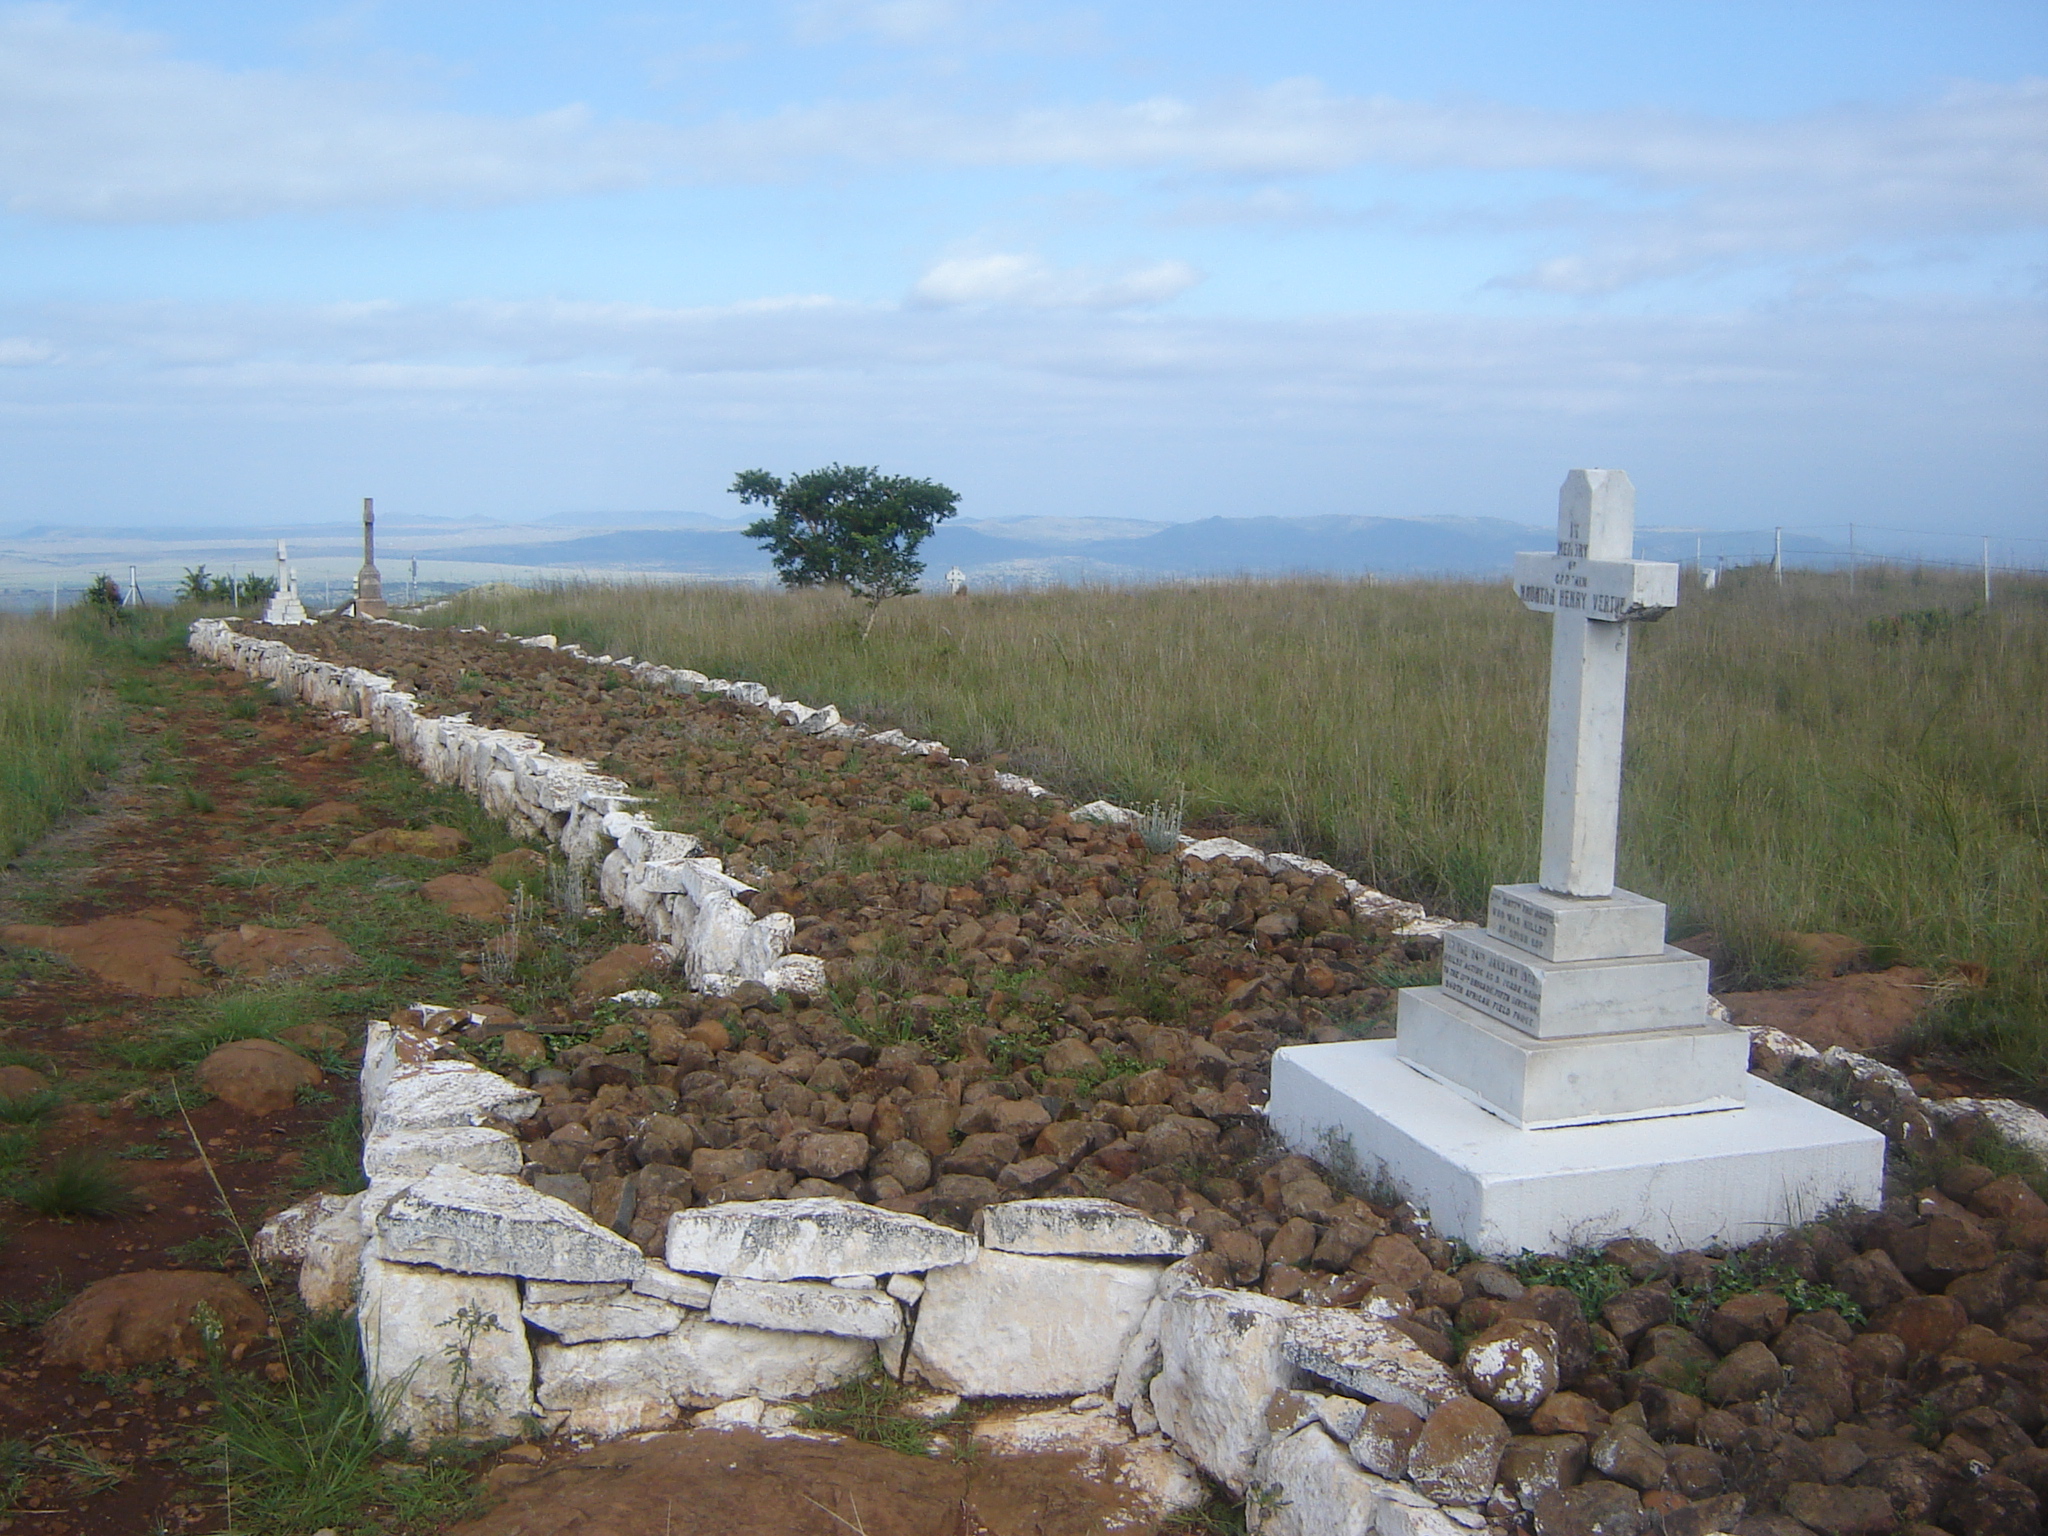
This photo shows a section of the British graves at the site of the Battle of Spioenkop. Many of the fallen soldiers were buried in the trenches where they died. These graves therefore give an indication of where the trenches were located at the time of the battle.
Shattered by the loss of Twin Peaks, General Schalk Willem Burger took his commando out of the battle line that night. On Spion Kop, the Boers who had fought bravely since morning abandoned their positions as darkness fell. They were about to retreat, when Botha appeared and persuaded them to stay. However, the Boers did not reclaim their positions. Unknown to Thorneycroft, the battle was as good as won. But Thorneycroft's nerve was also shattered. After sixteen hours on the Kop doing the job of a Brigadier General in total absence of instructions from Warren, he ordered an unauthorised withdrawal from Spion Kop after reporting that the soldiers had no water and ammunition was running short.[1] His reasons for withdrawing were that without artillery support to counter the heavy Boer artillery fire, there was no possibility of defending the position and the extreme difficulty of digging trenches on the summit of Spion Kop left the British soldiers completely exposed.[1] Churchill appeared on the scene for the second time.[1] This time he brought the first orders from Warren since he elevated Thorneycroft to brigadier. Churchill said 1,400 men were on the way with two large naval guns. Thorneycroft told him, "Better six good battalions safely down the hill than a bloody mop-up in the morning."[18] He ordered the brigade to retreat. At the same time, Buller sent Lyttelton strict orders to recall his troops from Twin Peaks.
When morning came, the Boer Generals were astonished to see two Burghers on the top of Spion Kop, waving their slouch-hats in triumph. The only British on the Kop were the dead and the dying.
Mohandas Gandhi in the uniform of a warrant officer of the Indian Ambulance Corps.
The British suffered 243 fatalities during the battle, many were buried in the trenches where they fell. Approximately 1,250 British were either wounded or captured. Mohandas Gandhi was a stretcher-bearer at the battle, in the Indian Ambulance Corps he had organised, and was decorated. The Boers suffered 335 casualties of which 68 were dead. Commandant Prinsloo's Commando lost 55 killed and wounded out of 88 men.
The British retreated back over the Tugela but the Boers were too weak to follow up their success. Buller managed to rally his troops; Ladysmith would be relieved by the British four weeks later.
Commentary[]
Buller erred in appointing Warren an independent commander, despite his own doubts about his subordinate's capacity.[19] On the evening of the battle, Warren only ordered up reinforcements in men and heavy guns at the late hour of 9:00 pm. Medical assistance, water and ammunition were also tardy in arriving.
Still, perhaps it was not Warren's failure to remedy these deficiencies that proved his worst error. It was his failure to tell Thorneycroft of his plans to do so. Astonishing as it may seem, he had sent no direct instructions to Thorneycroft since the heliogram appointing him a general at midday. He had left it to Coke to reassure Thorneycroft, although (by another astonishing blunder) Warren had never actually told Coke that he had put Thorneycroft in charge. Then, to compound all these blunders, at 9:00 pm Warren had ordered Coke to return to the HQ for consultation, leaving Thorneycroft alone among the horrors on the summit.[20]
Note about the name[]
Although the common English name for the battle is Spion Kop throughout the Commonwealth and its historical literature, the official South African English and Afrikaans name for the battle is Spioenkop: spioen means "spy" or "look-out", and kop means "hill" or "outcropping". Another variant that is sometimes found is the combination into Spionkop.
The reason why the older spelling is used internationally is because the name Spionkop originates from Dutch; spion [spee-yawn], and not spioen [spee-yoon], is the Dutch word for "spy". Until the 1920s, Dutch was still the official written language of the Boers, which is why the older Dutch spelling persists outside South Africa. Within South Africa, the spelling was updated along with Afrikaans spelling reform and recognition of Afrikaans as a language in its own right.
Legacy of the name[]
- Many football grounds in the English Premier League and Football League have one terrace or stand in their stadia named "Spion Kop" or "Kop" because of the steep nature of the terracing. For a history and list of these, see Spion Kop (stadia).
- The village of Spion Kop near Mansfield, Nottinghamshire was named after the battle.
- A hill outside Rugeley Staffordshire part of Cannock Chase AONB, SSSI is called Spion Kop, in memory of the battle.
- A railway hill in the Melbourne yards is called Spion Kop.[21]
- The 18th hole at The Otago Golf Club, oldest golf club in the southern hemisphere, is called Spion Kop.
- The 13th hole of the Launceston Golf Club, Tasmania, Australia is called Spion Kop.
- Daleview cottages, in the village of Ballybrack, in Co. Dublin, Ireland, were known locally as "The Kop". They were built around 1900 and are on a steep hill.
- The higher part of Wivenhoe village, Essex, England, is known as Spion Kop, possibly because veterans of the Boer war once lived on Manor road.
See also[]
References[]
- ↑ 1.0 1.1 1.2 1.3 1.4 1.5 1.6 1.7 Thorneycroft, Alexander (1999). The Stationary Office. ed. The Boer War, Ladysmith and Mafeking, 1900. Uncovered Editions (Abridged ed.). Guildford, Surrey: Biddles Limited. ISBN 0-11-702408-2.
- ↑ 2.0 2.1 "The Battle of Spion Kop". British Battles. Archived from the original on 25 May 2008. http://web.archive.org/web/20080525130716/http://www.britishbattles.com/great-boer-war/spion-kop.htm. Retrieved 2008-05-31.
- ↑ Dupuy, p.854
- ↑ 4.0 4.1 Thomas Pakenham, The Boer War, p. 281 - 283
- ↑ General Buller's despatches
- ↑ Thomas Pakenham, The Boer War, p. 282
- ↑ Churchill, "London to Ladysmith via Pretoria", Chapter XV
- ↑ Kruger, p.183
- ↑ 9.0 9.1 Thomas Pakenham, The Boer War, p. 284
- ↑ Thomas Pakenham, The Boer War, p. 286
- ↑ E. Woodgate (letter to C.Warren, 24 January 1900) from Uncovered Editions.
- ↑ Thomas Pakenham, The Boer War, p. 288
- ↑ Pakenham, p 303
- ↑ Pakenham, p 307
- ↑ Pakenham, p 308-309
- ↑ 16.0 16.1 Pakenham, p. 312
- ↑ Kruger, Goodbye Dolly Grey, pp.193-194
- ↑ Pakenham, p 319
- ↑ Symonds, Julian (1963). Buller's Campaign. London: The Cresset Press. p. 241.
- ↑ Pakenham, p 318
- ↑ Gerald A. Dee, "A Lifetime of Railway Photography," in Photographer Profile Series, Studfield, 1998, p. 20
Bibliography[]
- Defender (1902). Sir Charles Warren and Spion Kop: A Vindication. London: Smith, Elder. http://www.archive.org/details/sircharleswarre00defgoog.
- Thomas Pakenham, The Boer War. New York: Random House 1979.
- Oliver Ransford (1971). Battle Of Spion Kop. London: John Murray. http://books.google.com/books?id=23YcAAAAMAAJ.
- H.G. Castle (1976). Spion Kop: The Second Boer War. London: Almark. ISBN 0-85524-251-5. http://books.google.com/books?id=vsofIgAACAAJ.
- Arthur Conan Doyle (1902). The Great Boer War. ISBN 1-4043-0473-8. http://www.gutenberg.org/etext/3069.
- Deneys Reitz (1929). Commando: A Boer Journal Of The Boer War. ISBN 0-571-08778-7. http://www.ourcivilisation.com/smartboard/shop/reitzd/commando/chap9.htm.
- The 7 volume "The Times History of the War in South Africa", ed L.S. Amery,(pub 1900-1909)
- An Illustrated History of South Africa, Cameron & Spies, Human & Rousseau publishers, 1986 (ISBN 1-86812-190-9).
- Military Heritage did a feature about the bloody Spion Kop battle for a hill of the Boer War (Herman T. Voelkner, Military Heritage, October 2005, Volume 7, No. 2, pp 28 to 35, and p. 71), ISSN 1524-8666.
- Winston, Churchill, My Early Life. New York: Simon & Schuster, 1930.
- Byron Farwell, The Great Anglo-Boer War. New York; Harper & Row, 1976.
- Denis Judd, The Boer War. New York: MacMillan, 2003.
- William Manchester, The Last Lion. Boston: Little Brown, 1983.
- Celida Sandys, Churchill: Wanted Dead or Alive. New York: Carroll and Graf, 1999.
- Rayne Kruger, Goodbye Dolly Gray, New English Library, 1964
- Ian Knight, Colenso 1899: The Boer War in Natal. Osprey Campaign Series #38; Osprey Publishing; 1995. ISBN 1-85532-466-0
- Dupuy, R. E; Dupuy, T. N. (1977). The Encyclopedia of Military History. New York: Harper & Row. ISBN 0-06-011139-9.
External links[]
| Wikimedia Commons has media related to Battle of Spioenkop. |
- Personal reflections on a trip to Spion Kop Extensive page on the battle with dozens of photos
- BBC Sport - page containing a video which, although about the football stand called the Kop, goes through in detail the Spion Kop battle
- Despatches in the London Gazette original reports from the commanding officers.
The original article can be found at Battle of Spion Kop and the edit history here.