| Battle of Ulundi | |||||||
|---|---|---|---|---|---|---|---|
| Part of Anglo-Zulu War | |||||||
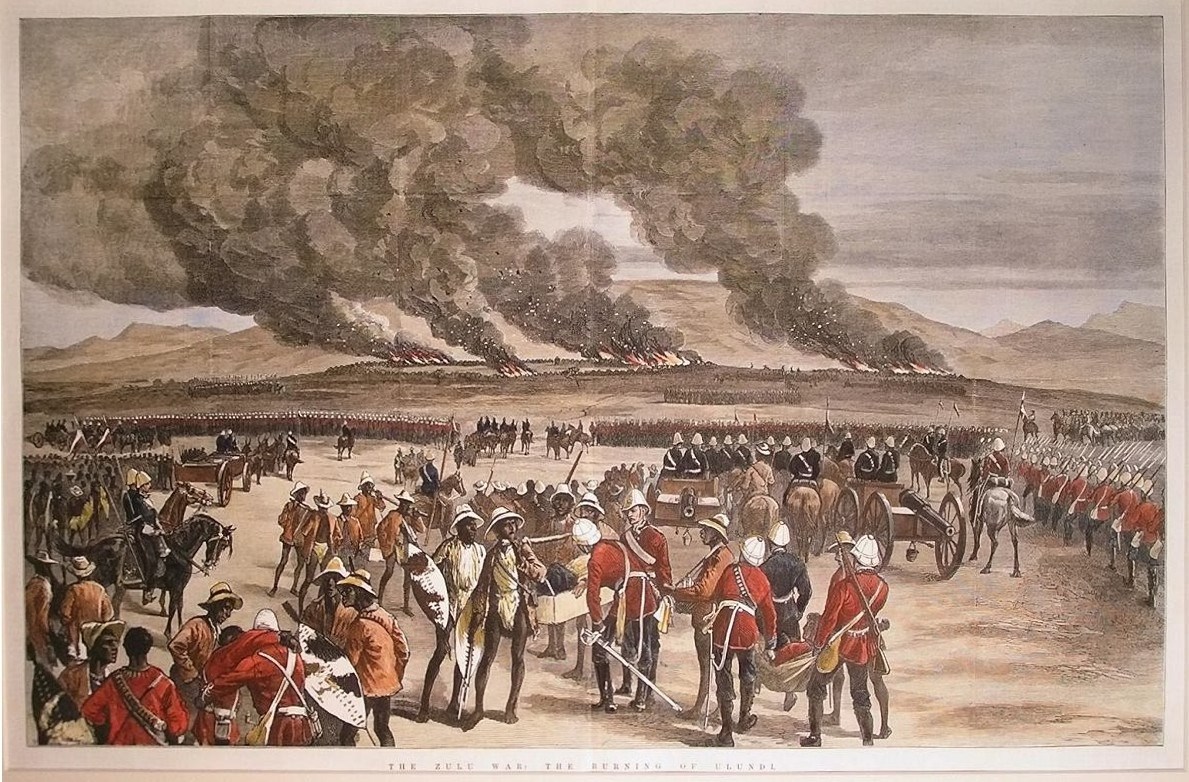 The Burning of Ulundi | |||||||
| |||||||
| Belligerents | |||||||
|
| Zulu Kingdom | ||||||
| Commanders and leaders | |||||||
| Lord Chelmsford | Ziwedu kaMpande[1] | ||||||
| Strength | |||||||
|
4,200 British[2] 1,000 Africans Two Gatling Guns 10 cannon | 12,000 to 15,000 [3] | ||||||
| Casualties and losses | |||||||
|
82-103. 13-18 killed[4] 69-85 wounded |
1,500:[5] 473 killed[6] 1,000+ wounded | ||||||
The Battle of Ulundi took place at the Zulu capital of Ulundi on 4 July 1879 and was the last major battle of the Anglo-Zulu War. The British army finally broke the military power of the Zulu nation by defeating the main Zulu army and immediately afterwards capturing and razing the capital of Zululand, the royal kraal of Ulundi.
Prelude[]

Photograph purported to be of Cetshwayo, c. 1875, although the identity of this man is in doubt
As a result of the decisive Zulu victory at the battle of Isandlwana in January over Chelmsford's main column and the consequent defeat of the first invasion of Zululand, the British found themselves forced to launch a new invasion of Zululand. In April 1879 despite recent battles at Kambula and Gingindlovu which had resulted in serious losses for the Zulus, the British were back at their starting point. News of the defeat at Isandlwana had hit Britain hard. In response, a flood of reinforcements had arrived in Natal with which Chelmsford prepared a second invasion of Zululand. Lord Chelmsford was aware by mid June that Sir Garnet Wolseley had superseded his command of the British forces. Chelmsford was ordered by Her Majesty's Government to "...submit and subordinate your plans to his control."[7] Chelmsford ignored this and various peace offers from Cetshwayo[8] in order to strike while the Zulu were still recovering from their defeats and to attempt to regain his reputation before Wolseley could remove him from command of the army.[9]
For his renewed offensive Chelmsford's overall strength was increased to 25,000.[10] However, the very size of the force overwhelmed the supply and transport capacity of Natal and Chelmsford would have to utilize a number of troops that could be sustained in the field.[11] In the event, for his main column, he fielded two cavalry regiments, five batteries of artillery and 12 infantry battalions, amounting to 1,000 regular cavalry, 9,000 regular infantry and a further 7,000 men with 24 guns, including the first ever British Army Gatling gun battery. The lumbering supply train consisted of 600 wagons, 8,000 oxen and 1,000 mules. The structure of the force was reorganised; Colonel Evelyn Wood’s No. 4 column became the flying column, Colonel Charles Pearson was relieved of command by Major General Henry Crealock and his No.1 column became the 1st Division and Major General Newdigate was given command of the new 2nd Division, accompanied by Lord Chelmsford himself.
Invasion[]
All through April and May there was much to and fro manoeuvring by the British, particularly with supply and transport.[12] Eventually, on 3 June, the main thrust of the second invasion began its slow advance on Ulundi.[13] The 1st division was to advance along the coast belt supporting 2nd division, which with Wood's flying column, an independent unit, was to march on Ulundi from Rorke’s Drift and Kambula. Still hoping for an end to hostilities, King Cetshwayo refrained from attacking the extended and vulnerable supply lines, consequently the British advance was unopposed.[14] As the force advanced Cetshwayo dispatched envoys from Ulundi to the British. These envoys reached Chelmsford on 4 June with the message that Cetshwayo wished to know what terms would be acceptable to cease hostilities. Chelmsford sent a Zulu-speaking Dutch trader back with their terms in writing.


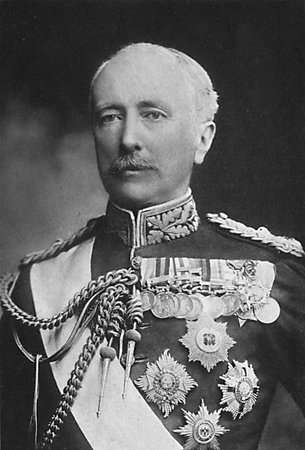
Lord Chelmsford
On the evening of 6 June jittery British troops and artillery in laager at Fort Newdigate opened fire on an arriving piquet company of Royal Engineers commanded by Lieutenant John Chard of Rorke's Drift fame, killing two horses and wounding one.[15] By the 16th the slow advance was quickened by the news that Wolseley was on his way to Natal to take command.[16] On the 17th a depot named 'Fort Marshall' was established - not far from Isandlhwana. On 28 June Chelmsford’s column was a mere 17 miles away from Ulundi and had established the supply depots of 'Fort Newdigate', 'Fort Napoleon' and 'Port Durnford' when Sir Garnet Wolseley arrived in Cape Town. Wolseley had cabled Chelmsford ordering him not to undertake any serious actions on the 23rd but the message was only received through a galloper on this day. Chelmsford had no intention of letting Wolseley stop him from making a last effort to restore his reputation and did not reply. A second message was sent on 30 June reading:
"Concentrate your force immediately and keep it concentrated. Undertake no serious operations with detached bodies of troops. Acknowledge receipt of this message at once and flash back your latest moves. I am astonished at not hearing from you"
Wolseley, straining to assert command over Chelmsford, tried to join 1st Division, lagging along the coast behind the main advance. A final message was sent to Chelmsford explaining that he would be joining 1st Division, and that their location was where Chelmsford should retreat if he was compelled. High seas prevented Wolseley landing at Port Durnford and he had to take the road. At the very time Wolseley was riding north from Durban, Chelmsford was preparing to engage the enemy. Wolseley's efforts to reach the front had been in vain.

Field Marshal Lord Wolseley
On the same day the first cable was received, Cetshwayo’s representatives again appeared. A previous reply to Chelmsford’s demands had apparently not reached the British force, but now these envoys bore some of what the British commander had demanded – oxen, a promise of guns and a gift of elephant tusks. The peace was rejected as the terms had not been fully met and Chelmsford turned the envoys away without accepting the elephant tusks and informed them that the advance would only be delayed one day to allow the Zulus to surrender one regiment of their army. The redcoats were now visible from the Royal Kraal and a dismayed Cetshwayo was desperate to end the hostilities. With the invading enemy in sight, he knew no Zulu regiment would surrender so Cetshwayo sent a further hundred white oxen from his own herd along with Prince Napoleon’s sword, which the Zulu had taken 1 June 1879 in the skirmish in which the Prince had been killed. The Zulu umCijo regiment, guarding the approaches to the White Umfolozi River where the British were camped, refused to let the oxen pass, deeming it a useless gesture, saying as it was impossible to meet all Chelmsford's demands - fighting was inevitable.[17] The irate telegram from Wolseley issued on 30 June now reached Chelmsford, and with only five miles between him and a redemptive victory, it was ignored.
The battle[]
On 3 July, with negotiations having broken down, Colonel Buller led a cavalry force across the river to reconnoitre the ground beyond. A party of Zulus were seen herding goats near the Mbilane stream and troopers moved to round them up. On a hunch, Buller bellowed an order for them to stop and prepare to fire from the saddle. His instinct proved right, for 3,000 Zulus rose from the long grass at that moment and fired a fusillade, before charging forth. Three troopers were shot dead and Buller ordered his men to retire. As they dashed back to the river, Baker’s Horse who had been scouting further across, took up position and gave covering fire for the river crossing. Their crossing in turn was covered by the Transvaal Rangers on the opposite bank. This incident had placed the entire reconnaissance in grave danger, but Buller’s alertness and leadership saved them from annihilation. Chelmsford was now convinced the Zulus wanted to fight and replied to Wolseley’s third message, informing him that he would indeed retreat to 1st division if the need arose, and that he would be attacking the Zulus the next day.
That evening Chelmsford issued his orders. The British, having learned a bitter lesson at Isandlwana, would take no chances meeting the Zulu army in the open with their normal line of battle such as the 'Thin Red Line' of Balaclava fame. Their advance would begin at first light, prior to forming his infantry into a large hollow square,[18] with mounted troops covering the sides and rear. Neither wagon laagers nor trenches would be used, to convince both the Zulus and critics that a British square could “beat them fairly in the open”.[citation needed]
At 6 a.m. Buller led out an advance guard of mounted troops and South African irregulars, which after Buller had secured an upper drift (river crossing at a ford), was followed by the infantry, led by the experienced Flying Column battalions. By 7:30 a.m. the column had cleared the rough ground on the other side of the riverbank and their square (in reality a rectangular shape) was formed. At 8:45 a.m.the Zulu engaged the cavalry on the right and left which slowly retired and passed into the square. The leading face was made up of five companies of the 80th Regiment in four ranks, with two Gatling guns in the centres, two 9-pounders on the left flank and two 7-pounders on the right. The 90th Light Infantry with four companies of the 94th Regiment made up the left face with two more 7-pounders. On the right face were the 1st Battalion of the 13th Light Infantry, four companies of the 58th Regiment, two 7-pounders and two 9-pounders. The rear face was composed of two companies of the 94th Regiment, two companies of the 2nd Battalion of the 21st Regiment (Royal Scots Fusiliers). Within the square were headquarters staff, No. 5 company of the Royal Engineers led by Lieutenant Chard, the 2nd Native Natal Contingent, fifty wagons and carts with reserve ammunition and hospital wagons. Buller’s horsemen protected the front and both flanks of the square. A rearguard of two squadrons of the 17th Lancers and a troop of Natal Native Horse followed.
Battalions with Regimental Colours now uncased them; the band of the 13th Light Infantry struck up and the 5,317-man strong ‘living laager’ began its measured advance across the plain. No Zulus in any numbers had been sighted by 8 a.m., so the Frontier Light Horse were sent forth to provoke the enemy. As they rode across the Mbilane stream, the entire Zulu inGobamkhosi regiment rose out of the grass in front of them, followed by regiment after regiment rising up all around them. The Zulu Army under the command of umNtwana Ziwedu kaMpande - around 12,000 to 15,000 strong, now stood in a horseshoe shape encircling the north, east and southern sides of the square. A Zulu reserve force was also poised to complete the circle. The Zulu ranks stood hammering the ground with their feet and drumming their shields with their assegais. They were made up of both veterans and novices with varying degrees of confidence. The mounted troops by the stream opened fire from the saddle in an attempt to trigger a premature charge before wheeling back to gallop through the gaps made in the infantry lines for them. As the cavalry cleared their front at about 9 a.m., the four ranks of the infantry with the front two kneeling, opened fire at 2,000 yards into the advancing Zulu ranks. The pace of the advance quickened and the range closed between the British lines and the Zulus. The British were ready and the Zulu troops faced concentrated fire. Zulu regiments had to charge forward directly into massed rifle fire, non-stop fire from the Gatling guns and the artillery firing canister shot at point-blank range.
Charges were made by the Zulus, in an attempt to get within close range, but they could not prevail against the British fire. There were a number of casualties within the square to Zulu marksmen, but the British firing did not waver and no warrior was able to get within 30 yards of the British ranks. The Zulu reserve force now rose and charged against the south-west corner of the square. Nine-pounders tore great chunks out of this body while the infantry opened fire. The speed of the charge made it seem as if the Zulu reserves would get close enough to engage in hand-to-hand combat but no warrior reached the British ranks. Chelmsford ordered the cavalry to mount, and the 17th Lancers, 1st King’s Dragoon Guards, colonial cavalry, Native Horse and 2nd Natal Native Contingent charged the now fleeing Zulus. The Zulus fled towards the high ground with cavalry at their heels and shells falling ahead of them. The Lancers were checked at the Mbilane stream by the fire of a concealed party of Zulus, causing several casualties to the cavalrymen before they overcame the resistance. The pursuit continued until not a live Zulu remained on the Mahlabatini plain, with members of the Natal Native Horse, Natal Native Contingent and Wood's Irregulars slaughtering the Zulu wounded, in revenge for the bloodshed at Isandlwana.
Aftermath[]
Sir Garnet Wolseley's camp at Ulundi
After half an hour of concentrated fire from the artillery, the Gatling Guns and thousands of British rifles, Zulu military power was broken. British casualties were ten killed and eighty-seven wounded, while nearly five hundred Zulu dead were counted around the square,[6] another 1,000 or more were wounded. Chelmsford ordered the Royal Kraal of Ulundi to be burnt – the capital of Zululand burned for days. Chelmsford turned over command to Wolseley on 15 July at the fort at St. Paul's, leaving for home on the 17th. Chelmsford had partially salvaged[19] his reputation and received a Knight Grand Cross of Bath, largely because of Ulundi; however, he was severely criticized by the Horse Guards investigation[20] and he would never serve in the field again.[21]
Cetshwayo had been sheltered in a village since 3 July and fled upon hearing news of the defeat at Ulundi. The British forces were dispersed around Zululand in the hunt for Cetshwayo, burning numerous kraals in a vain attempt to get his Zulu subjects to give him up[22] and fighting the final small battle to defeat the remaining hostile battalions. He was finally captured on 28 August by soldiers under Wolseley's command at a kraal in the middle of the Ngome forest. He was exiled to London, where he would be held prisoner for three years. Wolseley, having replaced both Chelmsford and Bartle Frere, swiftly divided up Zululand into thirteen districts, installing compliant chiefs in each so that the kingdom could no longer unite under one ruler. Cetshwayo was restored to the throne of the partitioned Zulu kingdom in January 1883 shortly before his death in 1884.[23]
See also[]
References[]
- ↑ Laband, John. Historical dictionary of the Zulu wars, Scarecrow Press, 2009, ISBN 0-8108-6078-3, p.6.
- ↑ 1,911 Encyclopædia Britannica entry for Zululand gives 5,200
- ↑ 1911 Encyclopædia Britannica entry for Zululand gives 12,000 to 15,000
- ↑ Ian Knight, Adam Hook, British Fortifications in Zululand 1879, Osprey, 2005, p.59: gives 13 killed 69 wounded. F.E. Colenso, History of the Zulu War and Its Origin, London, 1880, p. 448, gives 18 killed, 85 wounded.
- ↑ New York Times, 25 July 1879, THE BATTLE OF ULUNDI, gives 1,500 Zulu casualties. 1911 Encyclopædia Britannica entry for Zululand gives 1,500.
- ↑ 6.0 6.1 Hall, D.D..Military History Journal, V.4, No.4, Artillery in the Zulu War 1879, South African Military History Society, ISSN 0026-4016, December 1978. Quotes the London Standard reporting 473 counted dead.
- ↑ F.E. Colenso, History of the Zulu War and Its Origin, London, 1880, p.455
- ↑ F.E. Colenso, History of the Zulu War and Its Origin, London, 1880, p. 456
- ↑ F.E. Colenso, History of the Zulu War and Its Origin, London, 1880, p. 461, "... everyone understood that he would try and end the war before he was superseded ... that 'poor Lord Chelmsford' might get a chance, win a battle ...".
- ↑ Morris, Donald R.; Buthelezi, Mangosuthu The Washing of the Spears, Da Capo Press, 1998, p.498. F.E. Colenso, History of the Zulu War and Its Origin, London, 1880, p.396, gives British strength in April as 22,545.
- ↑ Morris, Donald R.; Buthelezi, Mangosuthu, The Washing of the Spears, Da Capo Press, 1998, p. 498.
- ↑ Morris, Donald R.; Buthelezi, Mangosuthu, The Washing of the Spears, Da Capo Press, 1998, pp.506-507.
- ↑ F.E. Colenso, History of the Zulu War and Its Origin, London, 1880, p. 440, "the correspondent of the Times wrote: "We are wandering towards Ulundi much as the Children of Israel wandered towards Canaan ... " '
- ↑ F.E. Colenso, History of the Zulu War and Its Origin, London, 1880, p.441
- ↑ F.E. Colenso, History of the Zulu War and Its Origin, London, 1880, p.439
- ↑ F.E. Colenso, History of the Zulu War and Its Origin, London, 1880, p. 440, " ... acted as the "spur to the head" which expedited Lord Chelmsford's movements."
- ↑ F.E. Colenso, History of the Zulu War and Its Origin, London, 1880, p. 449
- ↑ Hall, D.D..Military History Journal, V.4, No.5, Squares in the Zulu War 1879, South African Military History Society, ISSN 0026-4016, June 1979. Details and diagrams of squares used by British.
- ↑ Lock, Ron & Quantrill, Peter Zulu Victory: The Epic of Isandlwana and the Cover-up Jonathan Ball Publishers, Johannesburg & Cape Town, 2002 ISBN 1-86842-214-3, p.283.
- ↑ Lock, Ron & Quantrill, Peter Zulu Victory: The Epic of Isandlwana and the Cover-up Jonathan Ball Publishers, Johannesburg & Cape Town, 2002 ISBN 1-86842-214-3, Chapter 9.
- ↑ Gump, James O.. The Dust Rose like Smoke: The Subjugation of the Zulu and the Sioux, Bison Books, 1996, ISBN 0-8032-7059-3, p.99.
- ↑ Gump, James O.. The Dust Rose like Smoke: The Subjugation of the Zulu and the Sioux, Bison Books, 1996, ISBN 0-8032-7059-3, pp. 99-100.
- ↑ Gump, James O.. The Dust Rose like Smoke: The Subjugation of the Zulu and the Sioux, Bison Books, 1996, ISBN 0-8032-7059-3, p.105.
Bibliography[]
- Barthorp, Michael (2002). The Zulu War: Isandhlwana to Ulundi. Weidenfeld & Nicolson. ISBN 0-304-36270-0.
- Brookes, Edgar H; Webb, Colin de B. (1965). A History of Natal. Brooklyn: University of Natal Press. ISBN 0-86980-579-7.
- Colenso, Frances E. (1880). History of the Zulu War and Its Origin. Assisted by Edward Durnford. London: Chapman & Hall. http://www.archive.org/details/historyofzuluwar00colerich.
- David, Saul (February 2009). "The Forgotten Battles of the Zulu War". pp. 26–33.
- David, Saul (2005). Zulu, The Heroism and Tragedy of the Zulu War of 1879. Penguin Books. ISBN 0-14-101569-1.
- Gump, James O. (1996). The Dust Rose Like Smoke; The Subjugation Of The Zulu And The Sioux. Bison Books. ISBN 0-8032-7059-3.
- Laband, John (2009). Historical dictionary of the Zulu Wars. Scarecrow Press. ISBN 0-8108-6078-3.
- Laband, John; Knight, Ian (1996). The Anglo-Zulu War. Stroud: Sutton. ISBN 0-86985-829-7.
- Lock, Ron; Peter Quantrill (2002). Zulu Victory: The Epic of Isandlwana and the Cover-up. Johannesburg & Cape Town: Jonathan Ball Publishers. ISBN 1-86842-214-3.
- Martineau, John (1895). The life and correspondence of the Sir Bartle Frere,. John Murray.
- Morris, Donald R. (1998). The Washing of the Spears. Da Capo Press. ISBN 0-306-80866-8.
- Knight, Ian (2003). The Anglo-Zulu War. Osprey. ISBN 1-84176-612-7.
- Raugh, Harold E. Jr. (2011). Anglo-Zulu War 1879: A Selected Bibliography. Scarecrow PressPress. ISBN 0-8108-7227-7.
- Thompson, Paul Singer (2006). Black soldiers of the queen: the Natal native contingent in the Anglo-Zulu War. University of Alabama Press. ISBN 0-8173-5368-2.
- Spiers, Edward M. (2006). The Scottish Soldier and Empire, 1854–1902. Edinburgh University Press. ISBN 978-0-7486-2354-9.
External links[]
- http://www.britishbattles.com/zulu-war/ulundi.htm
- http://www.rorkesdriftvc.com/ulundi/
- http://www.historyofwar.org/articles/battles_ulundi.html
- Travellers Impressions
Coordinates: 28°19′S 31°25′E / 28.317°S 31.417°E
The original article can be found at Battle of Ulundi and the edit history here.