The Battle of Villers-Bocage took place during the Second World War on 13 June 1944, one week after the Allies landed in Normandy to begin the liberation of German-occupied France. The battle was the result of a British attempt to improve their position by exploiting a temporary vulnerability in the German defences to the west of the city of Caen. After one day of fighting in and around the small town of Villers-Bocage and a second day defending a position outside the town, the British force retired.
Both British and Germans regarded control of Caen as vital to the Normandy battle. In the days following the Allied D-Day landings of 6 June, the Germans rapidly established strong defences in front of the city. On 9 June a two-pronged British attempt to surround and capture Caen was defeated, but on the British forces' right flank, neighbouring American units had forced open a wide gap in the German front line. Seizing the opportunity to bypass Caen's defences, a mixed mobile force of tanks, infantry and artillery, formed around the 7th Armoured Division's 22nd Armoured Brigade, advanced through the gap in a flanking manoeuvre towards Villers-Bocage. British commanders hoped that the appearance of a strong force in their rear would force the German defenders of Caen's western approaches—principally the Panzer Lehr armoured division—to surrender or withdraw.
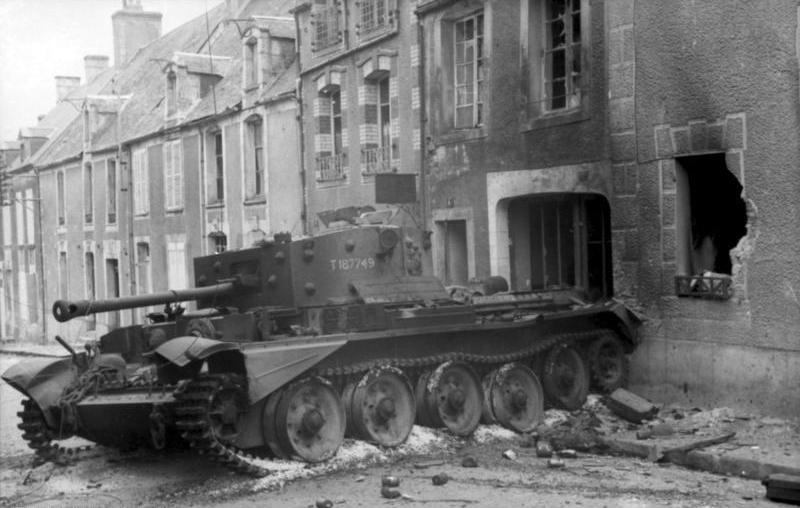
Under the command of Brigadier William "Loony" Hinde,[nb 2] the 22nd Armoured Brigade group reached Villers-Bocage without serious incident, but as its lead elements moved beyond the town on the morning of 13 June they were ambushed by Tiger I tanks of the 101st SS Heavy Panzer Battalion. In fewer than 15 minutes numerous tanks, anti-tank guns and transport vehicles fell victim to the German force, the vast majority being destroyed by SS-Obersturmführer Michael Wittmann's tank. With reinforcements arriving the Germans then launched an assault on the town. Although this was repelled, after six hours Hinde decided to withdraw his force to a more defensible position outside Villers-Bocage. The following day fighting resumed in the Battle of the island. The British defended their position until a controversial decision was taken to pull the Brigade group back from its salient. Villers-Bocage played no further role in the Second Army's Battle for Caen; the town was eventually liberated on 4 August, although by then it had been bombed twice by the Royal Air Force and was largely in ruins.
The Battle of Villers-Bocage has proved a contentious subject among students of the campaign because the British withdrawal marked the end of the post D-Day "scramble for ground" and the start of a grinding attritional battle for Caen. Most historians conclude that its failure was due to a lack of conviction among some senior commanders rather than a military defeat, although a few also maintain that the force committed was inadequate for the task. In particular Michael Wittmann's single-handed action during the battle's early stages has excited imaginations, to the extent that recent historians argue that it has disproportionately dominated the historical record and that, while "remarkable", Wittmann's role in deciding the battle's outcome has been exaggerated.
Background[]


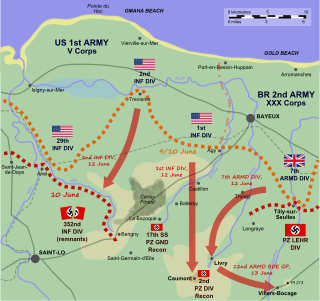
Allied and Axis dispositions on 12 June 1944, showing the British flanking attack through the Caumont Gap and the supporting US 1st Infantry Division's advance
For the soldiers of I Corps's 3rd Infantry Division who stormed ashore on Sword beach on 6 June 1944, the city of Caen some 9 miles (14 km) inland was the ultimate goal.[22] Possession of Caen was especially attractive to Allied planners; the surrounding country contained airfields and was open, dry, and conducive to swift offensive operations where the Allies could bring their numerical superiority in tanks and mobile units to bear.[23] The city's capture on D-Day was described by Chester Wilmot as an "ambitious" request to make of troops who would be landing "last, on the most exposed beaches, with the farthest to go, against what was potentially the greatest opposition".[24] It proved to be beyond the 3rd Infantry Division's means. Congestion in the beachhead delayed the division's armoured support, and its thrust inland grew progressively weaker as it was forced to fight past strongly held German positions en route. The advance ran out of steam before nightfall, stopped short of Caen's outskirts by elements of the 21st Panzer Division.[25]
The next day, following their pre-invasion timetable, the British launched Operation Perch. Envisaged as an advance to the southeast of Caen when it was planned before D-Day, Perch was heavily reliant on the city's rapid capture.[26] For a few days, I Corps continued to attack the outskirts of Caen, but the Germans regarded the city and its surroundings as the linchpin of their position in Normandy and poured reinforcements into the area.[27] With resistance solidifying it became clear to the British that any opportunity to rush Caen's defences with small-scale actions had passed. On 9 June the Allied ground forces commander, General Bernard Montgomery, altered Perch to incorporate a major two-pronged assault intended to surround and take the city.[28]
After a delay caused by manoeuvring forces into position, on 12 June simultaneous attacks were launched to the west and east of Caen.[29] Leading the drive around the eastern side of Caen, the 51st (Highland) Infantry Division soon ran into stiff resistance from the 21st Panzer Division. With casualties mounting for minimal gains, the next day the Highlanders' attack was called off.[30] To the west of Caen XXX Corps was no more successful, rapidly becoming bogged down in heavy fighting for the village of Tilly-sur-Seulles. Defending the village was the newly arrived Panzer Lehr Division—one of the most powerful armoured formations in the German Army.[31][32][33][34][nb 3]
Caumont Gap[]

During the night of 9/10 June the German 352nd Infantry Division retired towards Saint-Lô, creating a wide gap in the German lines covered only by light forces. On 12 June the British 7th Armoured Division passed through the gap heading for Villers-Bocage and the ridge beyond, while the US 1st and 2nd Infantry Divisions launched their own attacks in support.
Although the envelopment of Caen had stalled, on XXX Corps's right flank at the junction between the British Second and United States First Armies, a potentially favourable situation had developed. Since D-Day the US First Army and British XXX Corps had destroyed five German battle groups including LXXXXIV Korps's reserves,[35] leaving only the battered 352nd Infantry Division covering the Trévières–Agy sector.[36] The 352nd had been in continuous action since its defence of Omaha Beach on 6 June and had received few replacements for the heavy losses it had suffered.[37] Under severe pressure from American attacks,[36] the 352nd's left flank collapsed. With its position no longer tenable, on the night of 9–10 June the division pulled back to Saint-Lô.[38] This withdrawal created a 7.5-mile (12.1 km) hole in the German lines near the village of Caumont-l'Éventé, dubbed by the Allies the 'Caumont Gap'.[35][39] Only the 17th SS-Panzergrenadier Division's reconnaissance battalion remained in the area.[40] The Germans made plans to bring up the 2nd Panzer Division,[nb 4] but on 10 June the bulk of the division was strung out between Amiens and Alençon and was not expected to arrive in strength until 13 June. Reluctant to commit 2nd Panzer until it was fully assembled,[40] General der Panzertruppe[43] Hans Freiherr von Funck, of XLVII Panzer Korps, was nevertheless persuaded to rush the division's reconnaissance battalion to Caumont with orders to hold the high ground there.[40]
Conscious of the opportunity to bypass Caen's western defences by exploiting the Caumont Gap, British Second Army commander Lieutenant-General Miles Dempsey met with Lieutenant-General Gerard Bucknall, commanding XXX Corps, and Major-General George Erskine, commanding the 7th Armoured Division. Erskine was ordered to disengage his tanks from the fighting around Tilly-sur-Seulles.[44] The 7th Armoured Division was now to move through the gap,[39] seize the town of Villers-Bocage behind the front line, and menace the Panzer Lehr Division's exposed flank.[45][46] The British objective was a ridge 1.6 miles (2.6 km) to the east of Villers-Bocage;[47] Dempsey hoped that the appearance of a strong force in Panzer Lehr's rear, occupying high ground and interdicting important lines of communication, would compel the German division to withdraw or surrender and thus break the deadlock to the west of Caen.[8][12][48] The 50th (Northumbrian) Infantry Division would maintain pressure against the Panzer Lehr Division around Tilly-sur-Seulles to support the attack[49] while elements of the United States V Corps would push forward.[50]
Despite the need for rapid action to take full advantage of the German vulnerability, the 7th Armoured Division was slow to redeploy and spent the morning of 12 June attempting to advance on Tilly-sur-Seulles according to its original orders. At 12:00 a meeting was held between Major-General Erskine and Brigadier Hinde, the commanding officer of the division's 22nd Armoured Brigade. Hinde was ordered to move immediately through the gap.[8] Soon afterwards the 8th King's Royal Irish Hussars—the division's armoured reconnaissance regiment[51]—began to reconnoitre the route the brigade would take; the rest of the division departed from the village of Trungy at around 16:00.[52] Four hours later the main body was approaching Livry after a 12-mile (19 km) unopposed advance,[53] the last 6 miles (9.7 km) of which were though German-held territory.[46] Minor resistance was encountered when the 8th Hussars' leading Cromwell tanks were destroyed by an anti-tank gun of the Panzer Lehr Division's Escort Company,[52][nb 5] but riflemen and more tanks were brought forward and within two hours the position was cleared.[53][55]
Hoping to keep the Germans guessing as to his force's objective, on reaching the vicinity of la Mulotiere, north of Livry, Hinde ordered a halt for the night.[9] While the main force conducted routine maintenance,[52] the 8th King's Royal Irish and 11th (Prince Albert's Own) Hussars (the division's armoured car regiment[51]) reconnoitred the flanks.[56] The 11th Hussars found no resistance on the right flank and linked up with the US 1st Infantry Division near Caumont,[nb 6] while on the left flank the 8th Hussars located elements of the Panzer Lehr Division just under 2 miles (3.2 km) away.[56]
Planning[]

.jpg)
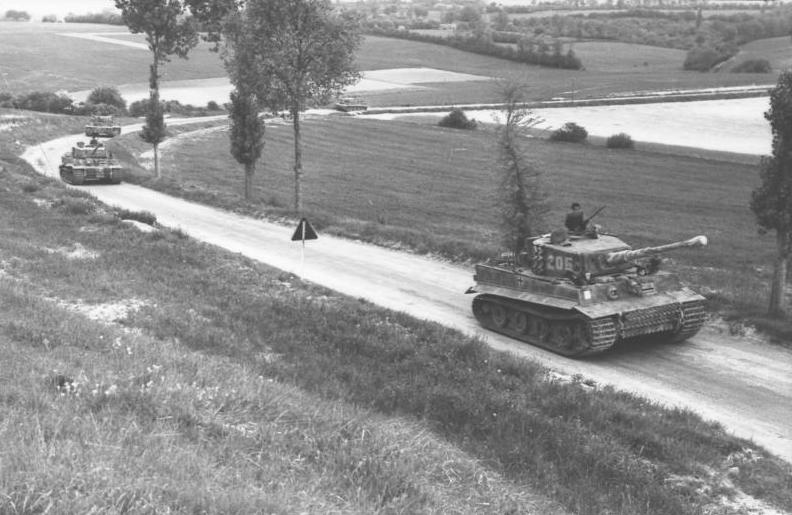
Wittmann's company, 7 June 1944, on road Route Nationale 316 en route to Morgny. Wittmann is standing in the turret of Tiger 205.[57]
During the night Hinde put the final touches to his battle plan.[12][58] It was clear that to control Villers-Bocage his 22nd Armoured Brigade group would have to rapidly occupy the nearby ridge.[47][59] The 4th County of London Yeomanry (4CLY), with one company of the 1st Battalion the Rifle Brigade, was to pass through Villers-Bocage and occupy Point 213, the highest point of the ridge. The 1/7th Queen's Royal Regiment (West Surrey) would follow up and occupy the town itself, while the 5th Royal Tank Regiment (5RTR), with a further company of the Rifle Brigade, was to take up positions on a second area of high ground to the southwest of the town at Maisoncelles-Pelvey.[60] Equipped with M10 Achilles self-propelled anti-tank guns,[13] the 260th Anti-tank Battery of the Norfolk Yeomanry would cover the gap between 4CLY and 5RTR.[60] The 5th Regiment, Royal Horse Artillery (5RHA), equipped with Sexton self-propelled artillery guns, would advance behind the rest of the brigade. The 5RHA and the brigade's tactical headquarters were established to the west of the town at Amayé-sur-Seulles.[61][62] Hinde's two Hussar regiments were to provide flank protection, act as a buffer, screen the British from the Panzer Lehr, and seek out enemy positions on either side of the line of advance.[63] The remainder of the division—the 131st Infantry Brigade with the 1st Royal Tank Regiment (1RTR) and the 1/5th and 1/6th battalions Queen's Royal Regiment (West Surrey)[51]—was to position itself in the Livry area to hold a "firm base", keeping the Brigade group's line of communication secure.[64][65]
Having done all they could in the short term to address the gaping hole in their front by sending light reconnaissance forces to cover the Caumont area until newly arriving divisions had assembled,[66] the Germans turned their attention to their open left flank. I SS-Panzer Korps commander Obergruppenführer[67] Sepp Dietrich ordered his only reserve, the 101st SS Heavy Panzer Battalion, to position itself behind the Panzer Lehr and 12th SS-Panzer divisions in the Villers-Bocage area,[68] as a precaution against any Allied attempt to hook through the Caumont Gap.[69]

.jpg)
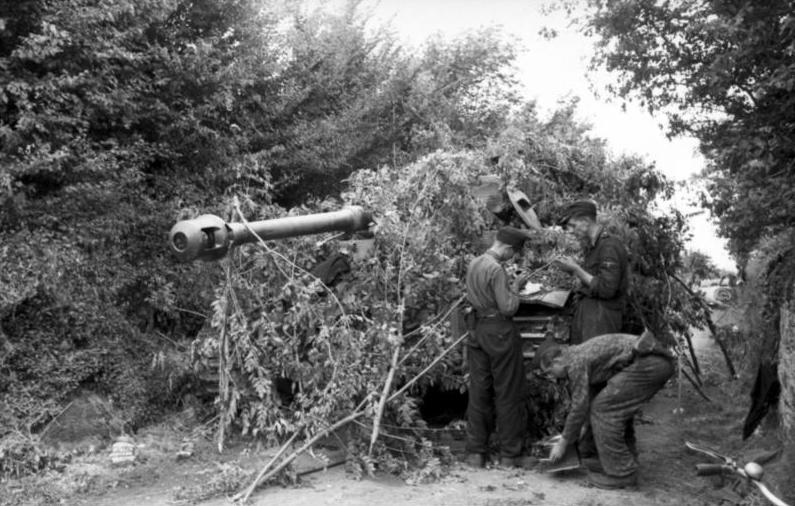
Most likely taken on 14 June this photo shows a camouflaged Tiger tank on the Ancienne Route de Caen (the old Caen Road), where Wittmann's company spent the night of 12/13 June.[70][71]
The 101st SS Heavy Panzer Battalion had arrived in Normandy on 12 June, after a five-day, 160-mile (260 km) drive from Beauvais.[69][72] Mustering 45 Tiger I tanks at full strength,[nb 7] the battalion had come under severe air attack near Versailles and been reduced to around 17 serviceable tanks.[72][73][nb 8] The battalion's 1st Company was situated 5.6 miles (9.0 km) northeast of Villers-Bocage; the 2nd Company, under the command of SS-Obersturmführer Michael Wittmann, was just south of Point 213 on the Villers-Bocage ridge; and the 3rd, with only one serviceable tank, was near Falaise and would not reach the front for another two days.[70][74] Wittmann's 2nd Company nominally consisted of 12 tanks,[nb 9] but through a combination of losses and mechanical failures only Tigers 212, 213, 214, 224, 231, and 232 were present on 13 June.[11][18]
The area around Villers-Bocage came under heavy naval artillery fire during the night of 12/13 June and fearing that he had been spotted, Wittmann relocated his company three times. The long drive to Villers-Bocage had caused significant wear to the tanks, so he scheduled a mechanical overhaul for the following morning.[77]
Battle[]
Advance[]
During the early hours of 13 June, riflemen of the 1st Rifle Brigade conducted a reconnaissance along the first half-mile (0.9 km) of the intended British route.[78] Livry was reported to be clear of Germans and the advance resumed at 05:30, with 4CLY leading the way.[52][63][79] Moving cautiously, the column was met at the farms and hamlets along its route by jubilant French civilians,[80] leading to a mood of general relaxation among the soldiers.[81] Information passed to the British—later found to be incorrect—suggested that German tanks were stranded in Tracey-Bocage,[82] and rumours stated that other tanks, without fuel or infantry, were similarly stranded at the Château de Villers-Bocage.[83] On 11 June, German medical personnel had established a hospital at the château,[84] but this position had been abandoned by first light on 13 June. However, a handful of German combat troops remained about the town.[85]
As the column approached Villers-Bocage a German Sd.Kfz. 231 armoured car was sighted some distance off. Its commander had clearly observed the British advance, but the nearest British tank was unable to traverse its turret to engage and by the time a second tank had moved into position the armoured car had withdrawn.[83][86] At 08:30, having safely covered the 5 miles (8.0 km) from its overnight position, the 22nd Armoured Brigade group entered the town to be greeted by celebrating residents; two German soldiers were spotted leaving at high speed in a Volkswagen Kübelwagen car.[87] The two Hussar regiments made contact with German forces on either side of the 22nd Brigade group's advance,[4] with the 8th Hussars engaging eight-wheeled armoured cars. They reported seeing German tanks heading towards Villers-Bocage but Lieutenant Charles Pearce, of 4CLY, believed that these were probably misidentified self-propelled guns.[88]
Morning fighting[]
British and German positions prior to Michael Wittmann's attack
With Villers-Bocage in British hands A Squadron 4CLY motored ahead to Point 213 without additional reconnaissance, according to their instructions.[59][89][90] A Kübelwagen encountered on the road was engaged and destroyed,[91] and the tanks moved into hull down positions to establish a defensive perimeter.[83] Along the road between the town and the ridge, the personnel carriers of the Rifle Brigade were ordered to pull over and park nose to tail to allow reinforcements for Point 213 to pass.[4][83][92] The riflemen dismounted and posted sentries, although they could see fewer than 250 yards (230 m) to either side of the road.[87][92]
Major Wright, commanding officer of the 1st Rifle Brigade,[93] called a conference to be held on Point 213 and attended by all officers and senior NCOs of A Company. Moving towards the ridge in a single half-track, it was realised that one enemy shell could wipe out the company's entire command capability, so the half-track's occupants were rapidly dispersed among several other vehicles.[83] In Villers-Bocage, Lieutenant-Colonel Arthur, Viscount Cranley, commanding officer of 4CLY,[94] expressed concern that his men were "out on a limb"; he was assured by Brigadier Hinde that all was well, and ordered to Point 213 to ensure his men had taken up good defensive positions. Hinde then left Villers-Bocage for his headquarters.[62]
South of Point 213 with his men of 2nd Company, 101st SS Heavy Panzer Battalion, Wittmann was surprised to discover British armour advancing through Villers-Bocage much sooner than had been expected.[95] He later stated: "I had no time to assemble my company; instead I had to act quickly, as I had to assume that the enemy had already spotted me and would destroy me where I stood. I set off with one tank and passed the order to the others not to retreat a single step but to hold their ground."[96]
"For Christ's sake get a move on! There's a Tiger running alongside us fifty yards away!"
Wittmann's Tiger was spotted at approximately 09:00 by Sergeant O'Connor of the Rifle Brigade, who was travelling towards Point 213 in a half-track and broke radio silence to give the only warning the British force received.[69] The Tiger emerged from cover onto Route Nationale 175 and engaged the rearmost tank of A Squadron 4CLY at Point 213—a Cromwell—destroying it.[70][97] A Sherman Firefly responded but was itself 'knocked out'.[nb 10] Burning, the Firefly came to rest across the road, impeding any attempt to either reinforce the ridge or to withdraw from it.[98] The British at Point 213 then came under fire from the rest of Wittmann's command, losing three more tanks.[98][99]

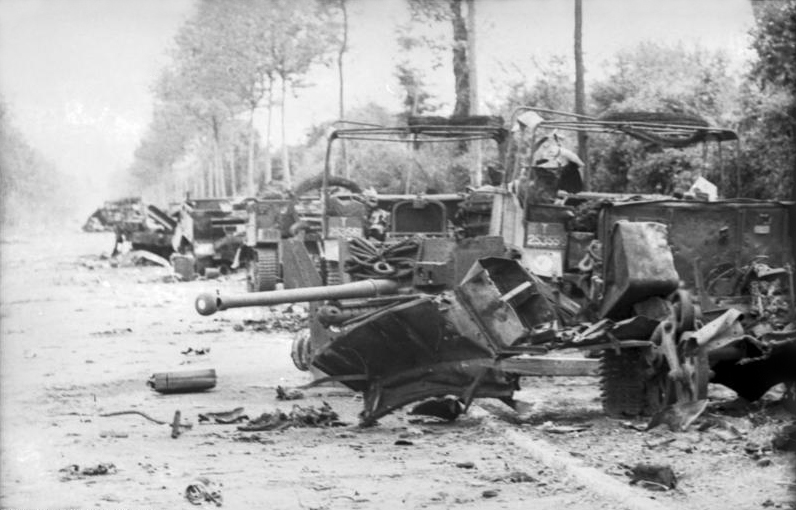
The wreckage of the 1st Rifle Brigade's transport column, and a 6 pounder anti-tank gun, on the road between Villers-Bocage and Point 213
Wittmann now headed for Villers-Bocage.[98] Along the road the men of the Rifle Brigade desperately attempted to find PIAT anti-tank weapons and set up a 6 pounder anti-tank gun, but as the Tiger drew closer panic set in and the riflemen abandoned their efforts and sought shelter. Along the roadside, one by one the brigade's carriers burst into flames as their fuel tanks were ruptured by machine gun and high explosive fire.[98][100][nb 11] However, few casualties were inflicted.[11] Reaching the eastern end of Villers-Bocage, Wittmann engaged three M5 Stuart light tanks of the 4CLY's reconnaissance troop. One, under the command of Lieutenant Ingram, attempted to block the road but was hit, exploding violently.[98] The other two soon followed suit.[100][nb 12]
In the town the tanks of 4CLY's Regimental Headquarters attempted to escape, but their reverse speed was "painfully slow".[11] One engaged Wittmann's Tiger, managing to get off two shots before being destroyed.[11][105] Two others, their commanders believing they were being engaged from the flank, reversed off the road into gardens; 4CLY's Adjutant, Captain Pat Dyas, found his Cromwell further screened behind a small barn. The Tiger rammed its way past the wrecked Stuart and continued towards the centre of town, knocking out one of the two British tanks but missing Dyas.[105] Lieutenant Charles Pearce took his scout car and, locating the rest of the reconnaissance troop in the middle of town, warned them about what was coming their way. While they quickly got off the road Pearce continued further west to alert 4CLY's B Squadron.[11] Wittmann, meanwhile, had accounted for another Cromwell,[106] and as he made his way onto Villers-Bocage's main street destroyed two artillery Observation Post (OP) tanks—a Cromwell and a Sherman[nb 13]—belonging to 5RHA.[107] These were followed by the intelligence officer's scout car and the medical officer's half-track.[109]


Major Well's Sherman OP tank on the main street in Villers-Bocage[110]
Accounts differ as to what happened next. Historians George Forty and Daniel Taylor record that following the destruction of the OP tanks, Wittmann briefly duelled without success against a Sherman Firefly before withdrawing.[111][112] This duel collapsed a house that also contained a German sniper, as shells from Wittmann's Tiger hit it.[113] In the Yeomanry Association's The Sharpshooter newsletter, tanker Robert Moore recalls that he was the one responsible for forcing Wittmann to pull back, when a shot from his tank dented the Tiger's driver visor.[114] These accounts attest that Wittmann's withdrawal brought him face to face with Dyas's Cromwell, which, having been bypassed, had been following the Tiger seeking a shot at its thinner rear armour. Dyas opened fire without effect; Wittmann returned fire and destroyed the British tank.[111] Charles Pearce, however, puts the destruction of Dyas's tank earlier, suggesting that Wittmann had engaged it by traversing the Tiger's turret around before advancing onto the town's main street;[115] a position supported by historian Henri Marie. Escaping the destruction of his tank, Dyas was shot at by German infantry positioned in houses along the street.[116] Wittmann's Tiger is reported to have continued eastwards to the outskirts of Villers-Bocage before being disabled at the road junction to Tilly-sur-Seulles by a 6 Pounder anti-tank gun under the command of Sergeant Bray.[117][nb 14] However, Wittmann's own account contradicts this. He states that his tank was disabled by an anti-tank gun in the town centre.[96]
In fewer than 15 minutes, 13–14 tanks, two anti-tank guns and 13–15 transport vehicles had been destroyed by the 101st SS Heavy Panzer Battalion, the vast majority by Wittmann's tank.[99][120] Now on foot, Wittmann made his way to the headquarters of the Panzer Lehr Division at the Cháteau d'Orbois, 3.7 miles (6.0 km) north of Villers-Bocage.[117]
Late morning and the fighting on Point 213[]
Later that morning Major Werncke, of the Panzer Lehr Division, conducted a reconnaissance of the area. On hearing tank engines he abandoned his scout car and, continuing on foot, discovered a column of unoccupied Cromwell tanks. Their crews were studying a map with an officer at the front of the column. Werncke mounted one of the tanks and drove off before the British could react. At the eastern end of Villers-Bocage he found a scene of "burning tanks and Bren-gun carriers and dead Tommies". He took his captured tank back to the Panzer Lehr's headquarters at Cháteau d'Orbois.[121]
In the wake of the 101st SS Heavy Panzer Battalion's 2nd Company's attack on Point 213, A Squadron 4CLY mustered nine operational tanks including two Fireflys and a Cromwell OP tank,[122][123] although some were without their full complement of crew.[75] In support was a single section of riflemen and an equal number of officers.[122] The senior officers decided that the force would hold its position on the ridge until reinforcements arrived and set about organising an all round defence.[123] At around 10:00 elements of the 101st SS Heavy Panzer Battalion's 4th Company—its support and reconnaissance troops—reached the battlefield and began to round up isolated British tankers and riflemen in the area between the ridge and the town. Some managed to evade capture; over the next 24 hours around 30 worked their way back to British lines.[124]
During the rest of the morning the troops of the 1/7th Battalion, Queen's Royal Regiment (QRR) took up defensive positions within Villers-Bocage, capturing an advance party of three men from the 2nd Panzer Division.[125] A force was put together to attempt to extricate the troops on the ridge, but this idea was soon abandoned.[20][126][nb 15] Around 10:30 Viscount Cranley reported over the radio that the position on Point 213 was becoming untenable, and withdrawal was now impossible.[10] Nevertheless a breakout was planned and two hours later a Cromwell attempted to negotiate its way back to Villers-Bocage by a roundabout route, but was knocked out by a German tank. The Germans then started to shell the trees bordering the road, causing the shells to air burst and spray the area with splinters. After five minutes of this, the troops on the ridge decided to surrender.[128] The British made an effort to burn their tanks before they fell into enemy hands, but German soldiers were quick on the scene. Thirty members of the County of London Yeomanry were taken prisoner, along with some riflemen and troops of the Royal Horse Artillery.[129] A few men managed to escape, such as Captain Christopher Milner MC of the Rifle Brigade, who spent the rest of the day on the run and crossed back into British lines after dark.[130]

Destroyed British tanks on Point 213 after the German arrival, with two Cromwells on the left and a Sherman Firefly on the right
On arriving at the Panzer Lehr's headquarters Wittmann briefed the division's intelligence officer, Oberstleutnant Kauffmann, on the situation in Villers-Bocage. He was then provided with a Schwimmwagen and returned to Point 213.[20][131] By the time he arrived the 101st SS Heavy Panzer Battalion's 1st Company, under the command of SS-Hauptsturmführer[132] Rolf Möbius, was on the scene, but although the two discussed the situation Wittmann played no further part in the battle.[20][61][nb 16] Meanwhile, Kauffmann ordered Hauptmann Helmut Ritgen to assemble what force he could and block the northern exits to the town. With 15 Panzer IV tanks, mainly from 6th Company 2nd Battalion Panzer Lehr Regiment 130,[125][138] and a further 10 collected from a workshop south of Route Nationale 175,[128] Ritgen rendezvoused with the Panzer Lehr Division's commanding officer,[126] Generalleutnant Fritz Bayerlein, at Villy-Bocage. Bayerlein confirmed Ritgen's orders,[126][139] but as Ritgen's tanks moved towards Villers-Bocage they ran into a screen of British anti-tank guns, losing one tank that burst into flames.[140] A group of four Panzer IVs then entered the town from the south; the lead two tanks were knocked out and the others withdrew.[138]
In Villers-Bocage, A Company 1/7th QRR was tasked with securing the railway station and surrounding area, while B and C companies were to occupy the eastern side of the town.[10] However, German infantry had already started to infiltrate Villers-Bocage and scattered house-to-house fighting and skirmishing broke out.[141] Two German tanks were damaged and driven off, but the QRR battalion's infantry companies were rapidly losing cohesion and were ordered to fall back to reorganise. A Company was again ordered to secure the railway station, while C Company was assigned the north-eastern edge of the town and D Company the south-eastern edge. B Company was placed in reserve and the battalion's anti-tank guns distributed along the front line.[137] At the town square an ambush site was established by Lieutenant Bill Cotton of 4CLY. A Sherman Firefly and several Cromwell tanks, supported by a 6 pounder anti-tank gun and infantrymen from 1/7th QRR armed with PIAT anti tank weapons, laid in wait for German tanks to move down the town's main street.[20] To the west of the town further fighting took place as the Germans attacked the 1/5th QRR near Livry, losing one tank in the process.[125]
Afternoon battle[]


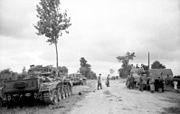
Knocked out German tanks on the main street of Villers-Bocage. Historian Henri Marie claims that the Tiger in the foreground was finished off by British infantry using grenades; none of the crew survived the attack.[142] The devastation was only partially caused by the battle; at first light on 14 June RAF Hawker Typhoons attacked the town hours before this photograph was taken.[137]
At around 13:00 tanks of the Panzer Lehr Division advanced into Villers-Bocage, but unsupported by infantry found the going difficult.[143] A group of four Panzer IV's attempted to push into the town's southern edge where they found a previously disabled Panzer IV, but as they moved further two tanks were knocked out by British anti-tank gunfire. Some of the Waffen-SS Tiger tanks were brought up and in an exchange of fire they silenced the anti-tank position.[137] SS-Hauptsturmführer Möbius ordered the main counterattack to be launched in two thrusts; the first would advance down the main highway through Villers-Bocage while the second would cut through the southern section of the town parallel to the main road. The objective was to secure the town centre.[144] The Tigers moving along the main road advanced slowly, their commanders confident that they could intimidate the British into withdrawing.[145] However, as they reached the town square they ran into Cotton's ambush.[146] The Firefly, commanded by Sergeant Bramall,[nb 17][145] opened fire on the lead tank and missed, but the anti-tank gun supporting the position knocked it out.[146] Now alerted to the ambush, a following group of three Tigers split up. Picking their way through the back streets in an attempt to flank the British, one was engaged by an anti-tank gun and destroyed. The other two were tackled by infantry using PIAT anti-tank weapons; one was knocked out and the other immobilised.[145][148]
Artists impression for the London Illustrated News of the Tiger being engaged though the corner window by Bramall's Sherman Firefly. The artist has drawn the Firefly as a Crusader.
A fifth Tiger halted on the main street short of the ambush site, apparently waiting for the British to emerge from cover.[148] This was spotted by Bramall through the side and front windows of a corner building and he decided that the only way to safely engage would be to reverse his Firefly and shoot diagonally through the building's windows.[148][149] His tank fired twice, damaging the Tiger's gun mantlet; it drew back slightly and then raced past the side street before Bramall could respond. A Cromwell under the command of Corporal Horne then advanced onto the main street from another side street and fired into the Tiger's rear, knocking it out, before reversing back into cover.[149] The next victim of the ambush was a Panzer IV, accounted for by Bramall's Firefly. Mindful of the German skill at recovering and repairing their damaged vehicles, during a lull in the fighting Lieutenant Cotton and Sergeant Bramall, with blankets and petrol, went to each knocked out tank in their vicinity and set them on fire.[148][nb 18] Outside the town, elements of the 7th Armoured Division stretching back to Amayé-sur-Seulles came under attack from the north and south but were able to fend off these assaults, while at Tracey-Bocage the 11th Hussars were called upon to deal with a pocket of German resistance.[151]
"Bill Cotton, sheltering under an umbrella, remonstrated with the French Fire Brigade for attempting to put out a fire in a disabled German Mk IV tank."
Supported by mortars and artillery, the Germans put in a strong attack on A Company 1/7th QRR in Villers-Bocage. The company was forced to concentrate its defence but one platoon was cut off and captured.[152][153] Even though the entire Queen's Royal Rifles battalion had been committed to the town's defence, holes were opening up through which German troops were infiltrating.[152][153] Two grenadier battalions of the 2nd Panzer Division attacked from the south and were engaged by B Squadron 4CLY, who inflicted heavy losses on the German infantry.[151] British positions on the main street came under attack from a Panzer IV until it was destroyed.[154] Both sides had begun calling artillery fire into the town, and several British mortars and a carrier were destroyed.[154] By 18:00 the QRR battalion headquarters had become pinned down and as pressure built, Hinde reluctantly decided that his force must be withdrawn. In his judgement they would be unable to continue to hold the town once darkness fell.[152][153][154] Under cover of a smoke screen and shellfire laid down by 5RHA, to which US V Corps's artillery batteries added their weight, the infantry pulled back. Last to leave were the tanks of 4CLY.[154][155] The Germans harassed the withdrawing units with artillery fire, inflicting some casualties, and infantry from Tracey-Bocage attacked the British as they fell back, resulting in a two and a half-hour battle. Despite taking heavy losses the German infantry were not repulsed until around 22:30.[154][156]
Casualties[]
Contradictory sources make exact casualty figures for 13 June difficult to establish. The 22nd Armoured Brigade group suffered around 217 men killed, wounded, and missing that day, a large proportion of whom were taken prisoner when the Germans cut off and captured the force on Point 213.[nb 19] This figure includes five riflemen who had been captured but were subsequently shot by their guards; according to Marie, the guards believed the British were attempting to escape when they spontaneously took cover in a ditch as American shellfire closed in.[154] The British lost between 23 and 27 tanks, more than half of which were on Point 213 where A Squadron 4CLY lost all 15 of the tanks it began the battle with.[61][nb 20]
Both the Panzer Lehr and 2nd Panzer Divisions were in action across the entire sector on 13 June and did not count the casualties sustained at Villers-Bocage separately from all losses incurred that day. However, the 101st SS Heavy Panzer Battalion was only engaged at Villers-Bocage, so this unit's losses are available. Taylor gives nine men killed and 10 wounded in the 1st Company and one killed and three wounded in the 2nd.[158][nb 21] Sources differ widely on the number of German tanks lost during 13 June—in part because elements of the Panzer Lehr Division were committed piecemeal making it impossible to be certain of the number of Panzer IVs knocked out.[61] German tank losses are generally placed at between eight and fifteen tanks, including six Tiger Is.[nb 22] Chester Wilmot notes what a costly loss this was, as there were only 36 Tiger tanks in Normandy at that time.[87] However, Taylor concedes that the numbers claimed by the British probably include tanks that were immobilised but subsequently recovered.[61]
Local Villers-Bocage historian Henri Marie names at least nine French civilians who died on 13 June. Six of these were killed by crossfire or shrapnel during the battle and the remaining three by artillery fire just before midnight. Marie claims that three of the deaths may in fact have been the result of executions. Further civilian casualties were sustained over the following days due to the continued fighting and bombing.[170] Following the British withdrawal the town was reoccupied and searched by the Germans for any wounded or hiding British soldiers. In the course of this several shops and houses, along with the town hall, were set on fire.[171]
Aftermath[]
14 June[]

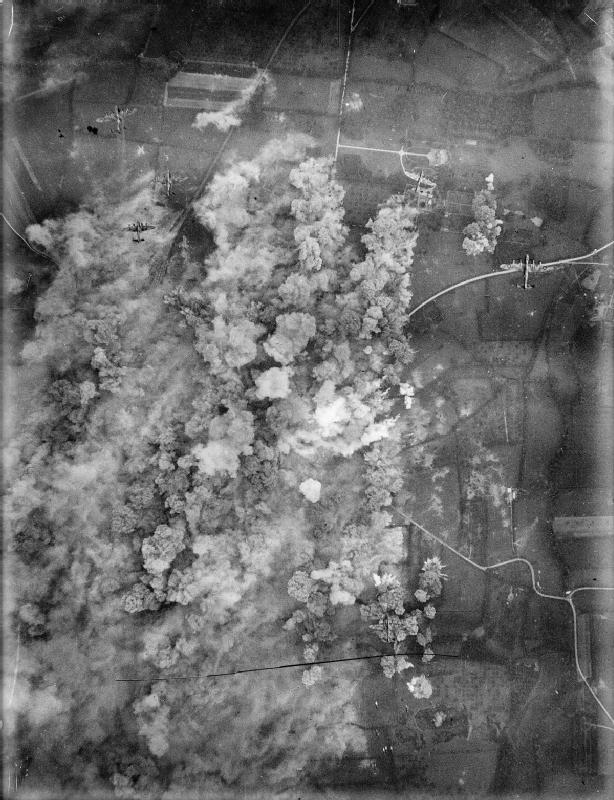
The town of Villers-Bocage, photographed during the bombing raid on 30 June 1944
On 14 June, with their withdrawal from Villers-Bocage complete, Hinde's 22nd Armoured Brigade group formed an all round defensive position—a "brigade box"—in the Amayé-sur-Seulles–Tracy-Bocage–St-Germain area.[nb 23] This location was chosen to give the British control over Villers-Bocage without actually occupying the town.[175]
Supported by the 1st Company 101st SS Heavy Panzer Battalion, the Panzer Lehr Division renewed its attempt to eliminate the British salient.[176][177] The United States 1st Infantry Division, in possession of the heights around Caumont, was able to bring the Germans under observed artillery fire, which helped to break up the initial assault on 22nd Armoured Brigade group's position.[178] However, subsequent German attacks closed in so tightly that further artillery concentrations could not be called in without hitting British positions. One platoon was overrun and a counterattack with tanks and infantry was mounted to restore the integrity of the brigade box. Rebuffed, the Germans subjected the box to harassing fire before launching a major two-pronged assault later in the day, supported by artillery and tanks.[179][180][181] This penetrated the British lines and came close to the brigade headquarters before being driven back. The fighting died down during the evening.[182] Although confident that the brigade box could be held, the inability of the 50th (Northumbrian) Infantry Division to make significant progress towards relieving the position prompted the decision to recall the Brigade group and straighten the front line.[177][183]
Bombing and liberation[]


Bill Cotton (on the left wearing a looted Iron Cross) and his tank crew
To cover the 22nd Armoured Brigade group's withdrawal on 14/15 June 337 Royal Air Force (RAF) bombers (223 Avro Lancasters, 100 Handley Page Halifax, 14 de Havilland Mosquitos) from No. 4 Group RAF, No. 5 Group RAF and No. 8 Group RAF dropped 1,700 tons of high explosives on the town of Évrecy and on targets around Villers-Bocage, destroying one Tiger tank of the 101st SS Heavy Panzer Battalion and damaging three more. No aircraft were lost.[6][184]
Just over two weeks later, at 20:30 hours on 30 June, Villers-Bocage was bombed again by 266 bombers (151 Lancasters, 105 Halifaxes and 10 Mosquitos) from No. 3 Group RAF, No. 4 Group RAF and No. 8 Group RAF, in support of Operation Epsom. 1,100 tons of bombs fell for the loss of only two aircraft.[185][186][187] The town was a vital traffic centre for the German forces and it was hoped that German troops would be caught in the bombing, but only French civilians were present at the time.[185]
After being severely damaged by the fighting of 13 June and subsequent bombing raids, the town was finally liberated by a patrol of the 1st Battalion Dorset Regiment, 50th (Northumbrian) Infantry Division, on 4 August 1944.[188]
Command changes[]
In early August up to 100 men, including Bucknall, Erskine, Hinde and other senior officers, were removed from their positions and reassigned. Historians largely agree that this was a consequence of the failure at Villers-Bocage and had been planned since the battle.[189][190][191][192] Daniel Taylor, however, is of the opinion that the battle's outcome simply provided a convenient excuse and that the sackings took place to "demonstrate that the army command was doing something to counteract the poor public opinion of the conduct of the campaign".[191]
Battle honours and awards[]
In 1956 and 1957, the British and Commonwealth system of battle honours recognised participation in the Battle of Villers-Bocage by the award to 11 units of the battle honour Villers Bocage, for service in expanding the bridgehead from 8–15 June.[193] For his actions at Villers-Bocage, Michael Wittmann was promoted to Hauptsturmführer and awarded Swords to his Knight's Cross of the Iron Cross.[194] For their skill and bravery in defending Villers-Bocage, Lieutenant Cotton was awarded the Military Cross and Sergeant Bramall the Military Medal.[148]
Analysis[]
Propaganda[]
Both sides attempted to manufacture capital from the Villers-Bocage battle. Having escaped from their knocked-out tank, Lieutenant Cloudsley-Thompson and his crew of 4CLY spent much of 13 June hiding in a basement in Villers-Bocage. They made their way back to British lines after dark and were picked up by elements of the 50th (Northumbrian) Infantry Division. During his debriefing Cloudsley-Thompson emphatically stated that he "never wished to see another tank as long as [he] lived", but the British press reported this as: "The first thing the five tank men asked for was another tank."[195]
Because the British had lost contact with their forces on Point 213 and withdrawn from Villers-Bocage, they were unable to establish the full extent of either their own losses or those they had inflicted. The German propaganda machine seized upon this opportunity.[196] Michael Wittmann—already a household name in Germany[194]—was credited with all the British tanks destroyed at Villers-Bocage.[196] He recorded a radio message on the evening of 13 June, describing his role in the morning's fighting and claiming that later counterattacks had destroyed an entire British armoured regiment and infantry battalion.[96] To lend weight to this claim doctored images were produced; three joined-together photographs published in the German armed forces magazine Signal gave a false impression of the scale of destruction in the town.[197] The propaganda campaign was given credence both in Germany and abroad, leaving the British convinced that the Battle of Villers-Bocage had been a complete disaster when in fact its results were less clear-cut.[196]
Wolfgang Schneider, an instructor at the German Bundeswehr tank school and historian,[198] provides a new perspective to the propaganda campaign; he states that the Waffen-SS did not have an "experienced tank arm" when compared to the army's panzer divisions. The Waffen-SS may have fought with distinction during the Battle of Kursk but it could not match the army's success, hence Dietrich's attempts to manufacture a hero out of Wittmann.[199]
Michael Wittmann's attack[]


.jpg)
German tank commander Michael Wittman, photographed one month prior to Operation Overlord
Wittmann's lone engagement of the 22nd Armoured Brigade group's spearhead has been the subject of such attention that, according to Stephen Badsey, it has cast a shadow over the period between D-Day and 13 June in historical accounts.[200] Many commentators, particularly those of the late twentieth-century revisionist school, find Wittmann's actions extremely impressive. Carlo D'Este views Wittmann's attack as "one of the most amazing engagements in the history of armoured warfare";[201] Max Hastings calls it "one of the most devastating single-handed actions of the war";[73] and Antony Beevor claims it was "one of the most devastating ambushes in British military history".[202] Hubert Meyer goes even further, attributing Operation Perch's failure solely to Wittmann's "courage, his tactical and technical abilities and [...] the valor, the expertise and the camaraderie of his Panzer crew".[203]
Henri Marie calls the attack a "spur of the moment" decision that demonstrated Wittmann's rapid grasp of the inherent possibilities in attacking an unprepared enemy, but equally describes the action as foolhardy because it failed to take account of the potential danger. He believes that other historians have become carried away by Wittmann's ambush and cynically notes that the first Tiger lost in combat during the campaign was that commanded by Wittmann.[204] This view is supported by John Buckley, who attributes much of the hyperbole surrounding Wittmann to the lingering influence of the highly successful German propaganda campaign. He reproves those historians such as D'Este, Gary Simpson and Meyer, that exaggerate Wittmann's role to such an extent that they imply he single-handedly stopped the entire 7th Armoured Division. Buckley points to Russell A. Hart's erroneous claim that Wittmann "all but annihilated" 7th Armoured's spearhead.[205] Badsey offers perhaps the most balanced view, summarising both Wittmann's attack and the historiography that has followed as "remarkable but massively over-written".[200]
Tactical handling[]
Regardless of the degree to which the ambush wrecked British intentions, both Beevor and Patrick Delaforce agree that its effects would have been mitigated had Wittmann's force been detected earlier. They place the blame for this squarely on "Erskine's failure to provide [a] reconnaissance screen" ahead of the British vanguard as it moved to Point 213.[206][207] Marie elaborates, suggesting that the British vanguard out-paced the rest of the Brigade group, whose flanks were in fact well protected, and advanced with poor information and little prior intelligence gathering. Christopher Milner MC of the Rifle Brigade suggests that information was not gleaned from the town's inhabitants when it should have been and that had the battalion's scout platoon been present, the outcome of the initial battle may have been very different.[208][nb 24] Milner also suggests that the initial attack could have been fought off if the battalion's officers and NCOs had been with their men rather than attending the meeting on the ridge.[210]
Taking a wider view, John Buckley believes that while Wittmann showed great audacity in his attack, the roots of the British defeat were broader. He is of the opinion that the British had only themselves to blame for their failure at Villers-Bocage and gives little credence to a view that superior German armour decided the outcome.[211] Hastings supports Buckley's conclusion, acknowledging that although the Tiger was "incomparably" more deadly than the British Cromwell tank, the "shambles" caused by Wittmann's tanks reflected poorly on the tactical handling of the British force. He goes on to write "The German achievement on 13/14 June had been that, while heavily outnumbered in the sector as a whole, they successfully kept the British everywhere feeling insecure and off-balance, while concentrating sufficient forces to dominate the decisive points. The British, in their turn, failed to bring sufficient forces to bear on these."[21] Marie notes the disappointment of the British Second Army commander, Miles Dempsey, in the lack of tactical flair and imagination shown by Brigadier Hinde throughout the battle.[210] Marie claims that by this point in the campaign the British should have known better than to attempt an armoured advance unsupported by infantry in the bocage, and goes on to criticise both sides: the British for fighting an uncoordinated infantry and tank battle during the morning of 13 June, and the Germans for doing much the same throughout the whole day.[208]


A knocked out Panzer IV in Villers-Bocage
Focusing mainly on Wittmann and the 101st SS Heavy Panzer Battalion, Schneider describes its contribution to the battle as "everything but awe-inspiring". He concedes that the Tiger companies and the Panzer Lehr Division averted the threat of a serious British breakthrough, but suggests that there was no need for the initial German response to have been launched so precipitately. Möbius's 1st Company was in command of the road to Caen, so Wittmann had the time to plan and coordinate an attack.[212] Calling into question Wittmann's tactical decisions, Schneider claims that "a competent tank company commander does not accumulate so many serious mistakes". He notes that by Wittman having his Tigers position themselves in a sunken lane overnight, with a vehicle with engine trouble at the head of a stationary column, he was hampering the mobility of his unit and risked blocking the entire company. However, Schneider saves his real opprobrium for Wittmann's solitary advance into Villers-Bocage. Although he acknowledges Wittmann's courage he points out that such an action "goes against all the rules". No intelligence was gathered beforehand, and there was no "centre of gravity" or "concentration of forces" in the attack. Because of Wittmann's actions "the bulk of the 2nd Company and Rolf Möbius 1st Company came up against an enemy who had gone onto the defensive". Schneider calls Wittman's "carefree" advance into British-occupied positions "pure folly" and states that "such over hastiness was uncalled for", before going on to surmise that if Wittmann had properly prepared an assault involving the rest of his company and the 1st Company, far greater results could have been achieved. He concludes with the belief that "thoughtlessness of this kind was to cost [Wittmann] his life [in] August ... near Gaumesnil, during an attack casually launched in open country with an exposed flank".[199]
Meyer agrees to some extent with Schneider's observations, admitting that the 2nd Company's advance into the town without infantry support was "obviously inexpedient".[213] Marie sees this as a serious tactical error on Möbius's behalf,[162] but Meyer believes it was a justifiable risk under the circumstances. Infantry were unavailable, and the British could have been expected to still be "under the devastating impression of seeing [their] vanguard totally destroyed in such a short time".[213]
British withdrawal[]
The British official Normandy campaign historian, Major L. F. Ellis, explains the 22nd Armoured Brigade group's withdrawal by claiming that with the unexpected arrival of the 2nd Panzer Division, the 7th Armoured Division "could hardly have achieved full success".[214] This view, although partially supported by the briefing given to 7th Armoured's divisional commanders prior to the retreat,[nb 25] has gained little support since. Buckley states that the order to retreat was given before 2nd Panzer arrived in any real strength[211] and Michael Reynolds points out that "2nd Panzer's tanks were nowhere near Villers-Bocage at this time".[136]
Ellis describes the withdrawal as a temporary measure. The 7th Armoured Division was to be reinforced with the 33rd Armoured Brigade before renewing its offensive towards Évrecy.[216] Adding to this, David French notes that the follow-up formations landing in Normandy were on average two days behind schedule. He speculates that had the 33rd Armoured Brigade, the 49th (West Riding) Infantry Division and the 7th Armoured Division's infantry brigade landed on schedule, XXX Corps might have been able to secure Villers-Bocage before the arrival of substantial German forces.[217] Other historians do not accept the view that insufficient means were available, pointing to substantial British forces that remained uncommitted during the battle. Mungo Melvin, despite approving of the 7th Armoured Division's institution of a flexible combined arms structure (a structure that other British armoured divisions would not adopt until after Operation Goodwood),[218] writes that neither the 131st Infantry Brigade nor the balanced divisional reserve of an armoured regiment and an infantry battalion were employed effectively.[218] Sceptical about the ability of "a reduced armoured brigade, with only limited mobile infantry and artillery support" to seriously worry the Germans, Buckley notes that in addition to the uncommitted elements of 7th Armoured the 151st Infantry Brigade was available in corps reserve.[219] Max Hastings expresses incredulity at this British failure to concentrate force at the crucial place and time, recounting the feelings of the "men on the spot" in Villers-Bocage who believed that "a single extra infantry brigade could have been decisive in turning the scale".[220] D'Este, however, defends XXX Corps commander Gerard Bucknall's claim that neither the 151st Infantry Brigade or the 49th Infantry Division could be made ready in time to influence the battle.[221]
Outcome of the battle[]


A knocked out Cromwell tank in Villers-Bocage
Other than its initial encounter with the 101st SS Heavy Panzer Battalion's 2nd Company and the subsequent loss of Point 213, the 22nd Armoured Brigade group had repelled every German assault on its positions throughout the two days of fighting.[nb 26] Students of the battle have therefore looked to the senior commanders involved to explain the "fumbled failure" at Villers-Bocage.[220] Dempsey remarked after the war that "this attack by 7th Armoured Division should have succeeded. My feeling that Bucknall and Erskine would have to go started with that failure ... the whole handling of that battle was a disgrace. Their decision to withdraw [from Villers-Bocage] was done by the corps commander and Erskine."[223] Although D'Este calls Dempsey's comments "excessively harsh" and believes that once the town had been abandoned the Brigade group's eventual withdrawal was inevitable,[7] historians generally support them—some going so far as to suggest that Bucknall threw away the chance to swiftly capture Caen.[5][6][7] General Bernard Montgomery, who had been a patron of Bucknall, conceded that his protégé "could not manage a Corps once the battle became mobile".[224][225] Buckley claims that Bucknall was unprepared to support the attack once problems developed and that Erskine was not suited to the task at hand.[226] Chester Wilmot agrees with Dempsey's assertion that it was Bucknall, not the Germans, that forced the 7th Armoured Division to retire. Wilmot claims that Bucknall refused to reinforce the division because he had already decided that its lines of communication were endangered. He concludes:
This great opportunity of disrupting the enemy line and expanding the Allied bridgehead was lost not so much in the woods and orchards around Villers-Bocage, as in the Corps Commander's mind.[222]
Drawing on testimony by SS-Brigadeführer Fritz Kraemer (of I SS-Panzer Korps), who was of the opinion that "the enemy had let a favourable opportunity slip", D'Este sees the failure to unhinge the German front line south of Caen and flank I SS Panzer Korps as "one of the costliest Allied mistakes" of the campaign.[7] He quotes Dempsey that with the British withdrawal the chance of mounting a "snap airborne operation" to seize Caen or to deepen the Allied bridgehead had been lost.[7] Also quoting Dempsey, Wilmot asserts that following the battle's outcome, "Caen [could] be taken only by a set-piece assault".[227] Max Hastings sees the "debacle" of Villers-Bocage as the moment that "marked, for the British, the end of the scramble for ground that had continued since D-Day".[228] Reynolds concurs, writing that the consequences of the battle would be felt in the coming weeks during the series of "costly" assaults needed to drive the Germans from Caen and the surrounding area.[6] The view at the time was less conclusive. The official 7th Armoured Division's history regards the battle as indecisive, stating "the brilliant defensive battle of Villers Bocage ..., although it obliged us to withdraw some seven miles, cost the enemy casualties disproportionate to this gain".[4] This perspective is echoed by some historians such as Daniel Taylor, who concludes that the battle ended with no clear winner.[3]
Notes[]
- Footnotes
- ↑ Daniel Taylor states that there was a total of 16 Tiger tanks in the area,[18] which were later supplemented by 25 Panzer IVs.[15] George Forty gives a total of 16 Tiger tanks[19] and 15 Panzer IVs.[20]
- ↑ According to Hastings, Hinde acquired his nickname as a result of his "courage and eccentricity" during the Western Desert Campaign.[21]
- ↑ The division contained 237 tanks and assault guns as well as double the number of half-tracked vehicles when compared to other panzer divisions.[34]
- ↑ Reynolds also mentions the 3rd Fallschirmjäger Division being sent to cover the gap,[41] but Harrison claims the II Fallschirmjäger Korps was diverted to the Carentan sector.[42]
- ↑ Daniel Taylor states that only the lead tank was destroyed,[53] while George Forty claims that two tanks were lost.[54]
- ↑ As they advanced the US 1st Infantry Division found the town to be occupied by two companies of the 2nd Panzer Division's reconnaissance battalion; part of the town was captured on 12 June and the remainder the following day.[50]
- ↑ Taylor states 14 tanks per company with a further 3 making up the headquarters unit.[17]
- ↑ Michael Reynolds states that the battalion's 1st Company had nine tanks, the 2nd Company six and the 3rd Company only one tank.[74] Daniel Taylor and George Forty both agree that the Second Company consisted of six tanks.[11][70] Taylor suggests that the 1st Company had ten tanks available while Forty suggests eight.[70][75]
- ↑ I. Zug (1st platoon) made up of Tigers 211 (SS-Obersturmführer Jürgen Wessel), 212 (SS-Unterscharführer Balthasar Woll), 213 (SS-Hauptscharführer Hans Höflinger) and 214 (SS-Unterscharführer Karl-Heinz Warmbrunn); II. Zug (2nd platoon) made up of Tigers 221 (SS-Untersturmführer Georg Hantusch), 222 (SS-Unterscharführer Kurt Sowa), 223 (SS-OberscharführerJürgen Brandt) and 224 (SS-Unterscharführer Ewald Mölly); and III. Zug (3rd platoon) made up of Tigers 231 (SS-Standartenoberjunker Heinz Belbe), 232 (SS-Unterscharführer Kurt Kleber) 233 (SS-Oberscharführer Georg Lötsch) and 234 (SS-Unterscharführer Herbert Stief).[76]
- ↑ Rendered incapable of completing its mission; knocked out encompasses a range of effects from being immobilised (a Mobility kill in modern US parlance) to being made defenceless (a Firepower kill) to complete destruction (a Catastrophic kill).
- ↑ Some French sources, along with British eyewitness accounts of the fighting, report that the Rifle Brigade's transport was in fact engaged by two Tigers.[101] It is speculated that the second German tank was positioned north of the main road, near the road junction to Tilly-sur-Seulles, and was possibly out of fuel.[101] Henri Marie speculates further that this is why the anti tank gun, at the back of the column, is not aimed up the road but towards the road junction; as the riflemen were aiming the weapon at the second Tiger.[102]
- ↑ The claim of the destruction of three Stuart tanks has been disputed. Daniel Taylor, in After The Battle magazine, states that the third light tank "may not have been taken precisely where I originally thought."[103] This view is supported by historian Walter Allen, who writes that the third Stuart tank was knocked out elsewhere: "As Brigadier Hinde had been up in his scout car and had said that the town must be held at all costs. Major Aird set about reorganizing the defence. Some of the Queen's infantry had arrived with anti-tank guns and these, with tank troops were dispersed round the roads leading into the Square. To the south Lt. Simons, in charge of a troop of Honeys [the nickname given to the Stuart by British forces], had had his tank knocked out by a mortar, so his patrol was drawn in."[104]
- ↑ The Sherman OP tank was equipped with a dummy main gun made of wood;[106][107] its weapon had been removed to make room for a map table and additional radio equipment.[97] The Cromwell retained its main armament.[108]
- ↑ A radio report logged at XXX Corps at 09:45 claims a Tiger knocked out by an anti-tank gun to the east of the town, and in the Rifle Brigade's regimental history Sergeant Bray is credited with knocking out a Tiger tank.[118] However, in his book on the Rifle Brigade, Major Hasting omits this, crediting Sergeant Bray with the destruction of two half-tracks and an armoured car.[119]
- ↑ According to Max Hastings, the relief attempt was vetoed by Viscount Cranley.[127]
- ↑ Some historians have suggested that Michael Wittmann took part in later fighting on Point 213 or participated in the afternoon counterattack. Carlo D'Este describes how, after engaging the Firefly from B Squadron, Wittmann withdrew from the town "into the woods southeast of Villers-Bocage" and "returned to his unit to re-arm and re-fuel"; D'Este then goes on to claim that Wittmann renewed the attack on Point 213 before launching a second attack on Villers-Bocage.[133] Antony Beevor suggests that Wittmann attacked elements of B Squadron, who were incapable of replying, before turning around and returning to Point 213 to "finish the battle with A Squadron."[16] These accounts are contradicted by Wittmann's personal testimony; he states that his tank was disabled in the town and he immediately proceeded on foot to the headquarters of the Panzer Lehr Division.[96] Sepp Dietrich supports this, noting that Wittmann left the town on foot during the morning, later returning to Point 213 by car.[134] Beevor, Max Hastings, and Dietrich all suggest that Wittmann was involved in the afternoon counterattack on Villers-Bovage; Beevor placing him alongside the 2nd Panzer, while Dietrich claims he directed the 1st Company, 101st SS Heavy Panzer Battalion.[16][134][135] George Forty challenges Dietrich's suggestion, asking "[why] would a competent, experienced SS captain like Möbius [the commanding officer of the 1st Company] defer to an officer of lower rank, however expert, and let him lead the attack?"[131] Beevor's assertion that tanks from the 2nd Panzer took part in this battle is dismissed by historian Michael Reynolds, who writes that their tanks were "nowhere near Villers-Bocage at the time."[136] Daniel Taylor credits Obersturmfuher Hannes Philipsen, from the 1st Company, with leading the attack into Villers-Bocage,[137] and states that after briefing Möbius, Wittmann was "whisked away to report to ... Sepp Dietrich ... and a number of eager journalists. It was they who made the most of the story."[61]
- ↑ Daniel Taylor spells this name as 'Brammall',[145] but both George Forty and Patrick Delaforce spell it as 'Bramall',[146][147] so the latter spelling has been used.
- ↑ According to Marie this also included Wittmann's abandoned tank.[150]
- ↑ Hastings claims the Rifle Brigade's A Company lost 80 men,[157] of whom Taylor states nine were killed and the rest captured.[158] D'Este records that 4CLY lost 85 men; four killed in action (Taylor gives 12 killed[158]), five wounded, and 76 missing.[159] Delaforce records that 1/7QRR suffered 44 casualties,[160] of which Taylor gives seven killed.[158] The Commonwealth War Graves Commission confirms two men killed from 5RHA, one each for 1RTR and 5RTR, and four from the 8th Hussars. No deaths are recorded for the 1/5QRR or the 65th Anti-tank Regiment.[158]
- ↑ Taylor breaks the total losses down for the 22nd Armoured Brigade group as 16 Cromwells, four Fireflys, and three Stuarts.[61] Major L.F. Ellis, the British official campaign historian, places the tank losses at 25,[12] whereas both D'Este and Delaforce claim 27 tanks were lost (giving 20 Cromwells).[147][159] Forty notes that the Brigade group did lose this number of tanks but over the 48-hour period of 13–14 June.[161] Henri Marie and Michael Reynolds both note that on top of the loss of 27 combat tanks there was additionally three artillery 'OP' tanks destroyed.[162][163] Additionally several sources claims the loss of 14 halftracks and 14 universal carriers,[12][147] Reynolds states there was in fact 16 universal carriers lost,[163] while Marie claims only 11 halftracks and six universal carriers were in fact lost.[162] Three scout cars,[12][147][159] nine Daimler armoured cars, and two anti tank guns were also lost during the battle.[162]
- ↑ Hubert Meyer differs slightly with a total of 10 killed and 12 wounded.[164]
- ↑ Chester Wilmot quotes Fritz Bayerlein, who reports the loss of six Tigers at Villers-Bocage.[87] Both Patrick Agte and Michael Reynolds records the loss of six Tigers and two Panzer IVs, these being found knocked out in the town following the battle.[165][166] Forty notes that up to six Tigers and three Panzer IVs were knocked out during the fighting;[20] a figure supported by the 7th Armoured Division's divisional history.[167] Villers-Bocage historian Henri Marie notes that six Tigers were destroyed[162] and details the loss of five Panzer IVs during the battle. He also notes that additional tanks were damaged in the fighting.[168] Taylor reports the British claimed to have disabled 14 tanks; 4CLY claimed four Tigers and three Panzer IVs, the Rifle Brigade claimed one Tiger, while the 1/7QRR claimed knocking out four Tigers with 6 pounder anti-tank guns and a further Tiger and Panzer IV with PIAT anti-tank weapons.[61] Patrick Delaforce claims the British knocked out 15 German tanks during the battle.[147] Ludovic Fortin supports this figure but notes it was made up of tanks that been destroyed or heavily damaged.[143] Niklas Zetterling points out that by 16 June the 101st SS Heavy Panzer Battalion had only 15 operational tanks; nine had been destroyed and a further 21 were under repair.[169] Additional German losses include one armoured car, one Kübelwagen, and two half-tracks.[91][119]
- ↑ There is some dispute as to the precise location of the Brigade Box. Carlo D'Este states it was between Amayé-sur-Seulles and Tracy-Bocage, around Hill 174.[172] Dan Taylor locates the box around the brigade's tactical headquarters positioned on Hill 174 and presents a map showing the brigade mostly to the south of the village of Amayé-sur-Seulles.[173] George Forty places the box to the north of Tracy-Bocage, around the hamlet of St-Germain,[174] and draws on a report by the 22nd Armoured Brigade group's commanding officer who states the position was east of Amayé-sur-Seulles and included St-Germain.[161]
- ↑ Due to shipping problems A Company's scout platoon had not arrived in time for Operation Perch.[209]
- ↑ Hastings quotes Lieutenant-Colonel Goulburn of the 7th Armoured Division, who recorded the reasons given for the withdrawal as "Firstly, 50 Div attack towards Longreves-Tilly [...] has made very little progress. Secondly, 2nd Panzer Division has been identified on our front."[215]
- ↑ Wilmot writes: "Erskine's troops had suffered no defeat after the first costly encounters with the single Tiger."[222]
- Citations
- ↑ Forty, pp. 66, 137
- ↑ 2.0 2.1 Taylor, p. 3
- ↑ 3.0 3.1 Taylor, pp. 76, 82
- ↑ 4.0 4.1 4.2 4.3 Lindsay, p. 36
- ↑ 5.0 5.1 5.2 Wilmot, pp. 310–311
- ↑ 6.0 6.1 6.2 6.3 Reynolds (2001), p. 107
- ↑ 7.0 7.1 7.2 7.3 7.4 D'Este, pp. 197–198
- ↑ 8.0 8.1 8.2 Taylor, p. 10
- ↑ 9.0 9.1 Taylor, pp. 11–12
- ↑ 10.0 10.1 10.2 Forty, p. 73
- ↑ 11.0 11.1 11.2 11.3 11.4 11.5 11.6 Forty, p. 61
- ↑ 12.0 12.1 12.2 12.3 12.4 12.5 Ellis, p. 254
- ↑ 13.0 13.1 Forty, p. 51
- ↑ Taylor, p. 6
- ↑ 15.0 15.1 Taylor, pp. 43, 51
- ↑ 16.0 16.1 16.2 Beevor, p. 192
- ↑ 17.0 17.1 Taylor, p. 8
- ↑ 18.0 18.1 Taylor, pp. 17–18
- ↑ Forty, p. 133
- ↑ 20.0 20.1 20.2 20.3 20.4 20.5 Forty, p. 74
- ↑ 21.0 21.1 Hastings (1999), p.163
- ↑ Williams, p. 24
- ↑ Van Der Vat, p. 146
- ↑ Wilmot, p. 272
- ↑ Wilmot, pp. 284–286
- ↑ Trew, p. 22
- ↑ Daglish, p. 36
- ↑ Stacey, p. 142
- ↑ Ellis, p. 247
- ↑ Ellis, p. 250
- ↑ Clay, p. 256
- ↑ Gill, p. 24
- ↑ Forty, p. 37
- ↑ 34.0 34.1 Forty, p. 29
- ↑ 35.0 35.1 Buckley (2006), p. 59
- ↑ 36.0 36.1 Harrison, p. 370
- ↑ Taylor, p. 9
- ↑ Harrison, p. 369
- ↑ 39.0 39.1 Weigley, pp. 109–110
- ↑ 40.0 40.1 40.2 Harrison, p. 373
- ↑ Reynolds (2001), p. 96
- ↑ Harrison, p. 371
- ↑ Beevor, p. 404
- ↑ Hart (2000), p. 134
- ↑ Buckley (2004), p. 24
- ↑ 46.0 46.1 Wilmot, p. 308
- ↑ 47.0 47.1 Forty, p. 47
- ↑ Clay, p. 257
- ↑ Copp, p. 76
- ↑ 50.0 50.1 Harrison, p. 374
- ↑ 51.0 51.1 51.2 Fortin, p. 13
- ↑ 52.0 52.1 52.2 52.3 Forty, p. 50
- ↑ 53.0 53.1 53.2 Taylor, p. 11
- ↑ Forty, p. 126
- ↑ Marie, p. 53
- ↑ 56.0 56.1 Taylor, p. 12
- ↑ Agte, pp. 224–225
- ↑ Forty, p. 52
- ↑ 59.0 59.1 D'Este, p. 177
- ↑ 60.0 60.1 Reynolds (2001), p. 101
- ↑ 61.0 61.1 61.2 61.3 61.4 61.5 61.6 61.7 Taylor, p. 76
- ↑ 62.0 62.1 Forty, p. 132
- ↑ 63.0 63.1 Taylor, p. 15
- ↑ Reynolds (2001), p. 111
- ↑ Forty, p. 82
- ↑ Reynolds (2001), p. 98
- ↑ Meyer, p. 134
- ↑ Reynold (2001), pp. 99–100
- ↑ 69.0 69.1 69.2 69.3 Forty, p. 57
- ↑ 70.0 70.1 70.2 70.3 70.4 Taylor, p. 18
- ↑ Marie, p. 61
- ↑ 72.0 72.1 Reynolds (2001), pp. 80, 99
- ↑ 73.0 73.1 Hastings (1999), p. 157
- ↑ 74.0 74.1 Reynolds (2001), p. 100
- ↑ 75.0 75.1 Forty, p. 68
- ↑ Agte, p. 179
- ↑ Agte, p. 194
- ↑ Taylor, pp. 12–13
- ↑ Taylor, p. 13
- ↑ Taylor, pp. 15–16
- ↑ Forty, p. 55
- ↑ Neillands, p. 226
- ↑ 83.0 83.1 83.2 83.3 83.4 Taylor, p. 16
- ↑ Marie, p. 41
- ↑ Marie, p. 56
- ↑ Forty, pp. 54–55
- ↑ 87.0 87.1 87.2 87.3 Wilmot, p. 309
- ↑ Marie, p. 54
- ↑ Neillands, p. 221
- ↑ Buckley (2004), p. 25
- ↑ 91.0 91.1 Forty, p. 56
- ↑ 92.0 92.1 Hastings (1950), p. 350
- ↑ Forty, p. 125
- ↑ Forty, p. 20
- ↑ Forty, p. 58
- ↑ 96.0 96.1 96.2 96.3 Taylor, p. 38
- ↑ 97.0 97.1 Reynolds (2001), p. 103
- ↑ 98.0 98.1 98.2 98.3 98.4 Taylor, p. 19
- ↑ 99.0 99.1 Forty, p. 66
- ↑ 100.0 100.1 Forty, p. 60
- ↑ 101.0 101.1 Forty, p. 59
- ↑ Marie, p. 64
- ↑ Daniel Taylor, "Villers-Bocage Revisited". After the Battle Issue 132, p. 34
- ↑ Allen, Chapter 12
- ↑ 105.0 105.1 Taylor, p. 23
- ↑ 106.0 106.1 Taylor, p. 24
- ↑ 107.0 107.1 Forty, p. 137
- ↑ Taylor, p. 28
- ↑ Forty, p. 62
- ↑ Taylor, p. 27
- ↑ 111.0 111.1 Taylor, p. 30
- ↑ Forty, p. 64
- ↑ Marie, p. 70
- ↑ 114.0 114.1 Robert Moore,"Villers-Bocage – Bob Moore writes" The Sharpshooter Newsletter 2003, p. 18
- ↑ J. L. Cloudsley-Thompson,"Return to Villers-Bocage" The Sharpshooter Newsletter 2003, p. 18
- ↑ Marie, p. 69
- ↑ 117.0 117.1 Forty, p. 65
- ↑ Taylor, p. 34
- ↑ 119.0 119.1 Hastings (1950), p. 351
- ↑ Taylor, p. 33
- ↑ Neillands, pp. 225–226
- ↑ 122.0 122.1 Taylor, p. 41
- ↑ 123.0 123.1 Forty, p. 143
- ↑ Taylor, p. 42
- ↑ 125.0 125.1 125.2 Taylor, p. 43
- ↑ 126.0 126.1 126.2 Taylor, p. 45
- ↑ Hastings (1999), p. 158
- ↑ 128.0 128.1 Taylor, p. 51
- ↑ Taylor, p. 56
- ↑ Forty, pp. 147–148
- ↑ 131.0 131.1 Forty, p. 149
- ↑ Agte, p. 178
- ↑ D'Este, pp. 181–182
- ↑ 134.0 134.1 Meyer, pp. 234, 558
- ↑ Hastings (1999), p. 159
- ↑ 136.0 136.1 Reynolds (2001), p. 109
- ↑ 137.0 137.1 137.2 137.3 Taylor, p. 59
- ↑ 138.0 138.1 Marie, p. 74
- ↑ Meyer, p. 135
- ↑ Forty, p. 151
- ↑ Forty, p. 153
- ↑ Marie, p. 78
- ↑ 143.0 143.1 Fortin, p. 6
- ↑ Marie, pp. 77–78
- ↑ 145.0 145.1 145.2 145.3 Taylor, p. 65
- ↑ 146.0 146.1 146.2 Forty, p. 154
- ↑ 147.0 147.1 147.2 147.3 147.4 Delaforce, p. 38
- ↑ 148.0 148.1 148.2 148.3 148.4 Forty, p. 156
- ↑ 149.0 149.1 Taylor, p. 67
- ↑ Marie, p. 80
- ↑ 151.0 151.1 Marie, p. 82
- ↑ 152.0 152.1 152.2 Forty, p. 76
- ↑ 153.0 153.1 153.2 Taylor, p. 69
- ↑ 154.0 154.1 154.2 154.3 154.4 154.5 Marie, p. 84
- ↑ Forty, p. 77
- ↑ Marie, p. 85
- ↑ Hastings (1950), p. 352
- ↑ 158.0 158.1 158.2 158.3 158.4 Taylor, p. 85
- ↑ 159.0 159.1 159.2 D'Este, p. 182
- ↑ Delaforce, p. 39
- ↑ 161.0 161.1 Forty, p. 78
- ↑ 162.0 162.1 162.2 162.3 162.4 Marie, p. 127
- ↑ 163.0 163.1 Reynolds (2001), p. 105
- ↑ Meyer, p. 237
- ↑ Reynolds (2001), p. 106
- ↑ Agte, p. 203
- ↑ Lindsay, p. 37
- ↑ Marie, pp. 74, 79–80, 82, 84
- ↑ Zetterling, 101. SS-Pz.Abt.
- ↑ Marie, pp.73–75, 120
- ↑ Marie, p. 131
- ↑ D'Este, p. 184
- ↑ Taylor, pp. 76–77
- ↑ Forty, p. 81
- ↑ Marie, p. 120
- ↑ Reynolds (2001), p. 110
- ↑ 177.0 177.1 Taylor, p. 77
- ↑ Harrison, p. 375
- ↑ Forty, p. 85
- ↑ Taylor, pp. 77–78
- ↑ Forty, p. 84
- ↑ Taylor, p. 78
- ↑ Forty, p. 160
- ↑ Royal Air Force Bomber Command 60th Anniversary. "Campaign Diary June 1944: 14/15 June 1944". http://www.raf.mod.uk/bombercommand/jun44.html.
- ↑ 185.0 185.1 Jackson, p. 56
- ↑ Royal Air Force Bomber Command 60th Anniversary. "Campaign Diary June 1944: 30 June 1944". http://www.raf.mod.uk/bombercommand/jun44.html.
- ↑ Reynolds (2002), p. 26
- ↑ Clay, p. 267
- ↑ Fortin, p. 10
- ↑ Forty, p. 104
- ↑ 191.0 191.1 Taylor, p. 84
- ↑ Wilmot, p. 398
- ↑ Rodger, p. 242
- ↑ 194.0 194.1 Forty, p. 134
- ↑ Taylor, p. 39
- ↑ 196.0 196.1 196.2 Taylor, p. 82
- ↑ Taylor, p. 37
- ↑ Marie, p. 154
- ↑ 199.0 199.1 Marie, p. 59
- ↑ 200.0 200.1 Buckley (2007), p.48
- ↑ D'Este, p. 719
- ↑ Beevor, p. 190
- ↑ Meyer, p. 236
- ↑ Marie, pp. 62, 127
- ↑ Buckley (2004), pp. 23, 222
- ↑ Beevor, p. 190, 195
- ↑ Delaforce, p. 36
- ↑ 208.0 208.1 Marie, p. 125
- ↑ Taylor, p. 7
- ↑ 210.0 210.1 Marie, p. 126
- ↑ 211.0 211.1 Buckley (2004), p. 26
- ↑ Marie, p. 158
- ↑ 213.0 213.1 Meyer, p. 235
- ↑ Ellis, p. 256
- ↑ Hastings (1999), p. 162
- ↑ Ellis, p. 255
- ↑ French, p. 118
- ↑ 218.0 218.1 Buckley (2006), pp. 28–29
- ↑ Buckley, pp. 25,26
- ↑ 220.0 220.1 Hastings (1999), p. 164
- ↑ D'Este, p. 191
- ↑ 222.0 222.1 Wilmot, p. 310
- ↑ D'Este, p. 196
- ↑ Forty, p. 106
- ↑ French, p. 251
- ↑ Buckley (2004), p. 27
- ↑ Wilmot, p. 311
- ↑ Hastings (1999), p. 166
References[]
- Agte, Patrick (2000) (in German). Michael Wittmann erfolgreichster Panzerkommandant im Zweiten Weltkrieg und die Tiger der Leibstandarte SS Adolf Hitler. Rosenheim: Deutsche Verlagsgesellschaft Preußisch Oldendorf. ISBN 3-920722-18-3.
- Allen, Walter Douglas (1997). Cawston, Roy. ed. Carpiquet Bound: Pictorial Tribute to the 4th County of London Yeomanry (Sharpshooters) 1939 to 1944. Ewell: Chiavari Publishing. ISBN 0-9520592-6-6.
- Beevor, Anthony (2009). D-Day: The Battle for Normandy. London: Viking. ISBN 978-0-670-88703-3.
- Buckley, John (2006) [2004]. British Armour in the Normandy Campaign 1944. London: Taylor & Francis. ISBN 0-415-40773-7. OCLC 154699922.
- Buckley, John, ed (2007) [2006]. The Normandy Campaign 1944: Sixty Years on. London: Routledge. ISBN 978-0-415-44942-7.
- Clay, Major Ewart W (1950). The path of the 50th: The story of the 50th (Northumbrian) Division in the Second World War. Aldershot: Gale and Polden. OCLC 12049041.
- Copp, Terry (2004) [2003]. Fields of Fire: The Canadians in Normandy. Toronto: University of Toronto Press. ISBN 0-8020-3780-1. OCLC 56329119.
- Daglish, Ian (2005). Operation Goodwood. Over the Battlefield. Barnsley: Pen & Sword Ltd. ISBN 1-84415-153-0. OCLC 68762230.
- Delaforce, Patrick (2003) [1999]. Churchill's Desert Rats: From Normandy to Berlin with the 7th Armoured Division. Stroud: Sutton Publishing Ltd; New edition. ISBN 0-7509-3198-1.
- D'Este, Carlo (2004) [1983]. Decision in Normandy: The Real Story of Montgomery and the Allied Campaign. London: Penguin Books Ltd. ISBN 0-14-101761-9. OCLC 44772546.
- Ellis, Major L.F.; with Allen, Captain G.R.G. Allen; Warhurst, Lieutenant-Colonel A.E. & Robb, Air Chief-Marshal Sir James (2004) [1st. pub. HMSO 1962]. Butler, J.R.M. ed. Victory in the West, Volume I: The Battle of Normandy. History of the Second World War United Kingdom Military Series. Naval & Military Press Ltd. ISBN 1-84574-058-0.
- Fortin, Ludovic (2004). British Tanks In Normandy. Paris: Histoire & Collections. ISBN 2-915239-33-9.
- Forty, George (2004). Villers Bocage. Battle Zone Normandy. Stroud: Sutton Publishing. ISBN 0-7509-3012-8.
- French, David (2001) [2000]. Raising Churchill's Army: The British Army and the War against Germany 1919–1945. Oxford: Oxford University Press. ISBN 978-0-19-924630-4.
- Gill, Ronald; Groves, John (2006) [1946]. Club Route in Europe: The History of 30 Corps from D-Day to May 1945. MLRS Books. ISBN 978-1-905696-24-6.
- Harrison, Gordon A (2002) [1951]. Cross-Channel Attack. United States Army in World War II. Center of Military History, United States Army, Washington DC. http://www.history.army.mil/books/wwii/7-4/7-4_Contents.htm#toc. Library of Congress Catalog Card Number: 51-61669
- Hart, Stephen Ashley (2007) [2000]. Colossal Cracks: Montgomery's 21st Army Group in Northwest Europe, 1944–45. Mechanicsburg: Stackpole Books. ISBN 0-8117-3383-1. OCLC 70698935.
- Hart, Stephen; Hart, Russell; Hughes, Matthew (2000). The German Soldier in World War II. Staplehurst: Spellmount Limited. ISBN 1-86227-073-2.
- Hastings, Max (1999) [1984]. Overlord: D-Day and the Battle for Normandy 1944. Pan Grand Strategy Series. London: Pan Books. ISBN 0-330-39012-0.
- Hastings, Major R.H.W.S. (1950). The Rifle Brigade In The Second World War 1939–1945. Gale & Polden. ASIN B000X890UK.
- Jackson, G.S.; Staff, 8 Corps (2006) [1945]. 8 Corps: Normandy to the Baltic. Smalldale: MLRS Books. ISBN 978-1-905696-25-3.
- Lindsay, Captain Martin; Johnson, Captain M.E. (2005) [1945]. History of 7th Armoured Division: June 1943 – July 1945. MLRS Books. ISBN 978-1-84791-219-0.
- Marie, Henri (2004) [1993]. Villers-Bocage: Normandy 1944. Bayeux: Editions Heimdal; Bilingual edition. ISBN 978-2-84048-173-7.
- Meyer, Hubert (2005) [1994]. The 12th SS: The History of the Hitler Youth Panzer Division: Volume I. Mechanicsburg: Stackpole Books. ISBN 978-0-8117-3198-0.
- Neillands, Robin (2005) [1995]. The Desert Rats: 7th Armoured Division, 1940–1945. London: Aurum Press Ltd. ISBN 978-1-84513-115-9.
- Reynolds, Michael (2001) [1997]. Steel Inferno: I SS Panzer Corps in Normandy. Da Capo Press Inc. ISBN 1-885119-44-5.
- Reynolds, Michael (2002). Sons of the Reich: The History of II SS Panzer Corps in Normandy, Arnhem, the Ardennes and on the Eastern Front. Havertown: Casemate Publishers and Book Distributors. ISBN 0-9711709-3-2. OCLC 50208471.
- Rodger, Alexander (2003). Battle Honours of the British Empire and Commonwealth Land Forces. Marlborough: The Crowood Press. ISBN 1-86126-637-5.
- Royal Air Force Bomber Command 60th Anniversary. "Campaign Diary June 1944". http://www.raf.mod.uk/bombercommand/jun44.htm.
- Stacey, Colonel Charles Perry; Bond, Major C.C.J. (1960). Official History of the Canadian Army in the Second World War: Volume III. The Victory Campaign: The operations in North-West Europe 1944–1945. The Queen's Printer and Controller of Stationery Ottawa.
- "The Villers-Bocage Debate". pp. 17–18. http://www.sharpshooters.org.uk/Newsletter/Newsletters/SYA%20Newsletter%202003.pdf. Retrieved 1 October 2009.
- Taylor, Daniel (2006). "Villers-Bocage Revisited". After the Battle. pp. 30–41.
- Taylor, Daniel (1999). Villers-Bocage Through the Lens. Old Harlow: Battle of Britain International. ISBN 1-870067-07-X. OCLC 43719285.
- Trew, Simon; Badsey, Stephen (2004). Battle for Caen. Battle Zone Normandy. Stroud: Sutton Publishing. ISBN 0-7509-3010-1. OCLC 56759608.
- Van Der Vat, Dan (2003). D-Day; The Greatest Invasion, A People's History. Toronto: Madison Press Limited. ISBN 1-55192-586-9. OCLC 51290297.
- Weigley, Russell F.; Russell Weigley (1981). Eisenhower's Lieutenants: The Campaigns of France and Germany, 1944–1945. London: Sidgwick & Jackson Ltd. ISBN 0-283-98801-0.
- Williams, Andrew (2004). D-Day to Berlin. London: Hodder. ISBN 0-340-83397-1. OCLC 60416729.
- Wilmot, Chester; Christopher Daniel McDevitt (1997) [1952]. The Struggle For Europe. Ware, Hertfordshire: Wordsworth Editions Ltd. ISBN 1-85326-677-9. OCLC 39697844.
- Zetterling, Niklas (1999). "The Normandy Campaign 1944: 101. schwere SS-Panzer Abteilung". http://home.swipnet.se/normandy/gerob/.
External links[]
| Wikimedia Commons has media related to Battle of Villers-Bocage. |
- Attwood, Christopher. "The war diary of 8th Kings Royal Irish Hussars – June 1944". http://freepages.military.rootsweb.ancestry.com/~attwood/8thkri/war_diary.htm. Transcribed from the War Diary of the 8th (Kings Royal Irish) Hussars for the period of June 1944 from copies provided by the Tank Museum, Bovington.
- Hamby, Alan. "Tiger I Information Center". http://www.alanhamby.com/unithist.shtml#SS101. War Diary of the Heavy SS-Panzer Battalion 101
- Paterson, Ian A. "History of the British 7th Armoured Division". Archived from the original on 2007-06-21. http://web.archive.org/web/20070621175054/http://www.btinternet.com/~ian.a.paterson/battles1944.htm#Normandy. Website's page on the division's activities in Normandy.
- Warlinks. "War Diaries for the 4th County of London Yeomanry September 1939 To July 1944". http://www.warlinks.com/armour/4_cly/4cly_44.html.
- Warlinks. "War Diaries for the 11th Hussars, (Prince Albert's Own) September 1939 To March 1946". http://warlinks.com/armour/11_hussars/11huss_41.html.
- Youtube. "German newsreel footage of the aftermath of the Battle of Villers-Bocage". http://www.youtube.com/watch?v=JBLrtDpRUDc.
Coordinates: 49°4′50″N 0°39′22″W / 49.08056°N 0.65611°W
The original article can be found at Battle of Villers-Bocage and the edit history here.