| Edinburgh City Artillery Lowland (City of Edinburgh) Heavy Battery 51st (Lowland) Heavy Regiment 66th (Lowland) Medium Regiment 357th (Lothians) Medium Regiment | |
|---|---|
| Active | 1859–1961 |
| Country |
|
| Branch |
|
| Type | Artillery Corps |
| Role |
Garrison Artillery Heavy Artillery Medium Artillery |
| Garrison/HQ | Edinburgh |
| Engagements | |
| Commanders | |
| Notable commanders | Sir Joseph Noel Paton |
The Edinburgh City Artillery was a part-time unit of Britain's Volunteer Force raised in the City of Edinburgh in 1859. It was the parent unit for a number of batteries in the later Territorial Force, including heavy batteries of the Royal Garrison Artillery that fought on the Western Front during World War I. It later formed a heavy regiment that served in the Battle of France and the campaign in North West Europe during World War II, while a spin-off medium regiment fought in Sicily and Italy. Its successor units continued in the postwar Territorial Army until the 1960s.
Volunteers[]
The enthusiasm for the Volunteer movement following an invasion scare in 1859 saw the creation of many Artillery Volunteer Corps (AVCs) composed of part-time soldiers eager to supplement the Regular Royal Artillery in time of need.[1][2][3][4] The 1st Edinburgh (City) Artillery Volunteer Corps was raised in the City of Edinburgh on 4 November 1859. Its members were mainly artists, and the first commanding officer (CO) was Captain Joseph (later Sir Joseph) Noel Paton, the illustrator and sculptor, with the painter John Faed as lieutenant. By October 1860, the unit had a strength of nine batteries:[5][6][7]
- No 1 Battery, raised 4 November 1859
- No 2 Battery, raised 10 January 1860
- No 3 Battery, raised 28 January 1860
- No 4 Battery, raised 6 March 1860
- No 5 Battery, raised 24 March 1860
- No 6 Battery, raised 23 May 1860
- No 7 Battery, raised 6 June 1860
- No 8 Battery, raised 13 August 1860
- No 9 Battery, raised 16 October 1860
The 2nd and 4th Batteries were mainly composed of artisans, but the members of the other batteries paid for their own uniforms and equipment. The unit's badges and accoutrements bore the inscription 'EDINBURGH CITY ARTILLERY'. Its headquarters (HQ) was established at 21 Castle Street (later at King's Stables Road, and then 28 York Place), Edinburgh, and it used the Argyle Battery (12-pounder guns) at Edinburgh Castle for drill. It carried out firing practice at a 32-pounder battery at Leith Fort, and for Carbine practice it used the Queen's Edinburgh Rifles' range at Hunter's Bog in Holyrood Park.[6][7][8]
Once the unit reached full size, a retired professional officer, William M.G.M. Wellwood (formerly Captain in the 2nd Bengal Light Cavalry), was appointed CO with the rank of Lieutenant-Colonel on 13 September 1860. He was succeeded by Thomas Bell on 4 April 1864, and then in turn by Sir William Baillie, 2nd Baronet, on 6 December 1866. Baillie remained in command until 1884.[6][8]
From 1864, the 1st and 2nd Berwickshire AVCs were attached to the Edinburgh City Artillery. The 1st had been raised at Eyemouth on 6 April 1860, and the 2nd at Coldingham appeared in the Army List in February 1861 but no officers were commissioned into it until 10 July 1863.[6][7][8][9][lower-alpha 1] The 2nd Berwickshire AVC was disbanded in 1883.[7][9]
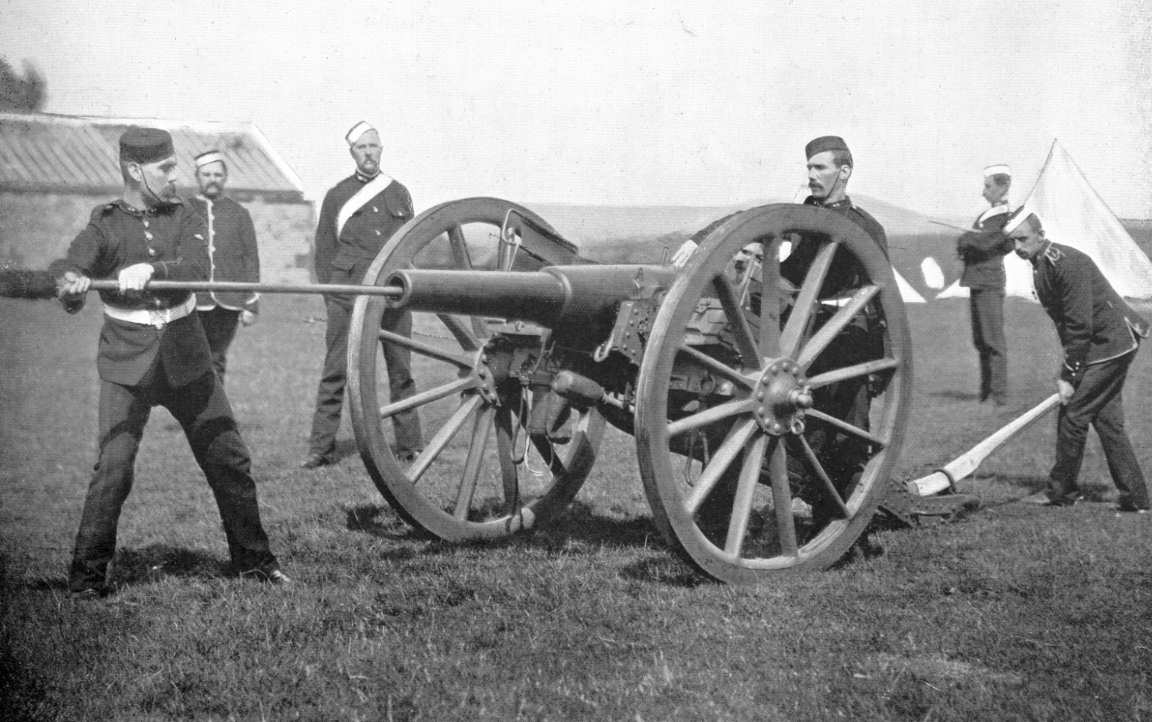
16-Pounder RML gun manned by Artillery Volunteers.
The AVCs were intended to serve as garrison artillery manning fixed defences, but a number of the early units manned semi-mobile 'position batteries' of smooth-bore field guns pulled by agricultural horses. However, the War Office (WO) refused to pay for the upkeep of field guns and the concept died out in the 1870s. It was revived in 1888 when some Volunteer batteries were reorganised as 'position artillery' to work alongside the Volunteer infantry brigades. In February 1889, the 1st Edinburgh AVC was issued with two position batteries of 16-pounder Rifled Muzzle-Loading guns, which were manned by four of the garrison batteries. In 1892, the two position batteries were numbered 1 and 2, and the remaining garrison batteries were redesignated Nos 3–7 Companies. The 16-pounders were replaced by 4.7-inch breechloading guns in February 1903, and position batteries were officially referred to as 'heavy' batteries from 1902.[6][7][10][11]
From 1 April 1882, the unit formed part of the Scottish Division of the Royal Artillery (RA); on 1 July 1889, the Volunteer artillery were regrouped into three large divisions, the 1st Edinburgh being assigned to the Southern Division. In 1899, the artillery Volunteers were transferred to the Royal Garrison Artillery (RGA), the Edinburgh unit becoming the 1st Edinburgh (City) RGA (V) with the 1st Berwickshire RGA (V) still attached.[7][8][12] By the early 20th Century the unit carried out its gun practice from the Inchkeith Batteries. In 1907, the unit's detachment won the King's Prize at the National Artillery Association meeting at Lydd.[6]
Territorial Force[]
When the Volunteers were subsumed into the new Territorial Force (TF) under the Haldane Reforms of 1908,[13][14] the personnel of the Edinburgh City Artillery was distributed to several new units:[7][8][15][16]
- The Lowland (City of Edinburgh) RGA
- Some personnel merged with parts of the 1st Argyll RGA and the 1st Renfrewshire RGA to form the Forth & Clyde RGA, a coast defence unit based at Edinburgh
- The 1st (City of Edinburgh) Battery was formed in the 1st Lowland Brigade, Royal Field Artillery, the rest of which came from the 1st Midlothian RGA
- Members of Edinburgh University who had served in Left Half, 1st Heavy Battery, transferred to the Edinburgh University contingent of the Senior Division of the Officers' Training Corps (OTC)
- 1st Berwickshire RGA (V) was disbanded[7][9]
Subsequently, the Lowland (City of Edinburgh) RGA became the Lowland (City of Edinburgh) Heavy Battery, RGA, based at McDonald Road, Edinburgh, with its own ammunition column.[8][16][17] It formed part of the Lowland Division of the TF.[18][19][20]
World War I[]
Mobilisation[]
On the outbreak of war on 4 August 1914, the Lowland Hvy Bty began mobilising at Edinburgh with its four 4.7-inch guns, under the command of Major J.B. Cameron.[18][19][21] Almost immediately, TF units were invited to volunteer for Overseas Service. On 15 August 1914, the WO issued instructions to separate those men who had signed up for Home Service only, and form them into reserve units. On 31 August, the formation of a reserve or 2nd Line unit was authorised for each 1st Line unit where 60 per cent or more of the men had volunteered for Overseas Service. The titles of these 2nd Line units would be the same as the original, but distinguished by a '2/' prefix. The 2/1st Lowland (City of Edinburgh) battery was formed in the 2nd Lowland Division.[22][23][24]
1/1st Lowland (City of Edinburgh) Heavy Battery[]
The battery and ammunition column completed mobilisation on 14 August and moved out to its war station at Stirling in the Scottish Coastal Defences the following day. When the Lowland Division (numbered as the 52nd (Lowland) Division) embarked for the Gallipoli Campaign in May and June 1915, its heavy battery remained training in Scotland. It moved from Stirling to Cupar on 25 October, then on 26 January 1916 it moved south to the RA depot at Woolwich to prepare for overseas service.[18][20][25][26]
1/1st Lowland Hvy Bty was sent to join the British Expeditionary Force (BEF) on the Western Front, disembarking at Le Havre in France on 16 February. Two days later, it joined XVII Brigade, RGA, at Authie.[18][27] The RGA brigades were renamed Heavy Artillery Groups (HAGs) shortly afterwards, and the policy was move batteries between HAGs as required. 1/1st Lowland Hvy Bty moved to 16th HAG on 3 March, then to 48th HAG on 17 April.[27][28]
Gommecourt[]

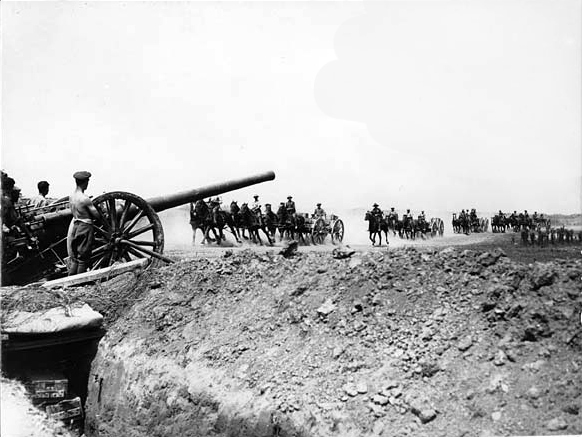
Ammunition limbers gallop past a battery of British 4.7 inch guns on the Somme.
48th Heavy Artillery Group was assigned to support VII Corps' Attack on the Gommecourt Salient in the forthcoming 'Big Push' (the Battle of the Somme). The battery was ordered to Berles-au-Bois north of Gommecourt at the beginning of May and spent a week preparing positions for its guns. It was then ordered to hand these over to 116th Hvy Bty, which would move in during June, so for several weeks the battery's gunners had to labour both to finish these positions for 116th Hvy Bty, and their own new positions, including a shell store for 400 rounds. Throughout May and through most of June, the battery fired on German positions around Adinfer Wood.[25][26]
48th Heavy Artillery Group's main role was Counter-battery fire to destroy the German artillery facing 56th (1st London) Division's attack front, although the Territorials' 4.7-inch guns could not actually reach the German heavy gun positions in the rear, and accuracy of the 4.7-inch batteries was generally poor. The planned seven-day bombardment of the German positions began on 24 June but 1/1st Lowland Hvy Bty did not begin registering its guns on Bucquoy until 27 June (X Day). Later, the guns practised a six-minute 'hurricane' bombardment on the German positions in which the battery fired 68 rounds. Y Day was spent shelling German gun positions, but the weather was poor for observation, and the battery only fired 20 rounds. Because of the weather, the attack was postponed for two days, and the additional days (Y1 and Y2) were used for further bombardment. The battery was silent on Y1. On Y2, 48th HAG engaged 18 separate targets, and 1/1st Lowland Hvy Bty fired 220 rounds, but this was far below the 400 per battery permitted, because of continuing difficulties of observation. Many of these rounds were wide of their intended targets. The failure to neutralise the German guns would have disastrous results for the attacking infantry.[25][26][29][30][31][32]
On Z Day (1 July), the entire artillery supporting 56th Division fired a 65-minute bombardment of the German front, starting at 06.25. At 07.30, the guns lifted onto their pre-arranged targets in the German support and reserve lines as the infantry got out of their forward trenches and advanced towards Gommecourt. At first, this went well for 56th Division. Despite casualties from the German counter-bombardment on their jumping-off trenches, the smoke and morning mist helped the infantry, and they reached the German front line with little loss and moved on towards the second and reserve lines. The artillery Observation Posts (OPs) reported the signboards erected by the leading waves to mark their progress. However, the OPs themselves came under attack from the German guns, which laid a Barrage across No man's land preventing supplies and reinforcements from reaching the leading infantry waves who had entered the German trenches. The heavy guns tried to suppress the German artillery, but the commander of 56th Division commented that although 'our counter-battery groups engaged a large number of German batteries – the results were not apparent'. From 07.25 1/1st Lowland Hvy Bty spent the day firing mainly at battery positions around Le Quesnoy Farm at ranges around 8,000 yards (7,300 m). Left and Right Sections (two guns each) each took a different target, then switched to another pair of targets at 07.40. It was not until 09.30 that the CO of 48th HAG could report that one of the Group's target batteries had been silenced. 1/1st Lowland Hvy Bty engaged the same four German batteries again at 10.46 and at 11.30, and fired on another battery near Adinfer Wood at 14.35, but none of these targets received more that 43 shells during the day (barely half the battery's allowance) and as the fire was unobserved the damage was probably negligible. (Although No 8 Squadron Royal Flying Corps identified 63 German batteries firing on VII Corps' front, many of these were out of range, and the aircrews were unable to spot fall of shot for the British guns because of smoke, haze and confusion.) By mid-afternoon, 56th Division's slight gains were being eroded by German counter-attacks, and all the remaining gains had to be abandoned after dark. VII Corps' costly attack was only a diversion from the main BEF attack further south, and was not renewed after the first day.[33][34][35][36]
Arras[]

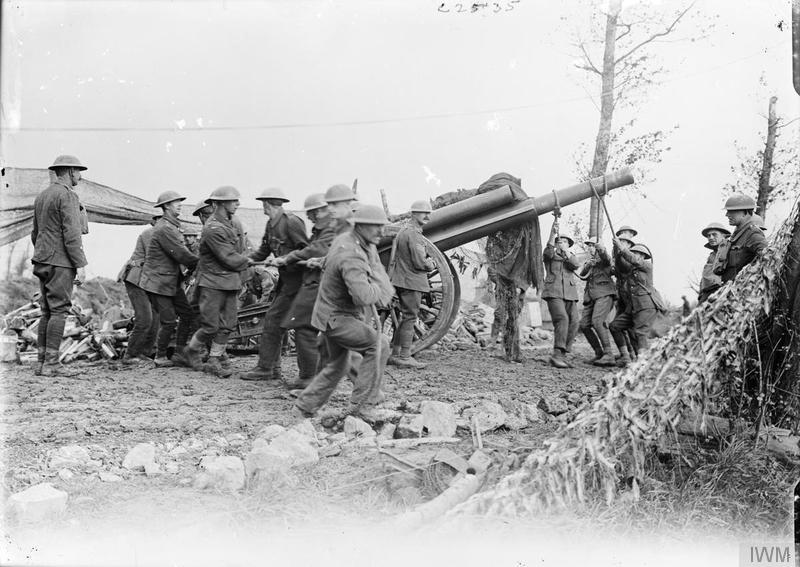
RGA manhandling a 60-pounder gun, 1917.
Over the next year, the 1/1st Lowland Hvy Bty was moved from one HAG to another as circumstances demanded. It was transferred to 46th on 28 August, 47th on 13 September and 8th on 5 October before returning to 47th on 29 December. All these moves were within Third Army, which was no longer involved in the Somme Offensive.[37]
The obsolescent 4.7-inch guns were progressively replaced in the BEF by 60-pounders during 1916. In December 1916, the WO decided that all heavy batteries should be composed of six guns and 1/1st Lowland Hvy Bty was brought up to that strength on 23 January 1917 when it was joined by a section of 201st Hvy Bty (newly arrived in France and immediately broken up).[27][28]
The battery rejoined 8th HAG on 13 January 1917.[37] This group supported VII Corps in its attack at the opening of the Battle of Arras on 9 April. This time there were many more guns available and the artillery plan was much more carefully worked out. After the preliminary bombardment, howitzers laid a standing barrage on the German trenches at Zero hour while the 60-pounders swept and searched in depth to catch machine gunners and moving infantry. As the attacking infantry reached their second objective (the Blue Line), their field guns moved up in support and the 60-pounder batteries moved forward into the vacated positions. On VII Corps' front, the attack was partially successful, but infantry–artillery communication was still limited, and follow-up attacks over succeeding days suffered from hastily-prepared artillery plans.[38][39]
Later war[]
After the Arras offensive, the 1/1st Lowland Hvy Bty was rested from 15 to 30 May. It then joined XVII Corps' Heavy Artillery on 8 June, being assigned to 35th HAG from 18 June, then 22nd HAG from 9 July, and then moved to 45th HAG in Fourth Army from 28 August. At the time, Fourth Army was on the Flanders Coast waiting to exploit a breakthrough from the Ypres Salient that never came.[27][37]
The battery was withdrawn from the line on 7 November, and was then resting, moving and training until 16 December. By now HAG allocations were becoming more fixed. From 28 December 1917 until the Armistice, 1/1st Lowland Hvy Bty was in 81st HAG, which became 81st Mixed Brigade, RGA, on 1 February 1918.[27][37]
The German Army opened its Spring Offensive on 21 March 1918 against Third and Fifth Armies. At the end of the first day 81st Bde was sent up to reinforce Third Army. During the 'Great Retreat' of March and early April, the artillery did their best to support rearguards until a new line was stabilised.[40]
81st Brigade was transferred from Third Army to First Army on 1 May, and remained with it until the Armistice with Germany.[27][37][41] After the German offensive was held, the Allies went over to the attack themselves during the summer of 1918 (the Hundred Days Offensive). By now, British attacks were supported by massive artillery concentrations. When XXII Corps attacked on 24 October at the Battle of the Selle, its two divisions were supported by no fewer than eight RGA heavy brigades including the 81st. Half of the 'heavies' were used for counter-battery tasks, the rest for the bombardment and barrage.[42][43]
When the BEF demobilised in 1919, the battery was placed in suspended animation.[16]
2/1st Lowland (City of Edinburgh) Heavy Battery[]
2/1st Lowland Heavy Battery was raised at Edinburgh before the end of 1914. The 2nd Lowland Division (later numbered the 65th (2nd Lowland) Division) slowly assembled in early 1915, hampered by lack of equipment for training. By August 1915, it had concentrated around Bridge of Allan, with 2/1st Lowland Hvy Bty training alongside its 1st Line parent at Stirling. In November, the division moved into winter quarters, with the heavy battery at Buddon.[18]
Western Front[]
In May 1916, the 2/1st Lowland Hvy Bty was sent to join the BEF, disembarking at Le Havre on 30 May. It joined VI Corps' Heavy Artillery in Third Army near Arras on 1 June, and was assigned to 8th HAG on 10 June.[23] The battery was brought up to six guns on 31 July 1916, when it was joined by a section from the newly-arrived 149th Hvy Bty. 8th HAG was not involved in the Gommecourt attack, and spent the rest of 1916 in routine trench warfare under Third Army.[27][37]
Like the 1/1st Battery, the 2/1st (also with 60-pounders) was moved from one HAG to another. On 25 November 1916, it was transferred to 35th HAG, on 17 December to 65th, then two days later to 54th, returning to 35th on 8 January 1917, then to 39th on 11 February, all within Third Army. Like its parent unit, 2/1st Lowland Hvy Bty in 39th HAG fired in support of VII Corps in the Arras offensive (see above).[27]
After Arras, 2/1st Lowland Hvy Bty moved back to 35th HAG on 30 May, to 58th on 9 June, and then on 16 June it returned to 39th HAG. On 5 October, it moved to 92nd HAG in Fifth Army, which was engaged in the final stages of the Battle of Passchendaele. Conditions for the gunners in this battle were appalling, with immense labour being required to position guns and gun platforms in thick mud on a bare slope without any cover. Exhausted artillery units were having to be rotated. After the battle ended, 2/1st Lowland Hvy Bty was rested from 18 December.[27][37][44]


A 60-pounder gun being moved up in 1918.
On 5 January 1918, 2/1st Lowland Hvy Bty joined the mixed-calibre 93rd HAG (93rd (Mixed) Brigade, RGA, from 1 February), and remained with this brigade for the rest of the war. 93rd Brigade was at the time with Fourth Army, but on 14 March it transferred to Fifth Army, just in time to be caught up in the Spring Offensive and Great Retreat.[27][37]
93rd Brigade moved to Fourth Army for the Battle of Amiens on 8 August 1918, supporting the Australian Corps in a barrage that was so thick and accurate that all the Australians' Phase 1 objectives were secured by 07.00, and scarcely a German shell fell after 05.40. The Australians continued to advance rapidly, sometimes running into their own barrage in their eagerness.[37][45][46]
The advance continued in a succession of bounds through the Hundred Days Offensive. By early October the Australians were taken out of the line for rest, handing their artillery including 93rd Bde over to the II US Corps for the Battle of Cambrai, in which the Americans advanced up to the River Selle.[47][48]
By the time of the Battle of the Selle (see above), II US Corps was about to be withdrawn for rest, and 93rd Bde was assigned to IX Corps' Reserve. The heavy batteries were well forward so that they could shell the Germans' lines of retreat across the Sambre. 93rd Brigade was part of the massive artillery support for IX Corps' attack on 23 October. After the Battle of the Sambre, the campaign continued as a pursuit until the Armistice, in which the heavy artillery could only play a limited part.[49][50][51]
When the BEF demobilised in 1919, the battery was disbanded.[16]
Interwar[]


Dalmeny Street drill hall today
When the TF was reconstituted as the Territorial Army in 1920–1, the Lowland (City of Edinburgh) Hvy Bty formed the basis of a new 2nd (Lowland) Medium Brigade, RGA, quickly renumbered as the 57th (Lowland) Medium Brigade, RGA. It consisted of one battery derived from the Lowland (City of Edinburgh) Hvy Bty, the others being converted from the 6th and 8th Battalions of the Royal Scots:[8][16]
- HQ at 6 Wemyss Place, Edinburgh
- 225 (City of Edinburgh) Medium Bty at Drill Hall, 124 McDonald Road, Edinburgh – from Lowland Hy Bty, RGA
- 226 (City of Edinburgh) Medium Bty (Howitzers) at Drill Hall, Dalmeny Street, Leith – from 6th Bn Royal Scots
- 227 (Haddingtonshire) Medium Bty (Howitzers) at Drill Hall, Dalmeny Street, Leith – from 8th Bn Royal Scots
- 228 (Peeblesshire and Midlothian) Medium Bty (Howitzers) at High Street, Dunbar – from 8th Bn Royal Scots
(The Leith and Dunbar Drill Halls had previously belonged to the 7th Battalion, Royal Scots.[8][17]) The CO (Lt-Col J.B. Cameron, DSO, TD) and senior major (E.G. Thompson, MC) of the new brigade were prewar officers of the 1st Lowland (City of Edinburgh) Hvy Bty. Affiliated to it were the cadet corps of North Berwick, Haddington, and Tranent Industrial School.[8] The brigade served as 'Army Troops' in 52nd (Lowland) Divisional Area of Scottish Command.[52] In 1924, the RGA was subsumed into the RA, and in 1938 RA brigades were redesignated as regiments.[16]
When the TA was doubled in size after the Munich Crisis of 1938, the regiment split into two:[16][53]
- 57th (Lowland) Medium Rgt
- Regimental HQ, 225 and 226 (City of Edinburgh) Btys at Edinburgh
- 66th Medium Rgt
- RHQ and 227 (Haddingtonshire) Bty at Prestonpans
- 228 (Peeblesshire and Midlothian) Bty at Leith
Shortly after the outbreak of war in September 1939, 57th (Lowland) Medium Rgt was converted to the heavy artillery role, being redesignated 51st (Lowland) Heavy Regiment at Leith.[16][54] In 1942, the 66th Medium Rgt gained the 'Lowland' subtitle.[16]
World War II[]
51st (Lowland) Heavy Regiment[]
Battle of France[]
At this time heavy regiments consisted of four 4-gun batteries, which in the 51st were designated A, B, C, and D.[55][lower-alpha 2] 51st (Lowland) Hvy Rgt would have been equipped with 6-inch guns (one Bty) and 9.2-inch howitzers (three batteries), both of World War I vintage.[57][lower-alpha 3] In November 1939, the newly-converted regiment deployed to join the British Expeditionary Force in France under Lt-Col D. McDowell, who had been CO since 1936.[8][55][60][62]
On 10 May 1940, the Phoney War ended with the German invasion of the Low Countries, and the BEF followed the pre-arranged Plan D and advanced into Belgium to take up defences along the River Dyle. It was largely in position by 15 May and subject to German probing attacks.[63] However, the Panzers of the Wehrmacht's Army Group A had broken through the Ardennes and threatened the BEF's flank, so on 16 May it began to withdraw to the River Escaut.[64] On 17 May a gap opened up between the BEF and the Belgian Army, and a battery of 51sth (L) Hvy Rgt was among the artillery reinforcements thrown into this gap along the River Dendre, where there was fierce fighting.[65] After leaving rearguards on the Dendre, the BEF occupied the Escaut line on 21 May, but by now the enemy was in its rear. To hold the line of the Aire Canal north of Saint-Omer the BEF organised a scratch force of rear elements ('Polforce'), including 51st (L) Hvy Rgt, to defend the crossings. The bridge at Saint-Momelin was held for three days against 1st Panzer Division by one gun of 98th (Surrey & Sussex Yeomanry) Field Rgt and the gunners of 51st (L) Hvy Rgt acting as infantry, equipped with nothing more than rifles and a few Bren guns.[lower-alpha 4] They had the satisfaction of intercepting a German radio message that said 'Bridge at Momelin strongly held, try elsewhere'. The defenders at St Momelin were relieved by French troops on 25 May and fell back into the 'pocket' round Dunkirk from which the BEF was preparing evacuation (Operation Dynamo).[66][67][68]
Home defence[]
All the BEF's heavy equipment such as artillery had to be disabled and left behind in France, and this could only be slowly replaced. By the Autumn of 1940, 51st (L) Hvy Rgt with its attached Royal Corps of Signals section had joined Western Command, facing the possibility of German invasion by sea and air. The available heavy guns were sited within range of likely landing places.[61][69][70][71][72] The regiment moved to Eastern Command in March 1941 and gained a Light Aid Detachment (LAD) of the Royal Electrical and Mechanical Engineers.[73][74][75][76][77][78]
The anticipated invasion never came, and the field force in the UK began to prepare for offensive action once more. One innovation was the Army Group Royal Artillery (AGRA), a powerful artillery brigade, usually comprising one heavy, three medium and one field regiment, which could be rapidly moved about the battlefield, and had the punch to destroy enemy artillery.[79][80][81] 51st (L) Hvy Rgt, together with its attached signal section and LAD, was assigned to 4 AGRA, formed in May 1943 as part of Second Army.[55][82][83]
By now, the RA's heavy regiments were equipped with two batteries of 7.2-inch howitzers and two of US-made 155mm 'Long Tom' guns.[57][80]
North West Europe[]


7.2-inch howitzer of 51st (Lowland) Heavy Regiment in France, 2 September 1944.


7.2-inch howitzer firing, 2 September 1944.
51st (Lowland) Heavy Rgt landed in Normandy with 4 AGRA in June 1944, shortly after D-Day.[55][80][83][84] On 8 and 9 July, the guns of 4 AGRA were part of the massive artillery support for I Corps' attack on Caen (Operation Charnwood).[83][85] After the breakout from the Normandy beachhead, I Corps was tasked with clearing the port of Le Havre on 10 September (Operation Astonia), again supported by 4 AGRA engaged in counter-battery (CB) fire.[83][86][87][88]
By now, I Corps was operating under the command of First Canadian Army advancing into the southern Netherlands.[89] At the end of October, 51st (L) Hvy Rgt was detached from 4 AGRA to support II Canadian Corps in its attack on Walcheren (Operation Infatuate). It returned to 4 AGRA in I Corps on 4 November and deployed around Etten-Leur, with a section of 7.2s west of Breda, directing harassing fire (HF) against German movements on the Moerdijk bridges. From 5 to 8 November, the regiment was engaged in CB and HF tasks around the Maas estuary, 2 and 6 Btys expending 800 rounds on CB tasks on 6 November alone. On 11 November, the regiment moved, establishing RHQ at De Rips, with 1 and 2 Btys (7.2-inch) on 11th Armoured Division's front east of Deurne, 4 and 6 Btys (155mm) on 3rd Division's front between Oploo and Overloon. The gunners then spent the next few days preparing gun positions. From 15 to 24 November, 1 and 2 Btys supported 11th Armd Division and 15th (Scottish) Division in their attack towards the Mass, though there was only a little CB and counter-mortar (CM) fire. On 25 and 27 November, 4 Bty carried out shoots against a German strongpoint at Kasteel, directed by Air Observation Post (AOP) aircraft. On 28 and 29 November, 4 and 6 Btys carried out small CB programmes, but 1 and 2 Btys were now out of range.[56]
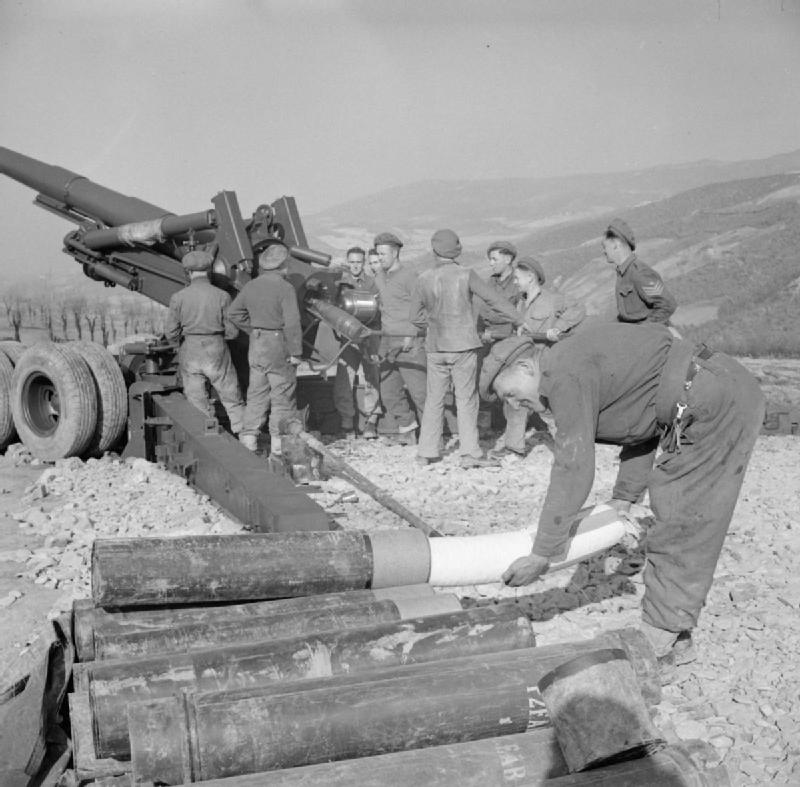

RA gunners load a US 155mm 'Long Tom' gun.
On 1 December, the regiment moved back into Belgium to join XXX Corps. During late December the corps was diverted south to strengthen the northern side of the 'Bulge' formed by the German Ardennes Offensive, and by early January 1945, 51st (L) Hvy Rgt was with 9 AGRA in XII Corps in the southern Netherlands, supporting 7th Armoured and 52nd (Lowland) Divisions with CB and HF missions.[56][90][91]
Once the Ardennes crisis was passed, Second Army began planning Operation Blackcock to clear the Roer Triangle. The regiment was split up, with the 7.2-inch howitzers of 1 Bty west of Sittard attached to 13th Medium Rgt in 3 AGRA, supporting 7th Armd Division, while 4 Bty was attached to 43rd (Wessex) Division for CM tasks. 51st (L) Heavy Rgt supplied 9 AGRA's liaison representatives at these two divisional HQs. The bulk of the regiment moved to Gangelt and began the artillery preparation for 'Blackcock' on 15 January. During this bombardment, 4 Bty fired on dug-in tanks near Berberen. On 20 January, the regiment shifted its positions so that the 155mm guns could reach targets across the River Ruhr. The fire tasks were completed and 4 Bty reverted to regimental control by 23 January. The regiment moved to 'harbour' at Loon op Zand 1–3 February except 2 Bty, which was under 68th Medium Rgt supporting the Canadians.[56]
For Operation Veritable (the clearance of the Klever Reichswald), 51st (L) Hvy Rgt reverted to 4 AGRA, which was assigned to XXX Corps to support 51st (Highland) Division. The batteries moved into 'hides' near Beers ahead of the operation.[56] The assembly of heavy guns and ammunition in forward areas for this offensive along inadequate roads was a major achievement. The concentration of artillery fire was the greatest employed by the British Army so far in the war.[92][93] The guns opened fire at H Hour (10.30) on 8 February.[56] XXX Corps' commander, Lt-Gen Sir Brian Horrocks, later recalled that 'The noise was appalling, and the sight was awe-inspiring. All across the front shells were exploding. ... It soon became clear that the enemy was completely bemused as a result of our colossal bombardment; their resistance was slight'.[94] The infantry followed the artillery fire closely, at the risk of incurring casualties from friendly fire, and overran the German forward positions. However, the battle slowed down into a series of short-range night and dawn attacks through flooded country from one 'island' village to another behind a barrage: 'it was a slog in which only two things mattered, training and guns ... Slowly and bitterly we advanced through the mud supported by our superb artillery'.[95] The British artillery prevented the Germans from assembling effective counter-attack forces.[96] 51st (L) Heavy Rgt fired in support of 51st (H) Division, 15th (S) Division and 32nd Guards Brigade over succeeding days, shifting its position to near Gennep on 15 February.[56] 'Veritable' ground on until 10 March, but succeeded in clearing the ground west of the Rhine.[97]
The Rhine crossing (Operation Plunder), involved an even greater concentration of artillery. 4 AGRA was once again supporting XXX Corps. The artillery opened fire at 17.00 on 23 March with CB fire to neutralise the 150 enemy guns that had been identified on the corps front, and that night the infantry crossings began. By 28 March, Second Army had broken out of its Rhine bridgehead and was pursuing the enemy across North Germany.[98][99][100]
In early April, 51st (L) Hvy Rgt returned to the Netherlands to come under the command of 1st Canadian AGRA near Bemmel. From 12 to 17 April the regiment supported 49th (West Riding) Division's assault crossing of the River Ijssel and clearance of the enemy pocket at Arnhem. On the last day of this action 1 Bty supported the Independent Belgian Brigade by firing on an enemy-held factory. The battery commander personally established the OP and after 10 ranging shots the battery fired 20 rounds 'for effect', of which 12 were direct hits.[56]
The regiment moved to the Otterloo area, where there was little firing apart from night HF tasks, though 4 Bty sent a fighting patrol on foot to comb nearby woods for Germans. On 23 April, the regiment fired on two hostile batteries, but the fighting was coming to an end.[56] Victory in Europe Day was declared on 8 May. The regiment was placed in suspended animation in 1946.[16]
66th (Lowland) Medium Regiment[]
Home Defence[]
66th Medium Regiment was not deployed to France with the BEF, and thus avoided the evacuation from Dunkirk. During the 'invasion summer' of 1940 and up to the end of 1941 it formed the medium artillery component of V Corps in southern England.[70][72][73][74][101] At the beginning of the war, medium batteries were equipped with eight World War I 60-pounders or 6-inch howitzers. From 1941, however, these were progressively replaced by 4.5-inch and 5.5-inch medium guns.[57][58][59]
66th Medium Rgt moved to Eastern Command in December 1941 and gained a signal section and LAD.[74][75][76][77] During this period, it trained alongside 3rd Division.[16] The regiment left Eastern Command in December 1942 and came under direct WO control preparatory to embarking for overseas service. By mid-February, it had sailed for the Middle East.[77]
Sicily and Italy[]
On arrival in Egypt the regiment joined 6 AGRA, formed in May 1943 at Almaza. Shortly afterwards it came under Eighth Army, which at that time was planning for the Allied invasion of Sicily (Operation Husky).[101][102]
66th (L) Medium Rgt landed in Sicily with one battery of 4.5-inch guns and one of 5.5s. It came into action on 17 July, together with six field regiments, in support of an attack on the Fossa Bottaceto, south of Catania, by 6th and 9th Bns Durham Light Infantry and the tanks of 3rd County of London Yeomanry (Sharpshooters). The guns fired a concentration for 30 minutes before Zero (which was at 01.00), then barrages and concentrations as required. The operation bogged down in close country and an attempt to restart it the next night broke down when the artillery was directed to fire on the Bottaceto itself, while German troops were still in position in front of it.[103]
After Sicily had been secured, Eighth Army moved to the invasion of mainland Italy, with 6 AGRA supporting XIII Corps, tasked with crossing the Strait of Messina to land around Reggio di Calabria on 3 September (Operation Baytown). The assembled guns fired vast amounts of ammunition without reply, and the assault troops met little opposition on the lightly-held shore.[101][104]
By November, the Allies had advanced to the German Winter Line. 66th (L) Medium Rgt with 6 AGRA supported V Corps in the Battle of the Sangro. For three days from 29 November, the guns helped 78th and 8th Indian Divisions to break into the Bernhardt Line, the 5.5s firing over 350 rounds per gun and the 4.5s over 327, despite there being only one road up which to supply this ammunition. In the first half of December, during the Moro River Campaign, 2nd New Zealand Division supported by 6 AGRA and 66th (L) Medium Rgt made sustained but unsuccessful attempts to take the hilltop town of Orsogna.[105]
After the long winter stalemate round Monte Cassino the Allied forces were reorganised for a spring offensive in 1944. Additional AOP aircraft were allocated, and 6 AGRA benefited from 'Rover David', a 'cab rank system' for direct fighter-bomber support that could be called down on fleeting targets.[106] Once Rome had fallen in June, 6 AGRA was with XIII Corps in the pursuit to the Trasimene Line and the advance on Florence. During four days of preparation for 2nd New Zealand Division to assault the Arezzo position (10–14 July), the guns fired on enemy artillery batteries to cover the lull. The attack was an anti-climax, the terrain offering more resistance than the enemy, but the steep nature of the ground made accurate artillery support difficult, and there was heavier fighting on 15 July before the Germans broke contact and retreated. In the subsequent advance to the Gothic Line, the AGRAs were decentralised across the wide front, with medium regiments assigned to individual divisions.[107]
6 AGRA continued with XIII Corps when that formation fought under Fifth US Army to breach the Gothic Line in September 1944.[108] When 78th Division came back into the line in October, taking over positions in the Santerno Valley, 66th (L) Medium Rgt was directly attached to it, though the precarious bridges across the Santero made the relief and subsequent supply a very slow business.[109] 6 AGRA remained in XIII Corps for the victorious Spring 1945 offensive in Italy (Operation Grapeshot).[110]
Sometime after the end of the war, either in 1946 or 1947, the 66th (Lowland) Medium Regiment was disbanded.[16][54]
Postwar[]
When the TA was reconstituted in 1947, the regiment reformed at Edinburgh as 357th (Lothians) Medium Regiment, Royal Artillery, changing the 'Lothians' subtitle to 'Lowland' in 1955. It formed part of 85 AGRA.[16][54][111] In 1956, it absorbed 416th (Clyde) (Mixed) Coast Rgt to form 357th (Lowland) Light Regiment:[16][112]
- P (City of Edinburgh) Bty – from 357th
- Q (Lothian) Bty – from 357th
- R (Clyde) Bty – from 416th
In 1961, R Bty was amalgamated with the 277th (Highland) Field Regiment, the rest of the regiment was amalgamated with the 278th (Lowland) Field Regiment to become 278th (Lowland) Field Regiment (The City of Edinburgh Artillery). (278th Field Rgt was descended from the 1st Lowland Brigade, RFA, to which the Edinburgh City Artillery had contributed one battery in 1908, see above.)[16][113] When the TA was reduced in 1967, 278th Fd Rgt became Q (City of Edinburgh) Battery in a combined Lowland Regiment, Royal Artillery, which was disbanded in 1975.[113][114][115]
Uniforms and insignia[]
The original uniform of the Edinburgh City Artillery was a dark blue tunic, black braided, with blue collar and cuffs that were later changed to scarlet, and a red stripe down the trousers. Officers wore black lace at first, later changed to white or silver cord and then red from 1878. A Busby was worn in full dress up to 1908, and a round peakless Forage cap in undress, with a different badge for each battery. Most of the battery badges were a variation on the Royal Arms of Scotland. The badge on the grenade-shape busby plume holder and officers' Sabretaches used the arms of Edinburgh above a scroll inscribed 'EDINBURGH CITY ARTILLERY'.[6][7]
While training with 3rd Division in 1942, 66th (Lowland) Medium Rgt wore a blue diamond-shaped shoulder flash bearing the numeral 7 embroidered in red.[16]
In 1958 the sword and full-dress pouch that had belonged to Sir Joseph Noel Paton, was presented by his family to 278th (Lowland) Fd Rgt, successors to 1st Lowland Brigade. They were worn by the commander of P (1st City of Edinburgh) Battery on every Royal saluting parade until 1967.[16]
Honorary Colonels[]
The following served as Honorary Colonel of the unit:[8][116]
- Sir Lewis McIver, 1st Baronet, appointed 2 December 1896 (went to Forth RGA in 1908)
- Walter, 8th Lord Polwarth (from 8th Royal Scots in 1921)
- Gen Sir Reginald Wingate, Bt, appointed 1 February 1922
- Colonel Edward Bruce, 10th Earl of Elgin and Kincardine, KT, CMG, TD, appointed to 357 Med Rgt[116]
Footnotes[]
- ↑ The Berwickshire AVCs should not be confused with the 1st Berwick-on-Tweed AVC, which was attached to the 1st Newcastle-upon-Tyne Artillery Volunteers, the county of Berwickshire being in Scotland but the town of Berwick-upon-Tweed being in England.
- ↑ By November 1944, the regiment's batteries were designated 1, 2, 4 and 6.[56]
- ↑ Ellis[58] and Farndale[59] state that the three howitzer batteries of a heavy regiment were equipped with either 9.2-inch or 8-inch howitzers. Because the Regular 1st Heavy Rgt was equipped with 8-inch howitzers,[60] of which 12 were captured in France,[61] the 24 captured 9.2-inch howitzers must have equipped the two TA heavy regiments deployed with the BEF.
- ↑ A heavy regiment was only issued with 53 pistols, 205 rifles, 10 Light machine guns and 17 anti-tank rifles, for about 700 men.[58][59]
Notes[]
- ↑ Beckett.
- ↑ Grierson, pp. 1–12.
- ↑ Litchfield & Westlake, pp. 1–4.
- ↑ Spiers, pp. 163–8.
- ↑ Beckett, Appendix VIII.
- ↑ 6.0 6.1 6.2 6.3 6.4 6.5 6.6 Grierson, pp. 128–30.
- ↑ 7.0 7.1 7.2 7.3 7.4 7.5 7.6 7.7 7.8 Litchfield & Westlake, pp. 62–5.
- ↑ 8.00 8.01 8.02 8.03 8.04 8.05 8.06 8.07 8.08 8.09 8.10 Army List, various dates.
- ↑ 9.0 9.1 9.2 Litchfield & Westlake, p. 32.
- ↑ Beckett, pp. 178–9.
- ↑ Litchfield and Westlake, p. 6.
- ↑ Litchfield and Westlake, pp. 3–6.
- ↑ Dunlop, Chapter 14.
- ↑ Spiers, Chapter 10.
- ↑ London Gazette 20 March 1908.
- ↑ 16.00 16.01 16.02 16.03 16.04 16.05 16.06 16.07 16.08 16.09 16.10 16.11 16.12 16.13 16.14 16.15 16.16 Litchfield, pp. 295–8.
- ↑ 17.0 17.1 Lothians at Great War Centenary Drill Halls.
- ↑ 18.0 18.1 18.2 18.3 18.4 Becke, Pt 2a, pp. 111–4.
- ↑ 19.0 19.1 Conrad, 1914.
- ↑ 20.0 20.1 52 Div at Long, Long Trail.
- ↑ RGA (TF) at Regimental Warpath.
- ↑ Becke, Pt 2b, p. 6.
- ↑ 23.0 23.1 Becke, Pt 2b, pp. 64–5.
- ↑ 65 Div at Long, Long Trail.
- ↑ 25.0 25.1 25.2 MacDonald, Offensive Spirit, pp. 199–20.
- ↑ 26.0 26.1 26.2 MacDonald, Pro Patria, pp. 178–9.
- ↑ 27.0 27.1 27.2 27.3 27.4 27.5 27.6 27.7 27.8 27.9 'Allocation of Heavy Batteries RGA', The National Archives (TNA), Kew, file WO 95/5494/2.
- ↑ 28.0 28.1 Farndale, Western Front, Annex E.
- ↑ MacDonald, Pro Patria, pp. 192–6.
- ↑ Edmonds, 1916, Vol I, p. 460.
- ↑ Farndale, Western Front, p. 148.
- ↑ Ward, pp. 34 and 45.
- ↑ Edmonds, pp. 462–4, 471–3.
- ↑ MacDonald, Pro Patria, pp. 258–67, 345, 364-8, 373–6, 385, 392–405.
- ↑ MacDonald, Offensive Spirit, pp. 426–7, 432, 519–20.
- ↑ Ward, p. 45.
- ↑ 37.0 37.1 37.2 37.3 37.4 37.5 37.6 37.7 37.8 'Allocation of HA Groups', TNA file WO 95/5494/1.
- ↑ Farndale, Western Front, pp. 164–82.
- ↑ Ward, pp. 117–31.
- ↑ Farndale, Western Front, pp. 265–71.
- ↑ Farndale, Western Front, Annex M.
- ↑ Farndale, Western Front, pp. 313–4.
- ↑ Edmonds & Maxwell-Hyslop, pp. 381–3.
- ↑ Farndale, Western Front, pp. 211–4.
- ↑ Blaxland, pp. 167–71.
- ↑ Farndale, Western Front, p. 290.
- ↑ Edmonds & Maxwell-Hyslop, p. 188.
- ↑ Yockelson, pp. 1938.
- ↑ Edmonds & Maxwell-Hyslop, pp. 354–7.
- ↑ Farndale, Western Front, pp. 307–12.
- ↑ Yockelson, p. 209.
- ↑ Titles and Designations, 1927.
- ↑ Scottish Command 3 September 1939 at Patriot Files.
- ↑ 54.0 54.1 54.2 Farndale, Years of Defeat, Annex M.
- ↑ 55.0 55.1 55.2 55.3 51 Hvy Rgt at RA 1939-45.
- ↑ 56.0 56.1 56.2 56.3 56.4 56.5 56.6 56.7 56.8 51 Hvy Rgt at RA Netherlands.
- ↑ 57.0 57.1 57.2 Forty, pp. 222–6.
- ↑ 58.0 58.1 58.2 Ellis, France and Flanders, Appendix I.
- ↑ 59.0 59.1 59.2 Farndale, Years of Defeat, Annex A.
- ↑ 60.0 60.1 Farndale, Years of Defeat, p. 4.
- ↑ 61.0 61.1 Farndale, Years of Defeat, Annex E.
- ↑ Joslen, p. 462.
- ↑ Ellis, France and Flanders, Chapter III.
- ↑ Ellis, France and Flanders, Chapter IV.
- ↑ Farndale, Years of Defeat, p. 45.
- ↑ Farndale, Years of Defeat, pp. 60, 74, Map 16.
- ↑ Ellis, France and Flanders, Chapter VII.
- ↑ Ellis, France and Flanders, Chapter VIII.
- ↑ Farndale, pp. 95–6.
- ↑ 70.0 70.1 Farndale, Years of Defeat, Annex D.
- ↑ Collier, Chapter VIII.
- ↑ 72.0 72.1 Order of Battle of the Field Force in the United Kingdom, Part 3: Royal Artillery, 26 December 1940, TNA files WO 212/4 and WO 33/2365.
- ↑ 73.0 73.1 Order of Battle of the Field Force in the United Kingdom, Part 3: Royal Artillery (Non-Divisional Units), 25 March 1941, with amendments, TNA files WO 212/5 and WO 33/2323.
- ↑ 74.0 74.1 74.2 Order of Battle of the Field Force in the United Kingdom, Part 3: Royal Artillery (Non-Divisional units), 22 October 1941, with amendments, TNA files WO 212/6 and WO 33/1883.
- ↑ 75.0 75.1 Order of Battle of the Field Force in the United Kingdom, Part 3: Royal Artillery (Non-Divisional units), 2 April 1942, TNA file WO 212/515.
- ↑ 76.0 76.1 Order of Battle of the Field Force in the United Kingdom, Part 3: Royal Artillery (Non-Divisional Units), 14 August 1942, TNA file WO 212/7 and WO 33/1927.
- ↑ 77.0 77.1 77.2 Order of Battle of the Field Force in the United Kingdom, Part 3: Royal Artillery (Non-Divisional Units), 22 November 1942, with amendments, TNA file WO 212/8 and WO 33/1962.
- ↑ Order of Battle of the Field Force in the United Kingdom, Part 3: Royal Artillery (Non-Divisional Units), 18 February 1943, TNA file WO 212/9 and WO 33/1987.
- ↑ Buckley, p. 41 & fn 60, p. 309.
- ↑ 80.0 80.1 80.2 Ellis, Victory in the West, Vol I, Appendix IV.
- ↑ Farndale, Years of Defeat, p. 99.
- ↑ Order of Battle of the Forces in the United Kingdom, Part 2: 21 Army Group, 24 July 1943, with amendments, TNA file WO 212/238.
- ↑ 83.0 83.1 83.2 83.3 4 AGRA at RA 1939-45.
- ↑ Joslen, p. 463.
- ↑ Ellis, Victory in the West, Vol I, pp. 311–5.
- ↑ Buckley, p. 193.
- ↑ Doherty, pp. 104–1.
- ↑ Ellis, Victory in the West, Vol II, p. 14.
- ↑ Ellis, Victory in the West, Vol II, p. 6.
- ↑ Buckley, pp. 260–1.
- ↑ Ellis, Victory in the West, Vol II, p. 190.
- ↑ Buckley, pp. 270–2.
- ↑ Ellis, Victory in the West, Vol II, pp. 255–7.
- ↑ Horrocks, pp. 248–9.
- ↑ Horrocks, pp. 250–1.
- ↑ Buckley, pp. 272–7.
- ↑ Buckley, p. 278.
- ↑ Buckley, pp. 283–5.
- ↑ Ellis, Victory in the West, Vol II, pp. 285–8, 297.
- ↑ Horrocks, pp. 257–8.
- ↑ 101.0 101.1 101.2 66 Med Rgt at RA 1939–45.
- ↑ 6 AGRA at RA 1939–45.
- ↑ Molony, Vol V, pp. 104–5.
- ↑ Molony, Vol V, pp. 234, 238.
- ↑ Molony, Vol V, pp. 489–500.
- ↑ Molony, Vol VI, Pt I, pp. 67–8.
- ↑ Jackson, Vol VI, Pt II, pp. 5, 76–9, 90.
- ↑ Jackson, Vol VI, Pt II, p. 263.
- ↑ Jackson, Vol VI, Pt II, pp. 390–1.
- ↑ Jackson, Vol VI, Pt III, p. 223.
- ↑ Litchfield, Appendix 5.
- ↑ Litchfield, p. 307.
- ↑ 113.0 113.1 266–288 Rgts RA at British Army 1945 on.
- ↑ Litchfield, p. 294.
- ↑ Lowland Rgt RA at Regiments.org.
- ↑ 116.0 116.1 Burke's.
References[]
- Maj A.F. Becke,History of the Great War: Order of Battle of Divisions, Part 2a: The Territorial Force Mounted Divisions and the 1st-Line Territorial Force Divisions (42–56), London: HM Stationery Office, 1935/Uckfield: Naval & Military Press, 2007, ISBN 1-847347-39-8.
- Maj A.F. Becke,History of the Great War: Order of Battle of Divisions, Part 2b: The 2nd-Line Territorial Force Divisions (57th–69th), with the Home-Service Divisions (71st–73rd) and 74th and 75th Divisions, London: HM Stationery Office, 1937/Uckfield: Naval & Military Press, 2007, ISBN 1-847347-39-8.
- Ian F.W. Beckett, Riflemen Form: A Study of the Rifle Volunteer Movement 1859–1908,
- Gregory Blaxland, Amiens: 1918, London: Frederick Muller, 1968/Star, 1981, ISBN 0-352-30833-8.
- John Buckley, Monty's Men: The British Army and the Liberation of Europe, London: Yale University Press, 2013, ISBN 978-0-300-13449-0.
- Burke's Peerage, Baronetage and Knightage, 100th Edn, London, 1953.
- Basil Collier, History of the Second World War, United Kingdom Military Series: The Defence of the United Kingdom, London: HM Stationery Office, 1957.
- Richard Doherty, Hobart's 79th Armoured Division at War: Invention, Innovation and Inspiration, Barnsley: Pen & Sword, 2011, ISBN 978-1-84884-398-1.
- Col John K. Dunlop, The Development of the British Army 1899–1914, London: Methuen, 1938.
- Brig-Gen Sir James E. Edmonds, History of the Great War: Military Operations, France and Belgium, 1916, Vol I, London: Macmillan,1932/Woking: Shearer, 1986, ISBN 0-946998-02-7.
- Brig-Gen Sir James E. Edmonds & Lt-Col R. Maxwell-Hyslop, History of the Great War: Military Operations, France and Belgium 1918, Vol V, 26th September–11th November, The Advance to Victory, London: HM Stationery Office, 1947/Imperial War Museum and Battery Press, 1993, ISBN 1-870423-06-2.
- Major L.F. Ellis, History of the Second World War, United Kingdom Military Series: The War in France and Flanders 1939–1940, London: HM Stationery Office, 1954/Uckfield, Naval & Military Press, 2004.
- Major L.F. Ellis, History of the Second World War, United Kingdom Military Series: Victory in the West, Vol I: The Battle of Normandy, London: HM Stationery Office, 1962/Uckfield: Naval & Military, 2004, ISBN 1-845740-58-0.
- Gen Sir Martin Farndale, History of the Royal Regiment of Artillery: Western Front 1914–18, Woolwich: Royal Artillery Institution, 1986, ISBN 1-870114-00-0.
- Gen Sir Martin Farndale, History of the Royal Regiment of Artillery: The Years of Defeat: Europe and North Africa, 1939–1941, Woolwich: Royal Artillery Institution, 1988/London: Brasseys, 1996, ISBN 1-85753-080-2.
- George Forty, British Army Handbook 1939–1945, Stroud: Sutton, 1998, ISBN 0-7509-1403-3.
- Maj-Gen J.M. Grierson, Records of the Scottish Volunteer Force 1859–1908, Edinburgh: Blackwood, 1909.
- Lt-Gen Sir Brian Horrocks, A Full Life, London: Collins, 1960.
- Gen Sir William Jackson, History of the Second World War, United Kingdom Military Series: The Mediterranean and Middle East, Vol VI: Victory in the Mediterranean, Part I|: June to October 1944, London: HMSO, 1987/Uckfield, Naval & Military Press, 2004, ISBN 1-845740-71-8.
- Gen Sir William Jackson, History of the Second World War, United Kingdom Military Series: The Mediterranean and Middle East, Vol VI: Victory in the Mediterranean, Part I|I: November 1944 to May 1945, London: HMSO, 1988/Uckfield, Naval & Military Press, 2004, ISBN 1-845740-72-6.
- Lt-Col H.F. Joslen, Orders of Battle, United Kingdom and Colonial Formations and Units in the Second World War, 1939–1945, London: HM Stationery Office, 1960/Uckfield: Naval & Military Press, 2003, ISBN 1-843424-74-6.
- Norman E.H. Litchfield, The Territorial Artillery 1908–1988 (Their Lineage, Uniforms and Badges), Nottingham: Sherwood Press, 1992, ISBN 0-9508205-2-0.
- Norman Litchfield & Ray Westlake, The Volunteer Artillery 1859–1908 (Their Lineage, Uniforms and Badges), Nottingham: Sherwood Press, 1982, ISBN 0-9508205-0-4.
- Alan MacDonald, Pro Patria Mori: The 56th (1st London) Division at Gommecourt, 1st July 1916, 2nd Edn, West Wickham: Iona Books, 2008, ISBN 978-0-9558119-1-3.
- Alan MacDonald, A Lack of Offensive Spirit? The 46th (North Midland) Division at Gommecourt, 1st July 1916, West Wickham: Iona Books, 2008, ISBN 978-0-9558119-0-6.
- Brig C.J.C. Molony,History of the Second World War, United Kingdom Military Series: The Mediterranean and Middle East, Vol V: The Campaign in Sicily 1943 and the Campaign in Italy 3rd September 1943 to 31st March 1944, London: HMSO, 1973/Uckfield, Naval & Military Press, 2004, ISBN 1-845740-69-6.
- Brig C.J.C. Molony, History of the Second World War, United Kingdom Military Series: The Mediterranean and Middle East, Vol VI: Victory in the Mediterranean, Part I: 1st April to 4th June 1944, London: HMSO, 1987/Uckfield, Naval & Military Press, 2004, ISBN 1-845740-70-X.
- Edward M. Spiers, The Army and Society 1815–1914, London: Longmans, 1980, ISBN 0-582-48565-7.
- Titles and Designations of Formations and Units of the Territorial Army, London: War Office, 7 November 1927 (RA sections also summarised in Litchfield, Appendix IV).
- Maj C.H. Dudley Ward, The Fifty Sixth Division, 1st London Territorial Division, 1914–1918, London: John Murray, 1921/Uckfield: Naval & Military Press, 2001, ISBN 978-1-84342-111-5.
- Mitchell A. Yockelson, Borrowed Soldiers: Americans under British Command, 1918, Norman, OK: University of Oklahoma Press, 2008, ISBN 978-0-8061-5349-0.
External sources[]
- Mark Conrad, The British Army, 1914 (archive site)
- British Army units from 1945 on
- Great War Centenary Drill Halls.
- The Long, Long Trail
- Orders of Battle at Patriot Files
- The Regimental Warpath 1914–1918 (archive site)
- Land Forces of Britain, the Empire and Commonwealth – Regiments.org (archive site)
- Royal Artillery 1939–1945 (archive site)
- Royal Artillery Units Netherlands 1944–1945
The original article can be found at Edinburgh City Artillery and the edit history here.