
Coordinates: 8°30′S 157°20′E / 8.5°S 157.333°E The New Georgia campaign was a series of land and naval battles of the Pacific campaign of World War II between Allied forces and the Empire of Japan. It was part of Operation Cartwheel, the Allied strategy in the South Pacific to isolate the Japanese base around Rabaul. The campaign took place in the New Georgia group of islands, in the central Solomon Islands and followed the Allied capture of the Russell Islands. The main fighting took place on New Georgia island itself, although significant actions also took place around the island chain throughout the campaign. The campaign began on 30 June 1943, when US troops carried out landings in the Kula Gulf, in the north of New Georgia island, and around the Munda area on the western coast. In addition, smaller landings were undertaken at Viru Harbor on the southern coast of the island, Wickham Anchorage on Vangunu Island, and on Rendova. In the north, several actions were fought around Enogai and Bairoko throughout July, while in the west, the main US objective was the Japanese airfield on Munda Point. Stubborn defense by the Japanese delayed the US advance on Munda and the Japanese mounted a strong counterattack before US force eventually captured Munda Point in early August. Elsewhere, further actions took place on Arundel Island in August and September after Japanese forces withdrew there after the fighting around Munda Point. A large number of Japanese troops concentrated on Kolombangara late in the campaign, but were bypassed by US troops who landed on Vella Lavella in mid-August and were later reinforced by New Zealand troops. The campaign ended on 7 October 1943 when the last Japanese troops were withdrawn from Vella Lavella, finalizing the Allied capture of the islands. A series of naval actions also took place in conjunction with the fighting on land, including actions in the Kula Gulf, off Kolombangara, in the Vella Gulf, off Horaniu and off Vella Lavella.
Background[]


Map showing the area in which Operation Cartwheel took place, with New Guinea in the west and the New Georgias highlighted
The Japanese had captured New Georgia in 1942 and built an airbase at Munda Point which began operations in December 1942 to support the Guadalcanal offensives. As it became clear at the end of 1942 that they could not hold Guadalcanal, the Japanese commanders guessed that the Allies would move toward the Japanese base at Rabaul on New Britain, and that the central Solomon Islands were logical steps on the way.[1]
The Imperial Japanese Army (IJA) believed that holding the Solomon Islands would be ultimately unsuccessful and that it would be better to wait for an Allied attack on Bougainville which would be much less costly to supply and reinforce. The Imperial Japanese Navy (IJN) preferred to delay the Allied advance for as long as possible by maintaining a distant line of defense. With no effective central command, the two Japanese services implemented their own plans: the navy assumed responsibility for the defense of the central Solomons and the army for the northern Solomons.[2]
In early 1943, Japanese defenses were prepared against possible Allied landings on New Georgia, Kolombangara and Santa Isabel. By June 1943, there were 10,500 troops on New Georgia and 9,000 on Kolombangara, all under the command of General Minoru (Noboru) Sasaki, well dug in and waiting for an Allied attack.[3][4]
Allied planning[]
Choice of New Georgia[]
By early 1943, some Allied leaders had wanted to focus on capturing Rabaul, but Japanese strength there and lack of landing craft meant that such an operation was not practical in 1943. Instead, on the initiative of the U.S. Joint Chiefs of Staff, a plan known as Operation Cartwheel was developed, which proposed to envelop and cut off Rabaul without capturing it, by simultaneous offensives in the Territory of New Guinea and northward through the Solomon Islands.[5]
The Allied base at Guadalcanal continued to suffer from Japanese bombing raids even after the island was declared secured on 9 February 1943. The Japanese airfield at Munda made these raids easier by giving Japanese planes a convenient place to refuel on the way to and from their main base at Rabaul. The Allies attempted to neutralize Munda with repeated bombing raids and naval shelling, but the Japanese were always able to repair the airfield in short order.[6] The Allied command thus determined that Munda had to be captured by ground troops. Since the New Georgias lay within the South Pacific Area, the operation would be the responsibility of Admiral William F. Halsey,[7] Commander South Pacific Force (renamed US Third Fleet on 15 March 1943), headquartered at Nouméa on New Caledonia.[8] US forces committed to capturing Munda totaled 32,000 Army personnel and 1,700 Marines.[9] Forces allocated to capturing Vella Lavella totaled 9,588, of which 5,888 were US servicemen and 3,700 were New Zealanders.[10][11]
Capture of the Russells[]

Rear Admiral Richmond Kelly Turner, Commander South Pacific Amphibious Forces
The Russell Island group, lying between Guadalcanal and the New Georgia group, had served as a troop staging base for the Japanese during the fight for Guadalcanal, and Admiral Halsey determined to capture it in preparation for the main action in the New Georgias. In early February, he instructed Rear Admiral Richmond Kelly Turner, formerly his Deputy Commander and now his Commander Amphibious Force, to undertake Operation Cleanslate.[12]
Beginning 21 February, Admiral Turner landed the US Army 43rd Infantry Division under Major General John H. Hester and the 3rd Marine Raider Battalion under Lieutenant Colonel Harry B. Liversedge on the Russells, a total of approximately 9,000 troops and their equipment. These landings were totally unopposed because, unbeknownst to the Allies, the Japanese had evacuated the Russells soon after leaving Guadalcanal. In fact, the men landing on nearby Banika Island were greeted by two coastwatchers with the offer of a cup of tea.[13]
Preliminaries to the New Georgia landings[]

Allied landings in the New Georgias
Alarmed that the Allies were working their way up the Solomons chain, the Japanese bombed the new American base in the Russells and began strengthening their own airfields at Munda and at nearby Vila on Kolombangara Island. In turn, the Americans attempted to subdue Munda field with naval gunfire with limited success.[14] During the course of one of these overnight bombardment sorties, on the night of 6–7 March 1943, an American force consisting of three light cruisers and three destroyers under the command of Rear Admiral A. Stanton Merrill encountered two Japanese destroyers as they were returning to the Kula Gulf from delivering food and supplies to the garrison at Vila. In the ensuing action, known as the Battle of Blackett Strait, both Japanese destroyers were sunk.[15]
The Americans next attempted to interdict the Japanese supply lanes by mining the ocean approaches to Vila and Munda. This proved as ineffective as bombardment had been, since the Japanese were able to sweep up the mines readily.[16]
The Allies had plenty of time to plan Operation Toenails, as the invasion of the New Georgias was called. The plan called for simultaneous landings on 30 June at four places. From southeast to northwest, these were: (1) Wickham Anchorage on the southeast coast of Vangunu Island; (2) Segi Point on the southeastern tip of New Georgia; (3) Viru Harbor on the southwest coast of New Georgia, just a few miles up from Segi; and (4) Rendova Harbor on Rendova Island just across Blanche Channel from Munda, placing the latter Japanese base well within range of land-based artillery.[17]
During the entire New Georgia campaign, the resolution and resourcefulness of the British Commonwealth coastwatchers proved invaluable to the Allied cause. District Officer Donald Gilbert Kennedy, a New Zealander, set the tone in a message he delivered to every native village when occupation by the Japanese was imminent: "These islands are British and they are to remain British. The government is not leaving. Even if the Japanese come, we shall stay with you and in the end they will be driven out." In the event, it was the prospect of District Officer Kennedy being killed or captured that led Admiral Turner to move up the first Allied landings by nine days. He sent two companies of the 4th Marine Raider Battalion to capture Segi Point on the morning of 21 June, where Kennedy and his native comrades were rescued.[18]
Conquest of New Georgia island[]
Initial landings: 30 June – 2 July[]

LCIs unloading at Rendova
A force consisting of portions of the 4th Marine Raider Battalion and the 103rd Infantry Regiment landed at Oloana Bay on the south coast of Vangunu Island on 30 June. From there they marched overland to Vura village which overlooked Wickham Anchorage, the first of the objectives of the original Allied plan. By 12 July, Vura was secured and garrisoned.[19] Meanwhile, the remainder of the 4th Marine Raider Battalion captured Viru Harbor, supported by dive bombers, on 30 June, after advancing overland from Lambeti Plantation. They had moved to the plantation by boat on 27 June from Segi Point, having been dispatched there on 21 June during a preliminary operation. Another company from the 103rd Infantry Regiment relieved the Marines in the harbor on 4 July, having landed at Segi Point on 30 June when the Marines' advance had been delayed.[20]
The landings in the Munda area were the most important of the four; the initial phase of this part of the operation required the capture of Rendova, commanded by Admiral Turner. The US Army's 172nd Infantry Regiment landed at Rendova Harbor early on 30 June while Companies A and B of the 169th Infantry Regiment along with a New Zealand-trained and led commando unit of 130 South Pacific islanders took three vitally placed islets in Blanche Channel.[21][22] Rendova, Wickham Anchorage and Viru Harbor were developed into staging areas for the main event, the siege of Munda, while Segi Point was developed into an airfield.[23]
On 2 July, the Americans were ready to make a landing in the Munda area on the New Georgia mainland. Laiana beach was closest, being only 2 miles (3.2 km) from Munda, but as it was heavily defended, it was rejected in favor of Zanana beach, more than 3 miles (4.8 km) farther east. Zanana would prove to be an unfortunate choice from an Allied perspective.[24][25] The crossing was undertaken in daylight by elements from two regiments in the afternoon of 2 July; a small perimeter was established around Zanana and defenses built up before the advance westwards towards Munda Point began several days later.[26]
Landings in Kula Gulf[]


Lieutenant Colonel Harry B. Liversedge on New Georgia.
Halsey's counterparts at Rabaul, Vice Admiral Jinichi Kusaka and Lieutenant General Hitoshi Imamura, had no intention of allowing New Georgia to fall the way Guadalcanal had. They loaded 4,000 troops on destroyers, brought them down The Slot on the night of 4–5 July and landed them at Vila on the southeast coast of Kolombangara Island.[27] From there, the men would be ferried across Kula Gulf on barges to Bairoko on the northwest coast of New Georgia, before moving along eight-mile jungle trail to Munda.[28]
The Allies also carried out an amphibious operation in Kula Gulf that night. Admiral Halsey had dispatched transports carrying 4,600 troops consisting of Marine raiders and two US Army battalions under Colonel Liversedge to Rice Anchorage on the northwest coast of New Georgia.[29] A force of three light cruisers and four destroyers commanded by Rear Admiral Walden L. Ainsworth covered the troopships. One of Ainsworth's destroyers was torpedoed and sunk by the Japanese as the latter were retiring up the Gulf from their reinforcement mission to Vila.[30]
Liversedge's men were tasked with moving down the coast and capturing Bairoko, thereby interdicting the trailhead used by the Japanese to reinforce Munda. They were successfully landed at dawn, but found the terrain difficult and advanced slowly inland over the course of several days.[31]
The night (5–6 July) after the Kula Gulf landings, the opposing naval forces engaged in a full-scale battle in the waters northeast of Kolombangara Island, an action that came to be called the Battle of Kula Gulf. The Americans lost a light cruiser while the Japanese lost two destroyers.[32][33] In the north, after advancing from Rice Anchorage, US forces occupied Triri on 7–8 July. A 400-strong Japanese force launched a counterattack on 8 July against Triri, which initially made some gains before it was checked by a flanking move. Following this, US troops captured Enogai at the mouth of the inlet on 10–11 July, before moving to establish a block along the Munda–Bairoko trail.[34]
Advance from Zanana and capture of Munda[]


Initial drive towards Munda
The US advance from Zanana to Munda was completely stymied, hampered by difficult terrain, supply problems and low morale.[35] General Hester tried to break the stalemate by sending the 172nd Infantry Regiment around to the north to take the Japanese position in the rear, while the 169th Infantry Regiment continued the frontal assault, but this effort was checked by Sasaki.[25] As a result, the US advance on New Georgia stalled in both the north and the south. The Japanese brought reinforcements by barge from Vila to Bairoko, and 1,200 more troops were loaded onto four destroyer-transports at Rabaul and sent down to be landed at Vila on the night of 12–13 July. These ships were escorted by a light cruiser and five destroyers. Admiral Ainsworth was sent to intercept this flotilla with three light cruisers and ten destroyers. He encountered the Japanese force in The Slot in the waters north of Kolombangara Island and in the ensuing Battle of Kolombangara one US destroyer and one Japanese light cruiser were sunk.[36]


Siege and capture of Munda
Major General Oscar W. Griswold, commander XIV Corps and General Hester's immediate superior, visited New Georgia in mid-July and assessed the situation as dire. He radioed Halsey at Nouméa that at least another division was needed to break the stalemate.[37] Lieutenant General Millard F. Harmon, of the United States Army Air Forces, was sent to confirm the situation. After an investigation, Harmon gave field command to Griswold so that Hester could concentrate on leading his own division. At the same time, a long-anticipated change in naval command took place with Rear Admiral Theodore Stark Wilkinson taking over leadership of the amphibious forces from Admiral Turner on 15 July.[38]
General Sasaki initially took advantage of the disorder on the American side. The Japanese learned to apply close assault tactics against American tanks, rendering armor even less effective in the jungle than usual. Meanwhile, the inexperienced, hungry and fatigued US soldiers' nerves began to fray and they began to lose their fire discipline.[39] On the night of 17 July, the Japanese launched a strong counterattack and succeeded in overrunning the command post of the 43rd Division near Zanana. Eventually, however, Sasaki's troops became sick and exhausted; also, he had lost communications with Rabaul.[40] US forces, bolstered by the arrival of the 37th Infantry Division, subsequently launched a corps-level offensive under Griswold aimed at capturing Munda Point.[41] Sasaki ordered a retreat from the Munda area on 3 August. General Griswold had his men sweep around Munda to the northwest and on 5 August plastered the remaining Japanese with artillery fire. That day, the Americans moved unopposed into Munda, finally achieving the campaign's most important goal.[40]
Capture of Bairoko[]

Approach to Bairoko
On the northern front, Colonel Liversedge's Marines consolidated their position around Enogai after 12 July and began patrolling the local area while US Army troops occupied the blocking position. This was subsequently abandoned on 17 July and the soldiers returned to Triri.[42] He had been reinforced by 700 Marines from the 4th Raider Battalion and made plans to capture Bairoko village, on the eastern side of Bairoko Harbor, on 20 July.[43] His Army detachment was to attack the village from the southeast while his Marines converged from the northeast, a classic pincer movement. The Japanese defensive positions were so well designed, and had been reinforced since the initial US landing at the Rice Anchorage;[44] as a result, neither force made any progress, and US casualties began to mount. Just before dawn on 22 July, Liversedge called for air strikes to cover his withdrawal. With a view to compensating for failures in land-based air cover following previous such requests, what followed was the heaviest aerial bombardment of the campaign so far.[45]
Beginning 3 August, Liversedge tried again, first establishing a battalion of the 148th Infantry Regiment at a blocking position on the Munda trail. Two days later he relieved these men with a combined Army/Marine force and moved the 148th to a dominant position overlooking the entire area. On 10 August, Liversedge picked up another US battalion and renewed the direct attack on Bairoko.[46] At the same time, two regiments from the 25th Infantry Division, sent to New Georgia as reinforcements, advanced on Bairoko from Munda Point mopping up after the capture of Munda airfield.[47] After two more grueling weeks, the Americans entered Bairoko unopposed on 24 August.[46]
Securing New Georgia[]

Actions in western New Georgia
Admiral Kusaka and General Imamura at Rabaul made a final, disastrous attempt to reinforce General Sasaki. Under the protection of a single destroyer, 940 troops and 700 naval personnel were loaded aboard three destroyer-transports and sent down under the command of Rear Admiral Kaju Sugiura to Kolombangara on the night of 6–7 August. Admiral Wilkinson, anticipating such a movement that night, sent a force of six destroyers under Commander Frederick Moosbrugger to intercept them.[48] In the resulting Battle of Vella Gulf, fought in the waters northwest of Kolombangara, the American destroyers took the Japanese completely by surprise. The three ships carrying passengers, were torpedoed and sunk, and the remaining escort ship, did not linger to search for survivors.[49]
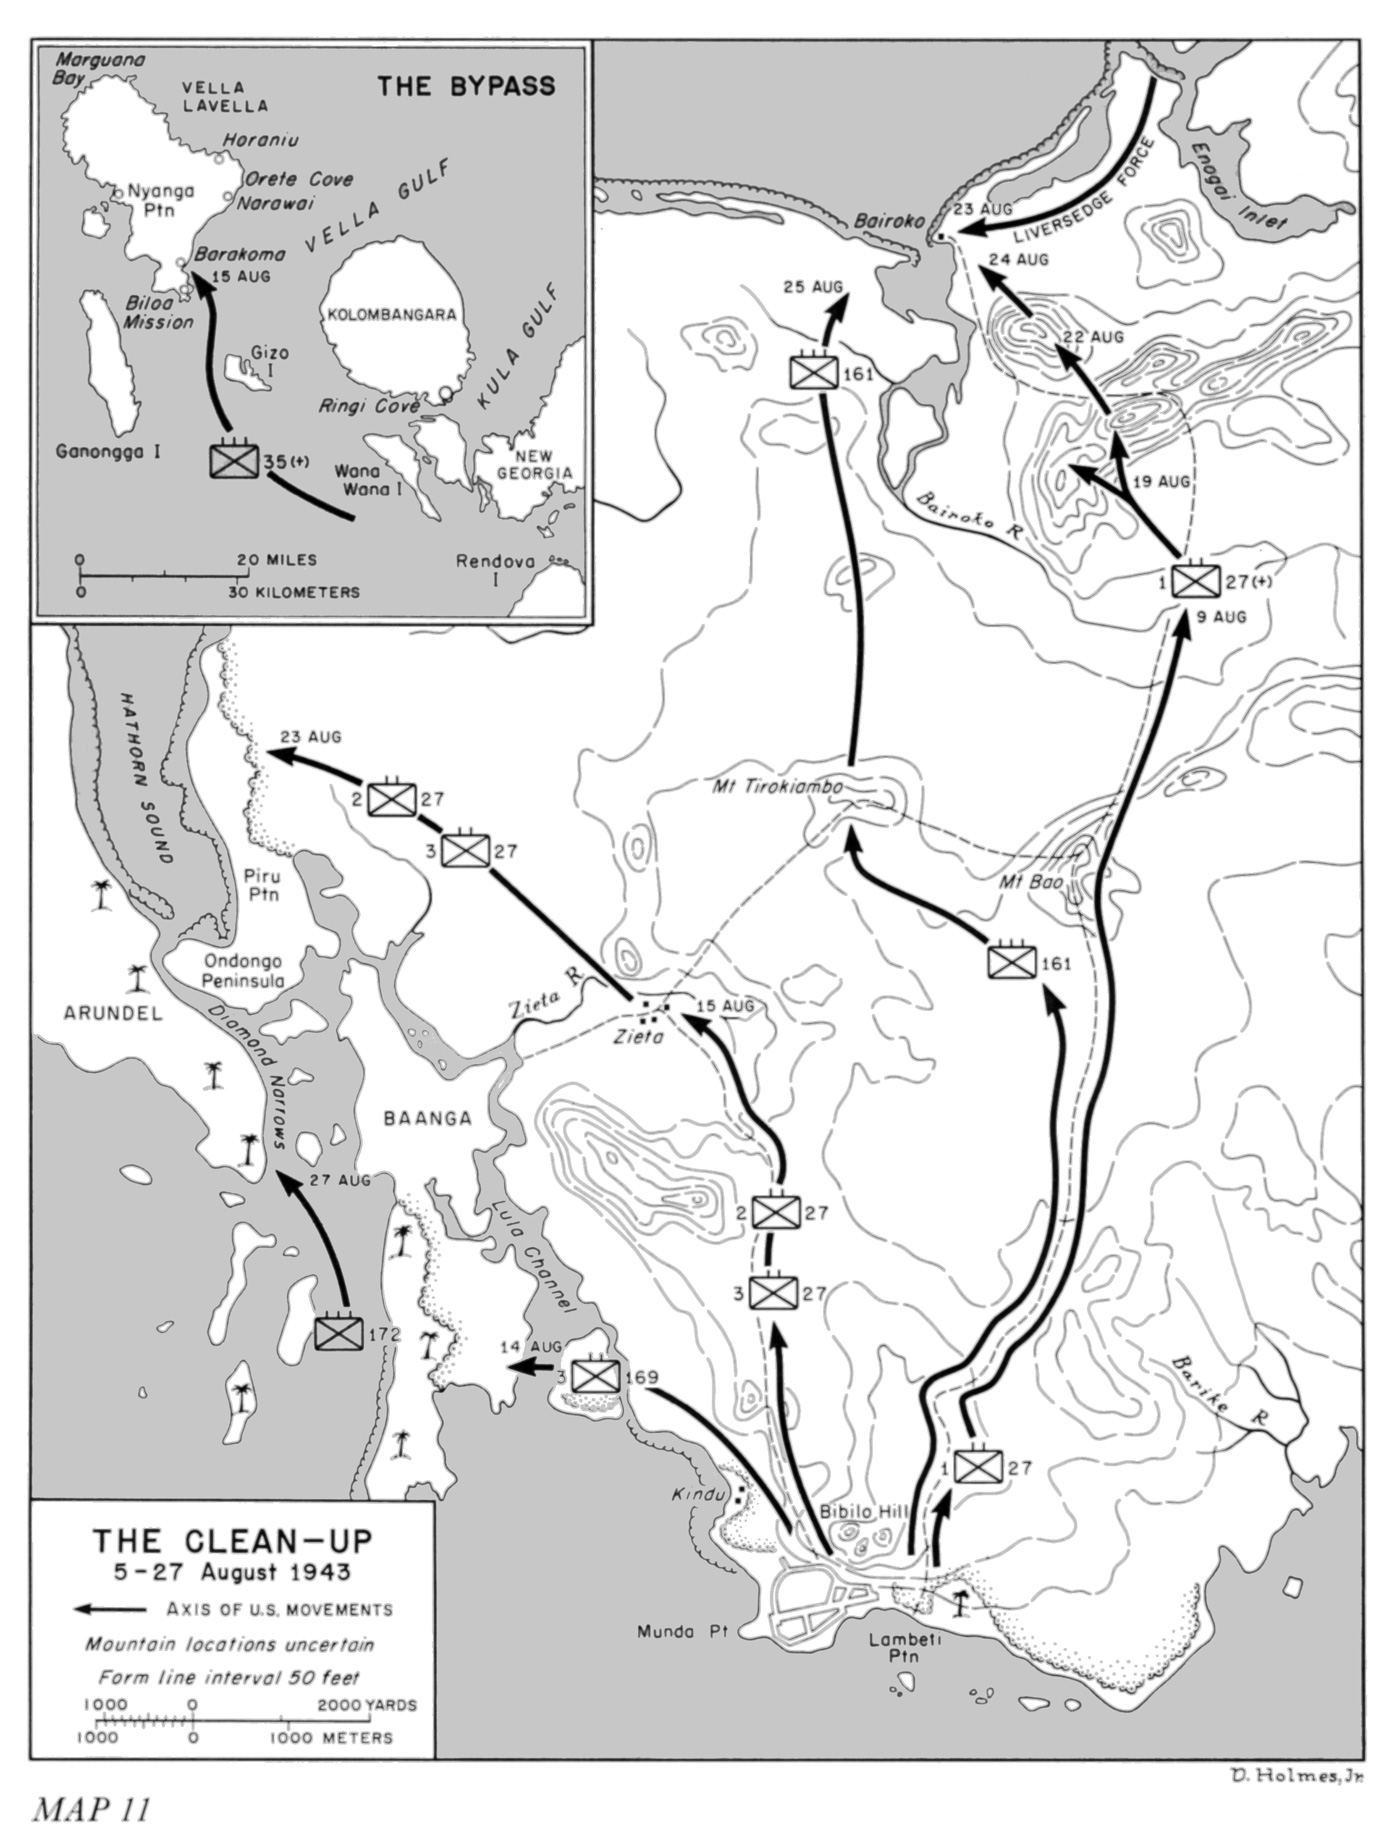
Following this major reversal, General Sasaki moved his headquarters to Kolombangara on 8–9 August, leaving behind a token force to defend the west coast of New Georgia. His mission now was simply to hold the remaining islands of the New Georgia group as long as possible, giving the Japanese a chance to reinforce the northern Solomons. US Army forces moved along the west coast of New Georgia, wiping out the 200 Japanese remaining in the Zieta area. Elements of the 169th and 172nd Infantry Regiments captured Baanga islet on 20–21 August, silencing the Japanese artillery that had been shelling Munda. Despite the proximity of U.S. patrols, the last Japanese troops on New Georgia were moved by barge from Bairoko Harbor over to Kolombangara on the night of 23 August. This marked the end of ground combat on New Georgia.[50][51]
Outlying islands[]
Arundel[]
General Sasaki played his delaying role to the hilt. When the US 172nd Infantry Regiment landed on Arundel Island, just west of New Georgia, on 27 August, he allowed them to come ashore unopposed and establish a beachhead. Just as the Americans were feeling the occupation would be easy, Sasaki counterattacked in multiple places, tying the Americans down and forcing them to call for reinforcements. He carried out a particularly determined attack on 15 September, bringing the whole Allied effort on Arundel to a halt, and with far fewer troops than his opponents. General Griswold ordered a full-scale effort, including Marine Corps tanks, to drive the Japanese off the island. After vicious fighting on 17 and 18 September, the Japanese abandoned Arundel for good on the night of 20–21 September.[52]
Vella Lavella[]
Admiral Halsey had earlier seen the wisdom of bypassing the heavily fortified island of Kolombangara and invading Vella Lavella instead, the latter island lying closer to Bougainville and Rabaul and being less well defended. Thus, a month before New Georgia was secured by the Allies, they landed a reconnaissance party on Vella Lavella to gain information about Japanese strength and dispositions as well as about suitable landing sites, before returning to Guadalcanal on 31 July. The village of Barakoma near the island's southeastern tip was selected as the landing place.[53] A large invasion force of about 6,500 troops led by Major General Robert B. McClure, escorted by 12 destroyers under the command of Admiral Wilkinson was dispatched from Guadalcanal early on 14 August.[54] That night, Japanese planes attacked multiple Allied bases, but completely missed this fleet headed for Vella Lavella. The next morning, disembarkation began at Barakoma.[55]

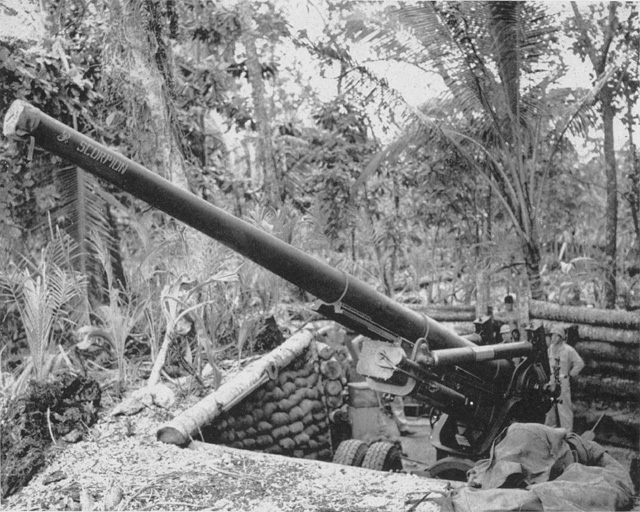
155 mm gun at Barakoma
The Japanese high command in Tokyo had already decided that no more troops would be wasted in the central Solomons. Rather than reinforce and defend Vella Lavella, it was to be used merely as a way station for the evacuation of the troops on Kolombangara that had been bypassed by the Allies with this new landing. Horaniu, on the northeast coast, was selected as a barge staging point and on the night of 17–18 August a small force of ground and naval troops was sent to secure the area. The Japanese destroyer covering force was met in The Slot by four US destroyers under Captain Thomas J. Ryan, and subsequently fought an inconclusive action off Horaniu. No ships of either side were lost and the Japanese succeeded in establishing a barge base.[56]
Meanwhile, throughout August, the Allies pushed the remaining Japanese ground forces on Vella Lavella into a pocket in the northwest corner of the island. The 3rd New Zealand Division, under the command of Major General Harold E. Barrowclough, was tasked with destroying this pocket. The New Zealanders began their pincer movement on 21 September, but the Japanese resisted so fiercely that it took until 5–6 October to bottle them up.[57] On the night of 6–7 October, Rear Admiral Matsuji Ijuin led a naval force to take the 600 remaining ground troops off Vella Lavella. In response, a force of US destroyers was dispatched to intercept them. Each side lost a ship in the ensuing naval battle, but the Japanese were able to successfully complete their evacuation.[58] As a result, General Barrowclough's men entered the evacuated area unopposed, concluding the New Georgia campaign.[57]
Aftermath[]
Casualties during the campaign amounted to 1,195 US servicemen killed and 93 aircraft destroyed, while the Japanese lost 1,671 killed, and 358 aircraft destroyed.[59] In addition, a total of 3,873 US troops were wounded. Casualties from disease were also high as were psychological casualties, with over 2,500 troops being diagnosed with "war neurosis" between 30 June and 30 September.[60] The next stage of the Allied advance through the Solomons saw them land at Cape Torokina as part of efforts to secure Bougainville beginning in November; this campaign would last until the end of the war with Australian troops relieving US troops in late 1944. This was preceded by diversionary actions in the Treasury Islands by elements of the New Zealand 3rd Division, and by US Marines on Choiseul.[61] Elsewhere, in New Guinea, commencing in late September, the Allies launched campaigns in the Markham Valley and on the Huon Peninsula as part of efforts to secure Lae and Finschhafen.[62] In analyzing the campaign, historian Samuel Eliot Morison described it as "the most unintelligently waged land campaign of the Pacific war (with the possible exception of Okinawa)", and highlighted the decision to land at Zanana during operations to secure Munda as a mistake, suggesting that Laiana should have been chosen instead. Morison further criticizes the failed flanking move undertaken by Hester's troops to break the deadock during the initial drive on Munda describing it as "perhaps the worst blunder in the [campaign]".[25]
Notes[]
- ↑ Lofgren, Northern Solomons: The U.S. Army Campaigns of World War II, p. 8
- ↑ Lofgren, Northern Solomons: The U.S. Army Campaigns of World War II, p. 9
- ↑ Miller, Cartwheel: The Reduction of Rabaul, p. 97
- ↑ Lofgren, Northern Solomons: The U.S. Army Campaigns of World War II, pp. 9 & 25
- ↑ Miller, Cartwheel: The Reduction of Rabaul, pp. 20–26; 225
- ↑ Morison, Breaking the Bismarcks Barrier, p. 90
- ↑ Miller, Cartwheel: The Reduction of Rabaul, p. 67
- ↑ Lofgren, Northern Solomons: The U.S. Army Campaigns of World War II, p. 25
- ↑ Potter, Nimitz, p. 245
- ↑ Miller, Cartwheel: The Reduction of Rabaul, p. 176
- ↑ Gillespie, The Pacific, p. 128
- ↑ Miller Guadalcanal: The First Offensive, pp. 351–356
- ↑ Horton, New Georgia: Pattern for Victory, p. 21
- ↑ Morison, Breaking the Bismarcks Barrier, pp. 106–107
- ↑ Morison, Breaking the Bismarcks Barrier, pp. 107–110
- ↑ Morison, Breaking the Bismarcks Barrier, pp. 110–116
- ↑ Morison, Breaking the Bismarcks Barrier, p. 139
- ↑ Morison, Breaking the Bismarcks Barrier, p. 141
- ↑ Horton, New Georgia: Pattern for Victory, pp. 46–51
- ↑ Miller, Cartwheel: The Reduction of Rabaul, pp. 83–85
- ↑ Horton, New Georgia: Pattern for Victory, pp. 54–57
- ↑ Larsen, Pacific Commandos, pp. 9 & 108
- ↑ Miller, Cartwheel: The Reduction of Rabaul, pp. 84–85
- ↑ Miller, Cartwheel: The Reduction of Rabaul, p. 92, footnote 27
- ↑ 25.0 25.1 25.2 Morison, Breaking the Bismarcks Barrier, p. 177
- ↑ Miller, Cartwheel: The Reduction of Rabaul, pp. 92–94.
- ↑ Morison, Breaking the Bismarcks Barrier, p. 156
- ↑ Miller, Cartwheel: The Reduction of Rabaul, Map p. 100 & pp. 104–105
- ↑ Shaw & Kane, Isolation of Rabual, pp. 119–121
- ↑ Morison, Breaking the Bismarcks Barrier, pp. 156–158
- ↑ Morison, Breaking the Bismarcks Barrier, p. 176
- ↑ Miller, Cartwheel: The Reduction of Rabaul, p. 99
- ↑ Prados, Combined Fleet Decoded, p. 491
- ↑ Shaw & Kane, Isolation of Rabaul, pp. 123–130
- ↑ Miller, Cartwheel: The Reduction of Rabaul, pp. 106–115
- ↑ Morison, Breaking the Bismarcks Barrier, pp. 180–182
- ↑ Morison, Breaking the Bismarcks Barrier, p. 198
- ↑ Horton, New Georgia: Pattern for Victory, p. 77
- ↑ Morison, Breaking the Bismarcks Barrier, p. 199
- ↑ 40.0 40.1 Morison, Breaking the Bismarcks Barrier, pp. 200–206
- ↑ Miller, Cartwheel: The Reduction of Rabaul, p. 137
- ↑ Shaw & Kane, Isolation of Rabaul, pp. 131–133
- ↑ Morison, Breaking the Bismarcks Barrier, p. 202
- ↑ Shaw & Kane, Isolation of Rabaul, pp. 134–135
- ↑ Horton, New Georgia: Pattern for Victory, pp. 105–108
- ↑ 46.0 46.1 Horton, New Georgia: Pattern for Victory, p. 109
- ↑ Miller, Cartwheel: The Reduction of Rabaul, pp. 167–171
- ↑ Horton, New Georgia: Pattern for Victory, p. 118
- ↑ Horton, New Georgia: Pattern for Victory, pp. 118–120
- ↑ Horton, New Georgia: Pattern for Victory, pp. 121–122
- ↑ Miller, Cartwheel: The Reduction of Rabaul, p. 172
- ↑ Horton, New Georgia: Pattern for Victory, pp. 124–128
- ↑ Horton, New Georgia: Pattern for Victory, p. 130
- ↑ Miller, Cartwheel: The Reduction of Rabaul, p. 176.
- ↑ Horton, New Georgia: Pattern for Victory, p. 135
- ↑ Morison, Breaking the Bismarcks Barrier, pp. 233–234
- ↑ 57.0 57.1 Horton, New Georgia: Pattern for Victory, p. 141
- ↑ Morison, Breaking the Bismarcks Barrier, pp. 243–250
- ↑ Altobello, Into the Shadows Furious, p. 354.
- ↑ Miller Cartwheel: The Reduction of Rabaul, pp. 120–122 & 187
- ↑ Miller, Cartwheel: The Reduction of Rabaul, pp. 238–241
- ↑ Keogh, The South West Pacific 1941–45, pp. 310–319
References[]
- Altobello, Brian (2000). Into the Shadows Furious. Presidio Press. ISBN 0-89141-717-6.
- Gillespie, Oliver (1952). The Pacific. The Official History of New Zealand in the Second World War, 1939–1945. War History Branch, Department of Internal Affairs. OCLC 491441265. http://www.nzetc.org/tm/scholarly/tei-WH2Paci-_N78506.html.
- Horton, D. C. (1971). New Georgia: Pattern for Victory. New York: Ballantine Books. ISBN 978-0-34502-316-2.
- Keogh, Eustace (1965). The South West Pacific 1941–45. Melbourne, Victoria: Grayflower Productions. OCLC 7185705.
- Larsen, Colin (1946). Pacific Commandos: New Zealanders and Fijians in Action: A History of Southern Independent Commando and First Commando Fiji Guerrillas. Reed Publishing. OCLC 1135029131.
- Lofgren, Stephen J.. Northern Solomons. The U.S. Army Campaigns of World War II. United States Army Center of Military History. OCLC 1051061668. CMH Pub 72-10. http://www.history.army.mil/brochures/northsol/northsol.htm.
- Miller, John Jr. (1995) [1949]. Guadalcanal: The First Offensive. United States Army Center of Military History. ISBN 0-16-001908-7. http://www.history.army.mil/books/wwii/GuadC/GC-fm.htm.
- Miller, John, Jr. (1959). Cartwheel: The Reduction of Rabaul. Office of the Chief of Military History, U.S. Department of the Army. OCLC 63151382. http://www.ibiblio.org/hyperwar/USA/USA-P-Rabaul/index.html.
- Morison, Samuel Eliot (1958). Breaking the Bismarcks Barrier, vol. 6 of History of United States Naval Operations in World War II. Castle Books. ISBN 0-7858-1307-1.
- Potter, E.B. (2013). Nimitz. Naval Institute Press. ISBN 978-1-61251-225-9. https://books.google.com.au/books?id=VK5kAgAAQBAJ&pg=PA245&lpg=PA245&dq=32,000+Allied+troops+on+New+Georgia&source=bl&ots=PcKKvnNcAZ&sig=ACfU3U2TetvEL3TiwJFyvBe2xYGjTjEU8w&hl=en&sa=X&ved=2ahUKEwjt78CqufjmAhVSwjgGHfkXCOcQ6AEwC3oECAwQAQ#v=onepage&q=32%2C000%20Allied%20troops%20on%20New%20Georgia&f=false.
- Prados, John (1995). Combined Fleet Decoded: The Secret History of American Intelligence and the Japanese Navy in World War II. Random House. ISBN 0-679-43701-0.
- Shaw, Henry I.; Douglas T. Kane (1963). Volume II: Isolation of Rabaul. Historical Branch, G-3 Division, Headquarters, U.S. Marine Corps. OCLC 568751111. http://www.ibiblio.org/hyperwar/USMC/II/index.html.
Further reading[]
- Alexander, Joseph H. (2000). Edson's Raiders: The 1st Marine Raider Battalion in World War II. Naval Institute Press. ISBN 1-55750-020-7.
- Bergerud, Eric M. (1997). Touched with Fire: The Land War in the South Pacific. Penguin. ISBN 0-14-024696-7.
- Craven, Wesley Frank; James Lea Cate (1951). Vol. IV, The Pacific: Guadalcanal to Saipan, August 1942 to July 1944. U.S. Office of Air Force History. OCLC 5732980. http://www.ibiblio.org/hyperwar/AAF/IV/index.html.
- Day, Ronnie (2016). New Georgia: The Second Battle for the Solomons. Indiana University Press. ISBN 0253018773.
- Dyer, George Carroll. "The Amphibians Came to Conquer: The Story of Admiral Richmond Kelly Turner". United States Government Printing Office. OCLC 495312649. http://www.ibiblio.org/hyperwar/USN/ACTC/index.html.
- Feldt, Eric Augustus (1991) [1946]. The Coastwatchers. Victoria, Australia: Penguin Books. ISBN 0-14-014926-0.
- Hammel, Eric M. (2008). New Georgia, Bougainville, and Cape Gloucester: The U.S. Marines in World War II. A Pictorial Tribute. Pacifica Press. ISBN 0-7603-3296-7.
- Hammel, Eric M. (1999). Munda Trail: The New Georgia Campaign, June – August 1943. Pacifica Press. ISBN 0-935553-38-X.
- Hayashi, Saburo (1959). Kogun: The Japanese Army in the Pacific War. Marine Corps. Association. ASIN B000ID3YRK.
- Lord, Walter (2006) [1977]. Lonely Vigil; Coastwatchers of the Solomons. New York: Naval Institute Press. ISBN 1-59114-466-3.
- MacArthur, Douglas; Willoughby, Charles. Japanese Operations in the Southwest Pacific Area, Volume II – Part I. Reports of General MacArthur. United States Army Center of Military History. OCLC 987406435. http://www.history.army.mil/books/wwii/MacArthur%20Reports/MacArthur%20V2%20P1/macarthurv2.htm#contents.
- Melson, Charles D. (1993). Up the Slot: Marines in the Central Solomons. History and Museums Division, Headquarters, U.S. Marine Corps. OCLC 809688017. http://www.ibiblio.org/hyperwar/USMC/USMC-C-CSol/index.html.
- Mersky, Peter B. (1993). Time of the Aces: Marine Pilots in the Solomons, 1942–1944. History and Museums Division, Headquarters, U.S. Marine Corps. OCLC 566041659. http://www.ibiblio.org/hyperwar/USMC/USMC-C-Aces/index.html.
- McGee, William L. (2002). The Solomons Campaigns, 1942–1943: From Guadalcanal to Bougainville—Pacific War Turning Point, Volume 2 (Amphibious Operations in the South Pacific in WWII). BMC Publications. ISBN 0-9701678-7-3.
- Peatross, Oscar F. (1995). John P. McCarthy. ed. Bless 'em All: The Raider Marines of World War II. Review. ISBN 0-9652325-0-6.
- Radike, Floyd W. (2003). Across the Dark Islands: The War in the Pacific. ISBN 0-89141-774-5. https://archive.org/details/acrossdarkisland00radi.
- Rentz, John (1952). Marines in the Central Solomons. Historical Branch, Headquarters, U.S. Marine Corps. OCLC 566041659. http://www.ibiblio.org/hyperwar/USMC/USMC-M-CSol/index.html.
- Rhoades, F. A. (1982). A Diary of a Coastwatcher in the Solomons. Fredericksburg, Texas: Admiral Nimitz Foundation. OCLC 220203268.
- Rottman, Gordon L. (2005). Duncan Anderson. ed. Japanese Army in World War II: The South Pacific and New Guinea, 1942–43. Oxford and New York: Osprey. ISBN 1-84176-870-7.
- U.S. Navy (1947). Chapter XXV: Campaign in the Solomons. II. US Department of the Navy, Bureau of Yards and Docks. OCLC 1023942. http://www.ibiblio.org/hyperwar/USN/Building_Bases/bases-25.html.
External links[]
| Wikimedia Commons has media related to New Georgia Campaign. |
- Hoffman, Jon T. (1995). "New Georgia" (brochure). From Makin to Bougainville: Marine Raiders in the Pacific War. Marine Corps Historical Center. http://www.nps.gov/archive/wapa/indepth/extContent/usmc/pcn-190-003130-00/sec11.htm. Retrieved 21 November 2006.
- "Oral history interview with John Higgins, a 2nd lieutenant who took part in the New Georgia Campaign". Veterans History Project at Central Connecticut State University. Archived from the original on 31 July 2012. https://web.archive.org/web/20120731175240/http://content.library.ccsu.edu/cdm/singleitem/collection/VHP/id/5607. Retrieved 9 January 2020.
The original article can be found at New Georgia campaign and the edit history here.