
The Battle of Savo Island, also known as the First Battle of Savo Island and, in Japanese sources, as the First Battle of the Solomon Sea (第一次ソロモン海戦 Dai-ichi-ji Soromon Kaisen), and colloquially among Guadalcanal veterans as The Battle of the Five Sitting Ducks, was a naval battle of the Pacific Campaign of World War II, between the Imperial Japanese Navy and Allied naval forces. The battle took place on August 8–9, 1942 and was the first major naval engagement of the Guadalcanal campaign, being the first of several naval battles in the straits later named Ironbottom Sound, near the island of Guadalcanal. The battle was the first of five costly, large scale sea and air-sea actions fought in support of the ground battles on Guadalcanal itself, as the Japanese sought to counter the American offensive in the Pacific. These sea battles took place every few days, with increasing delays on each side to regroup and refit, until the November 30, 1942 Battle of Tassafaronga (sometimes referred to as the Fourth Battle of Savo Island or, in Japanese sources, as the Battle of Lunga Point (ルンガ沖夜戦)) —after which the Japanese, eschewing the costly losses, attempted resupplying by submarine and barges. The final naval battle, the Battle of Rennell Island (Japanese: レンネル島沖海戦), took place months later on January 29–30, 1943 by which time the Japanese were preparing to withdraw and evacuate their remaining land forces.
In response to the Allied amphibious landings in the eastern Solomon Islands, Vice Admiral Gunichi Mikawa brought his task force of seven cruisers and one destroyer down New Georgia Sound (also known as "the Slot") from Japanese bases at New Britain and New Ireland to attack the Allied amphibious fleet and its screening force. The screen consisted of eight cruisers and fifteen destroyers under British Rear Admiral Victor Crutchley VC, but only five cruisers and seven destroyers were involved in the battle. Mikawa surprised and routed the Allied force, sinking one Australian and three American cruisers, while suffering only light damage in return. Mikawa's force immediately retired following the battle without attempting to destroy the Allied transport ships supporting the landings.
The remaining Allied warships and the amphibious force, fearful of additional attacks, withdrew earlier than planned from the Solomon Islands temporarily ceding control of the seas around Guadalcanal to the Japanese. Allied ground forces had landed on Guadalcanal and nearby islands only two days before. The early withdrawal of the fleet left them in a precarious situation, with barely enough supplies, equipment, and food to hold their beachhead. Mikawa, fearing Allied carrier strikes against his fleet upon daybreak, decided to withdraw under cover of night rather than attempt to destroy the Allied invasion transports. This missed opportunity to cripple the Allies supplies on Guadalcanal at an early stage of the campaign allowed the Allied forces to establish a firm position on the island. As a consequence, the Japanese would face difficulties in advancing against the Allied positions in the early stages of the campaign when the Allies were at their most vulnerable, allowing the successful defense of the area around Henderson Field until additional Allied reinforcements arrived later in the year.[4]
Background[]
Operations at Guadalcanal[]
On August 7, 1942, Allied forces (primarily U.S. Marines) landed on Guadalcanal, Tulagi, and Florida Island in the eastern Solomon Islands. The landings were meant to deny their use to the Japanese as bases, especially the nearly completed airfield at Henderson Field that was being constructed on Guadalcanal. If Japanese air and sea forces were allowed to establish forward operating bases in the Eastern Solomons they would be in a position to threaten the supply shipping routes between the US and Australia. The Allies also wanted to use the islands as launching points for a campaign to recapture the Solomons, isolate or capture the major Japanese base at Rabaul, and support the Allied New Guinea campaign, which was then building strength under General Douglas MacArthur. The landings initiated the six-month-long Guadalcanal campaign.[5]
The overall commander of Allied naval forces in the Guadalcanal and Tulagi operation was U.S. Vice Admiral Frank Jack Fletcher. He also commanded the carrier task groups providing air cover. U.S. Rear Admiral Richmond K. Turner commanded the amphibious fleet that delivered the 16,000 Allied troops to Guadalcanal and Tulagi.[6]:14 Also under Turner was British Admiral Victor Crutchley's screening force of eight cruisers, fifteen destroyers, and five minesweepers. This force was to protect Turner's ships and provide gunfire support for the landings. Crutchley commanded his force of mostly American ships from his flagship, the Australian heavy cruiser HMAS Australia.[1]:621–4
The Allied landings took the Japanese by surprise. The Allies secured Tulagi, nearby islets Gavutu and Tanambogo, and the airfield under construction on Guadalcanal by nightfall on August 8.[6]:14–5 On August 7 and August 8, Japanese aircraft based at Rabaul attacked the Allied amphibious forces several times, setting afire the U.S. transport ship George F. Elliott (which sank later) and heavily damaging the destroyer USS Jarvis.[7]:90–103 In these air attacks, the Japanese lost 36 aircraft, while the US lost 19 aircraft, including 14 carrier fighter aircraft.[1]:80


_with_US_destroyers_on_9_August_1942.jpg)
HMAS Canberra (center left) protects three Allied transport ships (background and center right) unloading troops and supplies at Tulagi.
Concerned over the losses to his carrier fighter aircraft strength, anxious about the threat to his carriers from further Japanese air attacks, and worried about his ships' fuel levels, Fletcher announced that he would be withdrawing his carrier task forces on the evening of August 8.[8]
Some historians contend that Fletcher's fuel situation was not at all critical but that Fletcher used it to justify his withdrawal from the battle area.[1]:94[6]:28[7]:104–5 Fletcher's biographer notes that Fletcher concluded that the landing was a success and that no important targets for close air support were at hand. Being concerned over the loss of 21 of his carrier fighters, he assessed that his carriers were threatened by torpedo-bomber strikes, and, wanting to refuel before Japanese naval forces arrived, withdrew as he had previously forewarned Turner and Vandegrift. Turner, however, believed that Fletcher understood that he was to provide air cover until all the transports were unloaded on August 9.[9]
Even though the unloading was going slower than planned Turner decided that without carrier air cover he would have to withdraw his ships from Guadalcanal. He planned to unload as much as possible during the night and depart the next day.[6]:59
Japanese response[]
Unprepared for the Allied operation at Guadalcanal, the initial Japanese response included airstrikes and an attempted reinforcement. Mikawa, commander of the newly formed Japanese Eighth Fleet headquartered at Rabaul, loaded 519 naval troops on two transports and sent them towards Guadalcanal on August 7. However, when the Japanese learned that Allied forces at Guadalcanal were stronger than originally reported, the transports were recalled.[1]:87[7]:126[10]
Mikawa also assembled all the available warships in the area to attack the Allied forces at Guadalcanal. At Rabaul were the heavy cruiser Chōkai (Mikawa's flagship), the light cruisers Tenryū and Yubari and the destroyer Yunagi. En route from Kavieng were four heavy cruisers of Cruiser Division 6 under Rear Admiral Aritomo Goto: Aoba, Furutaka, Kako, and Kinugasa.[11]:193–4[12]:21[13]
The Japanese Navy had trained extensively in night-fighting tactics before the war, a fact of which the Allies were unaware.[7]:43–4[14] Mikawa hoped to engage the Allied naval forces off Guadalcanal and Tulagi on the night of August 8 and August 9, when he could employ his night-battle expertise while avoiding attacks from Allied aircraft, which could not operate effectively at night. Mikawa's warships rendezvoused at sea near Cape St. George in the evening of August 7 and then headed east-southeast.[6]:19[12]:21
Battle[]
Prelude[]


Approach route of Mikawa's force from Rabaul and Kavieng (upper left), pausing off the east coast of Bougainville (center) and then traveling down The Slot to attack Allied naval forces off Guadalcanal and Tulagi (lower right)
Mikawa decided to take his fleet north of Buka Island and then down the east coast of Bougainville. The fleet would pause east of Kieta for six hours on the morning of August 8. (This would avoid daytime air attacks during their final approach to Guadalcanal.)[7]:126 They would then proceed along the dangerous channel known as "The Slot", hoping that no Allied plane would sight them in the fading light. The Japanese fleet was in fact sighted in St George Channel, where their column almost ran into USS S-38, lying in ambush. She was too close to fire torpedoes, but her captain, Lieutenant Commander H.G. Munson, radioed: "Two destroyers and three larger ships of unknown type heading one four zero true at high speed eight miles west of Cape St George"[15]:355 The warnings, however, were considered vague and the size of the force reported did not suggest an attack was pending.
Once at Bougainville, Mikawa spread his ships out over a wide area to mask the composition of his force and launched four floatplanes from his cruisers to scout for Allied ships in the southern Solomons.
At 10:20 and 11:10, his ships were spotted by Australian Hudson reconnaissance aircraft based at Milne Bay in New Guinea.[1]:88[16] The first Hudson misidentified them as "three cruisers, three destroyers, and two seaplane tenders". (Note: Some accounts state that the first Hudson's crew identified the enemy ships correctly but, the composition of enemy forces was changed from the aircraft crews' report by intelligence officers in Milne Bay.) The Hudson's crew tried to report the sighting to the Allied radio station at Fall River, New Guinea. Receiving no acknowledgment, they returned to Milne Bay at 12:42 to ensure that the report was received as soon as possible. The second Hudson also failed to report its sighting by radio, but completed its patrol and landed at Milne Bay at 15:00. It reported sighting "two heavy cruisers, two light cruisers, and one unknown type". For unknown reasons, these reports were not relayed to the Allied fleet off Guadalcanal until 18:45 and 21:30, respectively, on August 8.[7]:139–50[17]
Mikawa's floatplanes returned by 12:00 and reported two groups of Allied ships, one off Guadalcanal and the other off Tulagi. He reassembled his warships and began his run towards Guadalcanal, entering the Slot near Choiseul by 16:00 on August 8. Mikawa communicated the following battle plan to his warships: "On the rush-in we will go from S. (south) of Savo Island and torpedo the enemy main force in front of Guadalcanal anchorage; after which we will turn toward the Tulagi forward area to shell and torpedo the enemy. We will then withdraw north of Savo Island."[6]:20
Mikawa's run down the Slot was not detected by Allied forces. Turner had requested that U.S. Admiral John S. McCain, Sr., commander of Allied air forces for the South Pacific area, conduct extra reconnaissance missions over the Slot in the afternoon of August 8. But, for unexplained reasons, McCain did not order the missions, nor did he tell Turner that they were not carried out. Thus, Turner mistakenly believed that the Slot was under Allied observation throughout the day.[1]:89–92
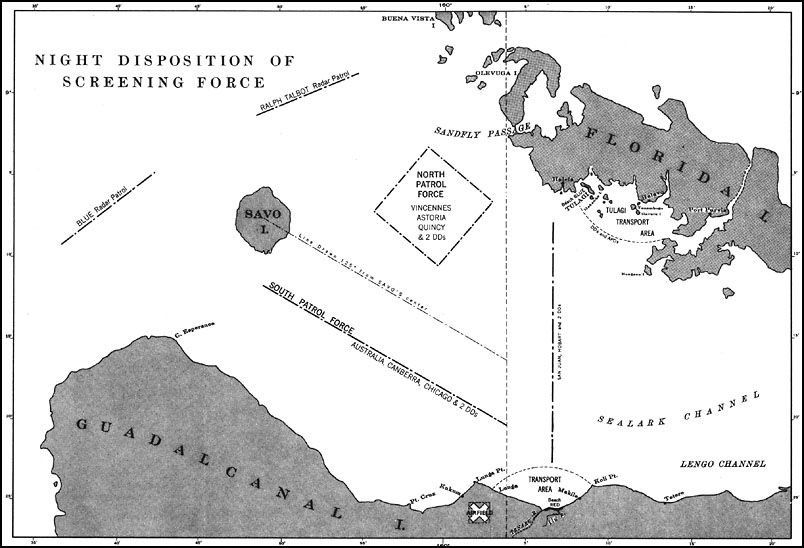

Chart of the disposition of Allied ships the night of August 8.
To protect the unloading transports during the night, Crutchley divided the Allied warship forces into three groups. A "southern" group, consisting of the Australian cruisers HMAS Australia and HMAS Canberra, cruiser USS Chicago, and destroyers USS Patterson and USS Bagley, patrolled between Lunga Point and Savo Island to block the entrance between Savo Island and Cape Esperance on Guadalcanal. A "northern" group, consisting of the cruisers USS Vincennes, USS Astoria and USS Quincy, and destroyers USS Helm and USS Wilson, conducted a box-shaped patrol between the Tulagi anchorage and Savo Island to defend the passage between Savo and Florida Islands. An "eastern" group consisting of the cruisers USS San Juan and HMAS Hobart and two U.S. destroyers guarded the eastern entrances to the sound between Florida and Guadalcanal Islands.[11]:195 Crutchley placed two radar-equipped U.S. destroyers to the west of Savo Island to provide early warning for any approaching Japanese ships. The destroyer USS Ralph Talbot patrolled the northern passage and the destroyer USS Blue patrolled the southern passage, with a gap of 12–30 kilometres (8–20 mi) between their uncoordinated patrol patterns. At this time, the Allies were unaware of all of the limitations of their primitive ship-borne radars, such as the effectiveness of the radar could be greatly degraded by the presence of nearby landmasses.[1]:99 Wary of the potential threat from Japanese submarines to the transport ships, Crutchley placed his remaining seven destroyers as close-in protection around the two transport anchorages.[7]:80–1
The crews of the Allied ships were fatigued after two days of constant alert and action in supporting the landings. Also, the weather was extremely hot and humid, inducing further fatigue and, in Samuel Eliot Morison's words, "inviting weary sailors to slackness." In response, most of Crutchley's warships went to "Condition II" the night of August 8, which meant that half the crews were on duty while the other half rested, either in their bunks or near their battle stations.[6]:32
In the evening, Turner called a conference on his command ship off Guadalcanal with Crutchley and Marine commander Major General Alexander A. Vandegrift to discuss the departure of Fletcher's carriers and the resulting withdrawal schedule for the transport ships. At 20:55, Crutchley left the southern group in Australia to attend the conference, leaving Captain Howard D. Bode of Chicago in charge of the southern group. Crutchley did not inform the commanders of the other cruiser groups of his absence, contributing further to the dissolution of command arrangements. Bode, awakened from sleep in his cabin, decided not to place his ship in the lead of the southern group of ships, the customary place for the senior ship, and went back to sleep. At the conference, Turner, Crutchley, and Vandegrift discussed the reports of the "seaplane tender" force reported by the Australian Hudson crew earlier that day. They decided it would not be a threat that night, because seaplane tenders did not normally engage in a surface action. Vandegrift said that he would need to inspect the transport unloading situation at Tulagi before recommending a withdrawal time for the transport ships, and he departed at midnight to conduct the inspection. Crutchley elected not to return with Australia to the southern force but instead stationed his ship just outside the Guadalcanal transport anchorage, without informing the other Allied ship commanders of his intentions or location.[1]:96–7
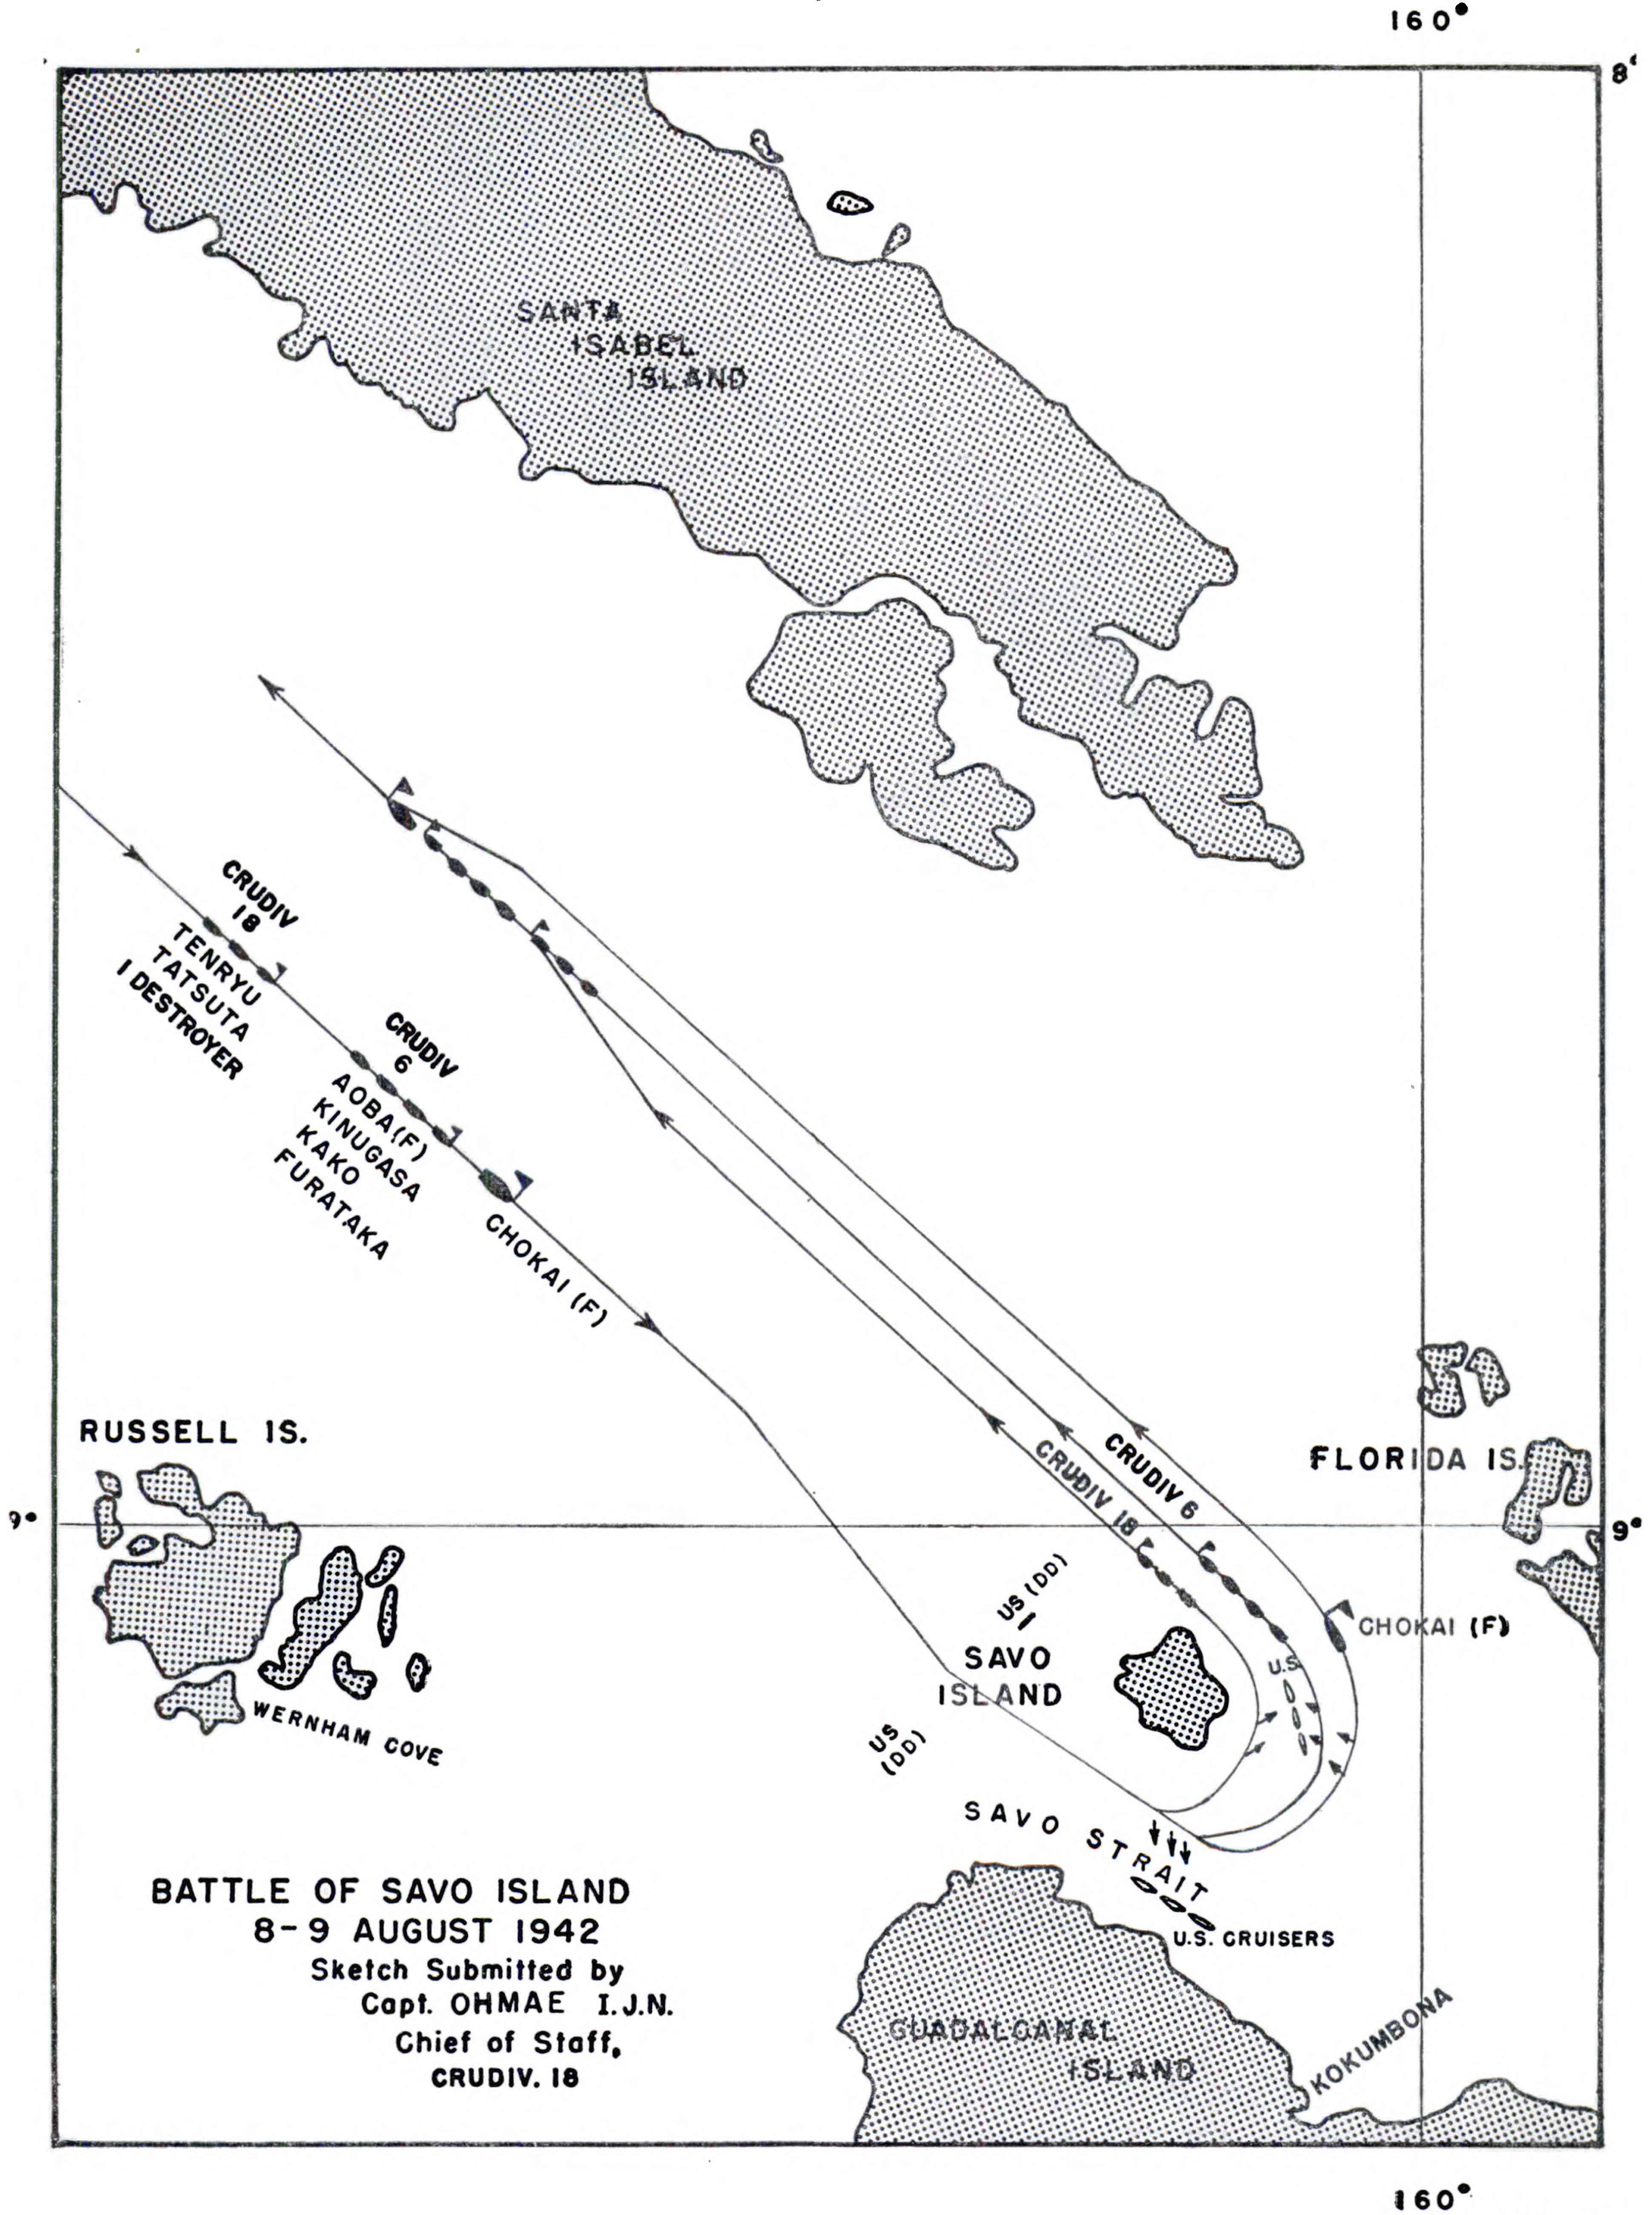

Chart of the approach and departure of Mikawa's ships from the battle area
As Mikawa's force neared the Guadalcanal area, the Japanese ships launched three floatplanes for one final reconnaissance of the Allied ships, and to provide illumination by dropping flares during the upcoming battle. Although several of the Allied ships heard and/or observed one or more of these floatplanes, starting at 23:45 on August 8, none of them interpreted the presence of unknown aircraft in the area as an actionable threat, and no one reported the sightings to Crutchley or Turner.[7]:165–6
Mikawa's force approached in a single 3 kilometre (2 mi) column led by Chōkai, with Aoba, Kako, Kinugasa, Furutaka, Tenryū, Yubari, and Yunagi following. Sometime between 00:44 and 00:54 on August 9, lookouts in Mikawa's ships spotted Blue about 9 kilometres (5.5 mi) ahead of the Japanese column.[11]:197[18]
Action south of Savo[]
To avoid Blue, Mikawa changed course to pass north of Savo Island.[6]:36 He also ordered his ships to slow to 22 knots (41 km/h), to reduce wakes that might make his ships more visible.[1]:103 Four minutes later, Mikawa's lookouts spied either Ralph Talbot about 16 kilometres (10 mi) away or a small schooner of unknown nationality.[1]:103[7]:171[19] The Japanese ships held their course while pointing more than 50 guns at Blue, ready to open fire at the first indication that Blue had sighted them.[6]:36 When Blue was less than 2 kilometres (1 mi) away from Mikawa's force, she suddenly reversed course, having reached the end of her patrol track, and steamed away, apparently oblivious to the long column of large Japanese ships sailing by her.[7]:171–3 Seeing that his ships were still undetected, Mikawa turned back to a course south of Savo Island and increased speed, first to 26 knots (48 km/h), and then to 30 knots (56 km/h). At 01:25, Mikawa released his ships to operate independently of his flagship, and at 01:31, he ordered, "Every ship attack."[11]:197
At about this time, Yunagi detached from the Japanese column and reversed direction, perhaps because she lost sight of the other Japanese ships ahead of her, or perhaps she was ordered to provide a "rear guard" for Mikawa's force. One minute later, Japanese lookouts sighted a warship to port. This ship was the destroyer Jarvis, heavily damaged the day before and now departing Guadalcanal independently for repairs in Australia. Whether Jarvis sighted the Japanese ships is unknown, since her radios had been destroyed. Furutaka launched torpedoes at Jarvis, which all missed.[1]:103–4 The Japanese ships passed as close to 1,100 metres of Jarvis, close enough for officers on Tenryū to look down onto the destroyer's decks without seeing any of her crew moving about. If Jarvis was aware of the Japanese ships passing by, she did not respond in any noticeable way.[7]:176–7
Two minutes after sighting Jarvis, the Japanese lookouts sighted the Allied destroyers and cruisers of the southern force about 12,500 metres away, silhouetted by the glow from the burning George F. Elliott.[7]:178 Several minutes later, at about 01:38, the Japanese cruisers began launching salvos of torpedoes at the Allied southern force ships.[6]:36–7 At this same time, lookouts on Chōkai spotted the ships of the Allied northern force at a range of 16 kilometres (10 mi).[1]:104 Chōkai turned to face this new threat, and the rest of the Japanese column followed, while still preparing to engage the Allied southern force ships with gunfire.[7]:179–80
Patterson's crew was alert because the destroyer's captain had taken seriously the earlier daytime sightings of Japanese warships and evening sightings of unknown aircraft, and told his crew to be ready for action. At 01:43, Patterson spotted a ship, probably Kinugasa, 5,000 meters dead ahead and immediately sent a warning by radio and signal lamp: "Warning! Warning! Strange ships entering the harbor!" Patterson increased speed to full, and fired star shells towards the Japanese column. Her captain ordered a torpedo attack, but his order was not heard over the noise from the destroyer's guns.[7]:206–7
At about the same moment that Patterson sighted the Japanese ships and went into action, the Japanese floatplanes overhead, on orders from Mikawa, dropped aerial flares directly over Canberra and Chicago.[6]:37 Canberra responded immediately, with Captain Frank Getting ordering an increase in speed, a reversal of an initial turn to port, which kept Canberra between the Japanese and the Allied transports, and for her guns to train out and fire at any targets that could be sighted.[7]:180–4 Less than one minute later, as Canberra's guns took aim at the Japanese, Chōkai and Furutaka opened fire on her, scoring numerous hits within a few seconds. Aoba and Kako joined in with gunfire, and within the next three minutes Canberra took up to 24 large caliber hits. Early hits killed her gunnery officer, mortally wounded Getting, and destroyed both boiler rooms, knocking out power to the entire ship before Canberra could fire any of her guns or communicate a warning to other Allied ships. The cruiser glided to a stop, on fire, with a 5- to 10-degree list to starboard, and unable to fight the fires or pump out flooded compartments because of lack of power. Since all of the Japanese ships were on the port side of Canberra, the damage to the ship's starboard side occurred either from shells entering low on the port side and exiting below the waterline on the starboard side, or from one or two torpedo hits on the starboard side.[1]:105[20] If torpedoes did hit Canberra on the starboard side, then they may have come from a nearby Allied ship, and at this time the US destroyer Bagley was the only ship on that side of the Australian cruiser and had fired torpedoes moments earlier.[7]:185–205[21]


View from the Japanese cruiser Chokai during the battle as aerial flares illuminate the Allied southern force.
The crew of Chicago, observing the illumination of their ship by air-dropped flares and the sudden turn by Canberra in front of them, came alert and awakened Captain Bode from "a sound sleep". Bode ordered his 5 in (127.0 mm) guns to fire star shells towards the Japanese column, but the shells did not function.[6]:39 At 01:47, a torpedo, probably from Kako, hit Chicago's bow, sending a shock wave throughout the ship that damaged the main battery director. A second torpedo hit but failed to explode, and a shell hit the cruiser's mainmast, killing two crewmen. Chicago steamed west for 40 minutes,[7]:213 leaving behind the transports she was assigned to protect. The cruiser fired her secondary batteries at the trailing ships in the Japanese column and may have hit Tenryū, causing slight damage. Bode did not try to assert control over any of the other Allied ships in the southern force, of which he was still technically in command. More significantly, Bode made no attempt to warn any of the other Allied ships or personnel in the Guadalcanal area as his ship headed away from the battle area.[1]:105–6
During this time, Patterson engaged in a gun duel with the Japanese column. Patterson received a shell hit aft, causing moderate damage and killing 10 crew members. Patterson continued to pursue and fire at the Japanese ships and may have hit Kinugasa, causing moderate damage.[1]:107 Patterson then lost sight of the Japanese column as it headed northeast along the eastern shore of Savo Island.[7]:207 Bagley, whose crew sighted the Japanese shortly after Patterson and Canberra, circled completely around to port before firing torpedoes in the general direction of the rapidly disappearing Japanese column; one or two of which may have hit Canberra. Bagley played no further role in the battle.[6]:38–9 Yunagi exchanged non-damaging gunfire with Jarvis before exiting the battle area to the west with the intention of eventually rejoining the Japanese column north and west of Savo Island.[11]:199[22]
At 01:44, as Mikawa's ships headed towards the Allied northern force, Tenryū and Yubari split from the rest of the Japanese column and took a more westward course. Furutaka, either because of a steering problem,[7]:208 or to avoid a possible collision with Canberra, followed Yubari and Tenryū. Thus, the Allied northern force was about to be enveloped and attacked from two sides.[1]:107–8
Action north of Savo[]


Map of the action northeast of Savo.
When Mikawa's ships attacked the Allied southern force, the captains of all three U.S. northern force cruisers were asleep, with their ships steaming quietly at 10 knots (19 km/h).[6]:40–7 Although crewmen on all three ships observed flares or gunfire from the battle south of Savo or else received Patterson's warning of threatening ships entering the area, it took some time for the crews to go from Condition II to full alert.[7]:217–21 At 01:44, the Japanese cruisers began firing torpedoes at the northern force. At 01:50, they aimed powerful searchlights at the three northern cruisers and opened fire with their guns.[1]:107
Astoria's bridge crew called general quarters upon sighting the flares south of Savo, around 01:49. At 01:52, shortly after the Japanese searchlights came on and shells began falling around the ship, Astoria's main gun director crews spotted the Japanese cruisers and opened fire. Astoria's captain, awakened to find his ship in action, rushed to the bridge and ordered a cease fire, fearful that his ship might be firing on friendly forces. As shells continued to cascade around his ship, the captain ordered firing resumed less than a minute later. Chōkai, however, had found the range, and Astoria was quickly hit by numerous shells and set afire.[6]:41–4[23] Between 02:00 and 02:15, Aoba, Kinugasa, and Kako joined Chōkai in pounding Astoria, destroying the cruiser's engine room and bringing the flaming ship to a halt. At 02:16, one of Astoria's remaining operational main gun turrets fired at Kinugasa's searchlight, but missed and hit Chōkai's forward turret, putting the turret out of action and causing moderate damage to the ship.[7]:231
Quincy had also seen the aircraft flares over the southern ships, received Patterson's warning, and had just sounded general quarters and was coming alert when the searchlights from the Japanese column came on. Quincy's captain gave the order to commence firing, but the gun crews were not ready. Within a few minutes, Quincy was caught in a crossfire between Aoba, Furutaka, and Tenryū, and was hit heavily and set afire. Quincy's captain ordered his cruiser to charge towards the eastern Japanese column, but as she turned to do so Quincy was hit by two torpedoes from Tenryū, causing severe damage. Quincy managed to fire a few main gun salvos, one of which hit Chōkai's chart room 6 meters (20 ft) from Admiral Mikawa and killed or wounded 36 men, although Mikawa was not injured. At 02:10, incoming shells killed or wounded almost all of Quincy's bridge crew, including the captain. At 02:16, the cruiser was hit by a torpedo from Aoba, and the ship's remaining guns were silenced. Quincy's assistant gunnery officer, sent to the bridge to ask for instructions, reported on what he found:
When I reached the bridge level, I found it a shambles of dead bodies with only three or four people still standing. In the Pilot House itself the only person standing was the signalman at the wheel who was vainly endeavoring to check the ship's swing to starboard to bring her to port. On questioning him I found out that the Captain, who at that time was laying [sic] near the wheel, had instructed him to beach the ship and he was trying to head for Savo Island, distant some four miles (6 km) on the port quarter. I stepped to the port side of the Pilot House, and looked out to find the island and noted that the ship was heeling rapidly to port, sinking by the bow. At that instant the Captain straightened up and fell back, apparently dead, without having uttered any sound other than a moan.
Quincy sank, bow first, at 02:38.[1]:111–3


Japanese cruiser Yubari shines searchlights towards the northern force of Allied warships during the battle.
Like Quincy and Astoria, Vincennes also sighted the aerial flares to the south, and furthermore, actually sighted gunfire from the southern engagement. At 01:50, when the U.S. cruisers were illuminated by the Japanese searchlights, Vincennes hesitated to open fire, believing that the searchlight's source might be friendly ships. Shortly thereafter, Kako opened fire on Vincennes which responded with her own gunfire at 01:53.[6]:47 As Vincennes began to receive damaging shell hits, her commander, U.S. Captain Frederick L. Riefkohl, ordered an increase of speed to 25 knots (46 km/h), but shortly thereafter, at 01:55, two torpedoes from Chōkai hit, causing heavy damage. Kinugasa now joined Kako in pounding Vincennes. Vincennes scored one hit on Kinugasa causing moderate damage to her steering engines. The rest of the Japanese ships also fired and hit Vincennes up to 74 times, and, at 02:03, another torpedo hit her, this time from Yubari. With all boiler rooms destroyed, Vincennes came to a halt, burning "everywhere" and listing to port. At 02:16, Riefkohl ordered the crew to abandon ship, and Vincennes sank at 02:50.[7]:225–8
During the engagement, the U.S. destroyers Helm and Wilson struggled to see the Japanese ships. Both destroyers briefly fired at Mikawa's cruisers but caused no damage and received no damage to themselves.[1]:114
At 02:16, the Japanese columns ceased fire on the northern Allied force as they moved out of range around the north side of Savo Island. Ralph Talbot encountered Furutaka, Tenryū, and Yubari as they cleared Savo Island. The Japanese ships fixed the U.S. destroyer with searchlights and hit her several times with gunfire, causing heavy damage, but Ralph Talbot escaped into a nearby rain squall, and the Japanese ships left her behind.[6]:50–1
Mikawa's decision[]
At 02:16 Mikawa conferred with his staff about whether they should turn to continue the battle with the surviving Allied warships and try to sink the Allied transports in the two anchorages. Several factors influenced his ultimate decision. His ships were scattered and would take some time to regroup.[1]:115 His ships would need to reload their torpedo tubes, a labor-intensive task that would take some time. Mikawa also did not know the number and locations of any remaining Allied warships and his ships had expended much of their ammunition.[11]:201
More importantly, Mikawa had no air cover and believed that U.S. aircraft carriers were in the area. Mikawa was probably aware that the Japanese Navy had no more heavy cruisers in production, and thus would be unable to replace any he might lose to air attack the next day if he remained near Guadalcanal.[15]:362 He was unaware that the U.S. carriers had withdrawn from the battle area and would not be a threat the next day. Although several of Mikawa's staff urged an attack on the Allied transports, the consensus was to withdraw from the battle area.[7]:237–9 Therefore, at 02:20, Mikawa ordered his ships to retire.[6]:53
Aftermath[]


_with_US_destroyers_on_9_August_1942.jpg)
U.S. destroyers Blue and Patterson evacuate the crew from the burning Canberra
At 04:00 on August 9 Patterson came alongside Canberra to assist the cruiser in fighting her fires. By 05:00, it appeared that the fires were almost under control, but Turner, who at this time intended to withdraw all Allied ships by 06:30, ordered the ship to be scuttled if it was not able to accompany the fleet. After the survivors were removed, the destroyers USS Selfridge and USS Ellet sank Canberra with torpedoes and gunfire.[1]:117–8
Later in the morning of August 9 General Vandegrift advised Admiral Turner that he needed more supplies unloaded from the transports before they withdrew. Therefore, Turner postponed the withdrawal of his ships until mid-afternoon. In the meantime, Astoria's crew tried to save their sinking ship. Astoria's fires, however, eventually became completely out of control, and the ship sank at 12:15.[6]:57–9
On the morning of August 9, an Australian coastwatcher on Bougainville radioed a warning of a Japanese airstrike on the way from Rabaul. The Allied transport crews ceased unloading for a time but were puzzled when the airstrike did not materialize. Allied forces did not discover until after the war was over that this Japanese airstrike instead concentrated on Jarvis south of Guadalcanal, sinking her with all hands. The Allied transports and warships all departed the Guadalcanal area by nightfall on August 9.[7]:250–3
In the late evening of August 9, Mikawa on Chōkai released the four cruisers of Cruiser Division 6 to return to their home base at Kavieng. At 08:10 on August 10, Kako was torpedoed and sunk by the submarine USS S-44 110 kilometers (70 mi) from its destination. The other three Japanese cruisers picked up all but 71 of her crew and went on to Kavieng.[11]:203
From the time of the battle until several months later, almost all Allied supplies and reinforcements sent to Guadalcanal came by transports in small convoys, mainly during daylight hours, while Allied aircraft from the New Hebrides and Henderson Field and any available aircraft carriers flew covering missions. During this time, Allied forces on Guadalcanal received barely enough ammunition and provisions to withstand the several Japanese drives to retake the islands.[24]
Despite their defeat in this battle, the Allies eventually won the battle for Guadalcanal, an important step in the eventual defeat of Japan. In hindsight, if Mikawa had elected to risk his ships to go after the Allied transports on the morning of August 9, he could have improved the chances of Japanese victory in the Guadalcanal campaign at its inception, and the course of the war in the southern Pacific could have gone much differently. Although the Allied warships at Guadalcanal that night were completely routed, the transports were unaffected. Many of these same transports were used many times to bring crucial supplies and reinforcements to Allied forces on Guadalcanal over succeeding months. Mikawa's decision not to destroy the Allied transport ships when he had the opportunity would prove to be a crucial strategic mistake for the Japanese.[1]:121
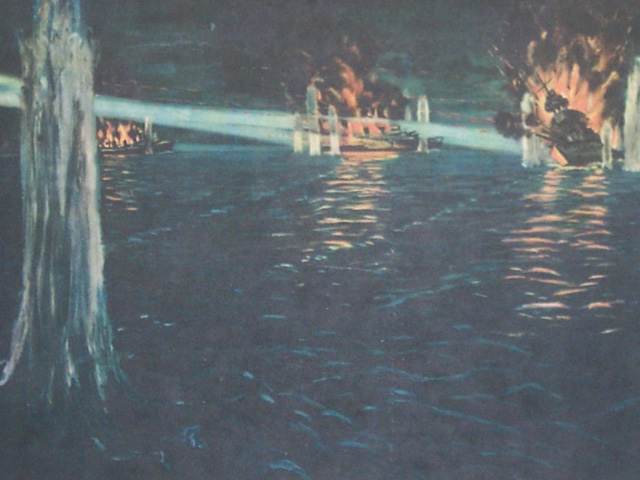
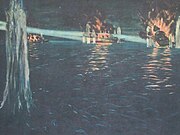
Japanese artwork from during the war depicts the destruction of three U.S. cruisers by Japanese warships at Savo Island
A formal United States Navy board of inquiry, known as the Hepburn Investigation, subsequently prepared a report of the battle. The board interviewed most of the major Allied officers involved over several months, beginning in December 1942.[1]:122 The report recommended official censure for only one officer: Captain Howard D. Bode. The report stopped short of recommending formal action against other Allied officers, including Admirals Fletcher, Turner, McCain, and Crutchley, and Captain Riefkohl. The careers of Turner, Crutchley, and McCain do not appear to have been affected by the defeat or the mistakes they made in contributing to it. Riefkohl, however, never commanded ships again. Captain Bode, upon learning that the report was going to be especially critical of his actions, shot himself in his quarters at Balboa, Panama Canal Zone, on April 19, 1943, and died the next day.[25][26] Crutchley was gazetted with the Legion of Merit (Chief Commander) in September 1944. Admiral Yamamoto signaled a congratulatory note to Mikawa on his victory, stating, "Appreciate the courageous and hard fighting of every man of your organisation. I expect you to expand your exploits and you will make every effort to support the land forces of the Imperial army which are now engaged in a desperate struggle." Later on, though, when it became apparent that Mikawa had missed an opportunity to destroy the Allied transports, he was intensely criticised by his comrades.[7]:267 Admiral Turner later assessed why his forces were so soundly defeated in the battle:
"The Navy was still obsessed with a strong feeling of technical and mental superiority over the enemy. In spite of ample evidence as to enemy capabilities, most of our officers and men despised the enemy and felt themselves sure victors in all encounters under any circumstances. The net result of all this was a fatal lethargy of mind which induced a confidence without readiness, and a routine acceptance of outworn peacetime standards of conduct. I believe that this psychological factor, as a cause of our defeat, was even more important than the element of surprise".[1]:123
Historian Richard B. Frank adds that, "This lethargy of mind would not be completely shaken off without some more hard blows to (U.S.) Navy pride around Guadalcanal, but after Savo, the United States picked itself up off the deck and prepared for the most savage combat in its history."[1]:123[27]
See also[]
- USS Savo Island (CVE-78)
- miniseries – The battle is briefly portrayed in the first episode of the HBO mini-series.
Notes[]
- ↑ 1.00 1.01 1.02 1.03 1.04 1.05 1.06 1.07 1.08 1.09 1.10 1.11 1.12 1.13 1.14 1.15 1.16 1.17 1.18 1.19 1.20 1.21 1.22 1.23 1.24 1.25 1.26 1.27 1.28 1.29 Frank. "Guadalcanal"..
- ↑ Breakdown of Allied deaths by ship: Quincy-389, Vincennes-342, Astoria-235, Canberra-85, Ralph Talbot-14, Patterson-10, and Chicago-2. Although Jarvis was sunk later on August 9 with the loss of her entire crew of 233, this loss is usually considered a separate action from the battle. Chicago was under repair until January 1943. Ralph Talbot was under repair in the U.S. until November 1942. Patterson was repaired locally.[citation needed]
- ↑ Breakdown of Japanese deaths by ship: Chōkai-34, Tenryū-23, and Kinugasa-1. Although Kako was sunk the next day (August 10) before reaching home port at Kavieng with 71 personnel killed, this loss is usually considered a separate action from the battle. All of the other damage to the Japanese cruisers was repaired locally.[citation needed]
- ↑ John Toland, Rising Sun, page 374
- ↑ Hogue, Pearl Harbor to Guadalcanal, pp. 235–36.
- ↑ 6.00 6.01 6.02 6.03 6.04 6.05 6.06 6.07 6.08 6.09 6.10 6.11 6.12 6.13 6.14 6.15 6.16 6.17 6.18 Morison. "Struggle for Guadalcanal"..
- ↑ 7.00 7.01 7.02 7.03 7.04 7.05 7.06 7.07 7.08 7.09 7.10 7.11 7.12 7.13 7.14 7.15 7.16 7.17 7.18 7.19 7.20 7.21 7.22 7.23 7.24 Loxton. "Shame of Savo"..
- ↑ Hammel, Carrier Clash, p. 99.
- ↑ Lundstrom, Black Shoe Carrier Admiral, pp. 368–85.
- ↑ The Eighth Fleet was also known as the Outer South Seas Force and included Cruiser Divisions 6 and 18.
- ↑ 11.0 11.1 11.2 11.3 11.4 11.5 11.6 Dull. "Imperial Japanese Navy"..
- ↑ 12.0 12.1 Coombe. "Derailing the Tokyo Express"..
- ↑ After the two transports were recalled, one of them, Meiyo Maru, was sunk near Cape St George, Bougainville at 21:25 on August 8 by the submarine USS S-38 with the loss of 373 personnel. This loss is usually regarded as a separate action from the Battle of Savo Island.
- ↑ Japanese night battle preparations included the use of lookouts intensively trained for night operations, specially designed optical devices for nighttime observation, the long-range Type 93 torpedo, use of battleship and cruiser-carried floatplanes to drop flares, and frequent and realistic fleet night-training exercises.[citation needed]
- ↑ 15.0 15.1 Toland, John (1970). "The Rising Sun: The Decline and Fall of the Japanese Empire 1936–1945". Random House.
- ↑ The floatplanes launched by Mikawa included three Aichi E13A "Jakes" and one Kawanishi E7K2 "Alf". One Jake was shot down by aircraft from USS Wasp, and its crew was killed. (Loxton, Shame of Savo, p. 129).
- ↑ The misidentification of two of Mikawa's cruisers as seaplane tenders by the first Hudson may have been because of the wide dispersal of the Japanese warships; also, the Hudson's crew sighted a floatplane returning. The first Hudson's report was not received by radio because the Fall River station was shut down at that time for an air raid alert. When the second Hudson tried to radio its sighting of Mikawa's force, Fall River refused to receive the report and rebuked the Hudson's crew for breaking radio silence. Loxton calls the claims by Morison, Dull, Richard Newcomb, and other historians that the first Hudson crew made no attempt to radio their sighting report, routinely and leisurely completed their patrol, and then "had tea" before submitting their report at Milne Bay an "outrageous rumor" and "calumny" that is at odds with what he found in his research.
- ↑ Dull says the time was 00:44, Loxton 00:53 (Shame of Savo, p. 171), Morison 00:54 (Struggle for Guadalcanal, p. 35), and Frank says 00:50 (Guadalcanal, p. 103).
- ↑ Morison claims that Blue later sighted a "Japanese auxiliary schooner" in that same area but gives no supporting evidence for why he or Blue believed that the schooner was of Japanese nationality (Struggle for Guadalcanal, p. 55). Loxton states that Blue found the schooner to be "harmless" (Loxton, Shame of Savo, p. 216).
- ↑ Frank does not believe that Japanese torpedoes hit Canberra and does not discuss the possibility that Allied torpedoes hit the ship.
- ↑ Loxton firmly believes that Canberra was hit by a torpedo from Bagley, citing survivor accounts, ship's records, and damage assessments. Morison (Struggle for Guadalcanal, pp. 37–38.) states that Canberra was hit by two torpedoes on the starboard side but believes they were of Japanese origin.
- ↑ Chicago's crew witnessed the gun battle between Jarvis and Yunagi (Loxton, Shame of Savo, p. 208).
- ↑ Astoria's captain's exact words upon arriving on the bridge were, "Topper, I think we are firing on our own ships. Let's not get excited and act too hasty! Cease firing!" Astoria's gunnery officer replied to this command with, "For God's sake give the word to commence firing!" The captain, after witnessing Chōkai's fourth salvo straddle his ship, declared, "Whether our ships or not, we will have to stop them. Commence firing!" (Loxton, Shame of Savo, pp. 226–27.)
- ↑ Murray, War to be Won, pp. 211–15.
- ↑ Shanks, Sandy. "The Bode Testament: Author's Interview". Microworks. http://www.microworks.net/pacific/library/shank_interview.htm..
- ↑ Hackett, CombinedFleet.com.
- ↑ Daniel H. Galvin Jr., a survivor of the sinking of the USS Quincy writes that: "For nearly 40 years the sailors [of the Quincy] held their grief for the loss of 389 shipmates – and an underserved shame for this overwhelming loss." However, because of the Freedom of Information Act, historians were able to discover the truth concerning the "The Battle of Savo Island." Galvin writes that what precipitated the defeat was Fletcher leaving the area and not assigning anyone to be in charge. Additionally, Australian allies who knew of the approaching Japanese warships failed to inform the Americans (Guadalcanal Echoes, Spring 2010 Edition, p. 14 (The Guadalcanal Campaign Veterans, [American veterans group]))
References[]
- Coombe, Jack D. (1991). Derailing the Tokyo Express. Harrisburg, PA: Stackpole. ISBN 0-8117-3030-1.
- Dull, Paul S. (1978). A Battle History of the Imperial Japanese Navy, 1941–1945. Naval Institute Press. ISBN 0-87021-097-1.
- Frank, Richard B. (1990). Guadalcanal: The Definitive Account of the Landmark Battle. New York: Penguin Group. ISBN 0-14-016561-4.
- Loxton, Bruce; Chris Coulthard-Clark (1997). The Shame of Savo: Anatomy of a Naval Disaster. Australia: Allen & Unwin Pty Ltd. ISBN 1-86448-286-9.
- Lundstrom, John B. (2006). Black Shoe Carrier Admiral: Frank Jack Fletcher at Coral Sea, Midway, and Guadalcanal. Annapolis:: Naval Institute Press. SBN 1-59114-475-2.
- Morison, Samuel Eliot (1958). The Struggle for Guadalcanal, August 1942 – February 1943, vol. 5 of History of United States Naval Operations in World War II. Boston: Little, Brown and Company. ISBN 0-316-58305-7.
- Murray, Williamson; Allan R. Millett (2001). A War To Be Won: Fighting the Second World War. United States of America: Belknap Press. ISBN 0-674-00680-1.
- Newcomb, Richard F. (1961 (Reissue 2002)). The Battle of Savo Island: The Harrowing Account of the Disastrous Night Battle Off Guadalcanal that Nearly Destroyed the Pacific Fleet in August 1942. New York: Owl Books. ISBN 0-8050-7072-9.
External links[]
| Wikimedia Commons has media related to Battle of Savo Island. |
- Bates, Richard W. (1950). "The Battle of Savo Island, August 9, 1942. Strategical and Tactical Analysis. Part I" (PDF). Naval War College. Archived from the original on August 24, 2006. http://web.archive.org/web/20060824140043/http://www.ibiblio.org/hyperwar/PTO/Hell/NWC-Savo.pdf. Retrieved August 11, 2006.
- Cagney, James (2012). "Interactive Animation of The Battle of Savo Island, August 9, 1942" (javascript). HistoryAnimated.com. http://www.pacificwaranimated.com/index.php/savo-island. Retrieved Sept 20, 2012.
- Horan, Mark. "First Battle of Savo Island". Order of Battle. Archived from the original on May 17, 2006. http://web.archive.org/web/20060517135028/http://www.navweaps.com/index_oob/OOB_WWII_Pacific/OOB_WWII_First-Savo.htm. Retrieved May 17, 2006.
- Lanzendörfer, Tim. "Opening Salvos: The Battle of Savo Island, August 9, 1942". The Pacific War: The U.S. Navy. Archived from the original on May 17, 2006. http://web.archive.org/web/20060517102454/http://www.microworks.net/pacific/battles/savo_island.htm. Retrieved May 17, 2006.
- Office of Naval Intelligence (1943). "The Battle of Savo Island August 9, 1942". Combat Narrative. Publications Branch, Office of Naval Intelligence, United States Navy. Archived from the original on May 13, 2006. http://web.archive.org/web/20060513024409/http://www.ibiblio.org/hyperwar/USN/USN-CN-Savo/index.html. Retrieved May 17, 2006.
Further reading[]
- Custer, Joe James (1944). Through the Perilous Night: The Astoria's Last Battle. The Macmillan Company. ASIN B0007DXLUG.
- D'Albas, Andrieu (1965). Death of a Navy: Japanese Naval Action in World War II. Devin-Adair Pub. ISBN 0-8159-5302-X.
- Domagalski, John J. (2010). Lost at Guadalcanal: The Final Battles of the Astoria and Chicago as Described by Survivors and in Official Reports. McFarland. ISBN 978-0-7864-5897-4.
- Hammel, Eric (1999). Carrier Clash: The Invasion of Guadalcanal & The Battle of the Eastern Solomons August 1942. St. Paul, MN, USA: Zenith Press. ISBN 0-7603-2052-7.
- Hornfischer, James D. (2011). Neptune's Inferno: The U.S. Navy at Guadalcanal. New York: Bantam Books. ISBN 978-0-553-80670-0.
- Kilpatrick, C. W. (1987). Naval Night Battles of the Solomons. Exposition Press. ISBN 0-682-40333-4.
- Lacroix, Eric; Linton Wells (1997). Japanese Cruisers of the Pacific War. Naval Institute Press. ISBN 0-87021-311-3.
- Ōmae, Toshikazu; David C. Evans (Editor) (1986 (2nd Edition)). "The Battle of Savo Island". The Japanese Navy in World War II: In the Words of Former Japanese Naval Officers. Annapolis, Maryland: Naval Institute Press. ISBN 0-87021-316-4.
- Warner, Denis Ashton; Peggy Warner & Sadao Senoo (1992). Disaster in the Pacific: New Light on the Battle of Savo Island. Naval Institute Press. ISBN 0-87021-256-7.
The original article can be found at Battle of Savo Island and the edit history here.