| First Battle of Ypres | |||||||
|---|---|---|---|---|---|---|---|
| Part of the Race to the Sea on the Western Front of the First World War | |||||||
 The frontline at the beginning of "First Ypres" | |||||||
| |||||||
| Belligerents | |||||||
|
|
| ||||||
| Commanders and leaders | |||||||
|
|
| ||||||
| Strength | |||||||
|
French Army: 3,989,103 Belgian Army: c. 247,000[3] British Army: 163,897 men[4] Total strength: 4,400,000 | 5,400,000[5] | ||||||
| Casualties and losses | |||||||
|
French Army: 50,000–85,000 killed, wounded and missing[6] Belgian Army: 21,562 killed, wounded and missing,[6] British Army: 7,960 killed in action[6] 29,562 wounded in action 17,873 missing in action Total:126,957-161,957 |
19,530 killed 83,520 wounded 31,265 missing[7] Total: 134,315 | ||||||
The First Battle of Ypres, also called the First Battle of Flanders (French), was a First World War battle fought for the strategic town of Ypres in western Belgium in October and November 1914. The German and Western Allied attempts to secure the town from enemy occupation included a series of further battles in and around the West Flanders Belgian municipality.
The strategy of both the Allied and German armies is not entirely clear. The accepted and mainstream reasoning for the Ypres battle was the British desire to secure the English Channel ports and the British Army's supply lines; Ypres was the last major obstacle to the German advance on Boulogne-sur-Mer and Calais. The French strategy revolved around a desire to prevent German forces from outflanking the Allied front from the north. This was the last major German option, after their defeats at the First Battle of the Aisne and First Battle of the Marne. The Ypres campaign became the culmination point of the Race to the Sea. The opposing armies both engaged in offensive operations until the major German offensive occurred in mid-October, which forced the Allies onto the strategic defensive and limited to counter-attacks.
The battle highlighted problems in command and control for both sides,[Notes 1] with each side missing opportunities to win a significant decision early on. The Germans in particular overestimated the numbers and strength of the Allied defences at Ypres, and called off their last offensive too early. The battle was also significant as it witnessed the destruction of the highly experienced and trained British regular army. Having suffered enormous losses for its small size, "The Old Contemptibles" disappeared, to be replaced by fresh reserves which eventually turned into a mass conscripted army to match its allies and enemies.
The result was a victory for the Allies, although losses were particularly heavy on both sides. The battle was called "The Massacre of the Innocents of Ypres" but only 30% of the German casualties were young and inexperienced reserves, partly volunteers from German colleges and universities. 70% were active soldiers and older members of the Landwehr and reserve.
- As an example: the „Reserve-Infanterie-Regiment Nr. 211“ had:
- 166 men in active service
- 299 members of the reserve (former soldiers out of active service and between 23 and 28 years old)
- 970 volunteers (inexperienced - ages probably between 18 and 20 years )
- 1499 members of the Landwehr (former soldiers released from the reserve into the Landwehr and thus between 28 and 39 years old)
- 1 Ersatzreservist (enrolled, but still inexperienced)[10]
The battle completed the entrenchments of the "race to the sea" and inaugurated the static western front. Mobile operations would not resume until 1918.
Background[]
The Ypres campaign was the culmination of the first year of the Great War. After four months of heavy fighting and casualties (750,000 German and 995,000 French),[3] the German and Allied armies attempted one more breakthrough operation to win a decisive victory in 1914. In August, the Imperial German Army implemented the Schlieffen Plan. It invaded Belgium in an attempt to outflank the large French Army forces on the German-French border, capture Paris and encircle the French via an advance to the Swiss border. Unfortunately for the Germans, poor strategic planning had induced Great Britain into joining the war on the side of the Franco-Russian Entente. From the British perspective, the German invasion of neutral Belgium meant German capture of the Belgian channel ports, which would threaten British naval supremacy in the English Channel, North Sea and Atlantic Ocean.[11] Moreover, Britain had a tradition of fighting wars on the continent to maintain the balance of power.[12] A German victory over France (and the Russian Empire) could not be tolerated. As a result, Britain declared war.[13]
The War Cabinet committed its British Expeditionary Force, under the command of Field Marshal Sir John French, to guard the flanks of the French Army by advancing into Belgium and checking the German invasion. Fortunately for the Entente, the Germans underestimated the Belgian Army. Serious Belgian resistance and scorched earth policies slowed down the German advance considerably, contributing to the failure of the German plan.[14] Nevertheless, German numbers succeeded in gaining victories during the Battle of the Frontiers, forcing the Allies to abandon their original offensive strategy in the Alsace and Belgium. Owing to German failures in logistics, and the difficulty of command and control at that time, the French were able to pull their forces out of the potential trap, and redeploy them in time to defeat the Germans at the First Battle of the Marne. Unable to drive each other back, the Allied and German forces conducted a race to the sea in an effort to outflank each other and achieve a decision.[15] The race continued north until the opposing forces reached Ypres, a city inside the Belgian border.
Ypres was strategically vital. It was the last geographical object protecting the Allied ports at Calais and Boulogne-sur-Mer. The loss of these ports would have denied the shortest logistical supply route to Allied forces on the Western Front and would have had decisive strategic consequences.[16] For the German Army, Ypres was also vital. The collapse of its Ypres front would allow the Allied armies access to the flat and relatively traversable terrain of Flanders. Beyond the Ypres position, the Germans had no significant defensive barrier to protect the huge Ghent-Roeselare rail network axis, vital to German strategic and operational mobility in Belgium and the entire northern flank of their front. Such a collapse would also allow the Allies to target the German-held Belgian ports Ghent and Ostend.[17][18]
Forces involved[]
German Army[]


Albrecht, Duke of Württemberg, commanded the German Fourth Army
The German Army was the strongest in Europe in 1914, and by November 1918 had mobilised 13.2 million men (41.4 percent of the male population). In 1914, in anticipation of a short war, just 5.4 million were mobilised. A further 308,000 kriegsfreiwillige (wartime volunteers) did not wait for conscription.[19] The army itself could draw immediately on a pool of sufficiently trained men. Owing to pre-war military service, a large percentage of German soldiers had an adequate standard of training. Of the kriegsfreiwillige, just 25 percent were trained reservists. Of the German forces at Ypres, the majority were well trained and by no means, as the myth of First Ypres implies, were the German soldiers all student volunteers.[20]
Nevertheless, German mobilisation did not go smoothly. In August 1914, the Germans activated 31 trained infantry divisions to add to the 51 active divisions. In addition, four Landwehr and six Ersatz divisions were formed. On 16 August, six new reserve corps were created. Five of them, XXII Reserve Corps (containing 43rd and 44th reserve divisions), XXIII Reserve Corps (containing 45th and 46th divisions), XXVI Reserve Corps (containing 51st and 52nd divisions), XXVII Reserve Corps (containing 53rd and 54th divisions). Attached to these were the 9th reserve division, the Marine division and the 6th Bavarian Reserve Division.[21][22] Owing to the nature of mass mobilisation, the German Army struggled to equip its divisions. Helmets were obtained from the Berlin police and weapons were seconded from training units. By September, weapons shortages were so acute, captured Russian and Belgian small arms were being used to equip reserve divisions. This problem would afflict the British when raising Kitchener's New Armies.[21] Compared to regular divisions, the reserve divisions had only nine field artillery batteries instead of 12. The artillery personnel were not as well trained as in regular divisions. Moreover, they lacked telephones or means of communications. In the reserves, of those new to military life, 61 percent had no previous military training.[20]
The German order of battle at Ypres consisted of two armies. The German Fourth Army, commanded by Generalfeldmarschall Albrecht, Duke of Württemberg contained five Corps. The III Reserve Corps, under Generaloberst Hans Hartwig von Beseler. The Corps consisted of the 5th and 6th Reserve Divisions and the 4th Ersatz Divisions. XXII Reserve Corps, under Erich von Falkenhayn, contained 43rd and 44th Reserve Divisions. Von Kleist's XXIII Reserve Corps consistemd of 45th and 46th Reserve Divisions. Von Hügel Commanded XXVI Reserve Corps, comprising 51st and 52nd Reserve Divisions. General Carlowitz, and later General von Schubert commanded XXVII Reserve Corps, containing the 53rd and 54th Reserve Divisions.[22]
Rupprecht, Crown Prince of Bavaria, commanded the German Sixth Army
The German Sixth Army was under the command of Rupprecht, Crown Prince of Bavaria. This contained II Corps, commanded by Alexander von Linsingen, with the 3rd and 4th regular infantry divisions. VII Corps (13th and 14th Division) was commanded by Eberhard von Claer (later General of the Infantry) and General Gustav Hermann Karl Max von Fabeck commanded XIII Corps (25th Reserve Division and 26th Division).[23] Two further Corps, the XIX "Saxon" (24th Division and 40th Division) and XIV Corps (26th Reserve Division and 6th Bavarian Reserve Division), under Maximilian von Laffert and General Von Loden respectively.[24] During the battle, Fabeck took control of an ad hoc battle group (Kampfgruppe), Army Group Fabeck, containing XV Corps under Berthold von Deimling, which contained the 30th Division and 39th Division and II Bavarian Corps under General Von. Martini, containing the reallocated 26th Division from XIII Corps with the 3rd and 4th Bavarian Divisions. Group Gerok comprised the 3rd and 25th Reserve, 6th Bavarian Reserve Division and 11th Landwehr Brigade.[24] Two further Army Groups were also committed. Alexander von Linsingen's XV Corps was given (from Fabeck's Group) to Linsingen during the battle. Karl von Plettenberg's Corps, named after him, and contained the 4th Division, seconded from II Corps and a Guards Division. The Cavalry had four Corps'; I Cavalry Corps (Guards and 4th Cavalry Division), II Cavalry Corps (2nd and 7th Cavalry Division), IV Cavalry Corps (6th and 9th Cavalry Divisions), V Cavalry Corps (3rd Cavalry and Bavarian Cavalry Divisions) under Generals Richthofen, Marwitz, Lt-Gen. Hollen and General Stetten respectively.[25]
French Army[]


Ferdinand Foch, Commander of French Northern Armies during the Battle of First Ypres
The French Army was also prepared for the conflict. The expectation was that five to 13 percent of men would not be mobilised immediately. In the event only 1.5 per cent were absentees. A three-year term of military service had been introduced in 1913, two years training having been the norm since 1905. The 1911–13 cohorts (those born from 1891 to 1893) were serving when war broke out. The French called up the 1896–1910 cohorts in August 1914 and the 1914 cohort in September 1914. By the end of 1914 they had called up the 1892-5 (those born between 1872 and 1875) as well as the 1915 cohort. By the spring, 1915, 80 percent of all French males between the ages of 18 and 46 had been called up.[26] France eventually mobilised 45 percent of its male population. This was more than any other major belligerent. The French had also reduced grounds for exemption from military service. The French called up 82 percent of all eligible to serve in the last decade before the war. This was in sharp contrast to Germany, which called up only 59 percent. However, this was offset by German manpower reserves being much larger. The French initially fielded about one million men, which would reach 4,400,000 by the end of 1914.
The main field weapon of French artillery was the Canon de 75 modèle 1897 field artillery piece. The gun was used by both field and horse batteries and was capable of firing 12 to 16 shells per minute. The army deployed some 618 field and 20 horse batteries, each of four guns, with 21 6-inch howitzer batteries and 15 mountain batteries.[27]
The French Army at Ypres contained the Détachement d'Armée de Belgique, commanded by General Victor Louis Lucien d'Urbal. This consisted of the IX Corps (16th and 7th Cavalry Divisions, with the 7th and 18th Infantry Divisions) under Dubois; XVI Corps, under fr (31st, 32nd, 39th and 43rd Infantry Divisions); XXXII Corps under fr (38th, 42nd, 89th Territorial and 4th Cavalry Divisions as well as the Marine Fusilier Brigade); XX Corps under fr (11th and 26th Divisions); I Cavalry Corps under Conneau (1st, 3rd and 10th Cavalry Divisions), and fr II Cavalry Corps (87th Territorial, 5th and 9th Cavalry Divisions).[28]
Belgian Army[]
On 13 May 1913, in response to the political climate in Europe, the Belgian Army was to be increased to a strength of 340,000. This late move wasn't enough to enable the Belgians to reach a state of preparedness. The Army was still only 120,500 strong in 1914, of which 3,500 were gendarmes. A shortfall of 2,300 officers was also a problem. To maximise effectiveness, 65,000 senior citizens were to serve in static fortress regiments while 46,000 Civil Guard members were to maintain rear-area security.[29]
Unit composition in 1914 Infantry units equated to 14 regiments of the line, three regiments of light infantry, one Grenadier regiment, one regiment of Riflemen and one battalion of Rifle-Cyclists, and one Corps of the Gendarmerie. In the Cavalry, two regiments of Guides, three of Mounted Riflemen, and five regiments of Lancers were available. The Artillery consisted of three Field regiments, two Horse groups and three fortress groups. The Engineers contained just one regiment.[29]
The Field Army consisted of 120,500 regulars and 18,000 volunteers. This was divided into six large Divisions, each containing 25–32,000 men. Each Division had two or three brigades; each brigade had two infantry regiments of three battalions each and one machine-gun company. Divisional artillery consisted of three batteries. The Cavalry regiments were mounted Rifles or Lancers. An aviation section was also available to aid with reconnaissance. The Army had also one Cavalry Division available. It had two brigades, instead of the planned three.[30]
By 15 October 1914 the Belgian Army had suffered high casualties in comparison to its small size. By the time it took up its position in Flanders, it had suffered 9,000 killed, 15,000 wounded and several ten of thousands captured, missing or forced to flee into the Netherlands into internment. The total available manpower had been reduced to 80,000 men, of whom only 48,000 still carried their rifles, supported by 184 machine guns and 306 artillery pieces.[31]
British Army[]


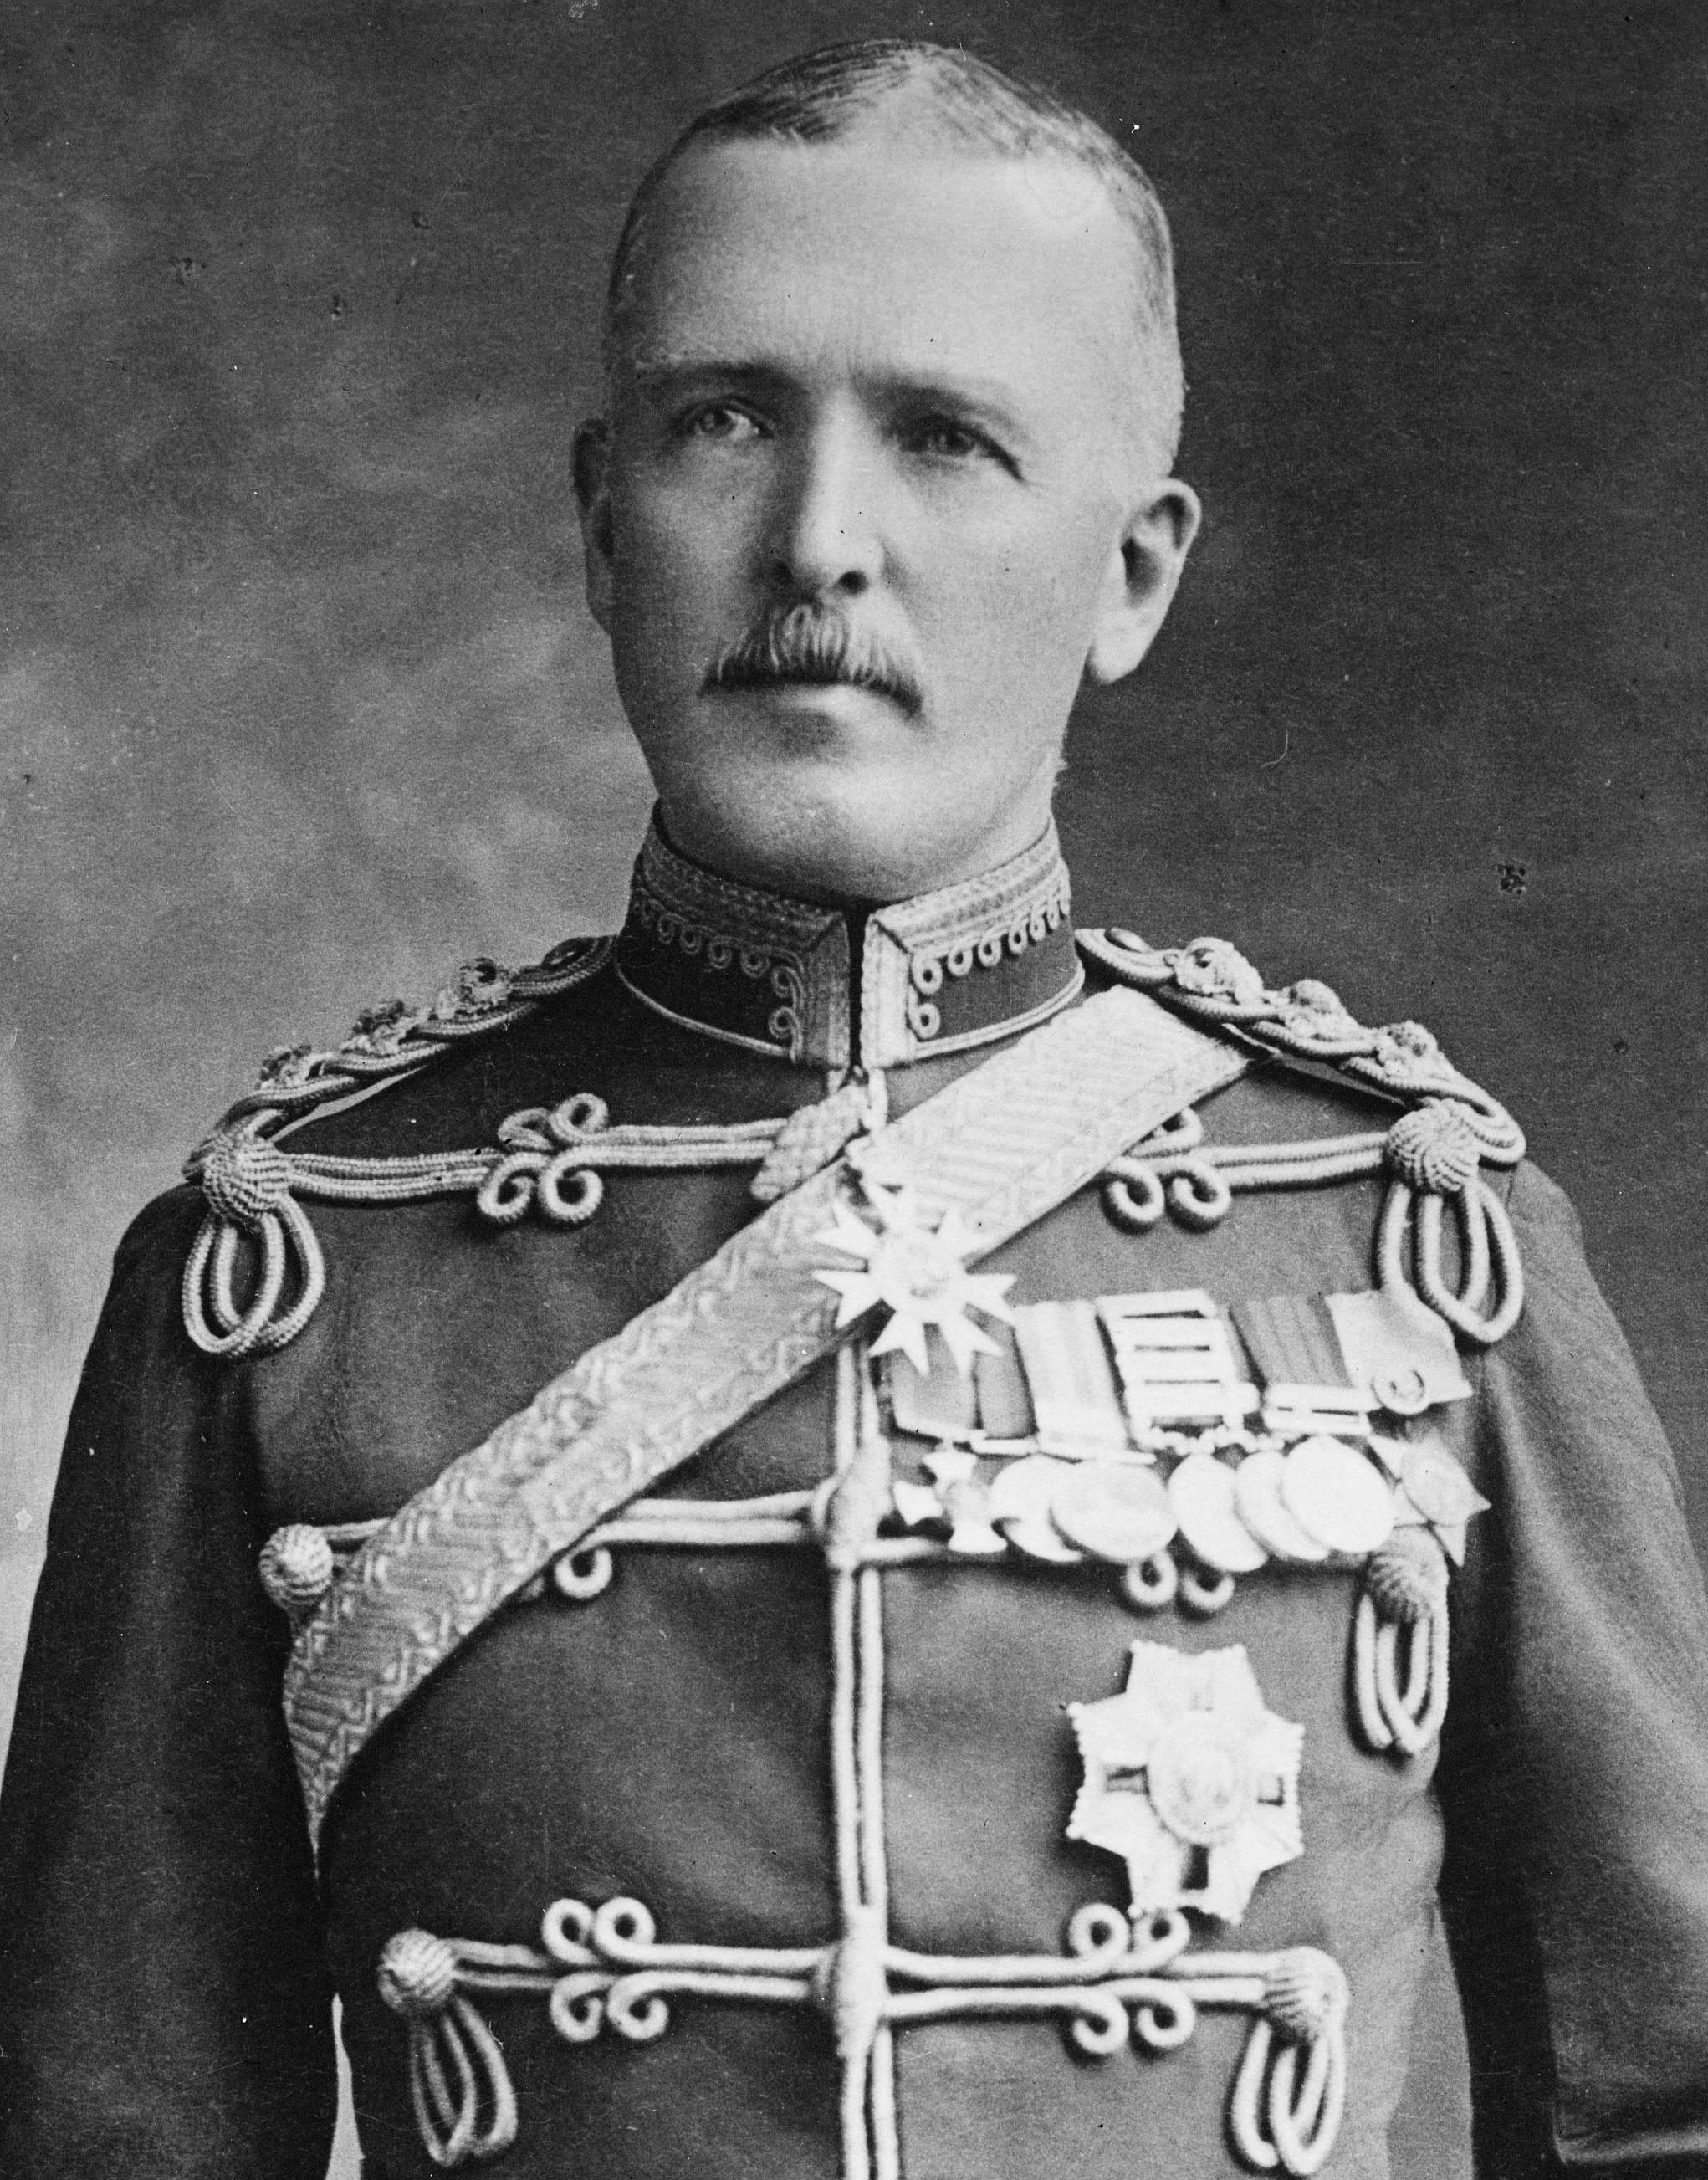
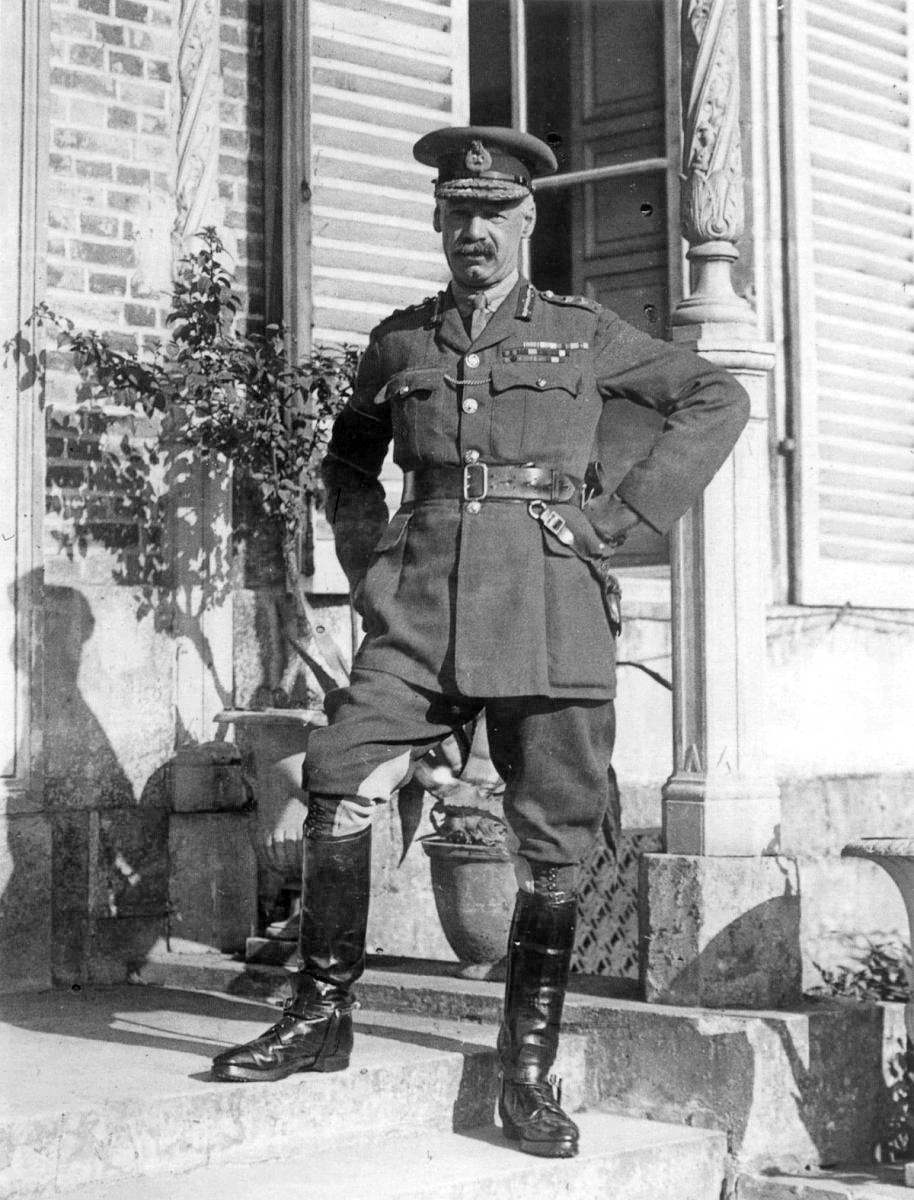
Sir John French (later First Earl of Ypres), commanded the British Expeditionary Force
The British Army would be the smallest field force of the four combatants at the First Battle of Ypres.[3] The British foresaw their effort much the same as in the Napoleonic Wars; maintaining dominance of the seas and providing financial support and a small highly trained army to supplement their Continental allies. Although equipped to fulfill the role set for it, the British Army found itself fighting an industrialised type of war that British Armies had never fought and had never prepared to fight against a formidable opponent such as Germany.[32][33]
The Army took second place to the Royal Navy. In the decade before the First World War, the number of service personnel was reduced by 16,000 as the maintenance of a large regular or standing army was expensive and therefore politically unacceptable. It was decided that just 71 battalions would be needed for a European Expeditionary Force in six divisions numbering 154,000 fighting men.[34] By 1 May 1914, it was still 10,932 fighting men short of its peacetime establishment.[35]
The British Army units could field just 60 or possibly 70 percent full-time regulars and reservists. The rest had to be formed from the territorials. 18 percent of territorials (seven percent) had combat experience, mostly against rebels in colonial conflicts. 51,647 men volunteered in August 1914, 174,901 by 5 September, just eight weeks prior to Ypres.[36] Some 4,192 of regular soldiers had more than 15 years experience, 46,291 having just under two years of service.[37] The British Army fielded just 4,000 gunners and 76 guns per division. Each battalion of infantry contained two machine guns, twelve battalions in each division of 18,073 men. The Cavalry division contained 9,000 men, 24 machine guns and the same number light artillery pieces.[37]
British NCOs and soldiers were highly trained. British infantry were intensively trained in rapid aimed rifle fire, being expected to fire 20 rounds per minute; this produced soldiers highly skilled in musketry.[38] Usually "hand picked", the regular army was highly competent but contained no nucleus of reserves or strength in depth to sustain losses.[39]
Further British weakness in numbers and methods extended to artillery. The Royal Artillery lagged behind the Germans and French in the early stages of the war. The British Army failed to apply the lessons of the Boer War and the Russo-Japanese War in the field of artillery. Indirect fire was largely ignored, British artillery existed only as a support weapon, or auxiliary, of the infantry. It was the superiority of rifle fire that was considered decisive. Light artillery guns, allowing for quick mobile actions were preferred but would be prove to be inadequate in the coming trench warfare.[40] Just 54 Field Artillery guns and eighteen Howitzers were permitted per division. There was no Corps level artillery control, no reserves in case of heavy losses and very little doctrine, appropriate numbers of staff, or communications for effective artillery-infantry cooperation.[41] Given the lack of Treasury support, there is little the army could have done to rectify these problems before the war.[42]
The British order of battle extended to The British I Corps under the command of Douglas Haig contained the 1st Infantry Division under the command of Major-General Samuel Lomax and 2nd Infantry Division under Major-General Charles Carmichael Monro. II Corps under the command of Horace Smith-Dorrien contained the 3rd Infantry Division and 5th Infantry Division under Generals Charles Fergusson and Hubert Hamilton. III Corps under the command of William Pulteney Pulteney contained the 4th Division (under H.F.M. "Fatty" Wilson – not to be confused with the much more famous and politically influential Henry Hughes Wilson – who had recently replaced Thomas D'Oyly Snow in command after he had been injured[43]) and the 6th Infantry Division under J. L. Keir. The Cavalry Corps was led by General Edmund Allenby and contained the 1st Cavalry Division (H. de Lisle) and the 2nd Cavalry Division (H. Gough). IV Corps was commanded by Henry Rawlinson and contained the 7th Division (Thompson Capper) and the 3rd Cavalry Division (Julian Byng). Unlike other divisions, the 3rd Cavalry possessed only 12 field artillery pieces.[44] The weakest formations were in James Willcocks' Indian Corps armed with the 3rd Lahore Division (H.B.B. Watkis and 7th Meerut Division (C.A. Anderson).[45]
Battle[]
The race to the Sea (September–October)[]

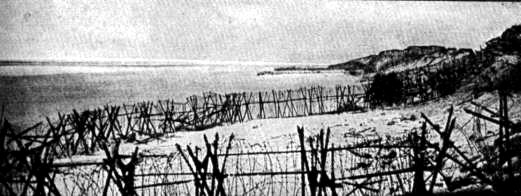
The "End of the Line": the Western Front reaches the sea near Nieuwpoort, Belgium.
The German armed forces faced a crisis in light of the failure of the Schlieffen Plan to deliver a six-week victory in and over France by September 1914. Despite the German success in Belgium, and against the Russian Army at the Battle of Tannenberg, the Austro-Hungarian check at Galicia and the German defeats at the First Battle of the Aisne and the First Battle of the Marne convinced the German General Staff to insist on a swift resolution in the West. But they were not optimistic.[46]
Erich von Falkenhayn, the new Chief of the German General Staff, was confident that a decisive victory was still possible. On 15 September 1914, he began drawing up operational plans for the withdrawal of the German Sixth Army from the stalemate in Alsace and Lorraine to the north of the German First Army. Its flank was wide open between Compiegne and Antwerp in Belgium. Some (who was never explained), wanted to use the German Sixth Army at Verdun but Falkenhayn opted to commit it to a smaller version of an envelopment of the Allied left. The German First, Second and Seventh Armies were ordered to consolidate and shorten their lines by a partial withdrawal, while the Third, Fourth and Fifth German armies were to conduct holding attacks in Alsace to prevent the French withdrawing forces for operations in the north. Lt General Karl von Bülow later claimed the army commanders were reluctant to release formations for operations further north.[47] Karl von Bülow and Oberst Tappen (Senior Operations Officer) pointed out that the French had the advantage of superior interior lines and would win a race to position their forces for a flanking manoeuvre. They favoured an attack between Soissons and Reims further south. The state of the railways in occupied Belgium and France was poor and just one line was open. Falkenhayn wavered and allowed Bülow to conduct an offensive at Soissons-Reims on 16 September. It was repulsed. Falkenhayn ordered the manouevre to the north on 25 September and the move of the German High Command (Oberste Heeresleitung – OHL) from Luxembourg to Mézières.[48] Despite this, Falkenhayn delayed until the 6 October, until finally committing himself to a drive toward Flanders and the Channel Ports, after the German Sixth Army had been halted around Arras. Falkenhayn would secure his own lines of communication in Belgium by completing the sieges of Antwerp, Zeebrugge and Ostend by 10 October, then strike West. Although sound in theory, in doing so Falkenhayn had not formulated any clear long-term strategic plan should his Flanders offensive fail. He relied on achieving a breakthrough as soon as possible with forces as strong as possible.[49]
The German intent did not escape the notice of the French. The French Commander-in-Chief Joseph Joffre had recognised Falkenhayn's intentions to launch holding attacks and try to expose the open flank north of Arras. Joffre withdrew French units before German spoiling attacks began. These formations were positioned north of the Oise, as part of General Noel de Castlenau's French Second Army on the Somme on 17 September, than as a part of Louis de Maud'huy's French Tenth Army further north on 2 October.[50] Unable to deal with modern day operations, the ageing Joffre had wanted to name Ferdinand Foch as his successor. Other Generals, suspicious of the Foch-Joffre 'Axis' ensured Foch was merely named his Assistant Chief of Staff on 4 October.[51] On 11 October Foch became the commander of the French Northern Army Group. He had no formal powers but was authorised by Joffre to coordinate with the Belgians and British.[51] Foch intended to move the BEF to the north from the Aisne. This would ease logistic concerns for the British Army, being nearer to the Channel Ports.[52]
The exit of the BEF from the interior of France meant the French had to fall back on Aisne. The railhead of Lille was also lost to German attacks because the rail system had been made available to the British and the French were unable to send reinforcements. Lille's loss disrupted railways for ten days.[53] The railways were essential to winning the race to build up in the north. Some 70 Allied divisions totalling 800,000 men had been carried north between 14 September and 17 November ranging from 40 to 350 miles in 6,000 train movements.[53] British strategic intentions to safeguard the French Channel Ports, secure Ghent and the Belgian ports and lift the Siege of Antwerp did not share common ground with the French strategic interests.[54] Without French cooperation, the attempts to relieve these objectives were frustrated.[55] The British blamed the failure to prevent the fall of Antwerp on the French.[56] Sir John French ordered the British 7th Division and 3rd Cavalry Division under Henry Rawlinson's newly created IV Corps[57] (the only British Army Corps in Flanders) to hold Ghent and Bruges as long as possible and then retire to the Dunkirk-St Omer line, while the remaining Corps were brought up from the south.[58]
Rawlinson reached Ypres on 14 October. Seven days earlier, on 7 October, German cavalry had briefly passed through Ypres. The Germans levied 70,000 francs for the town’s good behaviour. The Germans destroyed the telegraph system but Rawlinson's 7th Signal Company was able to repair one line the Germans had missed. The Germans were not to enter the town again.[59]
Battle for the initiative (8–18 October)[]

Henry Rawlinson. His caution saved the British 7th Division from destruction on 17 October
The plan of attack was decided by Field Marshal French and Foch at a meeting on 8 October. French wanted to conduct an offensive along the coast in a north-east direction in concert with the Belgian forces. French was initially suspicious of Joffre's appointment of Foch, suspecting his job was to prevent the British developing a campaign with the Belgians, and tying the British to the planned French offensive. Foch, though junior to French, was familiar enough with the British Commander and was able to gain his cooperation. Foch had received a directive from Joffre, that French combat power was to be used on the German line south of Arras. Foch, keen to ease the threat in the north, managed to get Joffre to agree to an advance from the Ypres-Nieuport to the Roulers-Thourout line, driving a salient between Generaloberst Hans Hartwig von Beseler's German Fourth Army, which was in danger of becoming detached from the main bulk of the German forces in Flanders. Should the German Fourth Army be isolated, Foch could break the German front on the Lys. If another French attack between Brimont and Craonne should also succeed, the pincers could bring about decisive results.[60]
Foch's plans ignored the increasing concentration of German forces opposite the BEF, and did not inform French of their presence. Instead, he encouraged French to join in the offensive by appealing to French's emotions that the British Army did not retreat. When agreed, the operational plan called for Maud'huy's French Tenth Army to link with the British at Vermelles. II Corps under the command of Horace Smith-Dorrien would advance to La Bassée, the III Corps under the command of William Pulteney Pulteney was to secure Armentieres. The centre of the two Corps advance was protected by the I Cavalry Corps under Conneau (1st, 3rd and 10th Cavalry Divisions) and fr II Cavalry Corps. Cavalry Corps was led by General Edmund Allenby and was to capture Messines Ridge and Wytschaete Ridges south of Ypres, while Rawlinson's IV Corps would capture Ypres. This would connect the Belgian, British and French forces on the Yser.
The Allied forces were ignorant as to German intentions near Ypres. The Germans had committed three Cavalry Corps to the area. IV Cavalry Corps under Lt-Gen Hollen had entered Ypres on 7 October but fell back from its exposed position. XIV Corps under Maximilian von Laffert and XIX (Saxon) and XIII (Wurttemberg) Corps, all a part of the German Sixth Army under the command of Rupprecht, Crown Prince of Bavaria were moving in position behind the Cavalry. The German Cavalry line was extended Menen to Armentieres to link with the 14th Division operating around Lille, captured on 12 October. As each side advanced, contact battles were fought along the northern front for the next seven days. Later that evening on 12 October, two notable casualties occurred. A young officer of the 1st Battalion Royal Warwickshire Regiment (Haig's I Corps), Bernard Law Montgomery, was shot through the lung by a sniper and survived owing to a Captain Phillips and Private H.W Jackson of the 21st Field Ambulance unit. During this time II Corps suffered a serious loss, when on 14 October Hubert Hamilton of 3rd Division was killed. Despite warnings and in an act of recklessness, he walked down the Richebourg Road which was being swept by shells.[61][62]
The British II Corps continued to push eastward but over 11–15 October the British advanced three miles for 2,000 casualties. German counter-attacks were determined and pressed home day and night and Smith-Dorrien lacked reserves. As Smith-Dorrien’s Corps struggled toward La Bassée, Pulteney and Allenby were advancing on the Armentieres-Wytschaete line. The Buses (motor vehicles) promised by the French had not materialised until 12 October, so the advance was slow and II Corps could not close with III Corps as intended. Pulteney was also criticised for being too far from the front, thus missing a chance to outflank the German IV Cavalry Corps by taking Mont des Cats to the enemy rear. In another probing action near Kemmel, British forces captured a dying Prince Maximilian Friedrich Wilhelm Georg Eduard von Hesse. Overall only limited advances were made.[63]


.jpg)
Falkenhayn ordered the Fourth and Sixth Armies to attack on 19 October. The first engagement of the battle took place on 20 October
French pushed for advances to Menin. IV Corps was ordered to take the town on 17 October. Confusion in the wording of the order prevented Rawlinson from moving quickly. It was not until 13:45 in the afternoon that a liaison officer from GHQ passed on the order to take the town, not merely advance toward it. Royal Flying Corps reports revealed German forces seven miles east of Menin, near Courtrai so Rawlinson delayed the assault.[64]
Despite receiving strong criticism from John French, Rawlinson’s decision had proved fortunate. With his attack just about to commence, large forces of German infantry converged on Rawlinson’s flank from the east. Rawlinson conducted a skilful retreat with only 150 casualties, saving the 7th Division.[65] The German concentrations at Menin, released by the German capture of Antwerp, which allowed the German Fourth Army, under Falkenhayn’s direction to concentrate on a breakthrough at Menin in order to overrun the Channel Ports before the Allies had completed their own concentration in Flanders. Substantial German forces were arriving by train at Brussels ready for the assault. Falkenhayn faced a dilemma; Austro-Hungarian Supreme Command and Paul von Hindenburg, Commander-in-Chief of German forces on the Eastern Front, demanded reinforcements. Falkenhayn decided that there could be no decision in the East but he could force one in the West. He was aware it was risky to withdraw experienced formations from anywhere else on the front, so Albrecht’s Fourth Army was given four of the new reserve Corps (XXII, XXIII, XXVI and XXVII Reserve Corps). Later, Beseler’s III Corps was also handed to Albrecht’s command. With the German Sixth Army on the defensive, the Fourth Army advanced to the Courtrai-Thourout line, some 10–17 miles from the French (depending on what part of the line the units were). Had Rawlinson ordered the advance of Thompson Capper's 7th Division to Menin, it would have been cut off and destroyed.[66]
The French had continued their advance eastward. Maud'huy's Cavalry had reached Roulers but found themselves confronted with an enormous concentration of German infantry. The German offensive westward had begun on 19 October 1914. RFC aerial reconnaissance had picked up German forces moving toward Menin at 10:30. Rawlinson abandoned any attack and ordered defensive positions to be established on the Zandvoorde-Kruiseecke line. Some elements, such as the 22nd Brigade of the 7th Division was already heavily engaged and conducted a fighting withdrawal with difficulty. The German Fourth Army advanced six to nine miles, formations of the German XXVI Corps capturing Roulers from the French, despite severe resistance. The British forces were now overextended by 25 miles. John French refused to break contact with the Belgians to the north to shorten the line and free reserves. Douglas Haig's I Corps which had detrained, was positioned to the north of Ypres, where French was convinced the German thrusts would be weakest.
When informed that there were five German Corps north of the Lys, French refused to believe it. French confronted Colonel John MacDonogh GSOI of GHQ’s Intelligence Section. MacDonogh threatened to resign when French called them ‘celestial’ divisions. The Operations Staff, George Harper tried to convince MacDonogh to give French only the kind of information that suited his preconceived ideas and failed, Intelligence played a critical part during the Battle for Ypres. Fifty radio messages were intercepted between September and October 1914. These provided warnings of six large German attacks during Ypres. Spy networks were also established behind German lines, gathering intelligence on German movements.[67] Despite the presence of formidable numbers of German formations, French ordered I, II and III Corps to coordinate with each other to take Menin. Haig's I Corps advance was to be covered by Rawlinson's IV Corps. Thus far, British casualties had been light. Just 4,500 were recorded between 9 and 18 October. This was to change on 20 October 1914, when both the Fourth and Sixth German Armies were ready to launch a joint offensive, north and south of Ypres designed to encircle the BEF.[68]
German assault begins (19–21 October)[]

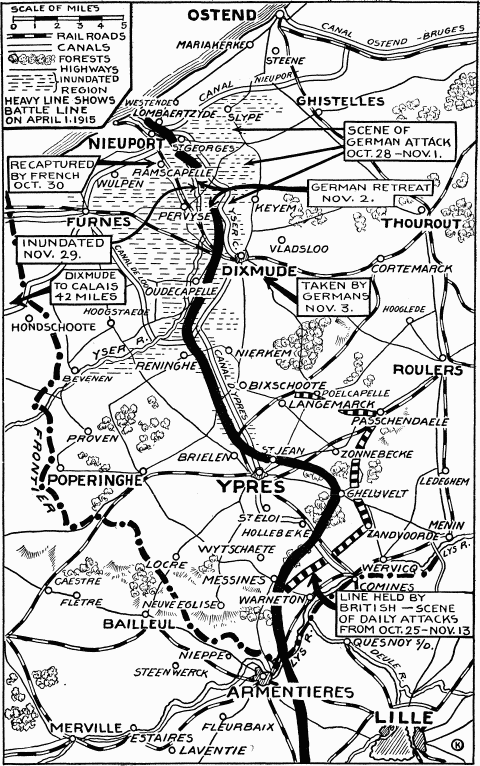
A map of the battles in and around Ypres October–November 1914
The German assault began on the morning of 20 October. Haig’s I Corps was en route to Ypres, arriving to the west of the town during the day. Smith-Dorrien’s Corps, to the north, was left facing the full force of five German corps of the German Fourth Army. The initial German attack, owing to French’s orders to advance, caught II Corps without any defensive preparation. At Le Pilly, the 2nd Royal Irish Regiment of the 8th Brigade 3rd Division was cut off and surrounded in Le Pilly after which they surrendered. During the course of its doomed defence, one battalion lost 257 of 578 ranks, including its CO (Commanding Officer). Some 290 of the casualties were Prisoner of War. The operations staff of 3rd Division had recognised it was too far forward and intended to pull it back. After heavy fighting, II Corps was becoming exhausted, particularly 5th Division, who were forced to abandon La Basse. II Corps received the welcome news that night, that I Corps had just reached Ypres.[69]
Near Ennetieres, the 2nd Sherwood Foresters of Brigadier General Walter Norris Congreve VC, 18th Brigade, 6th Infantry Division under J. L. Keir were destroyed in a retreat to La Valle. German formations approached in the after noon, and the German 26th Division of XIII Corps, supported by the German 25th Reserve Division at dusk, caught the British infantry in shallow trenches. In a two-night battle, the Foresters were overwhelmed by superior enemy numbers. In the retreat to Le Valle, some survivors were intercepted by advanced German elements. In the confusion, German formations were mistaken for being British reinforcements. The entire battalion was lost, some 1,119 casualties were taken.[70]
A further German attack on 21 October, stronger than the one that had destroyed the Royal Irish, developed against 3rd Division. It was ordered to retreat to a more suitable, less exposed defensive line that evening. This began a two and a half-mile retreat to a hastily prepared line on 22–23 October. Smith-Dorrien had not been pleased with the ‘spirit’ of the battalions of 5th Division during the fighting. He expected the COs to lift morale, something which he considered vital if they were to repel further attacks. The retirement of the 5th was covered by the 3rd Lahore Division (H.B.B. Watkis) of James Willcocks' Indian Corps. Smith-Dorrien was given orders that these were operational reserve only, and was not to engage them unless there was no other recourse.[69] Elsewhere on 21st, 12th Brigade under Brigadier Aylmer Hunter-Weston succeeded in inflicting heavy casualties on German infantry attempting to take Le Gheer, some five miles due south of Ypres, near the French border. It was briefly lost, but secured by dark, when 1st Sommerset Light Infantry and 1st East Lancashire Regiment recaptured the ground lost. Some 160 German prisoners were taken. German tactics, of massing in columns, suffered severely. Towards the end of the engagement, there were clear signs that they were changing this tactical fault. German infantry began to advance in small 'blobs' or 'swarms'. The Germans succeeded opening a gap on the 19th Brigade's left flank at Le Maisnil, which was partially closed by midnight.[71]
The German attack and penetration had threatened the left flank of Major-General de Lisle's 1st Cavalry Division. Despite the thinning of its ranks, it held its position on the Messines ridge. Gough's 3rd Cavalry Brigade of his 2nd Cavalry Division was shelled out of its positions at Kortewilde. The line was withdrawn to Hollebeke Chateau. Confusion in the given orders, meant the units interpreted Gough's order to retreat to this new line as a general retreat order beyond Hollebeke Chateau. Once this was realised, Gough ordered an immediate counter thrust to recapture any lost ground. The attack succeeded with little loss against the German Cavalry Corps. Lt-Gen. von Hollen, given command of the Cavalry Corps after his performance commanding German IV Cavalry Corps on 20 October, was dismissed and replaced by General von Marwitz. The 6th Cavalry Brigade and Capper's 7th British Division moved to cover the gap that threatened Gough's left flank.[72]
The 5th Division were now overstretched, covering some five and a half miles of front. The division's line was bent at right angles around nl and it had few entrenching tools to increase the strength of its position. Moreover, it was positioned and only partially concealed at the foot of the German-held ridges at nl and Passchendaele. The inexperience of the Division and its GOC, meant that it did not recognise these failings. The Germans succeeded in breaking through the British line at Poezelhoek, on the linking point of 20 and 21st Brigades. Nearby at Polderhoek, the 2nd Royal Scots Fusiliers held on against heavy attack. By the afternoon, I Corps was finally advancing on the north flank of IV Corps, easing the situation. Capper was able to spare units to cover the gap created by the retreat of the 3rd Cavalry Brigade. During the course of the day's fighting, there was only one minor retreat; the 22nd Brigades withdrawal from Zonnebeke Chateau.[73]
Haig’s I Corps, endeavouring towards Thourout in an effort to adhere to French’s desire for offensive action, found German resistance too strong to make any gains. John French’s belief that only one German Corps opposed Haig, the French Cavalry Corps was forced back to the Yser in the face of strong enemy concentrations, on the left of Haig’s 1st Division. 2nd Division did not fare much better, advancing some 1,000 – 2,000 yards before being stopped by enemy artillery. The retreat of the French Cavalry was forced by the German 46th Reserve division of General von Kleist’s XXII Reserve Corps. The CGOC of the 7th French Cavalry Division refused to obey the order, and conducted a fighting withdrawal whilst safeguarding 1st Divisions left.[74]
RFC reconnaissance was impossible owing to the cloud and general weather conditions. Nevertheless, the amount of opposition and German prisoners indicated the German forces were concentrating against the BEF. German Fourth Army’s XVII Reserve Corps (Carlowitz) opposite IV Corps, and elements of its XXIII and XXVI Reserve Corps opposite I Corps. The French and Belgians were assailed by elements of XXIII Corps, III and XXII Reserve Corps. To the south of Ypres, the German Sixth Army deployed VII Corps against Smith-Dorrien’s II Corps and its XIII Corps and XIX (Saxon) Corps engaging III British Corps and Conneau’s French Cavalry Corps. The German I, IV and V Cavalry Corps was opposite Allenby’s Cavalry Corps. At this point, seven and one-third British divisions, reduced by fighting, were holding a front of thirty-six miles against eleven German divisions, eight of which were fresh, and eight cavalry divisions. French finally accepted offensive operations were impossible under present conditions, and issued a general order to entrench. At the same time, the Germans did not appear to have known about the BEF weakness in numbers and its stretched position made it vulnerable to a concentrated attack, on most part of the line. The ferocity of the British defence had convinced the Germans there were strong Allied entrenched position at Ypres occupied by specialised formations. In fact, there were only small groups of infantry spread thin, with trenches no more than three feet deep, without wire or dugouts. So sparse was machine gun and artillery fire, the only way to cover gaps in the line was with crossfire.[75]
The Langemarck legend (22 October)[]

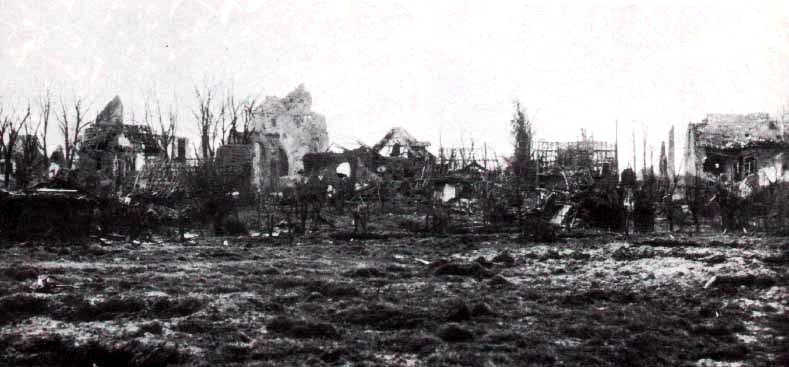
Langemarck was destroyed during the 1st Divisions repulse of the German reserve infantry on 22 October. Stories that German student soldiers marched into battle singing songs are myth, although heavy casualties, owing to inadequate tactics, were suffered
The 22 October the legend of Langemarck came into being. According to a German OHL communiqué on 11 November 1914, in the action of 22 October 1914, German soldiers had marched singing "Deutschland, Deutschland über alles, über alles in der Welt" as they went into battle suffering heavy losses. The battle actually took part at nl. But German propaganda chose the more Germanic sounding Langemarck as the site of the battle. According to regimental histories the song was “Wacht am Rhein”, and it was sung only to identify other units in the heavy mist. Several German regiments (206th Reserve Infantry Regiment and 204th Reserve Infantry Regiment) sang this in battle when attacking 1st Division. Throughout 1914 battles, regimental histories made constant reference to recognition songs. German casualties were heavy in assaults on the 1st division. Some German units, over several days fighting, may have lost 70 percent of their effectiveness to British rifle fire.[76]
Whereas John French resolved to maintain the defensive, in the south, the French under the newly promoted 'Commander of the North' General Victor d'Urbal, ordered French forces to counter-attack against the German XXIII Corps encroaching on Dixmude, a town east of Nieuport and south of Ostend. To do so, de Mitry's Cavalry Corps and the 42nd French division and the Belgian Army Detachment, renamed the French Eighth Army in November, were to pass through British 1st division lines. The attack failed and the French were driven back through British lines between Langemarck and Steenstraat. The advancing German XXIII Corps came into contact with the unsupported British division, and they shelled Langemarck heavily. The town was destroyed. The 5th Brigade of the 2nd British Division pushed into the gaps created by the retreating French and succeeded, through unsupported rifle fire, in repulsing German infantry attempting to overrun the town. The Germans made a final attempt that night, setting farms alight to help direct their artillery fire. But they did so only 50 yards form British trenches. The German attack, so close to British infantry positions, was a disaster. Early in the morning, counter-attacks by ad hoc British battle groups retook lost ground and releasing prisoners taken during the German assault and capturing 800 Germans. Almost 500 Germans had been killed in exchange for 47 British dead and 187 wounded. To the right of 2nd Division, enemy formations attempted to seize Becelaere (Beselare). RFC aerial reports spotted the approach, and German columns advancing in open formation were shot down in large numbers by 21st Brigade's defences.[77][78]
The arrival of increased French reinforcements and German losses convinced the German operations staff a breakthrough in the immediate future was unlikely. The arrival of Grossetti's French 42nd division, which joined the Belgian Army at Nieuport, and the 17th and 18th French divisions of the French IX Corps under General Dubois which was arriving west and south of Ypres. In order to relieve the under-pressure I Corps, d'Urbal and Foch agreed with future Chief of the Imperial General Staff (CIGS) Henry Wilson, who was then Deputy Chief of Staff to the BEF and very influential in Anglo-French relations as he spoke French, to launch a general offensive. The Belgians and 42nd division would advance eastward form Nieuport with the support of British naval gunfire. The Dixmunde garrison would take Thourout and Guignabaudet's 17th division, with two of de Mistry's Cavalry divisions towards the rail hub at Roulers in order to reach the Passchendaele-nl line. Owing to German offensive operations, the offensive was delayed.[79]
German pressure in the south (23–24 October)[]
German pressure on Pulteney’s III Corps started to commence on 23 October. The towns of Escobecques, Englos and Capinghem, some 19 miles south of Ypres and the focal point of the Allied right flank, came under sustained attack. The III Corps were so short on reserves, that even local counter-attacks were impossible given the level of German activity. There were no continuous lines either, and Platoons, the lowest tactical unit, were spread thin. Pulteney ordered all ground to be entrenched quickly, the lines straightened to provide continuous cover from flanking manoeuvres. Support points were erected in the rear as staging points for local reserves to reinforce the lines.[80] 1st, 2nd and 7th division came under intense attack, 1st division alone losing 1,006 casualties between 22 and 24 October. The French commander, under Dubois, decided on reinforcing the line during the night, Guignabaudet's division taking over 2nd division's position, which then went on to support 7th division east of Ypres. d'Urbal, like French before him, had every intention of continuing an advance on 24 October, assuming the Germans were poorly equipped and led formations. The French forces would also relieve 2nd division so the whole of I Corps could participate.[81]
Like Smith-Dorrien's II Corps, Pulteney's III Corps was forced to conduct a two-mile retreat. Edmund Allenby's Cavalry Corps, of some 9,000 men, were forced back by German 26th Division 24,000 strong units to the St Yvres-Messinies-Hollebeke line. The inefficiency of the Artillery Corps now also became apparent. The 2nd Cavalry Division under Hubert Gough occupied the east edge of the Messines-Wytschaete ridge. He had available some eighteen 13 pndr artillery. Gough could have mounted an effective defence, but the buffer springs had broken on most and the lack of any repair shops, spares or a large logistical tail (which the army would possess in 1918), meant Gough was forced to conduct a defence in a favourable position, but without artillery.[70] The other British Corps, the Is and IV Corps under Generals Haig and Rawlinson were forced to hold their respective lines at nl-Poperinghe and Zandvoorde-Langemarck. I Corps was covered, to some extent, by IV Corps' 2nd Infantry Division under Major-General Charles Carmichael Monro. 2nd Division was deployed behind IV Corps' 3rd Cavalry Division underJulian Byng. 1st Division under the command of Major-General Samuel Lomax was placed behind the 2nd Division, creating some strength in depth.[72]
While John French continued to believe that there nothing but Landwehr Divisions, II and III Corps came under intense pressure. Pulteney's III Corps was assailed by two German Corps on a 12-mile front. Some Brigades' battalions were broken up to use a stop-gaps elsewhere. Until the 21 October, some Brigades had been holding as much as two miles with a single line of men, a few strands of wire 25 yards in front of its positions and a field of fire which never exceeded more than 400 yards.[72]


Polygon Wood was the scene of several major battles in 1914 and 1917. It was here that the British 7th division decisively halted the German advance to Ypres on 24 October 1914.
The centre: Polygon Wood (24–31 October)[]
On the morning of 24 October, d'Urbal ordered the French 7th Division, supported by the British 2nd Division, to advance between Zonnebeke and Langemarck. However, 2nd Division had been heavily engaged by German units trying to push into Polygon Wood, so most of the early advances were made by the French. Despite advancing over open terrain where the Germans held good observation positions, they made good progress. But on their flank, continual attacks on the 2nd Division meant the British were unable to take part. The wood, lying just over two miles due east of Ypres, was the only geographical barrier to a German assault on Ypres itself.
In the wood, the 21st Brigade's 2nd Wiltshires were left isolated, having not received any order to retire to the wood's western end. It was overwhelmed by three German battalions. Of over 450 men, less than half, 200 men, escaped death or capture. To stop the German advance into the wood, barely two miles due east of Ypres, and a few hundred yards south of Zonnebeke, were the only British reserve, the Northumberland Hussars.[82] It was the first territorial unit to see action and it lost 300 killed. The inexperienced Germans seemed unaware that they had opened a critical hole in Capper's 7th Division defences. His Headquarters Staff, supplemented with cyclists, clerks, cooks and officers servants, were even considered for deployment to make a last stand at the wood. Communications were difficult, an indication of the technology of the time, but were made worse by German shelling which succeeded in disrupting cables from division headquarters to the 7th Signal Company's Cable Wagons at the frontline. The arrival of the 2nd Division's 5th Brigade, which engaged in hand-to-hand combat, routed some elements of the enemy and stabilised the line.[83]
Defensive operations on the central part of the front thus far had cost 7th Division 2,820 casualties in three days. The soldiers would remain there for longer than the week already spent. Many were tired, unshaven, unwashed and facing an enemy superior in number. Falkenhayn met his army commanders Albrecht and Rupprecht on 23 October and informed them that German operations would stop if more immediate success was not forthcoming. German forces had already taken heavy casualties and the loss of NCOs was reducing the effectiveness of the Reserve formations. Rupprecht's Chief of Staff, German Sixth Army, Krafft von Delmensingen, proposed reducing the front of the Sixth Army and halting the attack on Ypres to move further north and concentrate on the Belgian and French. Accordingly, the German Fourth Army, on 24–25 October, brought up 350 mm and 420 mm siege guns to bombard the ports and fortified positions along the northernmost Allied front. The French at Dixmude repulsed fifteen attacks in five hours, while the Belgians repulsed the attempt by German III Reserve Corps of Beseler to cross the Yser at Nieuport. Beseler achieved this with the help of XXII Corps, which assisted him. However, Besler was unable to advance any further, and was checked by the French 42nd Division, which arrived to assist the Belgians, who were operating at their limits. By morning on 25 October, Dixmude had been taken by the 43rd Reserve Division with the help of German artillery firing 20–30 shells a minute. According to the German semi-official account, during the fall of the town, some 161 Belgian civilians were murdered by German forces.[84]
With the French and Belgians exhausted, and the British unable to send reinforcements, the Allies resolved to flood the canal and waterways of the Yser on 26 October. Both the French and Belgians claimed credit for the idea. During the night of 29–30 October, eight weir gates at the Overlaat van Veurne-Ambacht or "Noordvaart" were opened by nl under German noses and flooded the area from the Yser to the railway embankment. Waiting for higher tides, the next three nights witnessed more flooding in the area between Pervyse and Dixmunde by 31 October. Eventually the flooded area became a lagoon, some 18–21 miles long, between one and three quarter and two and a half miles wide, and some three to four feet deep. The result was that leading German regiments were in danger of being cut off by the tide. They could not advance either. The German advance on the Yser was abandoned, with some 18,000 Belgian and 9,500 German casualties. But while the flooding secured the Allied north, it also secured the German right flank. The Germans were then able to transfer forces southward.[85]
The material battle[]
The repulse of the German attacks from Ypres to the sea prompted Sir John French to remark that the battle was all but won. However, this was premature. The British Army was suffering from logistical overstretch. Having expected to only be in action until December, had not prepared an industrial economy expansion, or state intervention in the production of military hardware until 1915. In 1907 the Murray Committee had decided Government ordnance expenditure could be cut back as private firms could cover needs in war.[86] Much of the British Army's hardware was contracted by private firms. As a consequence, the British Army was only able to supply seven divisions in the field in October–November 1914.[87] Despite the Quarter Master General having only 31 officers working for him,[88] the logistical system was deemed sufficient.[89] Under the circumstances, the army was to suffer ammunition shortages during the Ypres campaign.[90] On 24 October French had to restrict 18 pndr ammunition to thirty rounds a day and fifteen rounds for 4.5 inch howitzers. The howitzers were to be used only against vulnerable targets, such as massed infantry or enemy artillery on the move. Only siege howitzers and 60 pndrs could be used for searching enemy batteries in cover. On 26 October these restriction were lifted.[91] Ammunition expenditure in the army was still high and replenishment inadequate. For example, Haig's I Corps had expended 54 percent of its 18 pndr ammunition, 53 percent of all 4.5 inch howitzer shells, 57 percent of 60 pndr shells it would fire during the course of the war. Ammunition stocks were being depleted at an alarming rate.[92]
The French were in a better position. In ammunition terms, they had 400 rounds per gun for their 75mm batteries. French production produced a barely adequate 10,000 shells a day. Between the 15 October and the 14 November, d'Urbal's Belgian Army Detachment would expend 344,000 shells and the Tenth Army some 167,000 shells, some 55 percent of the expenditure of the entire army. French IX Corps never had more than 10,000 available and the Belgian 75 and 150mm were down to 130 rounds a day. The Germans on the other hand, entered the war with large stocks. Some four million field artillery shells was sufficient for 987 rounds per gun and 973 for each howitzer. This was not as much as was intended, but gradually increased to 1,029 to 1,044 per gun by September 1914.[93]
Crisis on the British sector (25–31 October)[]
Thompson Capper, GOC 7th division was blamed for poor tactical deployment and wearing out his formations.
Despite the ammunition shortages, French and d'Urbal agreed on the afternoon of 25 October to advance. Dubois was to continue towards Roulers though de Mitry was to hold his existing front. On the British sector, I, IV and the Cavalry Corps were also to advance due west to put more distance between Ypres and the front. Despite heavy resistance, the elements of 4th and 6th Brigade, 2nd Division reached the crest of Passchendaele–Becelaere ridge. The opposing German brigades (2nd Ersatz) GOC, General von Meyer was killed, but the unit offered resistance. Rain began to fall at night, prompting the British to dig in.[94]
The British position was better than it had been, but at nl there was a salient. the German 54th Reserve Division attacked the 2nd and 7th Divisions. The attack was resisted, with 200 German prisoners of the 242nd Reserve Infantry division. Nevertheless constant and superior intensity of German artillery destroyed communication trenches and prevented any movement. Capper's decision to site his trenches on the forward face of the slope with covered roofs made from timber and planks made the infantry more vulnerable to an enemy using High Explosive shells. That night, the Germans overran the 2nd Scots Guards, creating a gap of a quarter of a mile wide, which was sealed by a counter-attack. The next morning, on 26 October, the Germans were stretched when the British, and the French, reinforced by the new French 31st division, arrived to push towards Poelcapelle and Passchendaele. German reserves were deployed to German XXVI Corps, which stopped the advance. Heavy German artillery was brought up and with its support, and the injection of 15 reserve battalions into the line, the Germans destroyed and Zonnebeke and nl. The Germans got in behind the two battalions of the British 2nd Scots Guards and 1st Grenadier Guards. They had called out 'retire' in English creating confusion. Men of the 1st Staffordshire retired creating a gap and enabling the Germans to wipe out the forward companies of the Scots and Grenadiers. Although Capper sent in all his reserves to 20th Brigade, the formation had already lost 1,000 officers and men. 7th Divisions losses from 24–26 October amounted to 37 percent of its ranks (4,320) and 162 officers (43.6 percent). After visiting Capper's division HQ, Douglas Haig GOC I Corps, ordered the 1st division to cover its rear and launch a counter-attack. RFC reconnaissance detached German columns advancing towards its flank.[95]
The Cavalry Corps abandoned an offensive manoeuvres once Kruiseecke had fallen. Julian Byng's 3rd Cavalry Division and previously been withdrawn from Rawlinson's IV Corps on 25 October and given to Allenby, but now French handed 7th division to Haig on 27 October. Following their disagreement at Menin in early October, Rawlinson and French fell out again. A telegram from Rawlinson informed French that his corps was holding on only just and could only be stabilised if 8th Division, disembarking from Britain, could reinforce him. Infuriated, French demanded an apology or threatened to sack Rawlinson. French in any event, decided Rawlinson should return to England.[Notes 2], 7th division, depleted and low on morale, was to go to, as it was a drain on the command of Haig's I Corps. Capper, the division GOC, was criticised for the heavy losses during the last 48 hours, which GHQ regarded as having been suffered by positioning companies on the forward ridges at Passchendaele, which were exposed to enemy observation and artillery. In the event, 7th division stayed, holding the Zandvoorde–Menin Road, 1st division from the Menin Road–Reutel and 2nd division from Reutel–Moorslede–Zonnebeke Road.[97]
Attempts were made to breakthrough the German lines, but came to nothing. On 28 October RFC reconnaissance detected heavy motor vehicle traffic between Roulers and Moorslede heading in the direction of Ypres. The Germans were bringing in a new Army Group between Fourth and Sixth German Army. Forming up under Cavalry cover between St Yves and Gheluvelt with the intention of breakthrough south of Ypres and then heading north west towards Messines-Zandvoorde. Army Group Fabeck, containing XV Corps under Berthold von Deimling, which contained the 30th Division and 39th Division and II Bavarian Corps under General Von Martini (from the German Second Army), containing the reallocated 26th Division with the 3rd and 4th Bavarian Divisions. Group Gerok comprised the 3rd and 25th Reserve, 6th Bavarian Reserve Division (from the German Fourth Army) and 11th Landwehr Brigade was commissioned on 27 October under Command of General von Fabeck, former GOC XIII Corps.[98]
The balance of forces was now in the German favour. The Allies now could field only 11½ divisions against 17½ German division on 27 October. This number of German formations rose to 23½ divisions. Fabeck received 262 heavy howitzers and mortars and 484 field artillery guns of lesser calibre. The Fourth and Sixth Army, with Army Group Fabeck, were to attack the Gheluvelt on 30 October. The 6th Bavarian Reserve Division was to be used in diversions with I Cavalry Corps and XXVII Corps, now under von Schubert, on 29 October. Drawing in the reserves would allow Fabeck to punch through to Messines ridge. On the same day Falkenhayn was ordering the assault, French was telling the War Office that the Germans were incapable of launching an offensive.[99]
The southern front (29 October – 1 November)[]

Sir James Willcocks GOC Indian Corps. Willcocks took over command of the southern forces after the withdrawal of Smith-Dorrien to England. The poor performance and quality of the Indian Corps led to its eventual withdrawal in November 1915.[100]
II Corps' sector covered the Arras—Armentières. The Germans had attempted to break through this line up until the 29 October, even though it was not as strategically vital as Ypres, covering the Channel Ports. British artillery broke up attacks and machine guns prevented the German infantry from making noticeable gains. At one point, German infantry did succeed in creating a gap between 8th Brigades 3rd Division and the Jullundur Brigade of the Lahore division. Both the 15th Sikh and 1st Gordon battalions suffered heavily as both were inexperienced. The Sikhs in particular showed complete disregard for their own safety under shellfire. The Gordons had lost 80 percent of the regular men since the Battle of Le Cateau, and kept going, as with most units, on drafts of reservists. The 4th Middlesex of 8th Brigade restored the front by counter-attack in the evening.[101]
The state of II Corps was such that Smith-Dorrien asked the French for help. De Maud'huy also moved up his units to Givenchy and taking over the line enabling 5th Division to free three battalions for a reserve. Maud'hy agreed this, as the towns loss would mean the Germans could create a gap between the two armies. Conneau's Cavalry Corps contributed nine batteries, 5,000 cyclists, a dismounted battalion of 600 men and 300 men from a Chasseur battalion. The cause of II Corps was not helped by Smith-Dorrien's belief that the German main effort would not come in the south and that the enemy had sustained too damaging losses to continue offensive operations. On 26 October, however, the Germans launched an attack on the junction between 3rd and 5th division at Neuve-Chapelle. The Germans captured the town and reduced the 2nd Royal Irish to 20 officers and men, using the siege howitzers which had proved potent against the Belgian fortifications. Despite the destruction of the Irish, and the loss of four valuable artillery guns, the battalions on each flank held, and a counter-attack was organised at dusk by five companies from mixed battalions restored the line and retook most of the village, although the Germans remained in the northern edge.[102]
The next day the British II Corps began an attack towards Neuve-Chappelle, but a German attack, mounted at the same time, swept through the remaining British battalions on 27 October destroying the 1st Queens' Own West Kents. The 20th and 15th brigades along with the Lahore division stopped the attack with difficulty. After the fighting, 7th Brigade in 3rd division was nearly worn out. Opposite the 3rd division at Chappelle were 24 German battalions, the entire German 14th Division of VII Corps. On 28 October, the 7th Brigade, assisted by 14th Brigade and a battalion lent by 6th division, attempted to seize the town and establish a front to the east of it. Mist, faulty communications, exhausted officers all conspired to make coordination impossible. Only two companies of the 47th Sikhs, and the 20th and 21st company of the Sappers and Miners advanced on the village itself. Surprisingly, they managed to take the village in hand-to-hand fighting. The German counter-attack destroyed the Sikhs, losing 289 of their men. The sappers lost all of their officers and one-third of their men. Smith-Dorrien had never intended valuable sapper units to be used in any attacks, but they were committed through several misunderstandings and poor communications.[103]
The British II Corps was practically disbanded and most of its battalions were distributed to I and III Corps. Between the 12–31 October the Corps suffered heavily. The 3rd division lost 5,835 with all four brigades depleted and 8th and 9th brigade could barely must brigade strength between them. On 31 October II Corps had only 14,000 men, of the 24,000 establishment. Some 1,400 men were new inexperienced drafts. Smith-Dorrien returned to England on 10 November while Willcocks, merging the Indian Corps with the remaining II Corps, assumed command. The Germans admitted 6,000 casualties during the battles with Smith-Dorrien's II Corps. Once installed in II Corps trenches, their replacements, the Indian Corps under Willcocks, came under heavy shellfire. Owing to poor tactics of remaining in trenches instead of retreating further back temporarily they suffered needless casualties. By 3 November 1,989 casualties had been taken. Owing to indiscipline, some 65 percent of all casualties in the Indian Corps were covered by self-mutilation in order to escape duty. Incidents were not always punished by court martial. Willcocks, unwilling to rely on the Indians, asked for and received four battalions from 14th Brigade.[104]
To the north of II Corps, protecting its (left) flank at Armentieres, Pulteney's III Corps held the line. The British and French Cavalry screen on Willcocks' far left was now positioned in between the two Corps. Pulteney was expected to hold the line despite being opposed by the German XIX, XIII and I Cavalry Corps, which were twice his strength. No great pressure was put on his front, although the 6th division was attacked on 22–23 October. The British line at Le Quesne was reached by German thrusts on 23 October but was expelled by yet another counter-attack, this time by 16th Brigade. On 25–26 October, the division pulled back some 500 yards to put distance between the opposing fronts. The 1st Leicesters of 16th Brigade were engaged in hand to hand fighting, losing 188 casualties in the battles. Greater German efforts were made to break through the line over the following two days, by the 223rd and 224th Regiments of XXIV Reserve Corps. Only temporary success was achieved when British communications were disrupted by shell fire. German infantry managed to hold one part of the line (occupied by 1st Middlesex) before losing ground. Pulteney's Corps suffered 5,779 casualties through 15–30 October, but was never seriously endangered. But the lack of oil available put a large amount of rifles out of service which effected infantry firepower. Logistics were improving and the limit of 40 18 pndr shells per day was lifted. More 4.5 inch howitzer shells were also available.
The German pressure in the north promoted John French to reinforce positions there at the expense of the south. On 30 October 1914, he ordered 4th Divisions reserves to reinforce Edmund Allenby's Cavalry Corps while the reserves of 6th division were to cover the front of III Corps. Some of Smith-Dorrien's old battalions were sent to support III Corps to compensate. Allenby, who had occupied the intersection between Haig's I Corps and III Corps at Messines, was ordered to retire further west on 1 November. Fortunately, when the German Battle Group Fabeck began its offensive, they were only opposed by German cavalry formations, which lacked artillery and were not as well trained at dismounted actions as the British.
Fabeck's offensive (29 October – 14 November)[]
Messines, Zandvoorde and Menin Road[]


Coldstream Guards in France, 1914. Painting by William Barnes Wollen
British intelligence intercepted German radio traffic on 28 October and had been forewarned of any German attack at 05:30 on 29 October. Aerial reconnaissance spotted German transport columns moving up to the front. While I corps received this information at 15:00 hours on 29 October, it did not reach all units until midnight. Preparations had been made to co-ordinate the 1st, 2nd and 7th divisions’ artillery, but French refused in the hope of conducting an attack using 2nd division. The French offensive did begin on 30 October, with French IX Corps recapturing Zonnebeke and Kortekeer.
It was expected the German assault would come from Kruiseecke, south of the Menin-Gheluvelt road. The German offensive would fall on the Gheluvelt cross roads, where the Menin Road crossed between Kruiseecke and Poezelhoek. The cross roads formed the junction between 1st and 7th division. Each divisions flank was held by a Guards Division. The left of 7th division south of the cross roads was held by the 1st Grenadier Guards of 20th Brigade, and 1st Coldstream Guards of 1st (Coldstream) Brigade which held the right of 1st division. Brigadier General Charles Fitzclarence VC had moved two companies of the 1st Black Watch and a platoon of the 1st Gloucesters from 3rd Brigade. When moving into their positions, the trenches were founded to be support types only, rather than forward trenches. They were deep and narrow which cover overhead. Observing the enemy line was difficult. There was no time for Haig to prepare a second line. There was also little wire, with no rudimentary warning signal (as both sides used) such as pebbles placed in tins, which look outs would listen for any indication of an enemy surprise attack.
The German artillery attack began at 05:30 hours on 29 October. The morning was foggy which aided the Germans however their attack, conducted by the 16th Bavarian Reserve Infantry Regiment of the 54th Infantry division of XXVII Reserve Corps, was stopped by the Black watch and Coldstream units. The British machine gunners weapons jammed and it was found the cartridges for rifles were too large. After the first hour they British fire was not as effective. By 06:30 the Germans broke through and captured most of the Black Watch and Coldstreams. British artillery was not helping. Owing to a communications break down it continued to fire on enemy guns rather than German infantry.[105]
Reserve Coldstream and Black Watch companies held the line. Fitzclarence sent his companies forward to stem the tide. The Grenadiers had been sent to the rear, their GOCs unaware of the attack and in the belief it was not going to come. Covered by the fog, large formations of German soldiers attacked the position again. At 07:30, the fog lifted giving British rifleman 80 yards of visibility, but the Germans still managed to breakthrough in hand-to-hand fighting. The Grenadiers were rushed forward and lost 470 NCOs and other ranks. Only five officers and 200 ranks remained. More reserves were brought up from the rear and stopped the attack south of the Menin Road. As the British responded by bringing up reserves, the Germans widened their frontage to include al of I Corps line. The Germans had not recognised the advantage won that morning. The Germans did bombard Ypres with artillery and aircraft, though Ypres was devoid of military targets. Reserves from 3rd Brigade and two battalions from Capper’s 7th division were sent to reinforce the line. Before they could reach the front, a German attack destroyed the remaining Coldstream and Black Watch companies. Only at 11:30 did the 16th Bavarian Regiment of the XXVII Reserve Corps began advancing around Poezelhoek. Haig threw in 1st, 2nd and 4th brigades reserves to stem the advance. It succeeded, but a gap of 500 yards existed along the line. It was agreed by Haig and his staff to withdraw half a mile from the road, dig in, and re-establish the whereabouts of the tangled and mixed units holding the Germans. Haig’s I Corps only had three battalions (two from 2nd and one form 21st brigade) as reserve for his entire Corps. To make matters worse, there were sparse resources for properly entrenching their line, and strengthening their position. Haig told his staff, if there were any further breakthroughs around Gheluvelt and 1st divisions front, 2nd division would launch an attack at Polygon Wood to take the Germans in the flank.[106]
In gaining the Gheluvelt crossroads, the Germans had a staging point for attacking the town since there was a dip in the terrain east of it which allowed massing infantry to be hidden. The high ground around Gheluvelt and Kruiseecke allowed them to have a good line of sight, ideal for artillery observation nests. However, the ditches, hedges and generally enclosed nature of the surrounding geography concealed the weaknesses of the British line. The French meanwhile had wanted to continue the advance eastward. The British were in no condition to offer support. Dubois was ordered to seize Poelcapelle regardless. During the night of the 29 October, the German Army Group Fabeck received orders to breakthrough at Gheluvelt. The five divisions of the group, and its 266 heavy guns had been moved up at night and were ready for action on 30 October. It was that morning that the Germans intended to launch the offensive that, by Fabeck's own account, would "settle for ever the centuries-long struggle, end the war, and strike the decisive blow against out most detested enemy", [by which he meant the British].[107]
The German thrust would entail the Fourth and Sixth Armies creating a diversion. In the case of XXVII Corps, Fourth Army, it intended to take Zonnebeke to take in Allied reserves. The main effort would fall on the exhausted British 7 division on the Zandvoorde—Menin Road line and Allenby's three Cavalry divisions stretched between Zandvoorde and Messines. At 06:00 the artillery bombardment of XXVII Corps opened. At 06:30 German infantry advanced uncover of morning mist clouds. The German 54th Reserve and 30th divisions failed to breakthrough or even compel the British 1st and 2nd divisions to throw in their reserves. Ad hoc wire fences prevented the Germans from closing. As soon as the mist cleared the German infantry were exposed and suffered heavy losses.[108]
The 7th division and 7th Cavalry Brigade (3rd Cavalry division) were put under severe pressure during the main assault. At 06:45 German heavy guns wiped out most forward trenches, which had, despite warnings, place on forward-facing slopes and exposed to observation. In Byng's defence, his Cavalry had been aware of the forward trenches weakness, but had felt unable to pull back for risk of exposing his line to infiltration which would then expose neighbouring elements of the 1st and 2nd division. By 10:00 the Germans had captured Zandvoorde. Communications again became problematic as cable wagons were lost to enemy action. Many British positions were isolated, and often conducted their own defence without support or direction. As a result positions on the high ground were lost and the Germans could bring artillery fire on the 21st and 22nd Brigades headquarters. The 22nd Brigades 1st Royal Welch Fusiliers were overrun. Only 86 men escaped death or capture. Some 276, including Lt-Col H.O.S Cadogan had been killed and 54 captured. The 2nd Royal Scots Fusiliers also took heavy casualties. Counter-attacks to retake Zandvoorde failed with heavy losses. A new line was formed some 1,200 yards west of the town. Haig, GOC I Corps, sent counter-attack reinforcements as front line 'gap pluggers'. The line was perilously thin.[109]
Dubois was ordered by d'Urbal to cease his advance and dig in. Units, on Haig's request, were to be made available as the French recognised the seriousness of the situation and the German intent to punch through to Ypres. The Germans were cautious in following up success. The effectiveness of British fire convinced them that fresh enemy formations were continually reaching the front. At the same time the damage inflicted by rifle fire led to demands from some German divisional commanders to request halting operations. Such requests were rejected out of hand.[110]
To the south of 7 division and 3rd cavalry division, Gough's 2nd cavalry division was not troubled by II Bavarian Corps. However, German artillery caused some difficulty when it started shelling Hollebeke. Gough only had 1,500 men and ten guns, he needed 10,000 and 50 guns in order to mount an effective defence. To make matters worse, these formations were spread over four miles. The Germans forced the 3rd Cavalry Brigade out of position at midday. The leading German units were less than three miles from Ypres, but did not push further after the days fighting. The 1st cavalry division repulsed German attacks to the south, aimed at Messines. Foch, the C-in-C of the French forces, sent eight battalions from French XVI Corps to Hollebeke and the French 32nd division to St Eloi to cover the British. In the morning, one of the most decisive actions of Ypres would take place when the Germans attempted to push between Messines and the Comines Canal held by Allenby's Cavalry Corps. Fabeck moved his II Bavarian Corps (6th Bavarian Reserve division and 26th division) up to begin the assault during the evening of 30 October.[111]
The German 26th Württemberg division began its offensive at 04:30 and broke into Messines after nearly five hours of fighting. The 6,000-strong German 51st Brigade committed were facing less than 900 British cavalrymen. The British conducted a house-to-house battle, retreating out of the town. Around noon, II Corps' 9th and 13th Brigade arrived and conducted an advance to the Messines Road. It engaged the 6th Bavarian division preventing it from supporting the German 26th. They suffered heavy losses, as did the Germans, in their efforts to reach Messines. To the North of Messines, Gough's 2nd Cavalry division was engaged by elements of the 6th Bavarian Reserve and the full force of the 3rd Bavarian division. Gough received six French artillery batteries and one and a half Indian battalions, but were facing some 16,000 German infantry. The French sent a Cuirassiers and infantry Brigade from the French 32nd division. However, much to Gough's anger, did not contribute in the battle. Despite heavy shelling by German guns from 06:00, no infantry assault took place until 14:45. This was due to the aforementioned advance of II Corps on the right (south) of Gough's division into the flank of the Germans. C-in-C French later suggested the defence of Messines was crucial in the battle, and for the B.E.F. However, a much more important battle was fought at the Gheluvelt Plateau.[112]
Battle of Gheluvelt[]
The most serious German attack was aimed at Gheluvelt. It was the last significant ridge which afforded the British observation positions east of Ypres following the loss of Becelaere and Zandvoorde. The front was held by the British 3rd Brigade and two battalions from the 2nd Brigade. At 06:00 that morning German observation balloons began directing their fire on British lines. The infantry attack was repulsed on British 1st division’s entire front, with a few exceptions, the German XXIV Reserve Corps failed to make significant ground. By 08:00 German artillery had destroyed the positions of the 2nd Welch Regiment, holding the Gheluvelt line east of the town in front of the Menin Road. Despite a spirited defence, the 1st South Wales Borderers battalion’s 1st Queens Regiment (West Surrey) and two companies of the 2nd King’s Royal Rifle Corps (KRRC) were separated form the Welch. The Germans penetrated the gap and destroyed the battalion, leaving it with just 16 officers and 514 ranks dead, wounded or missing. The Welch’s CO, Lt-Col. C.B Morland was killed in action.[113]
The 1st Gloucestershire’s were sent to plug the gap. But under heavy fire all the way to the front, it was reduced to just 13 of an original 80. The German 54th Reserve and 30th division committed four and three battalions respectively to advance north and south of the Menin Road at 10:00. Three more battalions from the 30th were committed, with the 16th Bavarian Regiment in reserve. During the fighting the CO of the Bavarians, Colonel List, was killed. The Germans lifted their artillery fire from British trenches to interdict any reinforcements coming up. As they did so, the now unsuppressed British rifle fire. It was of such intensity the Germans believed they were facing an unseen line of British machine guns. The KRRC pulled out as the Germans brought up artillery. The Queens, with their CO dead, tried to hold on, but do so after other British units were driven back. Only two officers and 12 men survived death or capture. Many of those taken prisoner were murdered by men of the German 143rd Regiment. In the aftermath, the Queens were merged with the Welch under the 3rd Brigade.[114]
Gheluvelt was a shambles by 11:30, the British retreated and Haig ordered a new line in front of Veldhoek. To the north of the town, battalions of the German 54th Reserve division began an assault directed at the South Wales Borderers and 1st Scots Guards. They repulsed several attempt by the Germans to seize the Gheluvelt Chateau, and forced enemy infantry out of the grounds, sometimes firing on the steps of the main entrance. The only reserves available were an assortment of Black Watch and a Company of the 2nd Battalion Royal Worcester Regiment, lent by 5th Brigade. Lomax, GOC 1st division, recognised the situation was verging on disaster. German pressure was not letting up. Monro, GOC 2nd division, released to Lomax the 2nd battalion, Royal Worcesters. Monro also agreed with Lomax if any further German breakthroughs were made then the 2nd division’s reserves near Polygon Wood would conduct a flanking manoeuvre to the Germans right flank. Just as the conference at Hooge Chateau, near the Menin Road, was being completed, shells dropped just outside mortally wounding Lomax (who died in April 1915). Brigadier-General John Gough VC, brother of Hubert Gough, and Haig’s Chief of Staff, I Corps, was appointed GOC 1st division.[115]
Haig and Gough attempted to rally more reserves to support I Corps to the north. Allenby, GOC Cavalry Corps, refused to allow Byng's 6th and 7th Brigades of his 3rd Cavalry division to be committed. But Haig had appropriated the Brigades and division. When Byng was ordered by Allenby to head south to Gheluvelt to support the broken 1st division which was not fit for further action, Haig ordered the division to remain where it was, near the Menin Road. 6th Brigade responded to Allenby's order, riding south, while 7th Brigade moved north to support I Corps. By 13:30 I Corps held a line just 2,000 yards east of Ypres which had to be held at all costs, or risk the northern flank of Ypres collapsing. 2nd division appeared to be holding its own, but at Gheluvelt the situation was serious. At circa, 14:30, news reached Haig that the 2nd battalion Royal Worcesters, sent by Lomax late in the morning, arrived at Gheluvelt, and in a rapid counter-attack retook the town.[116]
Against significant odds, they pressed into the town, catching units of the 16th, 244th and 245th Bavarian Regiments off guard. This force, numbering some 1,200, were caught looting in the town and engaged by the Worcesters. The Worcesters even found sound of the Borders and Scots Guards survivors still holding out in parts of the town. The Germans appeared shaken and abandoned Gheluvelt. All in all, the Worcesters efforts succeeded in recapturing Gheluvelt at a cost of three officers and 189 men.[117] Remarkably, the Germans had done little to exploit their hard won success around Gheluvelt earlier in the day. The only forward push was made by the 105th Saxon Regiment south of the Menin Road. Their progress was abruptly halted by British rifle fire and retreating British columns earlier that afternoon, before the Worcesters counter stroke.[118]
On 31 October, Haig GOC I Corps, decided to pull out of Gheluvelt, and form a line 600 yards west of the Town. The situation between the Comines Canal and Gheluvelt was still critical. The 7th division, five French battalions and another two battalions from the French 2nd division, a battalion from 20th Brigade and two from 2nd Brigade was all that protected the line against a concentration of German forces. The retreat from Gheluvelt would secure these exhausted formations' north flank. German artillery began shelling the line at 08:00 and at 12:45 the infantry began advancing towards 7th divisions positions. The division was put under severe pressure, and the 22nd brigade staff, and GOC of the division, Capper himself, had to head into the combat zone to rally units and the very last reserve of 80 men from the Grenadier Guards. At the same time the Worcesters were retrieving the situation to the north at Gheluvelt, the 7th division was giving way, overwhelmed by enemy numbers at Zillebeke. Capper ordered a retreat to the Zillebeke—Frenzenberg line to be made if the German advance failed to slow by the afternoon. German momentum did slow, owing to officer casualties to British rifle fire.[119]
At circa, 15:00, Brigadier General Edward S. Bulfin, GOC 2nd Brigade, and commanding an ad hoc battle group, 'Bulfin Group', decided to counter-attack to retake some lost ground. He ordered the 1st Northamptonshires and the 2nd Royal Sussex to practice the "mad minute", that British soldiers were trained for – one minute of rapid fire followed by speedy advance with bayonet. The 2nd Gordon Highlanders were to act as a reserve. Bulfin expected to receive 200, he got 84. However, the woods in which they were positioned concealed their numbers. Just before the attack, 1st Royal Dragoons from 6th Cavalry Brigade arrived to join the assault.[120]
The attack retook some half a mile. The relative success was costly. The 20th, 21st and 22 Brigades were reduced respectively to 940, 750 and 800. The state of the battalions was no better. Of the 12 original battalion COs, four were dead, four wounded and four captured. Overall, of the 84 British infantry battalions 18 were at cadre strength (100 and below), 31 were very weak (100 to 200), 26 weak (200 to 300) and only nine were of medium strength (300 to 450). Pre war strength was 1,007.[121]
Battle for the Wytschaete – Messines line[]
Frustrated at Gheluvelt, Fabeck compelled his forces to try to break the Wytschaete – Messines line some seven miles south west of Gheluvelt at the most southern base of the bulge around Ypres. A success here would trap the bulk of the remaining British forces in the salient at Ypres, Gheluvelt, and St Eloi. Regardless of using only one pincer thrust, the Germans at the very least would force a British retirement eastward, abandoning the aforementioned towns and surrendering the high ground as far west as Locre, some five miles south west of Ypres. Wytschaete was held by only 415 men of the Composite Household Cavalry Regiment. The ridge between the town and Messines was held only by 600 men of the 6th Dragoon Guards, and other survivors of the London Scottish Regiments. They were faced with six German battalions, odds of 12:1 against. Both were steadily forced back from their positions at the towns and ridgelines by 04:00. At 06:00 another mass German infantry attack developed. Wytschaete had fallen at 02:45 but German infantry struggled to secure the ridge, and did not succeed until 07:35. 5th Cavalry Brigade and 9th Brigade committed 12th Lancers and Hubert Gough committed 1st Lincolns and Northumberland Fusiliers from 9th Brigade to retake the ridge and town. They failed at the ridge, but the Lancers recaptured the town. The Lincolns and the Northumberlands lost about 30 percent of their strength trying to recapture the ridge.[122]
De Lisle’s 1st Cavalry Division, holding the Messines area fell back. De Lisle had hoped that there was a possibility of recapturing Menin. The fading hope of achieving such a success was beyond the British, so deep into German lines. This made Messines less valuable as a staging post. Moreover, the German-held ridges exposed Messines to enemy artillery. As long as Wytschaete (to the north of Messines) and Warneton (to the south of Messines) remained in British hands, it was possible to prevent a German breakthrough in the south.[122]
To safeguard their retirement the British shelled Messines to prevent the Germans maintaining close contact. RFC aircraft were also busy, attacking German ground forces and harassing advancing columns. Elsewhere the Germans were less successful. The German 3rd (Pomeranian) Division was brought up to drive the British back out of Wytschaete. The French rushed the 32nd French division of d’Ubral’s I Corps to reinforce the British in the town. The French 39th division was assigned to retaking Messines. The 39th failed, and the 32nd was forced, along with the remaining British, out of Wytschaete by the 6th Bavarian Reserve division of II Bavarian Corps.[122] The Germans suffered heavy casualties attacking the French 32nd division. It was here that a young Gefreiter named Adolf Hitler won the Iron Cross 2nd Class for rescuing a man under fire.[123]
By the morning of the 1 November, the Germans had secured the line and both towns. But the ridges to the west of the Wytschaete – Messines line were reoccupied and held by the French 32nd division. The British were exhausted, most divisions had been reduced to a shadow of their former selves. The British 7th division had only 2,380 men left, and was withdrawn from the line and replaced by 8th division from Britain. The Germans had also suffered high losses, and needed to pause to reinforce their formations. The front fell quiet, action being limited to raids by both sides and heavy shelling of Ypres by German artillery. The Germans would make their last and final effort against Ypres on 10 November.[124]
Nonnebosschen[]
The Germans amassed the German Fourth Army Corps to begin the assault on the town. Yet, despite its numerical superiority over the Allies, the infantry had not sufficiently amended their tactics. They still marched in close order, which would cause unnecessary casualties. Fabeck and Albrecht, GOC Fourth Army, were to continue with the attack regardless of casualties, supported by Group Gerok, an ad hoc battle group (Kampfgruppe), comprising the 3rd division, 25th reserve division, 11th Landwehr division and the 6th Bavarian reserve divisions. They were to apply pressure to the north of Ypres, on the Comines Canal.
Fighting had been limited during early November. However, the 3rd and 26th German division did break through to St Eloi and succeeded in advancing to Zwarteleen, some 3,000 yards east of Ypres, only to be checked by the British 7th Cavalry Brigade. On 9 November the Germans attacked French and Belgian forces between Langemarck and Dixmude, forcing them back to the Yser, though the Belgians blew all the crossings/bridges. On 10 November 12 and a half German divisions from Army Group Fabeck, the German Fourth and Sixth Armies, and XXVII Reserve Corps began their assault. The bombardment was heavy and it kept the Allied infantry pinned down while the Germans advanced. However, the Germans were slow in their advance and return fire was possible. Neither Allenby’s or Conneau’s cavalry were put under pressure around Messines.
The main German attack came opposite the Gheluvelt, extending from the so-called Shrewsbury Forest in the south, across the Menin Road, to Nonnebosschen (Nun’s Copse) and the edge of Polygon Wood beyond it. This was held by the exhausted II Corps, covering some 3,500 yards of front.[125] The Corps possessed 7,800 men, plus 2,000 reserves against 25 German battalions of 17,500. The pressure applied was immense, and the British fell back on hastily improvised strong points. The German 4th division breached the line and took the forward trenches which the British failed to recover during counter-attacks. However, the strong points prevented any serious breach. Heavy rifle fire repulsed German attacks between Polygon Wood and Veldhoek.[126]
The Germans reached Noonebosschen, and faced just 900 men of the 1st and 3rd Foot Guards Regiment. British artillery, having been in reserve owing to ammunition shortages, began offering support. It was their return fire that prevented the Germans from launching a concentrated attack. Nothing lay behind the town, and the artillery lines represented the last line of defence. Monro, GOC II Corps, ordered his reserves, the Irish Guards and the 2nd Oxfordshire and Buckinghamshire battalions to form up, pending deployment. The 2nd Highland Light Infantry was ordered was to reinforce Polygon Wood, which had now, in parts, been occupied by German formations. The 1st Battalion Buckinghamshires' CO Lt-Col Henry Davies was ordered to partake in the pacification of the Wood, some seven miles away to the East. Davies decided the breach at Noonebosschen was more pressing. Along with the 2nd Oxfordshires and Buckinghamshires and with artillery support from XXXIX Brigade, he attacked and pushed the Germans out of the surrounding forests near Noonebosschen, catching many, including the Prussian Guard Units, by surprise. They reached the forward trenches but were then shelled by the French in error. The town was secured from further attack and the Ypres-Comines canal front was not breached. The cost to the Oxford and Bucks had been five dead and 25 wounded. Other units in the area suffered heavily, as had the attacking Germans. The German 4th division had suffered 2,932 in November, while the Guards division suffered 2,314 casualties from 11 to 19 November.[127]
By the morning, the Germans had possession of the British front line between the Menin Road and Polygon Wood. I Corps, under Haig and Dubois IX Corps, facing the enemy at Polygon Wood, were concerned that their Corps’ could be cut off should Ypres, or the Ypres-Comines canal, be cut or captured. As it was, I Corps was 90 percent short of its officer allocation, and 83 percent of its ranks. Haig bemoaned the situation. He claimed that the front was on the verge of collapse and the British Army was in danger of being destroyed. In the event, though Haig was not to know, was that the battle was effectively over. On 17 November Albrecht ordered his Army to cease action and dig in where it stood. This order was immediately confirmed by Falkenhayn. III Reserve Corps under Beseler and XIII Corps under Fabeck were ordered to the Eastern Front. The casualties, political and military situation on the Eastern Front was serious, particularly with the Russian concentration around Warsaw. Besides, Falkenhayn had noted that the German Army in the West was exhausted and a victory in a decisive fashion, was no longer attainable.[128]
The end of the battle was not immediately apparent. Several German attacks were made on 12 to 14 November. However, a stiff British defence and deteriorating weather conditions leading to heavy snowfall and hard frost ended large scale fighting. The British 8 division was deployed to the front on 13 November, providing much needed reinforcement. Field Marshal Frederick Roberts, 1st Earl Roberts came over to France to visit on 11 November, caught a chill, leading to congestion of the lungs, and died on 14 November. The next day, a reorganisation now took place. I Corps was relieved by French IX and XVI Corps. On 16 November Foch agreed with French to take over the line from Zonnebeke to the Ypres-Comines canal. The new British line ran 21 miles from Wytschaete to the La Bassee Canal at Givenchy. The Belgians held 15 miles and the French defended some 430 miles. The German withdrawal was detected on 20 November.[129]
Aftermath[]


Evening News cover, 18 November. It recounts the "British" repulse of the German Ypres attack. The battle was not without substantial Belgian and French participation.


Hitler in the German Army, 1914, sitting at right.
The German attempt to seek a decisive victory had failed, despite their superior numbers in men and artillery. Their command cohesion, while better than that of the Allies, failed to gain them an advantage. The Germans had failed to co-ordinate their assaults, pushing formations forward without retaining reserves for breakthroughs. Their method of seeking a weak spot by trying many merely exhausted their infantry. German intelligence was also very poor. They consistently believed the small numbers of enemy infantry were outposts only, and had radically overestimated the strength of Allied forces.
After the battle Erich von Falkenhayn reasoned that there is no more possibility for Germany to win the war. On 18 November 1914 he claimed a diplomatic solution, but Chancellor Bethmann-Hollweg, Paul von Hindenburg and Erich Ludendorff disagreed.[130]
The battle also marked out the superiority of the defensive over the offensive. Lightly armed Cavalry had proven quite able to hold off mass attacks by enemy formations backed by artillery. The Allied success had been defensive, not offensive. This problem would not be solved completely until the Hundred Days Offensive, in the late summer and autumn of 1918.[131] British casualties 14 October – 30 November were 58,155, French losses 86,237 and German losses 15 October—24 November 134,315.[132]
The battle also had a profound effect on Douglas Haig. Haig became the C-in-C of the British Army in December 1915 and firmly believed the Germans had called off their offensive too early, given the condition of the Allied forces. It was a mistake he was determined not to repeat. He believed that victory would belong to the side that 'stuck it out'. During the Third Battle of Ypres, Haig made references to the events of 31 October 1914, when the Germans had failed to seize their best opportunity, claiming, "we must not make the same error".[133]
The British and French held differing opinions over the value of Flanders. The British saw the German use of Ostend and Zeebrugge as threats to their naval supremacy in European waters. Should this materialise, reinforcement shipping from Britain to France could be threatened by German submarines and ships. In January 1915, 1916 and 1917, plans arose for an amphibious assault the German-held Belgian coast but were shelved. During the Second Battle of Ypres, April to May 1915, the indifference which the French displayed to the danger was evident again. They desired to cover Paris, while the British safeguarded the ports. However, the Third Battle of Ypres in 1917 represented the British desire to eliminate the problem, which failed to achieve its strategic objective. During the German Spring Offensive in 1918, Operation Georgette also attempted to break through to the channel ports, although by this stage tentative Anglo-French co-ordination was beginning after the recent appointment of Foch as Allied Generalissimo. On 28 September 1918, it was an army group under the command of Albert of Belgium, comprising the Belgian Army, British Second Army and French Sixth Army that broke the Flanders front. Ostend and Lille fell on 17 October and Zeebrugge to the Belgians on 19 October, ending the Flanders Campaign.[134]
See also[]
- Order of First Battle of Ypres (1914)
- Second Battle of Ypres (1915)
- Third Battle of Ypres (1917)
- Fourth Battle of Ypres (April 1918)
- Fifth Battle of Ypres (September 1918)
- Khudadad Khan
- World War I casualties
Notes[]
- Footnotes
- ↑ The First Battle of Ypres in November was the greatest crisis for commanders and their staffs still struggling to come to terms with the power of modern weaponry and adapting as quickly as possible to the new conditions of trench warfare.[8] Other communication difficulties, specific to Ypres, are mentioned throughout Sheffield and Todman's Command and Control on the Western Front.[9]
- ↑ Rawlinson was back in England on 6 November.[96]
- Citations
- ↑ Beckett 2004, p. 5., in the 2006 edition, p. 6: The British Official History dates the battle from 19 October to the 22 November 1914.
- ↑ Mc Greal 2010, p. 20: Also gives this date as "official" duration of the battle.
- ↑ 3.0 3.1 3.2 Beckett 2004, p. 41.
- ↑ Lomas and Dovey 1998, p. 6.
- ↑ Beckett 2004, p. 35.
- ↑ 6.0 6.1 6.2 Beckett 2003, p. 176.
- ↑ German Army casualties at Ypres, 1914.
- ↑ Barr, Neil in Sheffield and Todman 2004, p. 14.
- ↑ Sheffield & Todman 2004, p. 22, 27, 35, 100
- ↑ karl Unruh :"Langemarck - Legende und Wirklichkeit" Bernard&Graefe / Koblenz / 1986 p. 65 / ISBN 3-7637-5469-5
- ↑ Steiner 1977, p. 233.
- ↑ Sheffield 2003, p. 5.
- ↑ Beckett 2004, p. 9.
- ↑ Holmes 2005, p. 506.
- ↑ Lomas and Dovey 1998, p. 22.
- ↑ Ypres 2004, p. 101.
- ↑ Mead 2007, p. 196: Mead refers to attempts by Sir John French to breakthrough to these objects despite the disparity in numbers between British and German forces
- ↑ Third Battle of Ypres: Why the battle was fought. It was to remain a British target well into 1917.
- ↑ Beckett 2004 p. 35.
- ↑ 20.0 20.1 Beckett 2004 p. 37.
- ↑ 21.0 21.1 Beckett 2004, p. 36.
- ↑ 22.0 22.1 Beckett 2004, p. 194.
- ↑ Google 2013.
- ↑ 24.0 24.1 Beckett 2004, p. 195.
- ↑ Beckett 2004, p. 196.
- ↑ Beckett 2004, p. 38.
- ↑ Beckett 2004, p. 39.
- ↑ Beckett 2004, pp. 193–194.
- ↑ 29.0 29.1 Pawly & Lierneux 2009, p. 4.
- ↑ Pawly & Lierneux 2009, pp. 5–6.
- ↑ Pawly & Lierneux 2009, p. 15.
- ↑ Becket 2004, p. 45.
- ↑ Giffith 1994, p. 11.
- ↑ Beckett & Simpson 1985, p. 39.
- ↑ Beckett & Simpson 1985, p. 44.
- ↑ Beckett 2004, p. 31.
- ↑ 37.0 37.1 Beckett 2004, p. 32.
- ↑ Chappell 2003, p. 6.
- ↑ Robbins 2005, pp. 83–84.
- ↑ Bidwell & Graham 2004, pp. 11–13
- ↑ Bidwell & Graham 2004, pp. 19–21.
- ↑ Brown 1998, p. 41.
- ↑ Beckett 2006, pp. 73–4.
- ↑ Gardiner 2004, p. 149
- ↑ Beckett 2004, pp. 242–246.
- ↑ Beckett 2006, p. 14.
- ↑ Beckett 2006, p. 15.
- ↑ Beckett 2006, pp. 15–16.
- ↑ Beckett 2006, pp. 16–17.
- ↑ Beckett 2006, p. 17.
- ↑ 51.0 51.1 Beckett 2006 p. 18.
- ↑ Beckett 2006 p. 19.
- ↑ 53.0 53.1 Beckett 2006 p. 20.
- ↑ Beckett 2006 p. 21.
- ↑ Beckett 2006, pp. 21–28.
- ↑ Beckett 2006 p. 28.
- ↑ Gardiner 2004, 145.
- ↑ Beckett 2006 p. 30.
- ↑ Beckett 2006 p. 31.
- ↑ Beckett 2004, pp. 66–67.
- ↑ Beckett 2006, p. 70.
- ↑ Ashby 2000, pp. 112–116.
- ↑ Beckett 2006, pp. 70–74
- ↑ Beckett 2006, pp. 76–77
- ↑ Prior & Wilson 2004, p. 13.
- ↑ Beckett 2006, p. 78.
- ↑ Beckett 2006, p. 81.
- ↑ Beckett 2006, p. 83.
- ↑ 69.0 69.1 Beckett 2006, pp. 86–87.
- ↑ 70.0 70.1 Beckett 2006, p. 89.
- ↑ Beckett 2006, p. 91.
- ↑ 72.0 72.1 72.2 Beckett 2006, p. 90.
- ↑ Beckett 2006, p. 92.
- ↑ Beckett 2006, pp. 92–95
- ↑ Beckett 2006, pp. 96–97.
- ↑ Beckett 2006, pp. 98–100.
- ↑ Beckett 2006, pp. 102–104.
- ↑ Evans 1997, p. 19.
- ↑ Beckett 2006, pp. 104–105.
- ↑ Beckett 2006, p 89.
- ↑ Beckett 2006, pp. 106–107.
- ↑ Evans 1997, p. 18.
- ↑ Beckett 2006, p. 108.
- ↑ Beckett 2006, p. 110.
- ↑ Beckett 2006, p. 112.
- ↑ Beckett 2006, p. 114.
- ↑ Wilson 1986, pp. 35–37.
- ↑ Taylor 1921, p. 700.
- ↑ Chapman-Huston & Rutter 1924, p. 283.
- ↑ Brown 1998, pp. 41–42.
- ↑ Beckett 2006, pp. 113–114.
- ↑ Beckett 2006, p. 115.
- ↑ Beckett 2006, p. 116.
- ↑ Beckett 2006, p. 118.
- ↑ Beckett 2006, pp. 119–121.
- ↑ Prior and Wilson 2004, p. 14.
- ↑ Beckett 2006, p. 122.
- ↑ Beckett 2006, p. 123.
- ↑ Beckett 2006, pp. 123–124.
- ↑ Beckett 2004, p. 139, 141.
- ↑ Beckett 2006, pp. 130–132.
- ↑ Beckett 2006, pp. 134–136.
- ↑ Beckett 2006, p. 138.
- ↑ Beckett 2006, pp. 139–140.
- ↑ Beckett 2006, p. 148.
- ↑ Beckett 2006, pp. 149–152.
- ↑ Beckett 2006, p. 154.
- ↑ Beckett 2006, p. 155.
- ↑ Beckett 2006, pp. 155–157.
- ↑ Beckett 2006, p. 157.
- ↑ Beckett 2006, pp. 158–160.
- ↑ Beckett 2006, pp. 160–166.
- ↑ Beckett 2006, p. 169.
- ↑ Beckett 2006, pp. 169–170.
- ↑ Beckett 2006, p. 173.
- ↑ Beckett 2006, pp. 174–179.
- ↑ Beckett 2006, pp. 182–183.
- ↑ Beckett 2006, p. 183.
- ↑ Beckett 2006, pp. 184–186.
- ↑ Beckett 2006, p. 187.
- ↑ Beckett 2006, pp. 188–190.
- ↑ 122.0 122.1 122.2 Beckett 2006, p. 193.
- ↑ Evans 1997, p. 21.
- ↑ Evans 1997, pp. 21–22.
- ↑ Beckett 2006, p. 213.
- ↑ Beckett 2006, p. 214.
- ↑ Beckett 2006, pp. 216–218.
- ↑ Beckett 2006, pp. 219–220.
- ↑ Beckett 2006, pp. 221–224.
- ↑ Erdmann, Karl Dietrich (ed.) (1972). Kurt Riezler: Tagebücher, Aufsätze, Dokumente. Göttingen: Vandenhoeck & Ruprecht., p. 227.
- ↑ Beckett 2006, pp. 225–226.
- ↑ Edmonds, J. OH 1914 II, pp. 466–468.
- ↑ Beckett 2006, p. 227.
- ↑ Beckett 2006, pp. 228–229.
References[]
- Books
- Ashby, John. Seek Glory Now Keep Glory: The Story of the 1st Battalion Royal Warwickshire Regiment, 1914–1918. Helion and Company. 2000. ISBN 1-874622-45-0
- Beckett, Ian. Ypres The First Battle, 1914. Longman; 2004 Edition. ISBN 978-0-582-50612-1
- Beckett, Ian. Ypres The First Battle, 1914. Longman; 2006 Edition. ISBN 1-4058-3620-2
- Beckett, Ian and Simspon, Keith. A Nation in Arms: A Social Study of the British Army in the First World War. Manchester University Press. 1985, ISBN 978-0-7190-1737-7
- Bidwell, Shelford & Graham, Dominick. Fire-Power: The British Army Weapons and Theories of War, 1904–1945. Pen & Sword. London. ISBN 1-84415-216-2
- Chapman-Huston, Major D. and Rutter, Owen, Major. General Sir John Cowans, G.C.B., G.C.M.G: The Quartermaster-General of the Great War Volume 1, London, Hutchinson and Co, 1924. OCLC 792870994
- Evans, Martin Marix. Passchendaele and the Battles of Ypres 1914–1918. Osprey. 1997. ISBN 1-85532-734-1
- Foley, Robert. German Strategy and the Path to Verdun: Erich Von Falkenhayn and the Development of Attrition. Cambridge University Press, 2007. ISBN 978-0-521-04436-3
- Gardner, Nicolas. Trial by Fire: Command and the British Expeditionary Force in 1914. Pearson; London. 2003. ISBN 0-582-50612-3
- Griffith, Paddy. Battle Tactics of the Western Front: The British Army's Art of Attack, 1916-1918. St Edmunds Press, London. 1997. ISBN 0-300-05910-8
- Holmes, Richard. The Oxford Campanion to Military History. Oxford University Press. 2001. ISBN 978-0-19-860696-3
- Lomas, David. First Ypres 1914: The Birth of Trench Warfare. Greenwood Press; 2004. ISBN 978-0-275-98291-1
- Martin Gilbert: The Routledge Atlas of the First World War, second edition, Routledge 2002 ISBN 0-415-28508-9
- Mc Greal, Stephen. Boesinghe: Battle Ground Ypres. Pen & Sword. 2010. ISBN 1-84884-046-2
- Paul Van Pul : In Flanders Flooded Fields, before Ypres there was Yser, Pen & Sword Military, 2006 ISBN 1-84415-492-0
- Pawly, R. & Lierneux, P. The Belgian Army in World War I. Men at Arms, 2009. ISBN 978-1-84603-448-0
- Prior, Robin & Wilson, Trevor. Command on the Western Front: The Military Career of Sir Henry Rawlinson, 1914–1918. Pen & Sword. London. ISBN 1-84415-103-4
- Sheffield, Gary and Todman, Gary. Command and Control on the Western Front: The British Army's Experience 1914–18. Spellmount. London. ISBN 978-1-86227-420-4
- Sheldon, Jack. The German Army at Ypres 1914 Pen & Sword Military, London, 2010. ISBN 978-1-84884-113-0
- Colonel M. G. Taylor, 'Land Transportation in the Late War', Journal of the Royal United Service Institution, Issue 66 (1921) ISSN 0035-9289
- Wilson, Trevor. The Myriad Faces of War: Britain and the Great War, 1914–1918. Cambridge, Polity Press, 1986. ISBN 978-0-7456-0645-3
- Websites
- Google (16 May 2013). "Max von Fabeck". translate.google.com: Google translate. http://translate.google.co.uk/translate?hl=en&sl=de&u=http://de.wikipedia.org/wiki/Max_von_Fabeck&ei=0TlgS7LuDqL00gSoqO3iDA&sa=X&oi=translate&ct=result&resnum=7&ved=0CBcQ7gEwBg&prev=/search%3Fq%3Dmax%2Bvon%2BFabeck%26hl%3Den. Retrieved 7 September 2013.
External links[]
| Wikimedia Commons has media related to First Battle of Ypres. |
- Peter J Palmer, Langemarck: the Battle and the Myth
- Peter J Palmer, Battle of Nonnebosschen, 11 November 1914
- General Joffre's report on the battle
- Battles: The First Battle of Ypres, 1914
- film documents on the Battles of Ypres at www.europeanfilmgateway.eu
| ||||||||||||||||||||||||||||||||||||||||||||||||||||||||||||||||||||||||||||
The original article can be found at First Battle of Ypres and the edit history here.