| GADA 601 | |
|---|---|
| Active | 1939 – present |
| Country | República Argentina |
| Branch | Argentine Army |
| Type | Battalion size group |
| Role | Air Defence |
| Size | Around 1,000+ |
| Engagements |
Falklands War UNPROFOR UNFICYP |
| Decorations | Falklands Campaign Medal |
| Commanders | |
| Notable commanders |
(Honorary Commander) |
| Insignia | |
| Identification symbol |
A Roland type missile over two vintage cannons set in an "x " arrangement; a map of the Falklands in the background (GAA 601)[1] |
The 601st Anti-Aircraft Artillery Group (GAA 601 or Grupo de Artillería Antiaérea 601), historically known as GADA 601 (Grupo de Artillería de Defensa Aérea 601) is the main anti-aircraft artillery unit of the Argentine Army. Its headquarters are based just north of Mar del Plata. The unit's name was changed to GAA 601 Teniente General Pablo Ricchieri in 1999. The group played a key role during the 1982 Falklands War. The GAA 601 compound is the main air defence training center in Argentina.
Origins[]
The origin of the anti-aircraft artillery of the Argentine Army dates back to 1939, when the Grupo de Artillería Antiaérea was established in Campo de Mayo, the main headquarters of the army, along with the Centro de Instrucción Antiaéreo, a training unit.
Meanwhile, the authorities of the resort town of Mar del Plata were seeking the settling of an army base there. In 1940, a local independent commission, under the auspices of Juan Fava and Rufino Inda, both of them former socialist Mayors of the city, made a formal request to the Ministry of War.[2] Incidentally, the socialists ruled Mar del Plata during the two major combat deployments in the unit's history (1962 and 1982), although the country was under a military dictatorship in both occasions.[3] By the end of 1944 the two anti-aircraft groups were merged and effectively transferred to Mar del Plata, under the name of Escuela Antiaérea ("Antiaircraft Artillery School").
Weapons[]
The first AAA weapons deployed were 76.2 mm Skoda guns[2] and 20 mm cannons.[4]
Several years later, between 1949 and 1962, the army purchased Bofors 40 mm guns and 90 mm guns.[5] During 1951, the first long-range radar, a Westinghouse, was imported from the USA.[6] The group changed its name from Training Center of Air Defense (CIADA) to Artillery Battalion of Air Defense 601 (GADA 601) in 1964. Its first commander was Lieutenant Colonel Esteban Rodriguez. The GADA was composed of batteries, each one divided in three sections. The section, led by a 2nd Lieutenant, usually comprised two artillery pieces. In 1968, a new sub-unit, Battery "C", was established, incorporating new material like the 40 mm L 70 Bofors-Contraves radar-guided system.
The first missile Battery was equipped with Tigercat triple launchers in 1970.[7]
In 1980, after a border crisis with Chile, the army acquired the 35 mm Oerlikon-Contraves radar-guided system. Furthermore, a new unit had been added to the GADA in 1976, the AADA 602, to deal first with the Tigercats and some years later with Roland-2 missiles.
After losing half of the 35 mm systems and one of the four Rolands in the war of 1982, the group was reinforced with 40 mm Bofors and 30 mm Hispano-Suiza guns.
Operational history[]
Political unrest (1955–1978)[]
From the second term in office of Juan Perón to the dictatorships of the 1970s, there were several periods of political unrest and violence involving the military. Argentina witnessed the overthrowing of constitutional governments followed by sporadic clashes between rival factions of the armed forces and the surge of leftists militant organizations. The GADA took part on a number of these incidents:
1955: Revolución Libertadora. During the last days of Peronism in power, following a huge purge on its ranks, the Army became the only force inside the military with a majority of officers supporting Perón.[8] This was also the case of the GADA. There was a first ill-fated attempt against the government, led mainly by the Navy, on 16 June, when rebel aircraft launched a series of air strikes around Plaza de Mayo, killing nearly 350 people.[9] In Mar del Plata, the group kept a close watch on the naval base, taking positions on the hills surrounding the port.[10] Eventually, the uprising succeeded on 16 September. This time, the attitude of the GADA officers was hesitant. During the morning of the 19, the cruiser ARA 9 de Julio (former USS Boise) and five destroyers shelled the group's barracks, already abandoned by the troops. A long range radar tower and other equipment was destroyed. The commander changed sides shortly after this action.[11][12]
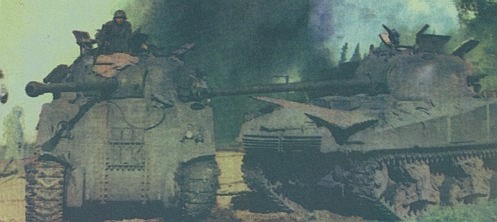
Sherman tank disabled by 40 mm fire near Florencio Varela, September 1962
1962: After the fall of President Arturo Frondizi and his replacement by a puppet civilian government under the supervision of the armed forces, the military remained divided over the issue of the banning of some political parties. While there was a wide consensus on the proscription of leftist ideologists, things became not so clear regarding peronism. The hard-line group was dubbed colorados ("the purples"), and the "legalist" - against an indiscriminate ban - azules ("the blues").[13]
In September 1962, the army's command in chief and the Ministry of Defence were controlled by the colorados. An internal uprising started inside the army on September 18, when the azules, led by General Onganía defied the central authority. President José María Guido remained neutral. On 20 September, the units involved marched to the capital. One of these was a 30 Sherman tanks strong column departed from their base at Magdalena, south east of La Plata. The Commander-in-Chief set up a roadblock near Florencio Varela, a city in the midway between Buenos Aires and La Plata.[14] A GADA's detachment, under the command of Major Merbilháa, was called to duty to reinforce the position with their Bofors 40 mm guns.[15] The half-hearted engagement began at mid-morning, when a reconnaissance plane was scared off by anti-aircraft fire.[16] The post was eventually overpassed by the armored column, but according to Colonel Federico de la Fuente, the group commander, the 40 mm guns disabled between 4 to 5 Shermans.[17] Historian Félix Luna, instead, suggests the loss of only two tanks.[18] During a previous action, a patrol of scouts had been captured by members of the GADA.[19] After a full day of clashes, the crisis ended with the dismissal Commander in Chief and the Minister of Defence when the armoured forces reached Buenos Aires. Onganía claimed victory for the azules and their "constitutional" point of view. However, he would took the presidential seat from president Arturo Illia by a coup d'état in 1966.[20]
1970–1978: The Dirty War. Amid leftist violence and social unrest, the military engaged in an indiscriminate repression along this period. The first significant GADA activity was the deployment, in 1975, of a full battery of light anti-aircraft guns in Tucumán province, which by the time was the scenario of a rough counterinsurgency campaign against the ERP. The guns were intended to deal with the alleged presence of a helicopter Hiller 1100 stolen by the guerrillas from a Government-owned company.[21] The conflict struck home in March 1976, when a splinter organisation of the ERP ambushed and killed the GADA commander in Mar del Plata's downtown.[22] A few days later, the military overthrew the government of Isabel Perón. The coup gave them the full control of the country and established a military dictatorship. The group, along with special intelligence officers, mounted operations not only against militants, but also against those ideologically affiliated to them. These illegal arrests were carried out with the collaboration of the Air Force, which built a clandestine detention facility near the city's airport, dubbed La Cueva (The Cave). Most of these detainees became missing or desaparecidos.[23] In 2008, former GADA commander Colonel Pedro Barda was indicted over human right abuses and eventually sentenced to life in prison.[24] Barda died in Buenos Aires in August 2011.[25]
Crisis with Chile (1978)[]
A dispute over the islands of the Beagle Channel prompted a conflict with Chile in 1978. On 12 December, the bulk of the GADA was deployed in northern Patagonia. The Grupo de Artillería de Defensa Aérea Mixto 602, in charge of the Tiger Cat missiles was moved by railway to the town of Río Colorado, close to the river of the same name, in Río Negro province. Meanwhile, the remainder of the force continued the trip further west, to the city of Zapala, in Neuquen province. The troops then marched by route to the build up area near Plaza Huincul. The group established three outposts along the rivers Colorado and Limay in order to provide AAA defence to key bridges. After a diplomatic breakthrough achieved by the Vatican envoy, Cardinal Antonio Samoré, the GADA came back to Mar del Plata on 30 January.[2]
Falklands War (1982)[]
Build-up[]
Just before the start of the crisis that would lead to the Falklands War, the army group was reinforced when an Argentine Air Force detachment, the Grupo 1 de Artillería Antiaérea (1st Group of Antiaircraft Artillery) was transferred from Tandil to Mar del Plata in October 1981. The Air Force group was reinforced with personnel from Río Gallegos. Both forces would operate together during the conflict in the defence of Stanley airport, renamed BAM Malvinas by the Argentines and Goose Green airstrip, designated BAM Cóndor (Cóndor Military Air Base).[26]
GADA 601 was mobilised to Comodoro Rivadavia, along the Patagonia's coast, on 12 April. The equipment was loaded at the naval base of Mar del Plata on board the cargo ship Córdoba, bound for Puerto Deseado. As the ship was damaged whilst at anchor, the artillery, missiles systems and vehicles were airlifted to Comodoro Rivadavia. A battery comprising a Roland-2 missile unit, a Skyguard radar and two 35 mm Oerlikon twin cannons was left behind to provide air defence for the mainland air bases of Puerto San Julián and Río Gallegos. The remainder of the troops and their materiel finally crossed to the Islands by air between 12 April and 24 April.[27]
The troops were deployed in three batteries (A, B and C), with three sections each, plus AADA 602 with a Roland-2 launcher. Each section manned two twin Oerlikon-Contraves guns controlled by a Skyguard radar. A second anti-aircraft group of the army, the GADA 101 from Ciudadela, Buenos Aires, arrived in Stanley on 29 April. They were armed with eight single HS-831 30 mm cannons. The main early warning system for the army was an AN/TPS-44 tactical surveillance radar (Alert Mk II A/O), manned by GADA 601 personnel, mounted on the eastern slopes of Sapper Hill. The main areas to defend were the airfields (Stanley and Goose Green), Command and Control centres and artillery positions. The Air Force Grupo 1 de Artillería Antiaérea was in charge of the airport, with nine twin 20 mm cannons and a Super-Fledermaus Fire Control radar with three Oerlikon 35 mm twin guns, similar to the Skyguard Fire Control radar. GADA 601 deployed one of its own 35 mm section near the east end of the airstrip. The other sections and the Roland unit were initially located in an arc from Moody Brook to the eastern slopes of Sapper Hill.[28] The third section of B battery was transported by helicopter to Goose Green on 29 April.[29]
Combat Operations[]
1st May: Opening Actions[]
The GADA radar on Sapper Hill was the first to detect the Black Buck raid of 1 May. Unsure of its position after such a long flight at low level over water, the commander (Flt Lt Martin Withers) of Vulcan bomber XM607 briefly climbed to gain a radar fix from the mountains east of Stanley.[30] In performing this manoeuvre, his aircraft was briefly detected by the crew of the AN/TPS-44 surveillance radar before descending once more to low level. Initially the crew were uncertain that the aircraft they had detected was hostile, leading to delays in alerting the air defence system.[30] The air base was warned at 4:20 am local time but the low level approach of the Vulcan bomber combined with active jamming from DASH 10 ECM pod prevented the AAA defences from engaging the bomber. The reaction of the defences was therefore ineffective. The stick of 21 1000 lb bombs damaged the airport tower, scored a single direct hit in the centre of the runway and killed two Air Force personnel. Nevertheless, the airstrip was still operational.[31]
At 7:40 four Sea Harriers from HMS Hermes carried out a second attack from the west. Argentine sources claimed that a Roland-2 downed one of these aircraft, however, British sources indicate that none of the aircraft taking part in this sortie were damaged.
As the air defences were now alert, another five Sea Harriers coming in from the east, were received by heavy 35 and 20 mm AAA, both from GADA and the Air Force's Grupo 1. Ingress was from the north at low level. The attackers used a combination of 1000 lb bombs and cluster bombs; a fuel depot was left in flames and minore damage was inflicted on the airport facilities. GADA claimed to have shot down two aircraft that morning, one to 35 mm fire, the other to a Tiger Cat missile.[32] British sources, whilst conceding that the reaction of the ground defences was intense, indicate only a 20 mm hit on the tail of the Sea Harrier piloted by Lt. Cdr. David Morgan.[33] In fact, no British aircraft were lost.[34]
Friendly fire incident[]
Later that day, a Mirage III, already damaged in combat by a Sea Harrier was the victim of a friendly fire incident while attempting to land on the air base. A GADA 601 battery fired three burst of 35 mm rounds at the Mirage,[35] but the aircraft had been already targeted by Argentine Navy 30mm guns deployed along the town.[36] The Official History of the Argentine Air Force put the blame on the lack of coordination between the Joint Antiaircraft Command and infantry troops on the ground, who started to fire their rifles at the aircraft, unleashing a chain reaction among the Navy and Army's gunners.[37]
Goose Green[]
In contrast to the vigorous anti-aircraft response in Stanley, the GADA 601/Grupo 1 team in Goose Green was taken by surprise. The ground crews there were assisting a number of Pucará aircraft that were about to take off to avoid being caught on the airstrip. At 8:00, the air warning was downgraded to "blue" to allow the Pucará's departure. The anti-aircraft guns were ordered to perform a training exercise. To make matters worse, the gear of one of the planes became embedded in mud, delaying the operation. A few minutes later, three Sea Harriers made a sudden appearance over the base. The leader of the formation dropped two 1,000 lb bombs, which missed their intended targets (the airstrip and an ammunition depot). The other aircraft instead, loaded with three cluster bombs, found their mark. Several bomblets hit one of the still grounded Pucarás, killing the pilot as the Argentine aircraft burst in flames. Another bomb dispensed its load of bomblets over the tents of the support personnel; seven men were killed and 13 wounded. The other bombs started a fire very close to a stockpile of heavy ammunition boxes. Eventually, the fire crews prevented further explosions.[38]
First Success[]

Piece of wreckage from Sea Harrier nº. XZ450
After a few days without air strikes, on May 4 a flight of three Sea Harriers belonging to the 800 Naval Air Squadron and armed with cluster bombs raided Goose Green. However this time potential targets were well camouflaged, and the air base had been put under a 24-hour full alert. The 35 mm cannons were relocated to the north and south of the small Goose Green peninsular from their original position west of the airstrip.[39] The raid's leading aircraft, piloted by Lt Cdr Gordie Batt, was locked up by the Skyguard system while flying from the east at very low altitude. Batt became aware of this from his onboard systems and deployed Chaff whilst breaking right so the Skyguard lost lock. However, behind the lead was Sea Harrier nº. XZ450 piloted by Lt Nick Taylor, this particular aircraft lacked a Radar Warning Receiver (RWR) as it had been removed before the war to fit instrumentation for a new missile, Sea Eagle, that was undergoing trials.[40] Unaware of the threat ahead, Taylor was hit by a second salvo from the 35 mm cannons.
Nº. XZ450's fuselage was hit and caught fire, losing the left wing in the process, it then cartwheeled in the air and crashed at a 10° angle. Taylor's body was thrown through the canopy and fell 80 meters away from the crash site. The crash was caught on the gun camera film, of Flt Lt Ted Ball, which showed a large explosion in the region of the fuselage that was clearly unsurvivable.[40]
The third aircraft, piloted by Flt Lt Ted Ball, released its bombs but no targets were hit and returned to Hermes.
The 20 mm cannons from Air Force's Grupo 1 claimed they shot down another of the Sea Harriers.[41][42] However British sources have confirmed that XZ450 was the only aircraft lost that day.[40][43]
The remains of Lt Nick Taylor were buried on the edge of the airfield where he fell, with full military honors, to this day his grave is still tended to by the residents of Goose Green.[40] The first shooting down of a Sea Harrier was a morale boost for GADA gunners and soldiers.[41] Incidentally Taylor's aircraft, no. XZ450, was also the aircraft that made the Sea Harrier's maiden flight on 20 August 1978.[44][45]
Examination of the wreckage of nº. XZ450 yielded the panel for the launch of Sea Eagle missiles, British sources have speculated that the Argentines concluded that Sea Eagle had been made operational and this was another factor that kept the Argentine navy in port.[46]
This GADA success prompted a change of tactics in the employment of the Sea Harriers: in order to avoid further losses of such valuable air defence assets and pilots, the subsequent air-to-ground operations were carried out from high altitude, well above the reach of the enemy ground fire. It was not until the arrival of the first GR3 Harriers that limited low level missions were launched, most of them in close air support role, or against high-value targets, like artillery and radars.[47][48] The GR.3 Harrier, however, repeated the experience of its naval counterpart: a series of losses and aircraft damaged[49] left three GR3 Harrier operational of 1(F) Squadron by June 1 (although re-inforcements joined the Task Force later that day by flying directly from Ascension Island).[50] To fix the problem, the RAF was forced to improve their countermeasures to continue its air campaign by increasing the number of Chaff and flares packages onboard and enhancing its radar-detection capabilities. The GR3 were also supported by Sea Harrier's diversionary missions.[51]
GR3 Harriers in action[]

Remains of the tail of Bob Iveson's Harrier nº XZ998, northwestern Lafonia
On May 12, another friendly-fire incident struck the GADA after three A4 Skyhawks conducted a successful attack on HMS Glasgow. One of the returning jets flew by mistake over a banned zone in Goose Green, and was shot down with the loss of the pilot. The Argentine Air Force conceded that this time the incident was triggered by the pilot's navigation error.[52]
With the beginning of Operation Sutton, the Harrier GR3s of 1(F) Squadron stepped up attacks upon ground targets. These included low-level strikes with cluster bombs and rockets as well as nuisance raids in which 1000-lb bombs were launched in loft and high-altitude profiles. During some high-altitude bombings the radar-guided guns locked onto the falling 1,000-lb bombs and, it is claimed, destroyed them on at least three occasions.[53] It is also claimed that a Roland-2 blew up another bomb in mid-air after the release aircraft successfully broke radar lock.[54]
On May 22, the section deployed in Goose Green engaged a strike package of four Harrier GR3s from 1(F) Squadron.[55] One of the Harriers, piloted by Sqn Ldr Jerry Pook, released chaff approximately 2 km from the target zone, blinding the radar and triggering an anti-missile alarm (confirmed by the reports of the GADA's antiaircraft battery under Second Lt. Braghini).[56] Nevertheless, Braghini reports that they re-locked Pook's Harrier[56] and fired several 35-mm rounds. British after-action reports indicate that the Argentine forces engaged all of the Harriers with heavy AAA fire[55] but that it was the Harrier GR3 piloted by Sqn Ldr PV Harris that was subsequently locked up by a Super Fledermaus-type radar. Harris pressed his attack but his cluster bombs hung up. Argentine forces report that the air attack produced no damage[56] but the after-action report by the British indicates secondary explosions following the attack with cluster bombs.[55] A further example of the "fog of war" is that although the British attack committed four Harrier GR3s,[55] the Argentine report mentions only three.[56]
On the night of May 24, the GADA 601 section issued a warning to the air base at Goose Green about the presence of a helicopter and the possible landing of special forces. Several minutes later, members of the SAS mounted a diversionary attack on Darwin Hill.[57]
On May 27, during the first stages of the battle of Goose Green, several Harrier sorties hit the Argentine advanced positions to the north in support of the assault, but the Close Air Support mission was complicated by bad weather and poor communications.[58] After making four passes, Sqn Ldr Bob Iveson's aircraft was hit by heavy AAA fire from GADA 601 35-mm cannon.[59][60][61] The aircraft, Harrier nº XZ998, exploded in the air about 5,000 meters from GADA 601's position. Sqn Ldr Iveson bailed out safely and was rescued by friendly forces three days later.[62][63][64] Many of the aircraft shot down by ground defences were hit after making repeated passes over the target, and the wisdom of these tactics was repeatedly questioned.[58][65]
Direct fire on Darwin Hill[]
The Darwin school-house in flames after been hit by 35 mm rounds
The next morning, on May 28, British troops from the 2nd PARA Regiment took Darwin Hill after fierce fighting.
The GADA detachment, unaware of the situation, observed several platoons advancing down the southern slopes of the ridge. After identifying them as British, GADA 601 section engaged with direct fire. The 35 mm bursts blocked the advance of the leading companies of the 2nd PARA Regiment, who suffered a number of losses. C Company bore the brunt of the Argentine fire, the Headquarters section of C Company was effectively put out of action[66] and all told they took 20% casualties, including their commander, Major Hugh Jenner, and his signallers.[67][68] One of Jenner's signallers, Private Mark Hollman-Smith, was killed by 35 mm fire while trying to recover a heavy machine gun from Private Steve Russell, who had been wounded in the neck.[69] The rear platoon, attached from A Company, was forced to remain behind Darwin Hill for the rest of the battle.[70]
The last direct-fire mission of GADA 601's section targeted the Darwin school-house, a position recently taken by troops of D Company.[71] The building, already set on fire by white phosphorus grenades by the British, was systematically destroyed by 35 mm rounds and burnt to the ground, resulting in further casualties for the paratroopers.[72] Private Steve Dixon, from D Company, died when a splinter from a 35 mm shell struck him in the chest.[73]
The British advance from this area was eventually halted on the orders of Major Chris Keeble who decided to stop the advance in order to consolidate his position.[74][75][76]
Shortly after the GADA position was subjected to mortar fire, and the power generator of the guns was damaged beyond repair. A later Harrier strike was inaccurate and failed to hit the GADA 601 position,[77] as corroborated by a British account of the action.[78] The mortar barrage, however, forced the section to seek shelter. With the garrison now isolated and surrounded, the Argentine commanding officer chose to surrender the following day.[79]
The Battle for the Capital[]
After the fall of Goose Green, the British effort was now free to concentrate on Port Stanley (called Puerto Argentino by the Argentines). From the period between May 2 to May 28, there were three Vulcan sorties planned, but only one was carried out against Base Aérea Militar Malvinas.[80] Argentine sources reveal that two soldiers were slightly injured but no damage was done to the airstrip.[81] Another attempt against the airstrip was carried out during May 24. A package of four GR3s, flying at very low level to avoid radar detection, managed to drop retarding fuse bombs right on the runway. They were supported by two Sea Harriers tossing air burst bombs from high altitude to deceive the air defences. The low-angle fall, however, produced only surface damage,[82] which was repaired six hours after the strike.[83] Argentine sources acknowledge that a Pucará and an Aermacchi were also damaged. One of the GR3s was also hit either by debris, according to the British version, or by antiaircraft fire, according to Argentine sources.[83] On May 25, the group suffered its first fatality [84] when a soldier was killed by the blast of an unexploded bomblet. Five days later, a pair of GR3 was initially tasked to attack with rockets entrenched troops on Mount Wall, west of Stanley, one of the very first strikes against the defensive ring around the Falklands capital. The air patrol was led by Sqn. Ld. Jerry Pook on nº XZ963. The original target was changed for a helicopter landing zone, some distance eastward. After approaching from the south, Pook flew right over a column of vehicles and troops, and was greeted by automatic fire[85][86] around 4 km from the target's area.[87] Argentine authors assert instead that the aircraft was hit by 35 mm fire from GADA's 1st section, B battery, which was completing a redeployment from Moody Brook to a position between Sapper Hill and the Stanley racecourse, under the command of 2nd Lieutenant Ferre.[88][89][90] Pook's first hand account recalls to have feeling a "heavy thump",[91] which is compatible with the impact of a large anti-aircraft shell. Nevertheless, the actual target's position given by Pook in his book was too far to the west to being acquired and shot at by GADA's gunners, albeit he is not too much assertive about having been hit by small arms rounds.[92] A British official report states, however, that on June 12 another GR3 was peppered by "AAA splinters" east of Mount Harriet, almost the same location where Pook's jet was damaged.[93] After finding no choppers on the assigned area, both Harriers attacked the original objective further west. At this time it became clear that Pook's jet was leaking fuel as consequence of the hit. With the engine in the verge of burning out and an incipient hydraulic failure, Pook climbed to 7,000 meters and ejected some 45 NM from Hermes. He was rescued only 10 minutes later.
Harrier nº XZ997 on HMS Hermes deck, showing shrapnel damage on its left wing, 14 June 1982
The next day, May 31, Stanley airport was hit by the combined action of Vulcan, Harrier and Sea Harrier aircraft. The Vulcan fired Shrike anti-radar missiles, which went stray when the Argentine radar-operators switched off their devices. The Sea Harriers dropped bombs from high level, and three Harriers straffed the airstrip with cannon fire and rockets, in the belief that A4 Skyhawks had recently landed there. A Skyguard section claims to have hit two GR3s just before the pilots opened fire.[94] Indeed, the RAF acknowledges that the two aircraft were badly hit, but the source of the damage is unclear. The engine of the leading Harrier, nº XV789, had to be replaced onboard Hermes, and remained grounded for five days. The other fighter, nº XZ977, only needed minor repairs.[95]
On June 1, the Roland-2 system claimed a Sea Harrier over the airport. The aircraft, nº XZ456, belonging to the 801 Naval Air Squadron from HMS Invincible, was in a recce mission 7 km south of Stanley, apparently out of the reach of the missile, but tracked by its radar. The Argentine officer on charge of the unit, Lt. Regalini, fired the Roland despite the target being 7,000 meters away. The pilot, Flt. Lt. Ian Mortimer, climbed up, confident that he had successfully outmaneuvered the missile. A couple of seconds later, the rear bay of his jet was torn apart by the explosion of the proximity fuze, leaving only the cockpit undamaged. Mortimer's ejection was witnessed by hundreds of Argentine troops. After a 9-hour ordeal at sea, he was recovered by a British helicopter.[96]
The GADA lost four men to a Shrike missile strike on June 3. While at least two Skyguard units were fighting off an air attack – believed at that time to be conducted by Harriers - two missiles were fired by one Vulcan bomber involved in the operation Black Buck six. The long range radars switched off their emissions as usual, but the two Skyguard systems waited until it was too late for one of them. Second Lt. Huergo's section claims that them locked a "bomb" and destroyed it in mid-air – it may be they hit one of the missiles - but at the same time of this explosion, another blast was heard. The other missile, mounted on the radar wave of the 1st section of battery A's Skyguard had hit its target.[97] First Lt. Alejandro Dachary, and three of his men were killed. Another soldier survived the attack.[98] Apparently the operator, warned by the alarm, turned off the radar, but the missile was already in terminal phase and struck home anyway.[99] The bomber, Vulcan nº XM597, was forced to divert to Rio de Janeiro in Brazil during the returning trip, after its in-flight refuelling probe broke. One of the missiles it was carrying was ditched into the ocean to reduce drag, but the other remained stuck on the pylon and could not be released. Sensitive documents containing classified information were jettisoned into the sea via the crew hatch, and a "Mayday" signal was sent. The aircraft was eventually cleared to land by Brazilian authorities. The Vulcan remained interned for nine days, and returned along with its crew on 11 June. However, the remaining Shrike missile was confiscated.[100]
On 9 June, Harrier nº XZ997 was hit again by shell splinters over Sapper Hill, defended by at least one 35 mm section.[101] The aircraft wings and upper fuselage were holed in several places, and the Harrier suffered a minor hydraulic failure on recovery.[102][103]
During a naval bombardment against Sapper Hill, on the early morning of June 12, the GADA's main radar was damaged and another soldier was killed.[104][105]
Harrier nº XW919 on board Contender Bezant on his way back to Britain after being declared out of service
In what may have been the last GADA 601 success in this war, Harrier nº XW919 was hit by shrapnel and seriously damaged on June 12, while dropping CBUs on an artillery position near Sapper Hill. During the recovery, the aircraft caught fire on Hermes flight deck, owing to a fractured reaction pipe.[106] Argentine sources claim that the aircraft was hit by AAA immediately after the attack. A 155 mm howitzer was lightly damaged and six soldiers injured. The account mistakes the CBUs for rockets.[107] As mentioned above, Sapper Hill was defended by at least one GADA section.[101] After being patched up, the aircraft was declared out of service and shipped to Britain on board MV Contender Bezant. The Harrier gone through extensive repairs and, though still operational, it was eventually transferred to the SFDO (School of Flight Deck Operations) at Culdrose.[108] This Harrier is now on display at the Defence College of Shrivenham.[109]
In the final hours of the war, the western most section of the group took part of the battle of Wireless Ridge, supporting the withdrawal of the Regiment of Infantry 7 with 35 mm fire.[110]
After the Argentine capitulation, the group's 35 mm Oerlikon guns, abandoned and disabled by their operators,[111] were captured by British forces. The weapons were refurbished and used to form a Royal Auxiliary Air Force squadron at RAF Waddington.[112] Four Skyguard radar units are employed by RAF Police to survey UK military flights over residential areas and to give warning of low-flying aircraft on sensitive facilities since 1993.[113][114][115]
The bulk of the group's personnel left the Islands on 17 June 1982.[116] The officers were released a month later.
Enemy aircraft shot down or disabled by GADA 601[]
| Nº | Pilot | Date | Place | Weapon | Effect |
|---|---|---|---|---|---|
| Sea Harrier XZ450 | Lt. Nick Taylor RN† | 4 May 1982 | Goose Green | 35 mm fire | Shot Down |
| Harrier XZ988 | Sqn. Ldr. Bob Iveson | 27 May 1982 | Goose Green | 35 mm fire | Shot Down |
| Harrier XZ963 | Sqn. Ldr. Jerry Pook | 30 May 1982 | West of Stanley | 35 mm/Small arms fire | Shot Down |
| Sea Harrier XZ456 | Flt. Lt. Ian Mortimer | 1 June 1982 | South of Stanley airport | Roland-2 missile | Shot Down |
| Harrier XW919 | Flt. Lt. Murdo McLeod | 12 June 1982 | Sapper Hill | 35 mm splinters | Out of service |
Direct fire support[]
| Date | Place | Target | Effect |
|---|---|---|---|
| 28 May 1982 | Goose Green | 2nd PARA Regiment | 2 soldiers killed, 11 wounded Two advancing companies halted 20% of casualties among PARA C Company Company's HQs out of action |
| 13/14 June 1982 | Wireless Ridge | 2nd PARA Regiment | Withdrawal of remnants of Regiment of Infantry 7 successfully covered by 35 mm fire |
Peacekeeping missions[]
After the war, the group took part in several UN peacekeeping missions since 1992 with a contingent of 200 troops. The main peacekeeping operation involving the GADA was UNPROFOR. The GADA was under the command of the Batallón Ejército Argentino (BAE), deployed in Western Slavonia from February 1992 to November 1995. About 70 officers and NCOs of the force also joint the Fuerza de Tareas Argentina (FTA) in Cyprus.[117]
1999 Merge[]
As part of an Army reform, the GADA 101 was moved from Ciudadela to Mar del Plata and merged into the GADA 601 in 1999. The joint force was renamed Grupo de Artillería Antiaérea 601 Teniente General Pablo Ricchieri. The commander of the group during the Falklands conflict, Héctor Lubin Arias, was appointed honorary commander on 20 November 2010.[118]
Notes[]
- ↑ See here
- ↑ 2.0 2.1 2.2 www.mardelplata-ayer.com.ar
- ↑ Mayors of Mar del Plata
- ↑ Reguera & others, p. 416
- ↑ ADA 601
- ↑ Potash, p. 234
- ↑ Grupo de Artillería Antiaérea 601
- ↑ Potash, pp. 214, 221
- ↑ Potash, p. 259
- ↑ La Capital newspaper, 17 June 1955
- ↑ Potash, p. 278
- ↑ Ruiz Moreno, pp. 288-289
- ↑ Potash, pp. 501-504
- ↑ Excerpts from Yo fuí testigo magazine, 1986
- ↑ Castello, antonio emilio (1986). La democracia inestable, 1962-1966: 1a pt. El calvario de un presidente. BPR Publishers, p. 125. ISBN 9505081774 (Spanish)
- ↑ Azules y Colorados: Diferencias Internas, Enfrentamientos Públicos Anuario del Instituto Argentino de Historia, 2004, nº 4, pp. 217-233 (Spanish)
- ↑ La Capital newspaper, 21 September 1962
- ↑ Luna, Félix (1988). 500 años de Historia Argentina: La Inestabilidad constitucional. Editorial Abril, p. 44 and 47 (Spanish)
- ↑ United Press International, 20 September 1962
- ↑ Excerpts from Yo fuí testigo magazine, 1986
- ↑ Burzaco, p. 99
- ↑ Díaz Bessone, p. 343
- ↑ CONADEP report
- ↑ ADUM website
- ↑ Murió el represor Pedro Barda La Capital, 20 August 2011 (Spanish)
- ↑ www.mardelplata-ayer.com.ar
- ↑ Rodríguez Mottino, p. 56
- ↑ Rodríguez Mottino, pp. 165–166, p. 212
- ↑ Rodríguez Mottino, p. 187
- ↑ 30.0 30.1 White, Rowland, Vulcan 607, Bantam Press, London, 2006 ISBN 0-593-05391-5
- ↑ Rodríguez Mottino, pp. 166–167
- ↑ Rodríguez Mottino, pp. 167–168
- ↑ Jackson, p. 154
- ↑ In what became one of the iconic statements of the Falklands War, BBC reporter Brian Hanrahan was able to document the safe return of the aircraft from the sorties that day with his report:
- "I'm not allowed to say how many planes joined the raid, but I counted them all out and I counted them all back."
- ↑ Rodríguez Mottino, p. 170
- ↑ El derribo del primer avión argentino en Malvinas (Spanish)
- ↑ Malvinas Argentinas from Historia de la Fuerza Aérea Argentina, Volume VI: La Fuerza Aérea en Malvinas (Spanish)
- ↑ Andrada, pp. 86–90
- ↑ Minutos después del ataque recorro con el Sargento Ayudante Tarditti la posición, buscando un nuevo lugar donde emplazar la sección, pues mi ubicación ya había sido detectada por la aviación enemiga y era imprescindible que efectuase un cambio de posición. Esa tarde tomo contacto con el Vicecomodoro Pedroso, quien ante una propuesta mía para efectuar un cambio de posición, me ordena desplazar mis cañones a una pequeña lengua de tierra en el otro extremo de la pista, en donde se encuentra la localidad de Ganso Verde, pues desde Puerto Argentino alertaban sobre la presencia de barcos enemigos en la entrada del estrecho y un probable desembarco. 2nd. Lt. Braghini statement, Rodríguez Mottino, p. 189
- ↑ 40.0 40.1 40.2 40.3 Morgan, David (2007). Hostile Skies. London: Phoenix. p. 99. ISBN 978-0-7538-2199-2.
- ↑ 41.0 41.1 Rodríguez Mottino, p. 189
- ↑ Andrada, pp. 112–113
- ↑ Nigel "Sharkey" Ward (2006). Sea Harrier Over the Falklands. Cassell Military Paperbacks. p. 220. ISBN 0-304-35542-9.
- ↑ Jackson, Peacock, Munson and Taylor, p. 309
- ↑ "Harrier Testing". www.harrier.org.uk. http://www.harrier.org.uk/history/Harrier_Testing.htm#prof. Retrieved 2008-05-31.
- ↑ Morgan, David (2007). Hostile Skies. London: Phoenix. p. 101. ISBN 978-0-7538-2199-2.
- ↑ Woodward, pp. 18–19
- ↑ Nordeen, p. 13
- ↑ "Some 150 missions were flown by GR3 Harriers against well defended targets, which led to them sustaining considerable damage and further losses. On 27 May a Harrier flown by Sqdr. Cdr. Bob Iveson was shot down by AAA. On 30 May a further GR3 was hit by ground fire and, losing fuel, ditched 45 nm. (83 km) short of Hermes." Fowler, p. 27
- ↑ "By now, following the losses of the previous days, 1 (F) is down to just three Harriers and of these only one is available for tasking." From Joint Force Harrier commemorates 25th Anniversary
- ↑ Fowler, pp. 27–28
- ↑ Fernández Reguera, p. 572
- ↑ Statement of 2nd Lt. Huergo, commander of the 2nd section, battery A, Port Stanley. Fernández Reguera, p. 562
- ↑ En una oportunidad, se le efectuó un disparo a un Harrier, pero en el momento que el misil se aproximaba a su blanco, coincidió con una maniobra ascendente que realizó el piloto de la nave británica para arrojar una bomba. Finalmente, el misil impacta contra el arma lanzada, al tener ésta una mayor velocidad radial respecto del radar de tiro en ese instante. From El Roland en Malvinas
- ↑ 55.0 55.1 55.2 55.3 The Falkland Islands, A history of the 1982 conflict, The Harrier Goes to War, The No 1 (Fighter) Squadron Operation Corporate Diary, Reproduced by kind permission of Air Chief Marshal Sir Peter Squire, Chief of the Air Staff, May 22 Entry, Accessed 2011-12-18
- ↑ 56.0 56.1 56.2 56.3 Rodríguez Mottino, p. 192
- ↑ Rodríguez Mottino, pp. 193–194
- ↑ 58.0 58.1 The Falkland Islands, A history of the 1982 conflict, The Harrier Goes to War, The No 1 (Fighter) Squadron Operation Corporate Diary, Reproduced by kind permission of Air Chief Marshal Sir Peter Squire, Chief of the Air Staff, May 27 Entry, Accessed 2011-12-18
- ↑ Jackson, Robert (1985). The RAF in action: from Flanders to the Falklands. Blandford Press, p. 156. ISBN 0713714190
- ↑ Van der Bijl, Nicholas (1999). Nine battles to Stanley. Leo Cooper, p. 127. ISBN 0850526191
- ↑ Pook, p. 109
- ↑ Rodríguez Mottino, 194
- ↑ Jackson, p. 156
- ↑ RAF- Goose Green
- ↑ Morgan, David (2007). Hostile Skies. London: Phoenix. p. 159. ISBN 978-0-7538-2199-2.
- ↑ "C Company themselves were spotted moving down from Darwin Ridge and came under AAA fire suffering several major injuries, mostly among the Company Headquarters who were effectively put out of action." Battle of Goose Green
- ↑ Fitz-Gibbon, p. 147
- ↑ "As the British C Company moved down the forward slope of Darwin Ridge, however, 2nd Lt. Braghini brought his 35mm guns into play, killing one man and wounding 11." Aldea, David (2002). Blood and Mud at Goose Green. Military History Magazine, April 2002
- ↑ Reynolds, David (2002). Task force: the illustrated history of the Falklands War. Sutton, p. 150. ISBN 0-7509-2845-X
- ↑ "As for the rear platoon, according to Middlebrook War World I-style understanding of tactics, they actually failed their duty - they withdrew back over the crest. They had taken several casualties including three machine gunners and the platoon sergeant. 3 platoon were to take no further part in the action that day." Fitz-Gibbon, pp. 147–148
- ↑ "The patrols platoon commander, Captain Paul Farrar, writes: My aim in attacking the Schoolhouse was clear. Having found ourselves so far forward, it seems the best objective to go for. I, for one, did not see the Patrols Platoon attacking Goose Green itself. My aim was to occupy the Schoolhouse area and provide a fire support base for D Company whom I assume would pass on along the axis of the track to Goose Green." Fitz-Gibbon, p. 157
- ↑ Fitz-Gibbon, p. 167, note 22
- ↑ "Goose Green: The Argentinian Story" by David Aldea. British Small Wars website
- ↑ "Major Keeble decided it was best to consolidate and dig in where they were."Battle of Goose Green
- ↑ "Lieutenant Waddington and a handful of others from 11 Platoon [from D company] progressed beyond the burning schoolhouse, but were stopped by fire from Goose Green. The same happened to the Patrols elements [From C company]. Farrar says he remembers 'engaging fleeing enemy along the shoreline', but that patrols eventually had to disengage after the Argentines 'set about systematically demolishing' the schoolhouse with AAA fire." Fitz-Gibbon, p. 157
- ↑ El avance por ese frente quedó frenado, evidentemente les habíamos causado muchas bajas. Braghini's statement, Rodríguez Mottino, p. 196
- ↑ No habíamos terminado de tomar cubierta cuando un Harrier se desprende de entre los cerros y suelta una bomba "beluga" sobre el cañón; pero con tan mala puntería que la mitad del ramillete cae en el agua y el resto a unos 80 metros de la pieza. Braghini's statement, Rodríguez Mottino, p. 196
- ↑ "Two misses and the cluster bombs the Harriers had been carrying killed fish as they exploded in the sea just off the settlement." Excerpt from Spearhead assault by John Geddes, Daily Mail, May 15 2007
- ↑ According to Argentine sources, the morale of GADA troops was still high after the battle: Quince minutos después un oficial dijo que debíamos rendirnos, y ninguno de nosotros quería hacerlo. Las bajas (por los dos lados) habían sido terribles, y queríamos seguir luchando. From an interview to GADA private Víctor Daniel Urbani, Somos magazine, issue 301, 25 June 1982
- ↑ Jackson, p. 155
- ↑ Esta misión se concretó a las 05:33 hs, sobre la BAM Malvinas, sobrevolándola con rumbo N-NE y lanzando diecisiete bombas con retardo de hasta dos horas, que impactaron a 45° de la cabecera 08, pero sin afectar la pista, aunque hiriendo levemente a dos soldados del Ejército Argentino.www.fuerzaaerea.mil.ar
- ↑ "As a result of debris damage to one aircraft and relative lack of effective penetration of the runway, Command decide that future bombing efforts should be high-angle." RAF diaries, 24 May entry
- ↑ 83.0 83.1 www.fuerzaaerea.mil.ar
- ↑ Private Ricardo Mario Gurrieri
- ↑ RAF diaries, 30 May entry
- ↑ Smith, p. 121
- ↑ Pook, p. 122
- ↑ Rodríguez Mottino, p. 158
- ↑ "During another action, an enemy aircraft fell victim to the 601 Air Defence's 35mm batteries. The plane came down in the water and the pilot, Maj. Jerry Pook, was rescued shortly after." Moro, p. 272, English edition
- ↑ Rodríguez Mottino, p. 159
- ↑ "En route to the target area, my radio began playing up and went dead for a short time. Fortunately the problem cleared itself for awhile (sic) just before the attack. I flew through concentrated small arms fire from the ground just before the target and my aircraft was hit. I felt a fairly heavy thump, but everything seemed all right so I carried on with my attack which was on a helicopter landing site. This was deserted, so I flew on to the secondary target, an artillery position about 2 miles away. Coming over a hill saw the position in front of me and fired both 2 inch rockets at it, swamping the area with weapons. It was then I realised that things were not at all well. My wing man signalled that I was losing fuel -that must have been the heavy thump earlier. Just before my radio packed up totally my wing man told me that the fuel loss rate was increasing; by now I also had a hydraulic failure in the Number 1 system. The radio failed again and I felt totally on my own. I decided to try to fly as far as I could towards the carriers I turned out over the sea and flew in the direction of the carrier force. But only minutes later I realised I wouldn't make it. My only hope lay in getting as close to the task force as possible." Godden, p. 53
- ↑ "I knew I had been hit: having seen no tracer or SAMs, I assumed it was small-caliber stuff." Pook, pp. 121–122
- ↑ "Mission scrambled for Air Alert and tasked by ASOC for armed recce of road East of Mt Harriet. Ingress was at low level from the South West. Troops in the open were attacked with CBU and guns during a single pass. Egress was to the South using chaff and flares. Harper's aircraft was hit by 2 small arms rounds and AAA splinters causing superficial damage to the port wing leading edge and airbrake." RAF diaries, 12 June entry
- ↑ Fernández Reguera, pp. 563–564
- ↑ Pook, p. 130
- ↑ Smith, p. 97
- ↑ La pieza a mi cargo impactó una de las bombas, y la explosión fue simultánea con la del misil que voló la unidad del Teniente Dachary. El Shrike había sido lanzado por un Vulcan que estaba volando a 6,000 metros de altura. Fernández Reguera, p. 564
- ↑ Along with Dachary lost their lives Sergeant René P. Blanco, privates Jorge Llamas and Oscar Diarte. The other soldier survived uninjured.
- ↑ Balza, p. 258
- ↑ Operation Black Buck
- ↑ 101.0 101.1 Rodríguez Mottino, p. 70
- ↑ RAF diaries, 9 June entry
- ↑ Joint Force Harrier commemorates Falklands 25th Anniversary
- ↑ Private Diego Martín Bellinzona, the last GADA soldier to be lost in this war. GRUPO DE ARTILLERÍA DE DEFENSA AÉREA 601 (Spanish)
- ↑ Rodríguez Mottino, page 183
- ↑ "During the attack, Macleod's aircraft was hit by shrapnel which penetrated the rear equipment bay area of the aircraft and fractured the aft reaction control air pipe. On decelerating to the hover during the recovery, this caused a fire to start in the rear equipment bay and smoke as seen coming from the aircraft. Fuel indications suggested a considerable fuel leak at the same time. MacLeod executed a very quick and professional landing in worrying circumstances. Having landed-on, the fire was extinguished by the groundcrew." RAF diaries, 12 June entry
- ↑ En uno de esos ataques -12 de Junio- el enemigo en vuelo rasante (150 mts. del suelo) descargó todos sus cohetes sobre el cañón: resultaron seis heridos leves y fue "tocado" por la propia artillería antiaérea; uno de los sirvientes descargó sobre la máquina enemiga su fusil FAL; el cañón continuó en servicio. Rodríguez Mottino, p. 91
- ↑ Harriers of the Falklands war
- ↑ www.demobbed.org.uk
- ↑ Pook, p. 162
- ↑ Rodríguez Mottino, p. 185
- ↑ Hansard 31 January 1985
- ↑ House of Commons debate
- ↑ Hansard, 17 July 2002
- ↑ MOD report
- ↑ Rodríguez Mottino, p. 184
- ↑ www.mardelplata-ayer.com.ar
- ↑ Emotiva ceremonia en el Grupo de Artillería Antiaérea 601 La Capital newspaper, 21 November 2010 (Spanish)
References[]
- Andrada, Benigno (1983). Guerra aérea en las Malvinas. Ed. Emecé. ISBN 950-04-0191-6. (Spanish)
- Balza, Martín (1985). Operationes Terrestres en las Islas Malvinas: El Combate contra el Enemigo Aéreo. Círculo militar, Buenos Aires, pp. 248–271. ISBN 950-43-0618-7. (Spanish)
- Burzaco, Ricardo (1994). Infierno en el monte tucumano. RE Editores. OCLC 31720152. (Spanish)
- Díaz Bessone, Ramón (1986). Guerra Revolucionaria en la Argentina. Ed. Fraterna. ISBN 950-9097-50-0. (Spanish)
- Fernández Reguera, José (1987). La Guerra de las Malvinas. Ed. Fernández Reguera, Buenos Aires. (Spanish)
- Fitz-Gibbon, Spencer (1995). Not Mentioned in Dispatches. James Clarke and Co. ISBN 0-7188-3016-4. (English)
- Fowler & others (1982). Battle of the Falklands: Air Forces. Osprey. ISBN 0-85045-493-X. (English)
- Godden, John (1983). Harrier: Ski Jump to Victory. British Aerospace Publishing. ISBN 0-08-031167-9. (English)
- Jackson, Peacock, Munson and Taylor (1996). Jane's All the World's Aircraft. Jane's information group. ISBN 0-7106-1377-6. (English)
- Jackson, Robert (1985). The RAF in Action: From Flanders to the Falklands. Sterling Publishers Co. ISBN 0-7137-1419-0. (English)
- Morgan, David (2006). Hostile Skies, Orion Books Limited, London. ISBN 978-0-7538-2199-2. (English)
- Moro, Rubén Oscar (1989). The History of the South Atlantic Conflict: The War for the Malvinas. Praeguer, New York. ISBN 0-275-93081-5. (English)
- Nordeen, Lon (2007). Harrier II: validating V/STOL. Naval Institute Press. ISBN 1-59114-536-8. (English)
- Pook, Jerry (2007). RAF Harrier Ground Attack-Falklands. Pen & Sword Books ltd. ISBN 978-1-84415-551-4. (English)
- Potash, Robert (1984). El Ejército y la Política en Argentina. 1945–1962. Ed. Sudamericana. ISBN 950-07-0008-5. (Spanish)
- Rodríguez Mottino, Héctor (1984). La Artillería Argentina en Malvinas. Ed. Clío. ISBN 950-9377-02-3. (Spanish)
- Ruiz Moreno, Isidoro (1994). La Revolución del 55: Cómo cayó Perón. Ed. Emecé. ISBN 950-04-1421-X. (Spanish)
- Smith, Gordon (2006). Battle Atlas of the Falklands War 1982. Lulu.com. ISBN 1-84753-950-5. (English)
- Ward, Nigel (2006). Sea Harrier Over the Falklands. Cassell Military Paperbacks. ISBN 0-304-35542-9. (English)
- Woodward, Sandy (1997). The one hundred days. Naval Institute Press. ISBN 0-00-215723-3. (English)
Coordinates: 37°53′30.56″S 57°31′31.91″W / 37.8918222°S 57.5255306°W
The original article can be found at GADA 601 and the edit history here.