| Gold Beach | |||||||
|---|---|---|---|---|---|---|---|
| Part of Normandy Landings | |||||||
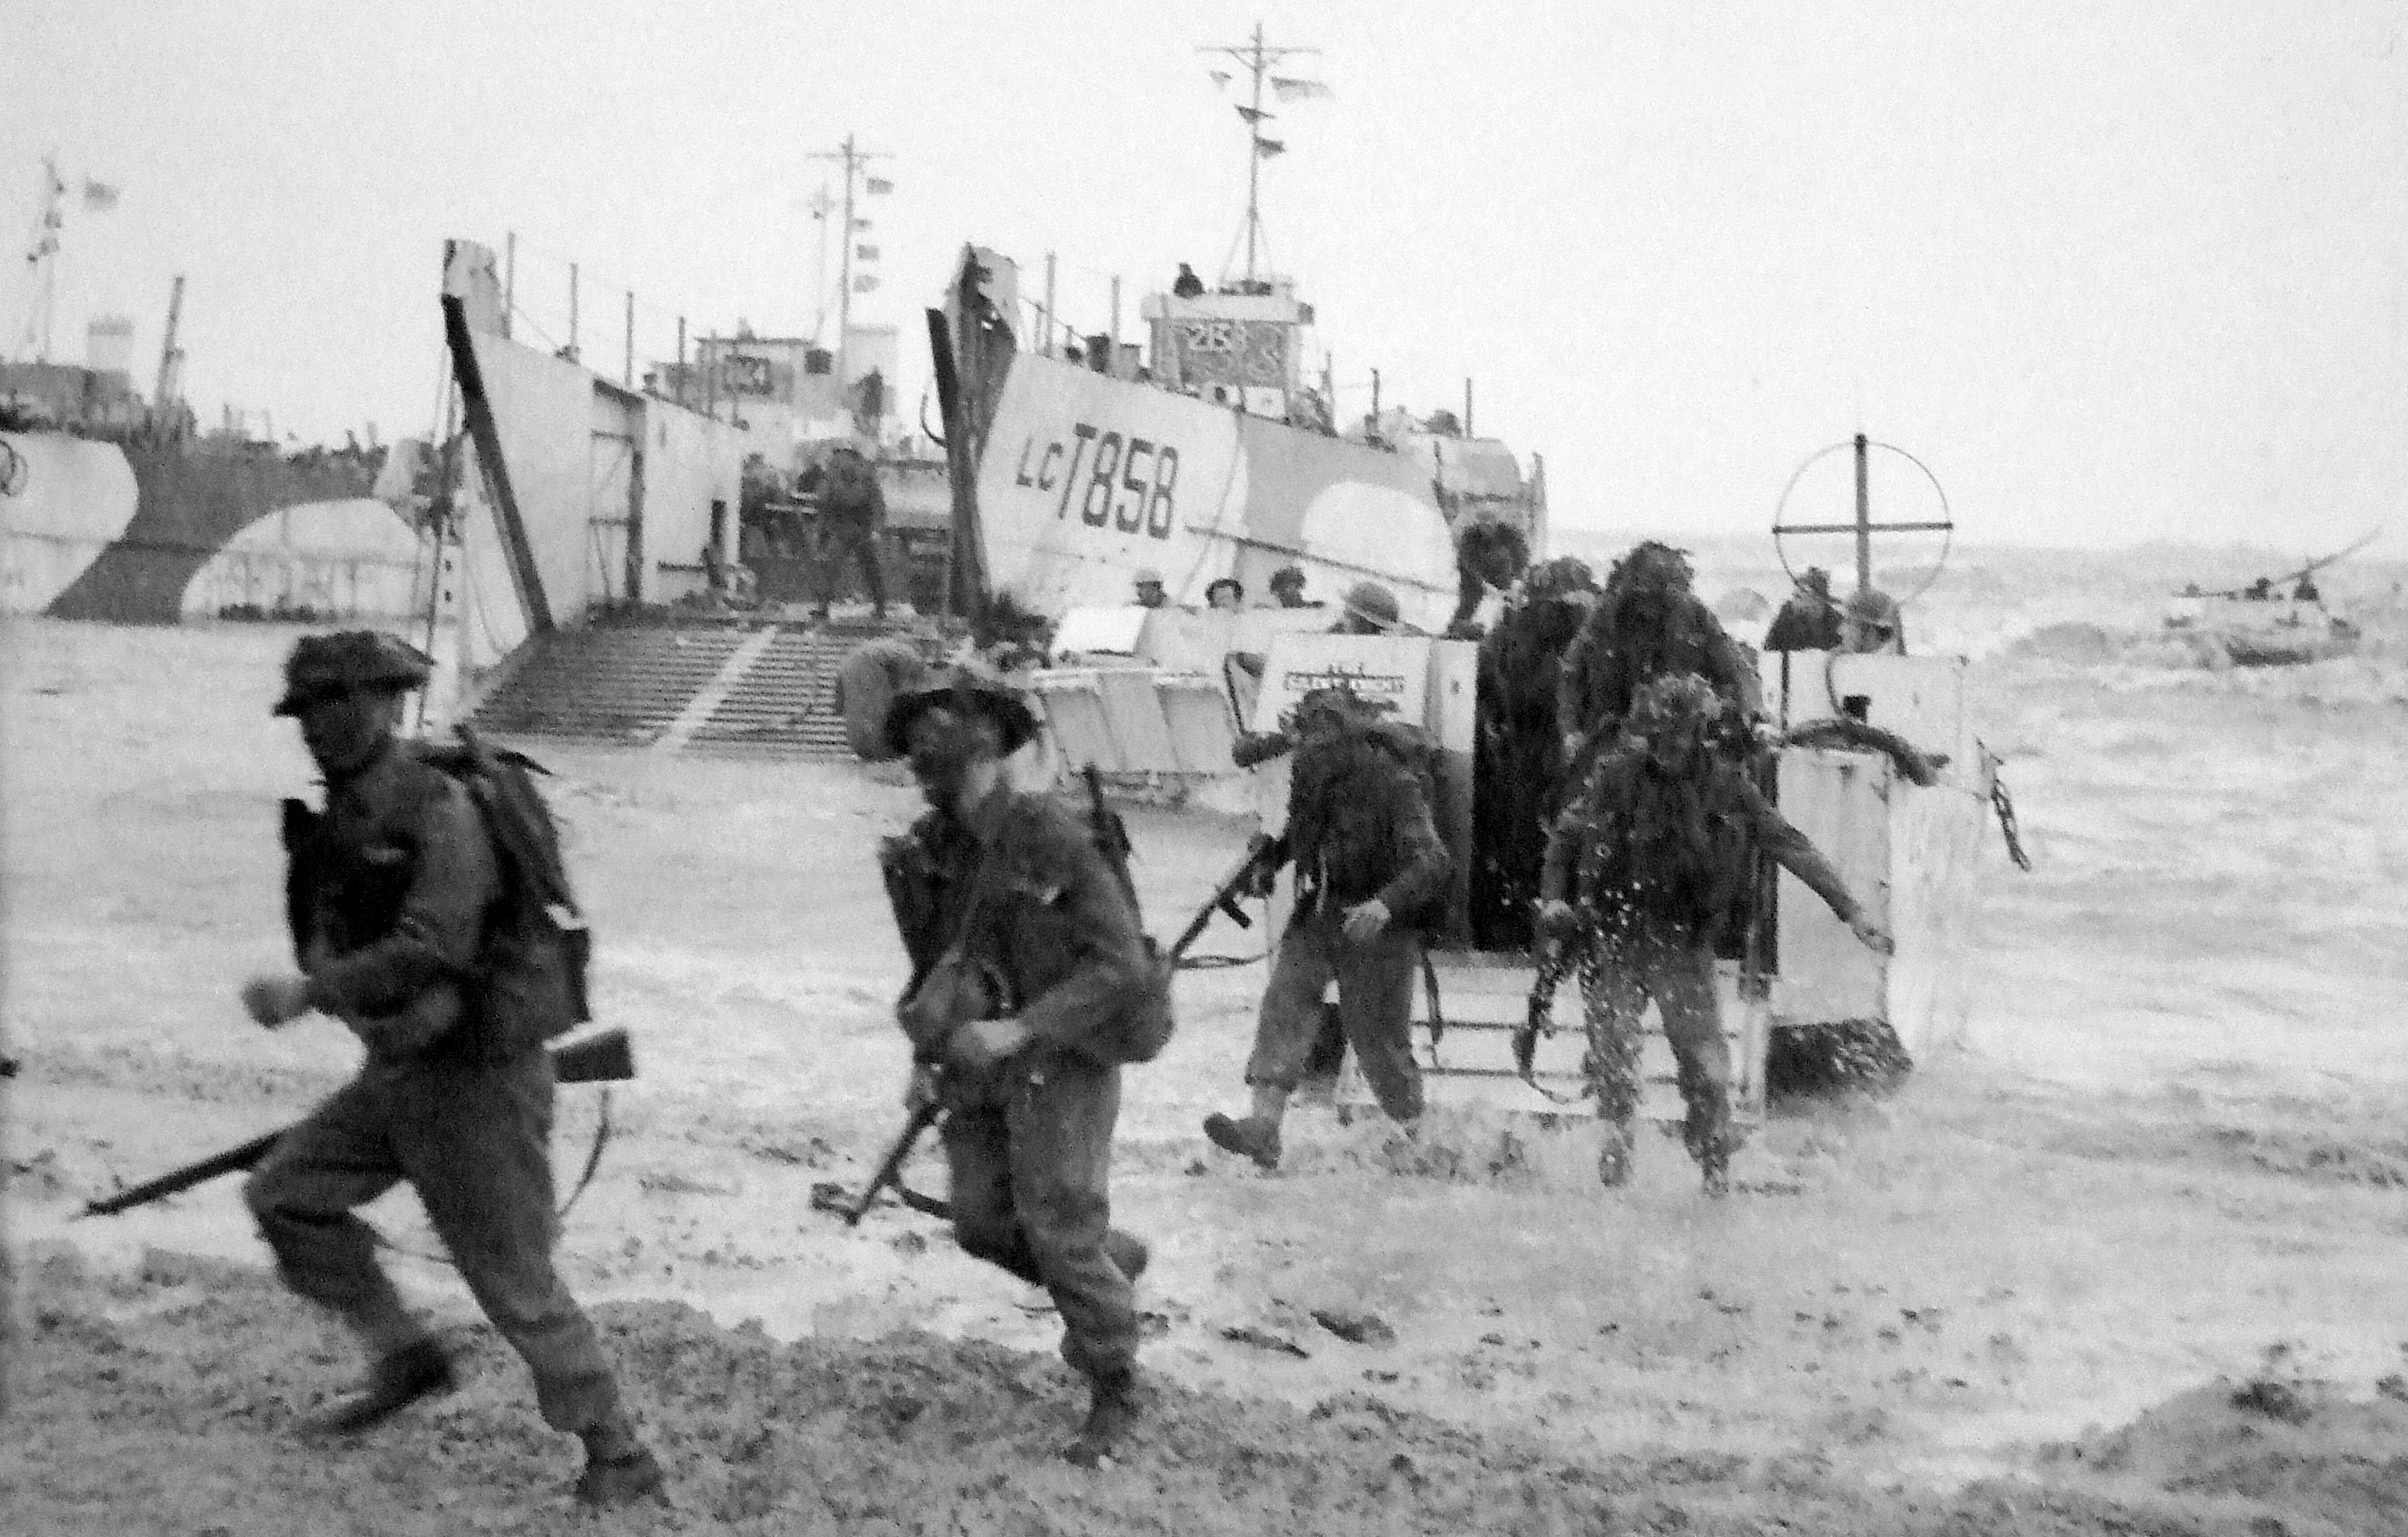 Commandos landing on Gold beach near La Rivière | |||||||
| |||||||
| Belligerents | |||||||
|
|
| ||||||
| Commanders and leaders | |||||||
|
|
| ||||||
| Units involved | |||||||
|
50th (Northumbrian) Infantry Division 8th Armoured Brigade No. 47 (Royal Marine) Commando | 716th Infantry Division | ||||||
| Casualties and losses | |||||||
| 400 casualties | Unknown | ||||||
| |||||
Gold, commonly known as Gold Beach, was the code name for one of the D-Day landing beaches that Allied forces used to invade German-occupied France on 6 June 1944, during World War II.
Gold lay in the area assigned to the 50th (Northumbrian) Infantry Division commanded by Major General Douglas Alexander Graham, and the 8th Armoured Brigade. These were part of XXX Corps, commanded by Lieutenant General Gerard Bucknall, which in turn was part of Lieutenant General Miles Dempsey's British 2nd Army. Gold had three main assault sectors – these were designated (from west to east): Item, Jig (split into sections Green and Red), and King (also in two sections named Green and Red). A fourth, named How, was not used as a landing area.[1]
The beach was to be assaulted by the 50th Division between Le Hamel and Ver sur Mer. Attached to them were elements of 79th (Armoured) Division. The 231st Infantry Brigade would come ashore on Jig Sector at Le Hamel/Asnelles and the 69th Brigade at King Sector in front of Ver sur Mer. No. 47 (Royal Marine) Commando, attached to the 50th Division for the landing, was assigned to Item sector.


D-Day assault map of the Normandy region and the north-western coast of France. Utah and Omaha are separated by the Douve River, whose mouth is clear in the coastline notch (or "corner") of the map.
Objectives[]
There were originally seventeen sectors along the Normandy coastline with codenames taken from one of the spelling alphabets of the time, from Able, west of Omaha, to Rodger on the east flank of the invasion area. Eight further sectors were added when the planned invasion was extended to include Utah on the Cotentin Peninsula. Sectors were further subdivided into beaches identified by the colours Green, Red and White.[2]
The primary D–Day objectives for the 50th Infantry Division were to establish a beachhead between Arromanches (crucial for the deployment of the artificial Mulberry harbour) and Ver-sur-Mer, then head south towards Route Nationale 13 (RN 13), reaching Bayeux and cutting the road to Caen.
The 231st and 69th Infantry Brigades were to be first ashore and establish a beachhead. The follow-up 56th and 151st Infantry Brigades would aim to push south-west towards RN 13 supported by the tanks of the 8th Armoured Brigade.
To the west, 47 Commando's mission was to capture Port-en-Bessin and link-up with American forces landing on Omaha.
50th Division was also tasked with meeting the Canadian troops coming ashore on Juno.
Order of battle[]
British forces - 50 Division Group[]
- 50th (Northumbrian) Infantry Division
- 69th Infantry Brigade
- (5th Battalion, East Yorkshire Regiment; 6th Battalion, Green Howards; 7th Battalion, Green Howards)
- 151st Infantry Brigade
- (6th Battalion, Durham Light Infantry; 8th Battalion, Durham Light Infantry; 9th Battalion, Durham Light Infantry)
- 231st Infantry Brigade
- (1st Battalion, Dorsetshire Regiment; 1st Battalion, Hampshire Regiment; 2nd Battalion, Devonshire Regiment)
- Divisional Troops
- 61st Reconnaissance Regiment, Royal Armoured Corps
- 2nd Battalion, Cheshire Regiment (Machine Gun)
- 233rd, 501st and 505th Field Companies, Royal Engineers
- 235th Field Park Company, Royal Engineers
- 74th, 90th and 124th Field Regiments RA
- 102nd Anti-Tank Regiment, Northumberland Hussars RA
- 25th Light Anti-Aircraft Regiment RA
- Attached
- 56th Infantry Brigade
- (2nd Battalion, South Wales Borderers; 2nd Battalion, Essex Regiment; 2nd Battalion, Gloucestershire Regiment)
- 8th Armoured Brigade
- (4th/7th Royal Dragoon Guards; 24th Lancers; Nottinghamshire Yeomanry; 12th Battalion, King's Royal Rifle Corps)
- 86th and 174th Field Regiments RA detached from Corps Troops (self-propelled guns)
- No. 47 (Royal Marine) Commando
- 2 squadrons from 6th Assault Regiment, R.E.
- 1st Royal Marine Armoured Support Regiment
- 89th, 90th Field Companies, Royal Engineers
- GHQ Liaison Regiment
- Beach Parties
- 2nd Battalion, Hertfordshire Regiment
- 6th Battalion, Border Regiment
German forces[]
- 716th Static Infantry Division - Generalmajor Wilhelm Richter
- 726th Grenadier Regiment
- 736th Grenadier Regiment
- 716th Pioneer (Engineer) Battalion
- 716th Anti-Tank Company
- 1716th Artillery Regiment[3]
- 352nd Infantry Division - Generalleutnant Dietrich Kraiss
- 1st Battalion, 916th Grenadier Regiment[4]
German defences[]
Facing the British in the eastern area of the beach were elements of the German 716th Static Infantry Division (No. 4 company of East Battalion 441 and No. 7 Company of the 736th Infantry Regiment).
The central stretch of the beach was marshy and defended only by No. 3 Company of the 441st East Battalion, composed mainly of Russian conscripts. Crew-served weapons in this sector were mainly 50 mm guns in concrete emplacements and 75 mm guns inside pillboxes.
Facing the British in the western area of the beach were units of the 1st Battalion of the 916th Infantry Regiment of the 352nd Division. The units facing the eastern and western areas of the beach were concentrated in fortified beach houses along the coast at Le Hamel and La Rivière. The houses proved to be highly vulnerable to both naval and aerial bombardment.[5]
Several artillery batteries were to the rear at Mont-Fleury, Ryes, Marefontaine, Creully and Crepon, covering the beach.
An observation post for four 155 mm guns was positioned on the top of the cliffs at Longues-sur-Mer. These guns were located a further half mile (800 m) inland.
Kampfgruppe Meyer, the 352nd division's reserve based at Bayeux, had been in an ideal position to counterattack the landings early on June 6. However, the presence of paratroopers of the US 101st Airborne Division near the Vire estuary, led General Kraiss, the Commander of the 352nd division, to perceive this threat as more important and ordered the reserve to this location. This tactical error meant several hours were spent retracing the 30 or so kilometres back towards the real threat at Gold. The ability to counter-attack had been lost.
Initial assault[]


King Green and Jig beaches from the air during the 50th Division's landing
Prior to the landings, German defensive positions were attacked by medium and heavy bombers; the bombardment was continued by the 6 inch (15 cm) and 8 inch (20 cm) guns of the accompanying cruisers,[6](see 'Naval support' section below).
King Sector (La Rivière/Ver sur Mer)[]
H-Hour for the landing at Gold was set at 0725 hrs on King sector[6] (50 minutes later than in the American sector to allow for the difference in the west to east tidal surge). The British were aware that the beach was littered with defences – anti-tank obstacles and mines – which were to be dealt with by engineers in the first wave. However, due to a strong north-westerly wind, sea levels along the coast were higher than had been anticipated. This higher tide covered many of the mines and other obstacles. Those engineers that did reach the obstacles soon came under enemy fire which prevented them from being cleared.
A decision was taken not to launch the amphibious DD tanks from their landing craft tank (LCTs) but to run them directly onto the beach. The first wave, carried in LCAs, came in under heavy fire from the German defenders and suffered casualties. The 1st Battalion of the Hampshire Regiment lost its Commanding Officer and Second-in-Command within minutes of landing. Following the Hampshires were the Commandos of the 4th Special Service Brigade. They too suffered badly during the run-in and only one of their allotted landing craft actually reached the shore.
The decision to land the tanks directly on to the beach proved correct as there was no German armour in the area. Once ashore the tanks provided close support to the infantry and most of the initial German resistance was quickly overcome. Many of the German strong points had been neutralised by the naval bombardment earlier in the morning; La Rivièra held out the longest, but by 1000 hrs it had been captured.[7]
Jig Sector (Le Hamel/Asnelles)[]
Men of the 6th Green Howards came ashore supported by DD tanks of the 4th/7th Dragoons and the special tanks of the Westminster Dragoons. In this sector the defence was weak and the coastal strong points were easily knocked out before the troops pushed inland to tackle the German artillery batteries.
The attack on Le Hamel was slow and British forces took a number of casualties. The intervention of the 147th Field Regiment, Royal Artillery, enabled the strong point to be neutralised and the village fell at approximately 1600 hrs.
The 69th brigade then continued its southward advance though Creully and Crépon. At 1600 hrs a German counter-attack was launched but failed to break the British lines.[8]
Item Sector[]
No 47 (RM) Commando, the last commando unit to land, came ashore on Gold east of Le Hamel in Item sector. Their task was to immediately push inland, then turn right (west) and cross 10 miles (16 km) of enemy held territory in order to seize and hold the coastal harbour of Port-en-Bessin. This small port was significant as it was to be the only permanent harbour for supplies to be brought in including fuel by underwater pipe from tankers moored offshore. After landing, 47 Commando moved south of Arromanches and pushed west to within a mile of Port-en-Bessin where they were halted just to the south of the Longues-sur-Mer battery. Here they dug in on ‘Hill 72’. Port-en-Bessin did not fall into British hands until June 8, following heavy fighting.
Beachhead[]
Despite fierce opposition initially, British forces broke through the German defences with relatively few casualties. They also had the assistance of the 79th (Armoured) Division, equipped with Hobart's Funnies.[9] These vehicles, such as the Sherman flail tank, proved essential on D-Day. They cleared minefields, laid fascines (to bridge ditches) and trackway across soft sand to assist in exiting the beaches.
[]
Hundreds of vessels made up Force 'G'[10] that was to assault Gold. Amongst these were the British cruisers HMS Ajax, HMS Argonaut, HMS Emerald, HMS Orion, the battleship HMS Warspite and the Free French Navy cruiser Georges Leygues. Commodore Douglas-Pennant, Naval Commander of Force "G", aboard the headquarters ship HMS Bulolo commanded the landing on Gold Beach, but the ship forced to relocate after receiving incoming fire the German battery at Longues-sur-Mer, but she remained off the beaches directing the assault. On 27 June she returned to Portsmouth.
German defences inland[]
Considerable opposition from inland enemy batteries and mortars hampered the landings, but by 1000 hrs, La Rivière was captured and a couple hours later, Le Hamel fell. The Royal Marine Commandos were able to reach within a mile (1.6 km) of Port-en-Bessin after finding that the Loungue-Sur-Mer battery had been put out of action by HMS Ajax.
Gold Beach timeline[]

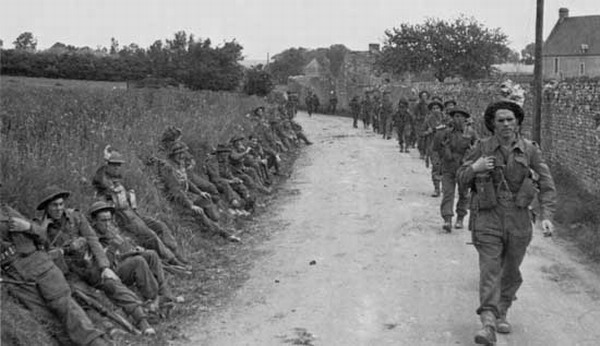
Infantry of the 50th Division moving forward near St Gabriel on 6 June
07.25 – The 231st and 69th Assault Brigades hit the beach. DD (swimming) tanks and beach clearance groups, delayed by bad weather, are landed directly on to the beach.
07.45 – Troops make slow progress against raking fire, but three beach exits are cleared within the hour.
08.20 – Follow-up battalions and No. 47 Royal Marine Commando land.
09.30 – Les Roquettes is captured.
09.50 – Stiff resistance at Le Hamel. Commandos head for Port-en-Besin to link with American forces. CSM Stan Hollis, 6th Green Howards, performs acts of bravery at Crépon for which he is later awarded the Victoria Cross.
10.50 – Reserve brigades begin to land; seven beach exits have been secured.
16.00 – Le Hamel is finally captured. 231st Brigade moves on to Arromanches. 69th Brigade encounters resistance in Villers le Sec/Bazenville area.
20.30 – 56th and 151st Brigades reach the outskirts of Bayeux and the Caen-Bayeux road.
21.00 – Arromanches is captured.
23.59 – A large bridgehead has been established, six miles wide and deep, linking up with the Canadians at Juno. 47 Royal Marine Commando are ready to take Port-en-Bessin on the following day.
By midnight on June 6, the 50th Division had landed 25,000 men with approximately 400 casualties. They had penetrated 10 km (6.2 mi) inland and met up with the Canadians coming from Juno at Tierceville. The 56th, 69th and 151st Brigades had dug in on a line between Vaux-sur-Aure and Coulombs. During the evening, patrols of the 2nd Gloucestershires reach the outer suburbs of Bayeux. To the west, Arromanches is reached at 2000 hrs and cleared an hour later. The link-up with the American troops cannot be made.
Men of the 47th Royal Marine Commando, after a day-long progression into enemy territory, had dug in on Hill 72 south of the Longues-sur-Mer battery. Their objective, Port-en-Bessin, did not fall until June 8.
Aftermath[]
Following the landing Operation Perch was launched to drive further inland and later to attempt to capture Caen in the Battle for Caen. In the meantime, the Mulberry harbour that came to be known as 'Port Churchill' was constructed at Arromanches in Item sector.
Stanley Hollis VC[]
It was during the assault on the beach and clearing the Mount Fleury battery that CSM Stanley Hollis's actions enabled D Company to open the main beach exit. Later that day his bravery at Crepon saved the lives of several of his men and he was awarded the only Victoria Cross to be bestowed for actions on D-Day.[11]
See also[]
- Arromanches-les-Bains
References[]
- Buckingham, William F. (2004). D-Day: The First 72 Hours. Tempus Publishing. ISBN 978-0-7524-2842-0.
- ↑ Gold Beach — Battle Zone Normandy. Simon Trew. pp. 47–67
- ↑ Buckingham, p. 88
- ↑ Axis History Factbook: 716. Infanterie-Division
- ↑ Steven Zaloga, Ken Ford, Stephen Badsey, Overlord: The D-Day Landings, Osprey Publishing, 2009, p.63
- ↑ The Battle of Normandy 1944. Robin Neilands. pp 65-74
- ↑ 6.0 6.1 Normandy Landing Beaches. Major & Mrs Holt's Battlefield Guide. pp. 129
- ↑ Gold Beach — Battle Zone Normandy. Simon Trew. pp. 58-66
- ↑ Gold Beach — Battle Zone Normandy. Simon Trew. pp. 52-58
- ↑ D-Day Dawn of Heroes. Nigel Cawthorne. pp 132
- ↑ D-Day 1944 (4): Gold & Juno Beaches. Ken Ford. pp 29
- ↑ Remembering D-Day: Personal Histories of Everyday Heroes Martin Bowman. pp 225
Gallery[]
Some pictures of modern day Arromanches-les-Bains (Gold Beach).
")
")
")
")
")
Coordinates: 49°20′43″N 0°34′18″W / 49.34528°N 0.57167°W
The original article can be found at Gold Beach and the edit history here.