| HMAS Canberra (D33) | |
|---|---|
 Canberra at Kings Wharf, Wellington, New Zealand, ca. 1930s | |
| Career (Australia) | |
| Namesake: | City of Canberra |
| Builder: | John Brown & Company, Clydebank |
| Yard number: | 513 |
| Laid down: | 9 September 1925 |
| Launched: | 31 May 1927 |
| Completed: | 10 July 1928 |
| Commissioned: | 9 July 1928 |
| Motto: |
Pro Rege, Lege et Grege Latin: "For the King, the Law, and the People" |
| Honours and awards: |
Battle honours: East Indies 1940–41 Pacific 1941–42 Guadacanal 1942 Savo Island 1942 |
| Fate: | Sunk following battle, 9 August 1942 |
| General characteristics | |
| Class & type: |
County class cruiser Kent sub-class |
| Displacement: |
9,850 tons (light) 10,000 tons (standard) |
| Length: |
590 ft (180 m) between perpendiculars 630 ft 1 in (192.05 m) overall |
| Beam: | 68.25 ft (20.80 m) |
| Draught: | 21 ft 4 in (6.50 m) (maximum) |
| Propulsion: | 8 Yarrow boilers, 4 shaft Brown-Curtis geared turbines, 80,000 shp |
| Speed: |
31.5 knots (58.3 km/h; 36.2 mph) (maximum) 12 knots (22 km/h; 14 mph) (cruising) |
| Range: |
2,870 nautical miles (5,320 km; 3,300 mi) at 31.5 knots (58.3 km/h; 36.2 mph) 13,200 nautical miles (24,400 km) at 12 knots (22 km/h; 14 mph) |
| Complement: |
Pre-war: 690 standard 710 as flagship Wartime: 751 standard 819 at loss |
| Armament: |
4 × 2 – 8-inch guns (4 twin turrets) |
| Armour: |
1.5 to 3 inches (38 to 76 mm) armour deck over machinery spaces and magazines up to 2 inches (51 mm) over turrets up to 3 inches (76 mm) on conning tower Anti-torpedo bulges |
| Aircraft carried: | 1 amphibious aircraft (initially Seagull III, later Walrus) |
HMAS Canberra (I33/D33), named after the Australian capital city of Canberra, was a Royal Australian Navy (RAN) heavy cruiser of the Kent subclass of County class cruisers. Constructed in Scotland during the mid-1920s, the ship was commissioned in 1928, and spent the first part of her career primarily operating in Australian waters, with some deployments to the China Station.
At the start of World War II, Canberra was initially used for patrols and convoy escort around Australia. In July 1940, she was reassigned as a convoy escort between Western Australia, Sri Lanka, and South Africa. During this deployment, which ended in mid-1941, Canberra was involved in the hunt for several German auxiliary cruisers. The cruiser resumed operations in Australian waters, but when Japan entered the war, she was quickly reassigned to convoy duties around New Guinea, interspersed with operations in Malaysian and Javanese waters. Canberra later joined Task Force 44, and was involved in the Guadalcanal Campaign and the Tulagi landings.
On 9 August 1942, Canberra was struck by the opening Japanese shots of the Battle of Savo Island, and was quickly damaged. Unable to propel herself, the cruiser was evacuated and sunk in Ironbottom Sound by two American destroyers. The United States Navy Baltimore class cruiser USS Canberra was named in honour of the Australian ship, and is the only US warship named for either a foreign warship or a foreign capital city.
Design[]
Canberra was one of seven Kent class cruisers—a subclass of the County class cruiser—designed by Eustace Tennyson-D'Eyncourt.[1] The ship was 590 feet (180 m) long between perpendiculars and 630 feet 1 inch (192.05 m) overall, with a beam of 68.25 feet (20.80 m), and a maximum draught of 21 feet 4 inches (6.50 m).[2] She displaced 9,850 tons at light load, and 10,000 tons at standard load.[2] The Kent class were built to meet the restrictions of the Washington Naval Treaty; with a reduction in armament and protection.[3]
Canberra was powered by eight Yarrow boilers which fed steam to four Brown-Curtis geared turbines; these in turn provided 80,000 shaft horsepower (60,000 kW) to the ship's four propeller shafts.[4] The cruiser could reach speeds of 31.5 knots (58.3 km/h), which could be maintained for 2,870 nautical miles (5,320 km), although 13,200 nautical miles (24,400 km) could be travelled at the more economical 12-knot (22 km/h) standard cruising speed.[4]
Before World War II, the ship's company was normally 690 (49 officers, 641 sailors); this increased to 710 when acting as a flagship.[4] During wartime service, the normal company expanded to 751 (61 officers, 690 sailors), and at the time of her loss, 819 people were aboard.[4]
Armament[]
Canberra's main armament consisted of eight 8-inch Mark VIII guns in four twin turrets.[4] Secondary armament consisted of four 4-inch quick-firing high-angle guns and four 2-pounder "pom-pom" guns.[4][5] A mixture of .303-inch machine guns were carried for close defence work: initially this consisted of four Vickers machine guns and twelve Lewis machine guns, although four Lewis guns were later removed.[4] During a refit in 1942, two multiple pom-poms and five 20 mm Oerlikons were added to enhance the anti-aircraft armament.[5] Four 3-pounder quick-firing Hotchkiss guns were used as saluting guns.[4] Two sets of quadruple 21-inch torpedo tubes were fitted.[4] Depth charges were carried: these were deployed by rails.[4]
The cruiser was designed to carry a single amphibious aircraft: initially a Supermarine Seagull III aircraft, but this was replaced in 1936 by the Supermarine Walrus.[5] However, the aircraft catapult was not installed until April 1936, during a refit in Sydney.[5] Before this, the Seagull amphibian was lowered into the water by the ship's recovery crane, and took off from there.[5]
Armour aboard Canberra was limited to an armour deck over the machinery spaces and magazines, ranging from 1.5 to 3 inches (38 to 76 mm) in thickness.[5] Armour plate was also fitted to the turrets (up to 2 inches (51 mm) thick) and the conning tower (3 inches (76 mm) thick).[5] Anti-torpedo bulges were also fitted.[5]
Construction[]
In 1924, the Australian government ordered two Kent class cruisers to replace the ageing light cruisers Sydney and Melbourne.[3] These ships were to be named Australia and Canberra, with both to be built by John Brown & Company, at their shipyard at Clydebank, Scotland: the only two County class ships built in Scotland.[1][3]
Canberra was laid down on 9 September 1925, and given the yard number 513.[4][6] Canberra was launched on 31 May 1927 by Princess Mary; the first ship of the RAN launched by a member of the Royal Family.[4][7] Work on the ship was completed on 10 July 1928, the day after the cruiser was commissioned into the RAN.[4] Most of the initial ship's company came from Sydney.[8] Canberra cost approximately A£2 million to construct.[4]
Operational history[]
Pre-World War II[]
Canberra left Portsmouth on 4 December 1928, after several months of workup trials, and arrived at Sydney on 16 February 1929.[8] The cruiser operated primarily in Australian waters during the next ten years, spending periods of time as the RAN flagship.[4] On 20 September 1929, during a round-Australia cruise, the ship grounded on a sand shoal outside Roebuck Bay, Western Australia.[9] The damage did not prevent the ship from operating, and it was not until early 1930 that the affected hull plates were replaced.[10] In September 1931, Canberra visited New Caledonia and Fiji.[4] The cruiser operated on the Royal Navy's China Station in 1932 and 1937.[4] In 1934, the warship was assigned to escort HMS Sussex, which was transporting the Duke of Gloucester during a visit to Australia.[4]

HMAS Canberra in 1930, sailing towards Garden Island and Woolloomooloo Bay under the completed arch of the still unfinished Sydney Harbour Bridge.
World War II[]
For the first nine months of World War II, Canberra was assigned to patrol and escort duties around Australia.[4] In January 1940, the cruiser escorted the first convoy carrying Australian and New Zealand soldiers, Anzac Convoy US 1, to the Middle East.[10] During May, Canberra joined sister ship Australia to escort Anzac Convoy US 3 across the Indian Ocean; the convoy was diverted via the Cape of Good Hope following fears that Italy was about to join the war.[10][11] On 26 June, Canberra left Australia with the troopship Strathmore for Cape Town, where the cruiser was assigned to the Indian Ocean as a convoy escort between Fremantle, Colombo, and Cape Town.[4][11][12] During November, Canberra attempted to locate the German merchant raider Atlantis.[12] She returned unsuccessful to Fremantle on 20 November, but sailed than night with a skeleton crew after the merchant ship SS Maimoa signalled that she was under attack by a German merchant raider (the auxiliary cruiser Pinguin).[12] Although unable to find Maimoa or her attacker, Canberra encountered three lifeboats on 22 November, which carried 27 sailors who had escaped from SS Port Brisbane, another victim of Pinguin.[4][12] The cruiser returned to Fremantle on 27 November without encountering the German raider.[12] Shortly after,[Clarification needed] Canberra headed for the East Indies Station.[12]
In February 1941, Canberra was involved in efforts to locate the German pocket battleship Admiral Scheer.[13] In early March, Canberra encountered two merchant ships; a tanker supplying a possible merchant raider, which split up and fled when ordered to stop.[14] Canberra pursued the suspected raider, and fired on her from maximum range to avoid a retaliatory attack, while her Walrus amphibian attempted to stop the tanker by dropping several bombs.[15] Both ships (the raider supply ship Coburg and the captured Norwegian tanker Ketty Brøvig) had commenced scuttling after the first attack from their pursuit, but the Australians continued attacking: the Walrus used all her bombs, while Canberra fired 215 shells, many of them misses.[15] A post-action analysis found that if Canberra had closed before firing, the same quantity of damage could have been achieved for less ammunition, and one or both ships might have been captured.[16][17]


.jpg)
Canberra being towed along the Brisbane River[Clarification needed]
Canberra was assigned back to Australia in July; operating around the western and southern coasts.[13] The cruiser was in Sydney in December 1941, when Japan entered the war: Canberra was quickly reassigned to convoy duties around New Guinea, interspersed by operations in Malaysian and Javanese waters.[13] On 12 December 1941 the cruiser was ordered from Sydney to meet the Pensacola Convoy, hoisting the flag of Rear-Admiral John G. Crace as she stopped in Brisbane on the 15th. In company with HMAS Perth she sailed for the vicinity of New Caledonia to meet the light cruiser HMNZS Achilles and the convoy.[18] In January 1942, Canberra and HMAS Vampire escorted the troopship Aquitania, leaving Sydney 10 January, carrying reinforcements to Singapore as far as Ratai Bay, Sunda Strait where the reinforcements were transshipped into seven smaller vessels for the final run to Singapore.[19][11] She was then part of the escort for that convoy, "MS.2A" of six Dutch KPM vessels and one British vessel, to Singapore arriving 24 January.[19] During her return voyage via the Dutch East Indies, the cruiser was assigned to the ANZAC Squadron.[11] A refit occurred in Sydney from February to May 1942, during which Canberra became the first Australian warship to be fitted with radar (a Type 241 surface search set, and an A290 air-warning set).[11] The cruiser was present in Sydney Harbour during the Japanese midget submarine attack on 31 May-1 June.[13] Although not damaged, at 04:40, Canberra recorded that the Japanese may have fired torpedoes at her.[13][20] This may have been one of many false alarms throughout the night; however, one of the midget submarines had attempted to fire its torpedoes at a target, but these did not release because of damage sustained during the infiltration.[20] The observer aboard Canberra may have seen bubbles from the compressed air released to fire the torpedoes.[20]


_with_US_destroyers_on_9_August_1942.jpg)
HMAS Canberra underway off Tulagi, during the landings on 7–8 August 1942. Three transports are among the ships visible in the distance, with Tulagi and Florida Islands beyond.
The cruiser headed north the day after the submarine attack to join the ANZAC Squadron, which had been redesignated Task Force 44.[11][13] On 17 June, Canberra participated in offensive patrols through the Coral Sea, and from July, she was assigned to Operation Watchtower; the opening stages of the Guadalcanal Campaign.[12][13] The cruiser escorted the force to be landed at Tulagi from 5 August, and screened the force during the landings on 7 and 8 August; the cruiser encountered no initial resistance.[11][21]
Loss[]
During the afternoon of 8 August, a Japanese task force commanded by Vice Admiral Gunichi Mikawa and consisting of five cruisers and a destroyer began to approach the south of Savo Island, with the intention to attack the naval force supporting the landing at Guadalcanal, then those at Tulagi.[22] Anticipating a naval attack following several assaults by land-based Japanese aircraft, the Allied commander of the naval forces, British Rear Admiral Victor Crutchley, split his forces around Savo Island: Crutchley aboard HMAS Australia led Canberra, USS Chicago, and the destroyers USS Patterson and USS Bagley on patrol of the southern waters.[22] At 20:45, Crutchley was recalled to meet urgently with US Admiral Richmond K. Turner, overall commander of the amphibious landings.[22] Although Chicago was the senior ship after Australia departed, Canberra, which had been following Australia, found herself at point.[22][23] Around 01:00 on 9 August, the engines of scoutplanes from Mikawa's ships were heard, but as no warning came from the other groups, it was assumed they were friendly.[22]
At 01:45, Patterson detected Mikawa's ships and alerted the Allied force.[24] The Japanese scout planes dropped flares to silhouette Canberra and Chicago.[23] The Australian cruiser was able to avoid the Japanese torpedoes fired at the start of the engagement, but was on the receiving end of the Japanese cruisers' gunfire.[24] The first two salvos killed or wounded several senior officers, disabled both engine rooms, damaged the bridge and 4-inch gun platform and forced the flooding of her 8-inch magazines.[12][24] Within two minutes, the cruiser had been hit 24 times; she was immobilised, without power, and listing to starboard, with multiple internal fires and at least a fifth of her personnel dead or wounded.[25] At least one torpedo strike was reported during the Japanese attack, although none of the 19 torpedoes fired at Canberra by the Japanese cruisers were recorded as hitting their target.[24] Several personnel from Canberra believe that USS Bagley inadvertently torpedoed the cruiser.[24][26] From the 819-strong ship's company, 84 were killed (74 during the battle, 10 dying later from wounds), and another 109 were wounded.[12][27]


_with_US_destroyers_on_9_August_1942.jpg)
American destroyers rescuing the surviving crew from HMAS Canberra after the Battle of Savo Island. In the billowing smoke, USS Patterson is approaching Canberra from astern.
At 03:30, Patterson came alongside and relayed orders from Rear Admiral Turner: if Canberra could not achieve mobility by 06:30, she would be abandoned and sunk.[27] The destroyer began to recover the Australian survivors, but at 04:30, Patterson detected an approaching ship.[27] The destroyer moved to investigate, at which point the unknown ship opened fire, and Patterson retaliated.[27] It was quickly realised that the attacker was USS Chicago, which had mistaken Canberra for a damaged Japanese vessel, and both ships ceased fire.[27] Patterson returned to continue the evacuation, and was aided by sister ship USS Blue.[28]
Canberra's engines could not be repaired, and she was to be scuttled.[28] She was torpedoed by the destroyer USS Ellet at 08:00, after 263 5-inch shells and four other torpedoes fired by USS Selfridge failed to do the job, and sank at 9°12′29″S 159°54′46″E / 9.20806°S 159.91278°ECoordinates: 9°12′29″S 159°54′46″E / 9.20806°S 159.91278°E.[28][29] She was one of the first ships to be sunk in what was eventually named "Ironbottom Sound".[30] Three US cruisers were also destroyed during the battle, and a US destroyer was damaged.[26]
Aftermath[]
Canberra's wartime service was recognised with four battle honours: "East Indies 1940–41", "Pacific 1941–42", "Guadalcanal 1942", and "Savo Island 1942".[31][32]
Captain Howard Bode of USS Chicago was formally criticised for his actions during the battle, particularly for not taking lead when Australia departed, and for not warning the northern cruiser force of the approaching Japanese ships,[28] leading to the loss of the three US cruisers.


_underway_at_sea_on_9_January_1961_(KN-1526).jpg)
The US cruiser USS Canberra underway in 1961
In recognition of the valour displayed by the Australian ship and her company, United States President Franklin Delano Roosevelt wished to commemorate the loss of HMAS Canberra by naming a US ship in her honour.[28] The under-construction Baltimore class cruiser Pittsburgh was selected to be renamed USS Canberra.[33] The ship was launched on 19 April 1943 by Lady Alice C. Dixon, the wife of Sir Owen Dixon, Australia's ambassador to the United States, and is the only United States warship to be named after a foreign capital city.[28]
Around the same time, the British government announced that the heavy cruiser HMS Shropshire (a sister ship to Canberra, but of the London subclass) would be transferred to the RAN as a gift.[34] Although King George VI had announced that the ship would be renamed Canberra, the duplication of ship names with the United States Navy was against RAN policy.[34] Although it was thought that Australia had a greater claim to the name, the Australian government decided to retain Shropshire's old name after learning that the US offer had come directly from President Roosevelt.[35] Many of the first Australian sailors posted to Shropshire in early 1943 were Canberra survivors.[36]
Rediscovery[]
Canberra's wreck was rediscovered and examined by Robert Ballard and his crew in July and August 1992, almost exactly fifty years after her scuttling. She lies upright on the ocean floor, approximately 2,500 feet (760 m) below sea level, with visible signs of shell hits and fire damage amidships.[30] Just as they were during her brief and fatal engagement with the Japanese during the Battle of Savo Island, Canberra’s "B", "X" and "Y" turrets were trained to port, while "A" turret was trained on the port bow. When the ship was rediscovered in 1992, the forward superstructure had collapsed over to starboard side. Additionally, "B" turret's roof was completely missing.
Memorials[]
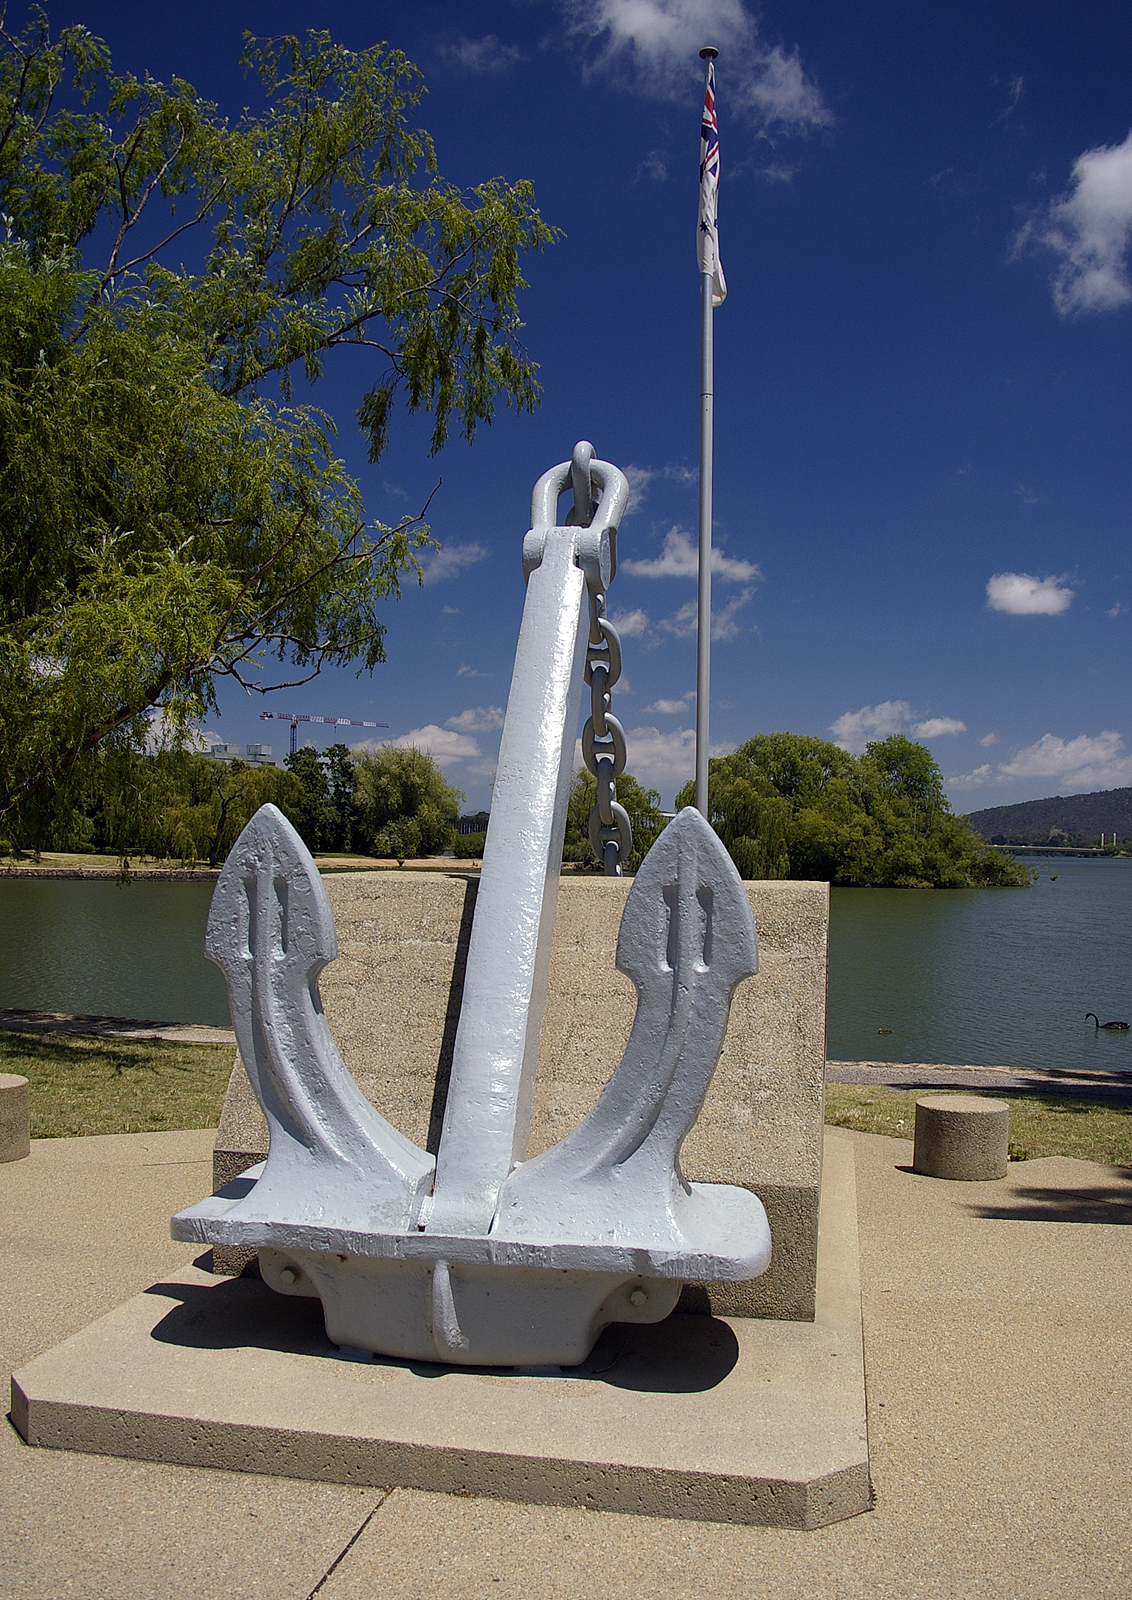

HMAS Canberra memorial in Canberra.
HMAS Canberra is remembered in various places. In her name city of Canberra, a memorial is located next to Lake Burley Griffin,[37] adjacent to the National Carillon. It incorporates a naval anchor and a section of chain cable (of the same type carried by Canberra),[37] and it has two plaques detailing the purpose of the memorial and the details of the cruiser. The memorial was erected by the Australian Capital Territory Branch of the Naval Historical Society, with donations from the ex-HMAS Canberra and Canberra-Shropshire Association members, and was unveiled on 9 August 1981 by Admiral Sir Anthony Synnot.[37] A commemorative address was given at the unveiling by Admiral Sir Victor Smith, who was aboard Canberra at the time of her loss.[37] Each year on the Saturday nearest 9 August, a service is conducted at the memorial, which is attended by the Australian Chief of Navy, the defence attachés from the United States and the United Kingdom, and personnel from the naval base HMAS Harman. A catafalque party was originally provided by personnel from the frigate HMAS Canberra until the ship's decommissioning; after this, the catafalque party was supplied by the Australian Navy Cadets unit TS Canberra.
The ship's service is also recognised in a stained glass window at the Garden Island Naval Chapel.[38]
Notes[]
- ↑ 1.0 1.1 Bastock, Australia's Ships of War, p. 102
- ↑ 2.0 2.1 Cassells, The Capital Ships, p. 39
- ↑ 3.0 3.1 3.2 Clark, The Fighting Canberras, p. 9
- ↑ 4.00 4.01 4.02 4.03 4.04 4.05 4.06 4.07 4.08 4.09 4.10 4.11 4.12 4.13 4.14 4.15 4.16 4.17 4.18 4.19 4.20 Cassells, The Capital Ships, p. 40
- ↑ 5.0 5.1 5.2 5.3 5.4 5.5 5.6 5.7 Bastock, Australia's Ships of War, p. 101
- ↑ "HMAS CANBERRA built by John Brown Clydebank". Clydebuilt Ships Database. http://www.clydesite.co.uk/clydebuilt/viewship.asp?id=2241. Retrieved 10 February 2010.
- ↑ Bastock, Australia's Ships of War, pp. 367-8
- ↑ 8.0 8.1 Bastock, Australia's Ships of War, p. 105
- ↑ Bastock, Australia's Ships of War, pp. 105–6
- ↑ 10.0 10.1 10.2 Bastock, Australia's Ships of War, p. 106
- ↑ 11.0 11.1 11.2 11.3 11.4 11.5 11.6 Clark, The Fighting Canberras, p. 10
- ↑ 12.0 12.1 12.2 12.3 12.4 12.5 12.6 12.7 12.8 Bastock, Australia's Ships of War, p. 107
- ↑ 13.0 13.1 13.2 13.3 13.4 13.5 13.6 Cassells, The Capital Ships, p. 41
- ↑ Frame, HMAS Sydney, pp. 113–4
- ↑ 15.0 15.1 Frame, HMAS Sydney, p. 114
- ↑ Gill, Royal Australian Navy, 1939–1942, pp. 456–7
- ↑ Frame, HMAS Sydney, pgs. 114, 133
- ↑ Gill 1957, p. 510.
- ↑ 19.0 19.1 Gill 1957, p. 524.
- ↑ 20.0 20.1 20.2 Grose, A Very Rude Awakening, pp. 160–2
- ↑ Cassells, The Capital Ships, pp. 41–2
- ↑ 22.0 22.1 22.2 22.3 22.4 Cassells, The Capital Ships, p. 42
- ↑ 23.0 23.1 Clark, The Fighting Canberras, p. 11
- ↑ 24.0 24.1 24.2 24.3 24.4 Cassells, The Capital Ships, p. 43
- ↑ Cassells, The Capital Ships, pp. 43–4
- ↑ 26.0 26.1 Mellefont, Two ships called Canberra, p. 5
- ↑ 27.0 27.1 27.2 27.3 27.4 Cassells, The Capital Ships, p. 44
- ↑ 28.0 28.1 28.2 28.3 28.4 28.5 Cassells, The Capital Ships, p. 45
- ↑ Mellefont, Two ships called Canberra, p. 6
- ↑ 30.0 30.1 U.S. Naval Historical Center: HMAS Canberra[dead link]
- ↑ "Navy Marks 109th Birthday With Historic Changes To Battle Honours". Royal Australian Navy. 1 March 2010. Archived from the original on 13 June 2011. http://web.archive.org/web/20110613184920/http://www.navy.gov.au/Navy_Marks_109th_Birthday_With_Historic_Changes_To_Battle_Honours. Retrieved 23 December 2012.
- ↑ "Royal Australian Navy Ship/Unit Battle Honours". Royal Australian Navy. 1 March 2010. Archived from the original on 14 June 2011. http://web.archive.org/web/20110614064156/http://www.navy.gov.au/w/images/Units_entitlement_list.pdf. Retrieved 23 December 2012.
- ↑ Cassells, The Capital Ships, pp. 45, 129
- ↑ 34.0 34.1 Cassells, The Capital Ships, p. 128
- ↑ Cassells, The Capital Ships, p. 129
- ↑ Bridges, Stuart. "HMAS Shropshire: 1928 – 1954". Naval Historical Society of Australia. http://www.navyhistory.org.au/hmas-shropshire-%E2%80%93-1928-1954/. Retrieved 26 July 2010.
- ↑ 37.0 37.1 37.2 37.3 Cassells, The Capital Ships, pp 64–5
- ↑ Mellefont, Two ships named Canberra, p. 7
References[]
- Bastock, John (1975). Australia's Ships of War. Cremorne, NSW: Angus and Robertson. ISBN 0-207-12927-4. OCLC 2525523.
- Cassells, Vic (2000). The Capital Ships: their battles and their badges. East Roseville, NSW: Simon & Schuster. ISBN 0-7318-0941-6. OCLC 48761594.
- Clark, Robin (March 2001). "The Fighting Canberras". pp. 9–16.
- Frame, Tom (1993). HMAS Sydney: Loss and Controversy. Rydalmere, NSW: Hodder & Stoughton. ISBN 0-340-58468-8. OCLC 32234178.
- Gill, George Hermon (1957) (PDF). Royal Australian Navy, 1939–1942. Australia in the War of 1939–1945, Series 2, Volume I. Canberra: Australian War Memorial. OCLC 848228. http://www.awm.gov.au/histories/second_world_war/volume.asp?levelID=67910. Retrieved 2009-10-12.
- Grose, Peter (2007). A Very Rude Awakening. Crows Nest, NSW: Allen & Unwin. ISBN 978-1-74175-219-9.
- Mellefont, Jeffrey (June 2008). "Two ships called Canberra". Australian National Maritime Museum. pp. 2–7.
External links[]
| Wikimedia Commons has media related to HMAS Canberra (D33). |
- HMAS Canberra (I) – Royal Australian Navy webpage for HMAS Canberra
- Australian Navy Ships – HMAS Canberra – Brief history and photographs published by the United States Naval Historical Center
- Remembering 1942: The loss of HMAS Canberra – Australian War Memorial webpage on the loss of the cruiser
- Convoy MS2
| |||||||||||||||||||
The original article can be found at HMAS Canberra (D33) and the edit history here.