| The Siegfriedstellung (Hindenburg Line) | |||||||
|---|---|---|---|---|---|---|---|
| Part of World War I | |||||||
 The Western Front, 1917 | |||||||
| |||||||
| Belligerents | |||||||
|
|
| ||||||
| Commanders and leaders | |||||||
|
|
| ||||||
| Strength | |||||||
| First, Second, Sixth and Seventh armies | British Third, Fourth and Fifth armies and French Third and Sixth armies | ||||||
| Casualties and losses | |||||||
| January – March 1917 65,381 | January – March 1917 British: 67,217 French: 108,000. | ||||||
| Casualty data from Churchill, W. The World Crisis (1923–1929) are totals for losses on the Western Front, do not correspond to the dates of the Alberich Bewegung and are included as a guide only. | |||||||
| |||||
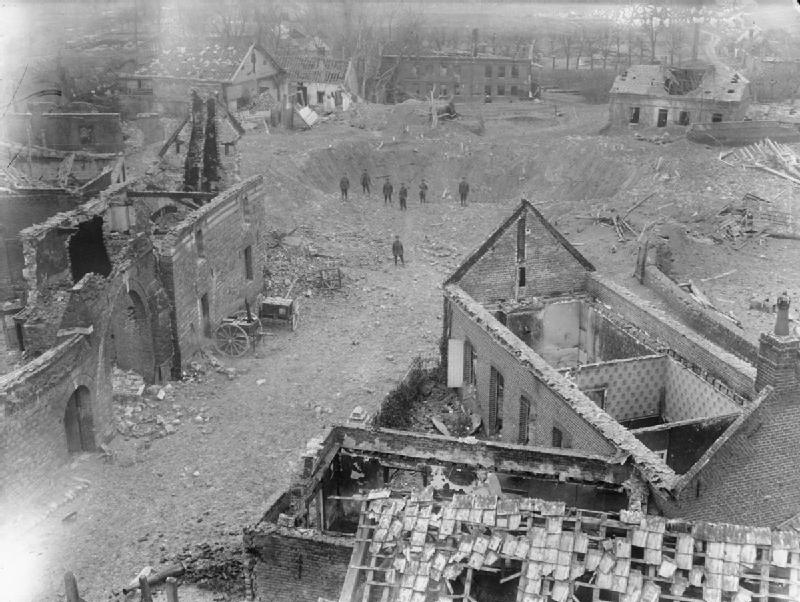
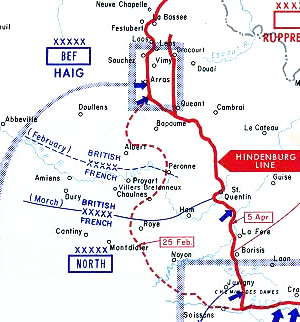
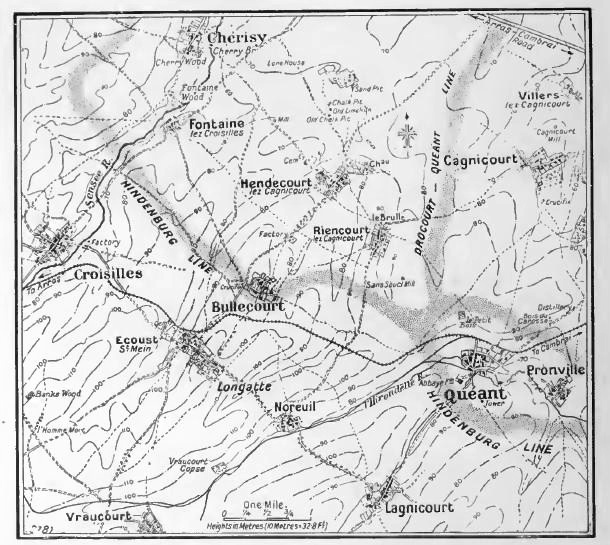
The Siegfriedstellung (Hindenburg Line) was a German defensive position in World War I built during the winter of 1916–1917 on the Western Front from Arras to Laffaux, near Soissons on the Aisne. In 1916 the Brusilov Offensive had inflicted huge losses on the Austro-Hungarian armies in Russia and forced the German eastern armies to take over more of the Eastern Front. The declaration of war by Romania had placed additional strain on the German war economy and army. The German offensive at Verdun had failed to inflict mass casualties on the French army cheaply and Anglo-French attacks on the Western Front had inflicted serious losses on the German army during the French counter-offensive at Verdun and the joint offensive on the Somme. Construction of the Siegfriedstellung (Hindenburg Line) began in September 1916 and was intended to counter an anticipated increase in the power of Anglo-French attacks in 1917. The shorter defensive position behind the Noyon Salient was built to contain an Allied breakthrough and make possible a deliberate withdrawal to prepared positions, which would also economise on manpower. By destroying the infrastructure and demolishing civilian buildings in the salient before a withdrawal, the Germans would dislocate Allied offensive preparations, by forcing them to advance into a zone which had been turned into a "desert". The Anglo-French armies would have to rebuild roads, bridges and railways in the abandoned area before they could resume their attacks, which would take about eight weeks. A shortened Western Front could be held with fewer troops and by incorporating of the lessons of the defence of the Somme into the design of the new positions, could reduce casualties in 1917, by exploiting the tactical advantages of troop dispersal, reverse-slope positions, defence in depth and camouflage. While the German army recuperated from the losses of 1916 protected by the Siegfriedstellung (Hindenburg Line) and similar defensive positions on the rest of the western front, a return to unrestricted submarine warfare and a strategic bombing offensive against Britain were planned.
The Siegfriedstellung was built as a precaution, rather than as part of a policy of withdrawal but by the beginning of 1917, the strategic situation made a retirement inevitable. The German manpower shortage on the Western Front was acute, despite the transfer of divisions from Russia, which increased the number of divisions on the Western Front to 133 on 25 January 1917. Greater production of explosives, ammunition and weapons by the German war economy, to provide the means by which the Allied materialschlacht (battle of equipment) could be countered, had been ordered in the Hindenburg Programme of August 1916 but production had not sufficiently increased over the winter, with only 60% of the programme expected to be fulfilled by the summer of 1917. The German friedensangebot (peace initiative) of December 1916 had been rejected by the Entente and the Auxiliary Service Law (December 1916) intended to further mobilise the civilian economy, had failed to supply the expected additional labour for war production. The retirement took place as part of the Alberich Bewegung (Operation Alberich or Alberich Manoeuvre) in February and March 1917, after local withdrawals on the Somme front had been forced on the First Army by British attacks up the Ancre valley in January and February. A 35-day Alberich timetable had been prepared for the plan to abandon the Noyon Salient. Infrastructure in the salient was destroyed and buildings demolished from 9 February – 15 March. The Anglo-French armies were not able seriously to interfere with the German retirement, which began on 16 March but construction of the Siegfriedstellung (Hindenburg Line) was incomplete and parts of it were poorly sited, having been built according to the obsolete principle of a long field of fire, which forced the Germans to fight delaying actions in outpost villages for longer than anticipated.[Note 1] News of the demolitions and condition of the French civilians left behind, were a serious blow to the prestige of the German empire in neutral countries. Labour was transferred in February 1917 to work on the Hundingstellung from La Fère to Rethel and on the forward positions on the Aisne front which the Germans knew were due to be attacked by the French armies. Divisions released by Operation Alberich and other reinforcements, increased the German armies on the Aisne front to 38 divisions by early April. The Siegfriedstellung (Hindenburg Line) was attacked several times in 1917, notably at St. Quentin, Bullecourt, the Aisne and Cambrai and was broken in September 1918 during the Hundred Days Offensive.
Background[]
Battle of the Somme 1916[]


In August 1916 the German armies on the Somme had been subjected to great strain; the IX Reserve Corps had been "shattered" in the defence of Pozières. Ten fresh divisions had been brought into the Somme front and an extra division had been put into the line opposite the British. Movement behind the German front was made difficult by constant Anglo-French artillery harassing-fire, which added to equipment shortages, by delaying deliveries by rail and interrupting road maintenance. Destruction, capture, damage, wear and defective ammunition had caused 1,068 of 1,208 field guns and 371 of 820 heavy guns in the two German armies on the Somme to be out of action by the end of August. The artillery situation was only slowly improved by the plan of General Max von Gallwitz, to centralize the command of the remaining artillery for counter-battery fire and to use reinforcements of aircraft to increase the amount of observed artillery fire, which had little effect on Allied air superiority but did eventually increase the accuracy and efficiency of German bombardments. The Second Army had been starved of reinforcements in mid-August, to replace exhausted divisions in the First Army and plans for a counter-stroke had been abandoned for lack of troops. The emergency in Russia caused by the Brusilov Offensive, the entry of Romania into the war and the French counter offensive at Verdun had already overstretched the German army.[2]
General Erich von Falkenhayn the German Chief of the General Staff was dismissed on 29 August 1916 and replaced by Field Marshal Paul von Hindenburg, with First Generalquartiermeister General Ludendorff as his deputy. The new supreme command (OHL) ordered an end to attacks at Verdun and the dispatch of troops from there to Romania and the Somme front. On 5 September proposals for a new shorter defensive position to be built in France were requested from the commanders of the western armies, who met Hindenburg and Ludendorff at Cambrai on 8 September. The western front commanders were told that no reserves were available for offensive operations, except those planned for Romania. Lieutenant-General Fuchs a corps commander, recommended that a defensive line be built from Arras to west of Laon, to shorten the front by 25 miles (40 km) and release ten divisions, which with other troops could be used for an offensive in Alsace or Lorraine.[3] Ludendorff criticised the practice of holding ground regardless of its tactical value and advocated holding front-line positions with a minimum of troops and the recapture of lost positions by counter-attacks,[4] a practice which had already been forced on the German armies on the Somme.[5]
On 15 September Generalfeldmarschall Crown Prince Rupprecht, commander of the northern group of armies, was ordered to prepare a rear defensive line and on 23 September work on the new Siegfriedstellung (Hindenburg Line) began. On 21 September, after the battle of Flers-Courcelette (15–22 September), Hindenburg ordered that the Somme front was to have priority in the west for troops and supplies. By the end of the Battle of Morval (25–28 September) Rupprecht had no reserves left on the Somme front. During September the Germans sent another thirteen fresh divisions to the British sector and scraped up troops wherever they could be found. The German artillery fired 213 train-loads of field artillery shells and 217 train-loads of heavy ammunition, yet the début of the tank, the defeat at Thiepval (26–28 September) and the number of casualties (September was the costliest month of the battle for the German armies) had been severe blows to German morale. On 7 October Rupprecht anticipated a British attack north of the Ancre river in mid-October, anxiety about the situation at Verdun also increased and on 19 October the dispatch of reinforcements from Verdun to the Somme was suspended. Defeats inflicted by the French Tenth Army (10–21 October) led to the sacking of Gallwitz's Second Army Chief of Staff, Bronsart von Schellendorf.[6]
German strategy for 1917[]


The supersession of Falkenhayn in August 1916 led to significant domestic changes at the instigation of Hindenburg and Ludendorff to complement their changes of military policy. German workers were to be organised and disciplined by a new Auxiliary Service Law (Hilfsdienstgesetz) which made all Germans from 16 to 50 years old subject to compulsory service, from November 1916.[7] The Hindenburg Programme was begun to compensate for Germany's shortage of manpower with a superiority of weapons and equipment. The programme was intended to create a 100% increase in the production of ammunition and trench mortars by the spring of 1917, a 300% increase in the output of artillery and machine guns and large increases in the manufacture of aircraft, anti-aircraft guns and many other items of military equipment. The German army returned 125,000 skilled workers to the war economy and exempted 800,000 workers from conscription between September 1916 and July 1917.[8] Despite these changes, production of steel in February 1917 was 252,000 long tons (256,000 t) short of expectations and explosives production was 1,100 long tons (1,100 t) below the target, which added to the pressure on Ludendorff to agree that a retreat to the Hindenburg Line was unavoidable.[9] Hindenburg and Ludendorff forced a return to the policy of unrestricted submarine warfare on 9 January 1917 and engineered the dismissal of the Chancellor Bethmann-Hollweg and other opponents of the policy the next day. The policy was to resume on 1 February, with the intention of sinking 600,000 long tons (610,000 t) of shipping per month and knocking Britain out of the war in 5–12 months. Optimistic claims by the navy were less important to the decision, than the "desperate" position of the western armies and the decrepitude of Germany's allies.[10][11] Another front in the west was to be opened by the resumption of air attacks on Britain. New aircraft had become available to replace airships, which had become too vulnerable to British counter-measures in 1916. Planning began in late 1916 and Operation Türkenkreutz began in May 1917.[12]
Defensive fortification[]


As part of the defensive strategy for the Western Front, five defensive positions were planned to form the basis of the Abwehrschlacht (defensive battle) expected in 1917. A Flandernstellung (Flanders Position) from the Belgian coast, along Passchendaele Ridge and behind the Messines salient, to the defences of Lille, the Wotanstellung (Wotan Position, known as the Drocourt-Quéant Line to the British) from Lille to Sailly, was to be built behind the battlefields of 1915 at Loos, Vimy and Arras and the 1916 battlefield of the Somme. The Siegfriedstellung (Siegfried Position, known to the British as the Hindenburg Line) was to be built across the base of the Noyon Salient, from Neuville Vitasse near Arras, through St. Quentin and Laon, to the Aisne east of Soissons, ending at Cerny en Laonnois on the Chemin des Dames ridge, although the withdrawal to the last part of the line was made under the pressure of the Nivelle Offensive, rather than the retirement of March 1917. The Hundingstellung (Hunding Position) was to run from Péronne to Etain, north-east of Verdun behind the Champagne battlefields of 1915. The Michelstellung (Michel Position) was to cover Etain to Pont-à-Mousson behind the St. Mihiel Salient. The new fortified areas were intended to be precautionary measures (Sicherheitskoeffizient) built to be used as rallying-positions (Eventual-Stellungen, similar to the ones built on the Russian front) and to shorten the Western Front to economise on troops and create more reserves. The Siegfriedstellung had the potential to release the greatest number of troops and was begun first.[13] The decision to begin construction of the line was made by Hindenburg and Ludendorff, its course was decided on 19 September and construction began on 27 September 1916.[14]
Withdrawal to the Siegfriedstellung was debated by Ludendorff and other senior German commanders during the winter of 1916–1917. An offensive in the new year with 21 divisions was discussed on 19 December by the western commanders and Ludendorff but it was considered that such a force could not achieve a decisive result.[15] An Oberste Heeresleitung (OHL) memorandum of 5 January, noted that offensive preparations by the French and British were being made all along the Western Front so as to keep the site of a spring offensive secret. It was considered that the Somme front, the area between Arras and Lille, the Aisne front, Lorraine and Flanders were particularly threatened. Prisoner interrogation, postal analysis, espionage and air reconnaissance were used to identify the probable sites of Anglo-French offensives. March was considered the earliest that the Anglo-French could attack, with a possible delay if a Russian offensive was also planned. The Chief of Staff of Rupprecht's army group, General Hermann von Kuhl issued a survey of offensive possibilities on 15 January. A breakthrough attempt was rejected for lack of means and the consequences of failure. Limited-objective attacks at Loos, Arras, the Somme and the Aisne were considered but the manpower and equipment shortage meant that even smaller attacks risked using up reserves, needed for defence against the expected Anglo-French spring offensives. Local attacks like those at Bouchavesnes and La Maisonette on the Somme in late 1916, which could be mounted without reinforcements, were all that could be considered. Ludendorff accepted the analysis that no offensive was possible.[16]
On a visit to Kuhl on 20 January a corps commander, Lieutenant-General von Fuchs, concluded that Allied superiority was so great, that the German army could not pin down the Anglo-French with an attack or stop them attacking elsewhere. The army could not withstand another battle like the Somme and that work on defences there was futile and would exhaust the troops for nothing. On 29 January Ludendorff ruled that a withdrawal could not be ordered on political as well as military grounds, then on 31 January discussed withdrawal with Kuhl, Rupprecht's Chief of Staff, while the First and Second Army commanders on the Somme front opposed a retirement. Resources continued to be directed to the Somme defences during January and February and on 6 February the First Army command requested three divisions and 15,000 labourers to work on new positions, to implement the Wotan–Siegfried–Riegel plan, a partial withdrawal to a line from Arras to Sailly. Even with the expansion of the German army over the winter and the transfer of divisions from Russia, 154 German divisions the Western Front were confronted by 190 French, British and Belgian divisions, many of which were bigger than the German equivalents. The Wotan–Siegfried–Riegel plan would reduce the front by 13 kilometres (8.1 mi) and need six fewer front-holding divisions, compared to a shortening of 45 kilometres (28 mi) and a saving of 13–14 divisions by withdrawing an average of 15 kilometres (9.3 mi) to the Siegfriedstellung (Hindenburg Line).[17]
Anglo-French strategy for 1917[]
The German army was far from defeat but in 1916 had been forced back on the Somme and at Verdun, as had the Austro-Hungarian army in southern Russia. At the Chantilly Conference of November 1916 the Allies agreed to mount another general offensive. The Anglo-French contribution was to be a resumption of the Somme offensive with much larger forces, extending the attack north to Arras and south to the Oise, followed by a French attack between Soissons and Rheims. The British were to attack the salient that had formed between Bapaume and Vimy Ridge with two armies and the French with three armies from the Somme to Noyon. The attacks were to be made on the broadest possible fronts and advance deep enough to threaten German artillery positions.[18] When Marshal Joffre was superseded by General Robert Nivelle, the "Chantilly strategy" was altered. A policy of breakthrough and decisive battle to be achieved within 24–48 hours and lead to the "total destruction of active enemy forces by manoeuvre and battle" was returned to. Successive attacks in a methodical battle were dropped and continuous thrusts were substituted, to deprive the Germans of time to reinforce and strengthen their defences. A large amount of heavy artillery fire up to 8 kilometres (5.0 mi) deep, to the rear edge of the German defences would achieve the breakthrough. The infantry advance was to reach the German heavy artillery in one attack and then widen the breach with lateral attacks. A strategic reserve would then move through the gap and destroy the German reserves in open warfare. The original French attacks between the Somme and Oise were reduced in size and the secondary attack between Soissons and Rheims was reinforced to become the main offensive. The Nivelle Offensive was planned to begin with a British attack on the Bapaume salient in early April 1917, to assist the main French attacks a week later by holding German troops on the Arras front and diverting reserves from the Aisne.[19]
Prelude[]
German Western Front preparations[]
German reconnaissance aircraft surveyed all of the Western Front over the winter of 1916–1917 to look for signs Anglo-French offensive preparations.[20] The design of the Siegfriedstellung (Hindenburg Line) was drawn up by Colonel Kraemer, an engineer from supreme headquarters (OHL) and General Lauter, the Inspector General of Artillery. Construction was organised by Rupprecht and Kuhl; when the plans were ready the line was divided into sectors and officers from the General Staff, gunners and engineers were appointed to oversee construction, which was expected to take five months.[21] The defences were built by German construction companies, who brought skilled workmen to fabricate ferro concrete emplacements, while 12,000 German and 3,000 Belgian labourers and 50,000 mainly Russian prisoners of war dug the trenches.[Note 2] The building works absorbed most of the cement, sand and gravel production of occupied France and Belgium plus that of west Germany. Transport of materials was conducted by canal barge and railway, which carried 1,250 trainloads of engineering stores, although the building period from October 1916 to March 1917 meant that only about eight trains a day were added to normal traffic.[21] Mass-production techniques were used to produce items for the position. Steel-reinforced concrete dug-outs for infantry squads and artillery-observation posts were standard designs and all woodwork was made to a pattern.[22] The line was 90 miles (140 km) long and built for a garrison of twenty divisions, one every 4.5 miles (7.2 km). Telephone cables were deeply buried and light railways built to carry supplies to the defences. The position had two trenches about 200 yards (180 m) apart, with sentry garrisons to occupy the front trench, with the main line of defence in the second line, which was equipped with dug-outs for most of the front garrison. Fields of barbed-wire up to 100 yards (91 m) deep were fixed with screw pickets in three belts 10–15 yards (9.1–13.7 m) wide and 5 yards (4.6 m) apart, in a zig-zag so that machine-guns could sweep the sides placed in front of the trench system. Artillery observation posts and machine-gun nests were built in front and behind the trench lines. Where the lie of the land gave observation from behind the system, it was built on reverse slopes (a Hinterhangstellung) with a short field of fire for the infantry according the experience of the Western Front defensive battles of 1915 and 1916, when forward-slope positions had been smashed by observed Anglo-French artillery-fire.[23]
In much of the new position, the new principles of reverse-slope positions with artillery-observation posts to the rear, was not followed. Artillery observation posts had been built in the front-trench system or in front of it. The trenches had been dug near a crest, on a forward slope or at the rear of a reverse slope, which replicated the obsolete positions being abandoned. The First Army commander General von Below and his Chief of Staff Colonel von Lossberg rejected this layout, since smoke and dust would make artillery observation from such positions impossible. They urged that the First Army section of the Siegfriedstellung (Hindenburg Line) from Quéant, where it met the site of the Wotanstellung (Wotan Line) to Bellicourt north of St. Quentin, should have another position built 2,000–3,000 yards (1,800–2,700 m) in front of the new position, which would become the artillery protection position (Artillerieschutzstellung) behind the revised front system; the line already had 1,200 dug-outs to accommodate 14,000 men, which was sufficient to shelter local reserves. The new line would be similar but on reverse slopes as planned, have dug-outs for 24,000 men and be ready by 15 March. The existing artillery positions were scrapped and the artillery sited to dominate ground useful for the assembly of assault-troops, such as the La Vacquerie plateau. Rupprecht refused to delay implementation of Operation Alberich (the Alberich Bewegung) but having inspected the Siegfriedstellung (Hindenburg Line) on 27 February, sanctioned the First Army proposal and provided three divisions and 15,000 labourers for the new construction, which turned the Siegfriedstellung (Hindenburg Line) into the Siegfried I Stellung. Another two-trench system (Siegfried II Stellung) was planned near the artillery reserve positions, which were about 3,000 yards (2,700 m) behind the existing battery positions, to be built as soon as labour became available. The extra position would ensure that an attack which captured the Siegfried I Stellung (Hindenburg Line), could not continue without a pause to move artillery into range of the Siegfried II Stellung. When complete the various positions had a depth of 6,000–8,000 yards (5,500–7,300 m) and the original Hindenburg Line had become an intermediate line (Siegfried I Zwischenstellung). Work began on another defensive position in the autumn of 1917, with the original Hindenburg Line as its front-trench system.[24]
German defensive methods revised[]
The practice rigidly defending front-line trenches regardless of casualties was abolished, in favour of a mobile defence of the fortified areas being built over the autumn and winter of 1916–1917. Allgemeines über Stellungsbau (Principles of Field Fortification) was published in January 1917, in which instructions were given for the construction of defences in depth, according to the principles of greater depth and disguise by dispersal and camouflage. Trench-lines were mainly intended for accommodation, supply-dumps and to act as decoys rather than be firing-lines. Deep dug-outs in the front line were to be replaced by many more smaller shallow Mannschafts-Eisen-Beton-Unterstände (pillboxes) with most built towards the rear of the defensive areas. Within the new forward zones, battlezones and rearward battle zones, the chain of command was streamlined by making corps headquarters into Gruppen (groups), responsible for the administrative tasks in an area into which divisions would be moved for periods, before being withdrawn to rest, train and be brought up to strength. Command of areas rather than units was also introduced in divisions with command of regiments devolved to the front battalion commander (Kampftruppenkommandeur) which reduced the chain of command from five to two posts.[25]
The value of ground was to be determined by its importance to a defensive position. Where the lie of the land gave the defender a tactical advantage, by which an attacker could be defeated with the minimum of casualties to the defenders, using small-arms fire from dispersed disguised positions and observed artillery-fire, it was to be fought for by the garrison and local reserves, which would counter-attack to regain any ground lost. The changes were codified in a training manual Grundsätze für die Führung in der Abwehrschlacht (The Conduct of the Defensive Battle in Position Warfare) issued on 1 December 1916, which made infantry sections (Gruppen) rather than the battalion the basic tactical unit. Small forward garrisons were to repulse attacks and penetrations were to be cut off and counter-attacked immediately, without waiting for orders. Front line troops were allowed to move away from fire, preferably by advancing into no man's land but moves to the flanks and rear were also allowed.[26]
When front-line garrisons and their supports were unable to hold or recapture the front-line, they were to defend positions even when surrounded, to give time for a counter-thrust by reserve divisions. When an immediate counter-thrust from behind the defensive position was not possible, a deliberate counter-attack was to be planned over several days. Two schools of thought emerged over the winter; the principal authors of the new training manual, Colonel Max Bauer and Captain Hermann Geyer of the General Staff, wanting front garrisons to have discretion to move forwards, sideways and to retire. General von Hoen and Colonel Fritz von Lossberg the First Army Chief of Staff, who on 30 January 1917 issued a memorandum, Erfahrungen der I Armee in der Sommeschlacht (Experience of the German First Army in the Somme Battles), advocated the rigid holding of the front line by its garrison, to keep the defence organised under the control of battalion commanders. Lossberg and Hoen doubted that relief divisions could arrive quickly enough, to counter-attack before Anglo-French infantry had consolidated. They predicted that Ablösungsdivisionen (relief divisions) would not be ready in time for hasty counter-attacks to succeed and that they should make planned counter-attacks after 24–48 hours with full artillery support. Both theories were incorporated by Ludendorff into the new Ausbildungsvorschrift für die Fusstruppen im Kriege (Training Manual for Foot troops in War) of March 1917.[27] Training schools were established to prepare German commanders and courses began in February 1917.[28]
Anglo-French offensive preparations[]
British and French plans for 1917 were agreed at an Allied conference at Chantilly on 15–16 November 1916. Existing operations were to continue over the winter, fresh troops arriving in front-line units were to be trained and in the spring the front of attack was to be broadened, from the Somme to Arras and the Oise. The front of attack was to be about 50 miles (80 km) long, with two French surprise attacks near Rheims and in Alsace, prepared to begin some time after the main attacks, to exploit German disorganisation and lack of reserves. The Allies expected to have 168 divisions against 129 German divisions for the co-ordinated offensives. A British operation in Flanders was also agreed, to begin several weeks after the main offensives further south. Joffre was replaced by Nivelle on 13 December, who proposed a much more ambitious strategy, in which the plans for a resumption of Anglo-French attacks either side of the Somme battlefield of 1916 was to be retained but the offensive on the Aisne was to become a breakthrough offensive, followed by the commitment of a strategic reserve of 27 divisions to fight a "decisive" battle, leading to the exploitation of the victory by all of the Anglo-French armies. French troops south of the British Fourth Army were freed to join the strategic reserve by an extension of the British front, to just north Roye on the Avre facing St. Quentin, which was complete by 26 February.[29]
During periods of fine weather in October 1916, British reconnaissance flights had reported new defences being built far behind the Somme front; on 9 November reconnaissance aircraft found a new line of defences, from Bourlon Wood–Quéant–Bullecourt–Sensée river–Héninel to the German third line near Arras.[30] Next day an escaped Russian prisoner of war reported that 2,000 prisoners were working on concrete dug-outs near St. Quentin. Behind the Fifth and Fourth army front, the course of the Hindenburg Line was farther away and the winter weather was exceptionally bad, which grounded aircraft and made air observation unreliable (on 11 December, a reconnaissance in the area of Marcoing reported nothing unusual, despite flying over the new digging). German fighter opposition in the area had become much worse, with an increase in numbers of aircraft and the arrival in service of superior aircraft types in the late summer of 1916. Three intermediate defensive lines begun in late 1916 and built much closer to the Somme front were being observed by British reconnaissance aircraft, which made fragmentary reports of digging further back unexceptional.[31]
On 2 January Nivelle instructed the French air service to co-operate with the British, in investigating German defensive systems which had been mentioned by spies and repatriated civilians. It was not until 26 January that a British Intelligence summary reported a new line of defence between Arras and Laon. In February attempts to send more aircraft to reconnoitre the line were hampered by mist, snow, rain, low cloud and an extremely determined German air defence. British air reconnaissance discovered diggings between Drocourt and Vitry en Artois at the end of January and on 15 February found a line between Quéant and Etaing. The British were able to trace the new line (named the "Drocourt–Quéant Switch") south to Bellicourt on 15 February and St. Quentin on 25 February, the day after the first German withdrawal on the Ancre. British aircraft losses on these flights were severe due to the presence of the "Richthofen Circus" near Douai; six British reconnaissance aircraft were shot down on 15 April along with two escorts.[32]
Operations on the Ancre 1917[]
Winter weather in mid-November 1916 stopped the Anglo-French attacks on the Somme, rather than the defensive efforts of the German army. On 1 January a German attack took Hope Post near Beaumont Hamel, which was lost to a British attack on 5 January. On the night of 10/11 January a British attack captured The Triangle and Muck Trench, covering the flank of an attack on Munich Trench during the day; British troops edged forward over Redan Ridge during the rest of the month. A fall in temperature added to German difficulties by freezing the mud in the Ancre valley, making it much easier for infantry to move. On 3 and 4 February British attacks towards Puisieux and River trenches succeeded, despite German counter-attacks on 4 February. On 7 February British attacks threatened the German hold on Grandcourt and Serre. Each small advance uncovered another part of the remaining German defences to British ground observation. A bigger British attack began on 17 February to capture Hill 130 to gain observation over Miraumont and the German artillery positions behind Serre. Three divisions attacked after a three-day artillery bombardment with the new fuze 106. A thaw set in on 16 February which, with the Germans alerted to the attack by a deserter, led to the attack on the south bank advancing only a maximum of 1,000 yards (910 m) and to the capture Boom Ravine (Baum Mulde). The attack on the north bank to gain observation over Miraumont from the west succeeded, despite the weather and the Germans being warned of the attack.[33]
On the Fourth Army front fewer attacks took place while the French line was being taken over in stages, south to the Amiens–Roye road. On 27 January the 29th Division took 368 prisoners in an advance of only 400 yards (370 m) and on 1 February an Australian attack on Stormy Trench was repulsed by a German counter-attack. A second attack on 4 February succeeded. On 8 February a battalion of the 17th Division took a trench which overlooked Saillisel and held it despite German counter-attacks, which continued on 9 February. On 21 and 22 February Australian troops captured more of Stormy Trench despite rain, which made the ground even more "appalling", than before the freeze in January and early February. On 23 February, British and Australian troops on the south aide of the Ancre, sent patrols forward to investigate fires seen in German trenches and discovered the German withdrawal. Reports began to reach British commanders by 9:30 a.m. on 24 February, who ordered intensive patrolling and advanced guards to be prepared, ready to move forward at dawn on 25 February.[Note 3] The German positions back to a reserve line, R. I Stellung from Le Transloy to Serre were found to be empty; Gough ordered that strong patrols were to move forward and regain contact with the Germans.[Note 4] Behind the British front, the effect of the thaw on roads and supply routes caused acute supply difficulties.[36]
Withdrawal[]
German withdrawal plan[]

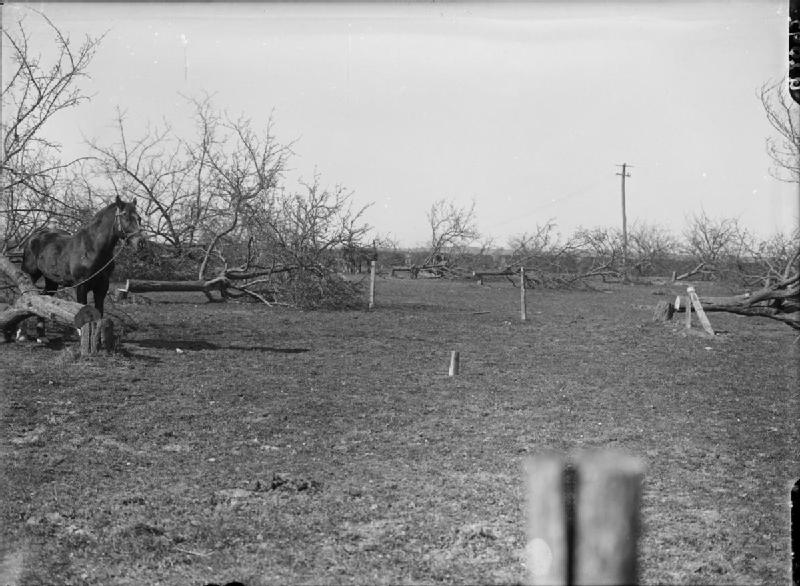
Over the winter various German deception operations were conducted, indications of an offensive through Switzerland diverted French attention at the end of 1916 and the British were occupied by the movement of troops and heavy artillery into Flanders and increased agent reports from Lille, Tourcoing and Courtrai of troop movements. Until January 1917, the British took seriously a possible limited offensive towards the Channel ports and made Flanders the subject of most of its long-range reconnaissance flights.[37] Rupprecht, the northern army group commander on the Western Front, was made responsible for planning the devastation of the infrastructure within the Noyon Salient and retirement to new defensive positions along the Siegfriedstellung (Hindenburg Line), which was codenamed the Alberich Bewegung ("Operation Alberich" or the "Alberich Manoeuvre"). The plan contained a schedule for the removal of military buildings and depots, destruction of railways and roads, the demolition of houses in towns and villages and the planting of mines and other booby-traps, to disrupt Allied attempts to follow the withdrawal.[38][Note 5] Trees were to be cut down, wells polluted and the civilian population forced to leave the area. Rupprecht objected to the scorched-earth policy on moral and practical grounds, that the destruction would be a propaganda disaster, provide enemy troops with shelter, material to repair the damage to roads and undermine the morale and discipline of the German soldiers involved in the destruction. The buildings of Nesle, Ham, Noyon and several villages were excepted from the plan and 10,000–15,000 French civilians were to left behind in them, while 150,000 able-bodied civilians were to be evacuated to work in the rest of occupied France and Belgium. A 35-day timetable for the demolition plan was prepared to be followed by two "marching days" for the troops on the flanks of the area, three for the troops between Nauroy and Coucy le Chateau and four marching days for those between St. Quentin and La Fère.[41]
German retirements on the Somme[]

Defensive positions held by the German army on the Somme after November 1916 were in poor condition, the garrisons were exhausted and censors of correspondence from front-line soldiers reported tiredness and low morale. The situation left the German command doubtful that the army could withstand a resumption of the battle. The German defence of the Ancre began to collapse under British attacks in January, which on 28 January caused Rupprecht to urge that the retirement to the Siegfriedstellung (Hindenburg Line) begin. Ludendorff rejected the proposal next day but British attacks on the First Army, particularly the Action of Miraumont (also known as the Battle of Boom Ravine, 17–18 February) caused Rupprecht on the night of 22 February to order a preliminary withdrawal from Essarts to Le Transloy, of approximately 4 miles (6.4 km) to the R. I Stellung (R. I Position). On 24 February the Germans withdrew to the R. I Stellung protected by rear guards, over roads in relatively good condition which were then destroyed. Next day German rear guards inflicted 174 casualties on Australian troops near Loupart Wood and forced British troops back out of Irles with artillery-fire. A British attack on Puisieux on 26 February took all day and ended in hand-to-hand fighting. Next day troops of the 5th Prussian Foot Guard withdrew from Thilloy, completing the retirement to the R. I Stellung. The German withdrawal was helped by a thaw, which turned roads behind the British front into bogs and by disruption to the railways which supplied the Somme front. On the night of 12 March the Germans withdrew from the R. I Stellung between Bapaume and Achiet le Petit, while small parties of troops sent up flares to mislead the British who were preparing an attack. It took the British until 13 March to reach the R. II Stellung (R. II Position).[42]
The British opposite the German First Army received an indication that a withdrawal was imminent on 20 and 21 February, when intercepted wireless messages were decoded, ordering German wireless stations at Achiet le Petit, Grévillers and in the vicinity of Bapaume to close down and prepare to move back. After this period, information from prisoners and the evidence of German demolitions indicated that a longer retirement was planned but the existence of three German reserve lines 5–6 miles (8.0–9.7 km) behind the front line, made the possibility of a local German retirement more likely than a longer one.[Note 6] On 13 March a document revealing the plan and the code-name Alberich dated 5 March, was found in Loupart Wood.[44] On 24 February Lieutenant-General Hubert Gough defined the boundaries of the three corps making the advance and ordered them to regain contact with the German armies, using strong patrols supported by larger forces moving forward more deliberately behind them. The German front-line was being maintained along the rest of the front and the possibility of a sudden German counter-offensive was not discounted. On 25 February the 2nd Australian Division advanced on Malt Trench and found it strongly held, being forced to retire with 174 casualties. The Fifth Army divisions advanced with patrols until they met German resistance, then prepared deliberate attacks, some of which were forestalled by German withdrawals, which by 26 February had abandoned the ground west of the R. I Stellung apart from small detachments. British engineers improvised sleds to move guns and waggons, with pack-mules being used to carry food and ammunition and on 8 March, ammunition lorries were able to move forward in the V Corps area. Behind the old British front line the thaw badly affected roads, which had been in a very poor condition at the end of 1916 and many were closed, while others were limited to horse-drawn traffic. Railway transport was even worse affected, with Boulogne harbour blocked, the number of trains and waggons on the northern French railways far short of British requirements, the lines being congested and subject to traffic restrictions. Supply difficulties had also begun to increase on the Third Army and Fourth Army fronts before any German withdrawals.[45]
On 10 March the Fifth Army took Grévillers Trench and Irles in a deliberate attack, which overwhelmed the German defence and took 215 prisoners. Fires could be seen behind Bapaume, with more visible behind the R.III Stellung and British Intelligence reported that the headquarters of Crown Prince Rupprecht, the army group commander had been moved to Mons; civilians were known to have been evacuated along with supply dumps and artillery. The R. II Stellung was found to be empty, between Bapaume and Achiet le Petit on the night of 12 March but on 13 March an attack on Bucquoy failed with 574 casualties. The German document found in Loupart Wood was dated 5 March, contained details of the Alberich Bewegung (Operation Alberich) and showed that Loupart Wood had been abandoned a day early. On the night of 14 March patrols found that the Germans had withdrawn from part of the Fourth Army front and on 17 March the Germans slipped away on all of the Third and Fifth Army fronts.[46]
Alberich Bewegung[]

On 4 February the order was given to begin the Alberich Bewegung (manoeuvre), with 9 February to be the first "Alberich day" and 16 March the first "marching day".[47] The First Army from Arras to Péronne brought reserve "Siegfried divisions" forward to the R. III Stellung (R. III Position) and outpost villages close to the Siegfriedstellung (Hindenburg Line). The front-holding divisions, which had been worn down by British attacks, were withdrawn behind the Siegfriedstellung (Hindenburg Line). On 17 March the German troops at the north end of the Bapaume Salient withdrew swiftly, as there were no intermediate lines corresponding to the R. III Stellung north of Achiet le Grand. The R. I Stellung was abandoned by 18 March and next day Boyelles and Boiry Becquerelle were evacuated. The withdrawal went straight back to the Siegfriedstellung (Hindenburg Line) except for outposts at Hénin sur Cojeul, St. Martin sur Cojeul and the west end of Neuville Vitasse. Numerous raids were mounted on British outposts during 20 and 21 March. [48] The R. I Stellung was abandoned north of the Ancre along with part of the R. II Stellung near its junction with the R. I Stellung at Bapaume which was also abandoned, while many houses were still on fire. Next day parties of Germans at Beugny in the R. III Stellung fought until nightfall then slipped away but a party at Vaulx Vraucourt was surprised (while some were shaving) and driven back to Lagnicourt. On 20 March an Australian attack on Noreuil failed with 331 casualties and an attack on Croisilles was repulsed. A German counter-attack to recover Beaumetz was mounted on 23 March and got into the village before being forced to withdraw; the attack was repeated next day but only one party reached the village. Lagnicourt was lost on 26 March and a counter-attack from Noreuil repulsed, then a British attack on Bucquoy was defeated.[49]
The Second Army conducted the withdrawal with the line-holding divisions, which were fresher than those of the First Army and with several cavalry divisions and cyclist battalions. On 17 March withdrawals began north of the Avre and by 18 March the German Seventh, Second, First and southern wing of the Sixth Army began to withdraw from the old front-line (110 miles (180 km) in length or 65 miles (105 km) as the crow flies). Soissons was abandoned, roads leading out of Noyon were flooded and railway bridges blown and the crossings of the Somme river and canal from Offoy to Péronne were destroyed. Roads built on causeways over marshy ground between the river and canal caused water form to pools 0.5-mile (0.80 km) wide, making crossings practical only at the causeways. The bridges over the Germaine, Omignon, Cologne, Tortille rivers and the Canal du Nord were also destroyed and huge craters blown in cross-roads, the damage being made worse by the thaw. German rear-guards made a stand in part of the R. III Stellung from Nurlu to Péronne on 18 March, which was the third and final marching day of the retreat from Roye to St. Quentin and the second and final day from Péronne to le Catelet, when the main body of German troops reached the Siegfriedstellung (Hindenburg Line), although work was still being done to remedy defects in the original position. The rear-guards retired next day from Nurlu and Bertincourt as soon as British troops appeared, then counter-attacked British cavalry around Poeuilly on 22 March.[50]

A large counter-attack was mounted on the French front on 22 March, which forced French cavalry and cyclists back over the Crozat Canal, with many casualties but began too soon to ambush a large force including artillery as had been intended. A Booby-trap exploded in Bapaume town hall on 25 March, killing Australian troops and two French Deputies; French civilians were left behind at Bouvincourt, Vraignes and Tincourt on 26 March. Villers Faucon, Saulcourt and Guyencourt were lost on 27 March to attacks by British cavalry and armoured cars. Supplies of armour-piercing bullets had been sent forward after Roisel was captured the day before, resulting in the armoured cars being peppered with bullet-holes. The armoured cars decoyed the German defenders, while the cavalry got round the flanks and captured the villages.[51] The outpost villages close to the Siegfriedstellung (Hindenburg Line) south of Quéant had to be held for longer than expected, because of the need to complete the additions to the defences being built to remedy defects in the original position. Heudicourt, Sorel and Fins were lost on 30 March. The northern outpost villages were lost on 2 April and Lempire fell on 5 April.[52]
Anglo-French advance[]


In early March, instructions were given by Fourth Army corps commanders for advanced guards to maintain contact, should the Germans retreat, with larger forces to dig in behind them on defensible ground, so that the advanced guards could fall back if attacked. The first sign of a German retreat was seen on 14 March when fires were seen in St. Pierre Vaast Wood. Later in the day the British entered Saillisel and by 16 March most of the wood had been occupied. The British Fourth and Fifth armies organised all-arms forces of cavalry squadrons, infantry and cyclist battalions and artillery batteries, to some of which armoured-car units were attached. On 15 March the French Groupe d'armées du Nord (GAN), south of the junction with the British Fourth Army at Roye, was ordered to follow up a German retirement.[53] By 18 March the German Sixth, First, Second and Seventh armies were withdrawing and British and French cavalry patrols met in Nesle, 9.5 miles (15.3 km) behind the old front line. When French troops entered Lassigny they caused a traffic jam and vehicles which tried to skirt the jam bogged in mud.[54] The French armies of GAN had been on ten-day's notice to attack (about fourteen days before Nivelle's big breakthrough attempt on the Aisne) between the Oise and Avre rivers. News of the first German retirements led the army group commander General Franchet d'Espérey to advocate an attempt to surprise the Germans and force them to retreat prematurely. The suggestion was rejected and the GAN began to prepare a limited attack for 17 March, by when the Germans had gone.[55]
On 17 March Haig and the British army commanders met and discussed the effect of the German retirement. The precedent of a German withdrawal to a prepared position, followed by a counter-attack in 1914 was noted and that the reserves freed by the retirement would give the Germans an opportunity to attack the flanks of the withdrawal area. Nivelle had already decided to use the French troops released by the shorter front to reinforce the line in Champagne. British preparations for the attack at Arras were to proceed, with a watch kept for a possible German attack in Flanders and preparations for the attack on Messines Ridge were to continue. The pursuit of the German army was to be made in the Fourth Army area with advanced guards covered by the cavalry and cyclists attached to each corps and the 5th Cavalry Division. Larger forces were not to move east of a line from the Canal du Nord to the Somme south of Péronne until roads, bridges and railways had been repaired. The boundary of the Fourth Army and French Third Army was set from south of Nesle, through Offroy to St. Quentin. In the Fifth Army area from Bapaume to the north the advance to the Hindenburg Line needed to be complete in time to conduct supporting operations for the Third Army attack due at Arras in early April. All-arms columns of cavalry, infantry, artillery and engineers were organised to advance on the front of each division. The advanced guards of the 5th and 2nd Australian divisions each had a detachment of the Australian Light Horse, a battery of 18-pounder field guns, part of an engineer field company, two infantry battalions and machine-guns. The advance had fewer geographical obstacles than further south. On the left flank the country beyond the R. II Line was open and on the right the Germans made little effort to hold the ground west of the R. III Line, the ground inclining slightly to the north-east towards Bullecourt, 9 miles (14 km) away, with most of the rivers flowing in the direction of the British advance.[56]
After 18 March the main body of the Fifth Army was ordered to dig in temporarily from Bancourt to Bapaume, Achiet-le-Grand and Ablainzevelle and the advanced guards, which were large enough to be mobile columns, be reinforced to the strength of brigade groups. Some of the columns advanced boldly and others dug in temporarily as a precaution. Information that the Germans were burning villages behind the Hindenburg Line, led Gough to order II Corps and V Corps and the Lucknow Cavalry Brigade to advance vigorously on 19 March, with the support of the reinforced mobile columns to Ecoust St. Mein, Croisilles, Lagnicourt and Hénin sur Cojeul. Next day the brigade groups were to support the cavalry drive the Germans back to the Hindenburg Line, which led the 2nd Australian Division force to attack Noreuil on 20 March. The attack was repulsed with 331 casualties and an advance on Ecoust and Croisilles by infantry of the 18th Division with cavalry and artillery on the flanks was repulsed by fire from about fifteen machine-guns and six field guns; Gough ordered that attacks on the German outpost line were to stop until more artillery was available.[57]
The British advance in the Fourth Army area reached the Somme rapidly from 17 to 20 March, with a continuous pursuit by vanguards and the main body moving forward by bounds between lines of resistance up to the Somme river and Canal du Nord which ran north-to-south from Offoy to Péronne, then paused while the river was bridged, with a priority of light bridges for infantry first, pontoon or trestle bridges for wagons and field artillery and then heavy bridges for mechanical transport and heavy artillery. The heavy steel bridges could be transported from a Base Park at Le Havre with 72 hours' notice. A bridge over the canal near Péronne was built by surveying the ground on the night of 15 March, towing pontoons up river the next night, building beginning at dawn on 17 March and the 60 feet (18 m) pontoon being ready by noon. Infantry of the 1/8th Royal Warwicks crossed that evening and were then ferried over the river beyond on rafts, to become the first Allied troops into Péronne.[58] On the right flank, IV Corps had to advance about 14 miles (23 km) over cratered and blocked roads to reach the Somme but Corps Mounted Troops and cyclists arrived on 18 March to find German rearguards also mounted on bicycles. Infantry crossed the river on 20 March by when the mounted troops had reached Germaine and the Fourth Army infantry outposts were established on high ground 2.5–3 miles (4.0–4.8 km) east of the Somme. "Ward's Force" was formed with corps cavalry, cyclists and two batteries of field artillery, two sections of engineers, a battalion of infantry from the 48th Division on 22 March as a precaution after cavalry was forced out of Poeuilly and neighbouring villages by a counter-attack and the coprs cavalry relieved by the 5th Cavalry Division. The villages were reoccupied next day. The German retirement from the R. III Stellung had begun on 19 March when Nurlu and Bertincourt were occupied by the British after slight pressure. British infantry and cavalry were finding greater German resistance.[59]
After a pause until 26 March, Ward's Force captured Roisel with an infantry company, two cavalry squadrons and two armoured cars; Canadian cavalry took Equancourt. The cavalry advanced again on 27 March and took Villers Faucon, Saulcourt and Guyencourt "with great dash". An attempt at a swifter pursuit by French cavalry and cyclists on 22 March failed, when they were forced back over the Crozat canal by a German counter-attack, with many casualties. On 28 March the British precautionary line of resistance was moved forward to a line Germaine–Caulaincourt–Bernes–Marquaix–Lieramont–Nurlu–Equancourt–Bertincourt while the outposts of cavalry, cyclists and some infantry mostly paused. On the army boundary with the French the 32nd Division kept two brigades in line and one in reserve. Each brigade in the line had two infantry companies in outposts held by platoons backed by their battalions and the artillery close enough to cover the outposts. By late March each British corps in the pursuit had diverted a minimum of one division to work on road repairs and bridging, the thaw making the effect of German demolitions far worse. In the Fifth Army area, repair work was concentrated on the railway up the Ancre valley, the Candas–Acheux line, two light railways and the Albert–Bapaume, Hamel–Achiet le Petit–Achiet le Grand and Serre–Puisieux–Bucquoy–Ablainzevelle roads, most of the labour coming from front-line divisions.[60]
By 1 April, the British and French armies were ready to begin operations against outpost villages, still occupied by the Germans west of the Hindenburg Line. The French Third Army prepared to attack at St. Quentin on 10 April for which the preliminary bombardment began on 4 April. The British Fourth Army prepared to support the attack with artillery and such infantry attacks as could be attempted while communications were still being repaired. Information from captured documents and prisoners had disclosed the details of Operation Alberich and that outpost villages had to be held for longer than planned, to enable work to continue on the Hindenburg Line (Siegfriedstellung), where it was being rebuilt south of Quéant. Despite increased German resistance Neuville Bourjonval, Ruyaulcourt, Sorel le Grand, Heudicourt, Fins, Dessart Wood, Ste. Emilie, Vermand sur Omignon, Vendelles, Jeancourt, Herbecourt, Epehy, Peizière were captured between 28 March and 1 April. Deliberate attacks were mounted in early April to take Holnon Wood, Savy (where the German garrison had to be overwhelmed by house-to-house fighting), Holnon, Sélency (including six German field guns) and Francilly Sélency. A German counter-attack on 3 April by a storm troop, to recover a German artillery battery from Holnon Wood, coincided with a British attempt to do the same and failed. The French Third Army captured the Epine de Dallon on 3 April, bringing it up to the Hindenburg Line and on 4 April the British captured Metz en Couture in a snowstorm. Ronssoy, Basse Boulogne and Lempire were captured after house-to-house fighting but an attack on le Verguier failed. The villages still held by the Germans were found to be in a much better state of defence, with much more barbed-wire around them. An attack on Fresnoy Le Petit late on 5 April, was hampered by uncut wire and a second attack the next night was stopped half-way through the village, the defenders holding out until 7 April; an attack on Vadencourt also failed. On 9 April the Fourth Army began a bombardment of the Hindenburg Line, with such heavy artillery that it had in range, as the Third and First armies began the offensive at Arras to the north. Fighting on the Fourth Army front, for the remaining outpost villages, went on until the end of April.[61]
Air operations[]


German air operations over the winter concentrated on reconnaissance to look for signs of Anglo-French offensive preparations, which were found at Messines, Arras, Roye, the Aisne and the Champagne region. By March the outline of the Anglo-French spring offensive had been observed from the air. German air units were concentrated around Arras and the Aisne which left few to operate over the Noyon Salient during the retirement.[62] When the retirement began British squadrons in the area were instructed to keep German rearguards under constant observation, harass German troops by ground attacks and to make long-range reconnaissances to search the area east of the Hindenburg Line, for signs of more defensive positions and indications that a further retreat was contemplated. A policy on rapid movement had been devised in September 1916, in which the Army Wing and Corps Wings not attached to the corps moving forward, would move with army headquarters and the Corps Wings attached to the corps which were advancing, would keep as close to their associated corps headquarters as possible.[Note 7] Squadrons would not need to move every day and could arrange temporary landing-grounds. On 21 March 1917 the use of temporary facilities was ordered with portable hangars to be built near corps headquarters and aircraft flown back to their normal aerodromes at nght. IV and V Brigades were involved in the advance, with their squadrons attached to divisions for contact-patrols. Two cavalry divisions were attached to the Fourth and Fifth armies for the advance, with aircraft for reconnaissances of the ground that the cavalry was to traverse and to help the cavalry maintain touch with the rear.[64] Suitable targets found by air observation were engaged by artillery using the "zone call" system.[Note 8] The cavalry divisions were issued with wireless stations to keep in touch with their attached aircraft but in the event good ground communications made them redundant. The German retirement was so swift and the amount of artillery fire was so small, that telephone wires were cut far less frequently than expected. German troop movements were well-concealed and rarely seen from the air and it was usually ground fire that alerted aircrew to their presence. Pilots flew low over villages and strong-points, to invite German ground fire for their observers to plot, although this practice gave no indication of the strength of rearguards. A few attacks were made on German cavalry and infantry caught in the open but this had little influence on ground operations. The artillery wireless organisation broke down at times, due to delays in setting up ground stations which led to missed opportunities for the direction of artillery fire from the air. The main influence of air operations was exerted through message-carrying and reconnaissance, particularly in observing ground conditions in front of the advance and intermittent co-operation with artillery. Distant reconnaissance, some by single-seat fighters, found no evidence of German defences beyond the Hindenburg Line but many new aerodromes and supply dumps, indicating the permanence of the new position.[66]
Aftermath[]
Analysis[]


The success of the German withdrawal to the Hindenburg Line has been explained as an Allied failure to anticipate the retirement and in being unable seriously to impede it.[67][68] Another view is that the Anglo-French were not pursuing a broken enemy but an army making a deliberate withdrawal after months of preparation, which retained considerable power of manoeuvre and counter-attack.[69] Belated awareness of the significance of the building work along the base of the Noyon Salient, has also been given as a reason for a cautious pursuit deliberately chosen, rather than an inept and failed attempt to intercept the German retirement.[70] In Cavalry Studies: Strategical and Tactical (1907) Haig had described the hasty retreat of a beaten enemy and an organised withdrawal by a formidable force, capable of rapidly returning to the attack to defeat a disorganised pursuit.[71] In the case of an organised withdrawal, Haig described a cautious follow up by advanced guards, in front of a main force moving periodically from defensive position to defensive position, always providing a firm base on which the advanced guards could retire. The conduct of the Anglo-French pursuit conformed to this model. General Franchet d'Espérey proposed a hasty offensive to Nivelle, which was rejected in favour of strengthening the main French front on the Aisne. British heavy artillery had been moved north from the Fifth Army in January, ready for the offensive at Arras and had been partly replaced by inexperienced units from Britain. Divisions from the Fourth Army had been moved south, to take over former French positions and I Anzac Corps had been transferred to the Fifth Army to compensate for divisions sent north to the Third Army by 6 February, which left the Anglo-French forces in the area depleted.[72]
Beach concluded that evidence of German intentions had been collected by air reconnaissance, spy reports and debriefings of refugees and escaped prisoners of war but that German deception measures made information gleaned from intermittent air reconnaissance during the frequent bad flying weather over the winter appear unremarkable. German digging behind existing fortifications had taken place several times during the Somme battle and led British Intelligence to interpret the evidence of fortification-building further back from the Somme front, as an extension of the construction already being watched. In late December 1916 reports from witnesses led to British and French air reconnaissance further to the south and in mid-January 1917 British intelligence concluded that a new line was being built from Arras to Laon. By February the line was known to be near completion and by 25 February the local withdrawals on the Fifth Army front and prisoner interrogation, led the Anglo-French to anticipate a gradual German withdrawal to the new line.[73] When British patrols probing German outposts found them unoccupied, the Allies began a cautious advance, slowed by German destruction of the transport infrastructure and the troubled transport situation behind their own lines, caused by mounting difficulties on the Nord railways and the effect of overloading and the thaw on roads. The Germans had the advantage of falling back over good roads, to prepared defences protected by rear-guards. The German armies made an efficient withdrawal, although the destruction accompanying Operation Alberich caused a considerable amount of indiscipline.[74] Defending villages as outposts, with most of the rearguard posted at the western exits, left them vulnerable to encirclement and attacks from commanding ground, the predictability of such methods provided Anglo-French troops with obvious objectives.[75]
Cyril Falls, the British Official Historian, criticised the British army for the failings it showed during the German withdrawal to the Hindenburg Line, writing that the divisions were "bewildered and helpless", until they gained experience in the new form of warfare.[76] The commander of the 8th Division, Major-General W. Heneker wrote on 2 April that it had taken three weeks for his division to become proficient in open-warfare techniques.[77] In April 1917, an analysis by II Corps had found that patrols coming under fire had stopped to report, ground of tactical importance had been ignored by patrols which had returned to British lines, forfeiting opportunities to force German withdrawals and artillery had been reluctant to push forward. Liaison between divisional engineers and artillery had been poor, advanced guards had not known the importance of reporting on the condition of roads, ground and the accuracy of maps; the cavalry element of advanced guards was also criticised for hesitancy[78] although in contrast, Charles Bean, the Australian Official Historian, concluded that the advanced troops of I Anzac Corps had been sent out on a limb.[79]
Falls rejected claims that British methods were predictable, noting that attacks had been made at dawn, noon, afternoon and at night. Bombardments had been fired before some attacks, during attacks on other occasions, on call from the infantry or were dispensed with. Attacks had been made indirectly, using ground for cover and a number of outflanking moves had succeeded. Combined operations with infantry, cavalry, cyclists, armoured cars and aircraft had also occurred. The most successful divisions in the pursuit, were found to have been those which had been on the Somme for a considerable time, rather than the newer divisions, which were fresh and had trained for open warfare in England.[80] Many of the British attacks had substantial casualties, mostly from German machine-gun fire, although artillery casualties were also high. Attacks on similar objectives using different methods had similar casualties, which suggested that losses were determined by the German defence, rather than unsatisfactory British methods. British field artillery had been supplied with an adequate amount of ammunition, despite the transport difficulties but much heavy artillery was left behind.[81] The weather was also unusually severe, with snow in early April, which had less effect on German rearguards, who occupied billets and then blew them up when they retired. Allied troops in the pursuit suffered from exposure and shortages of supplies but had increased morale, better health (trench foot cases declined sharply) and adapted to open warfare. Draught animals suffered from the weather, short rations and overloading; the British artillery soon had a shortage of 3,500 horses and several immobilised heavy artillery batteries.[82]
The length of the Western Front was reduced by 25 miles (40 km), which needed 13–14 fewer German divisions to hold. The Allied spring offensive had been forestalled and the subsidiary French attack up the Oise valley negated.[83] The main French breakthrough offensive on the Aisne (the "Nivelle Offensive") forced the Germans to withdraw to the Hindenburg Line defences behind the existing front line and German counter-attacks became increasingly costly during the battle, after four days 20,000 prisoners being taken by the French armies. Approximately 238,000 casualties were inflicted on German armies opposite the French and Belgian fronts between April and July, most during the Nivelle Offensive, which were higher losses than any earlier Entente attack, against 274,000 French casualties for the same period. The French armies lost 96,125 casualties by 25 April and were also struck by a collapse of the medical services on the Aisne front, approximately 60,000 casualties being stranded close to the battlefield for several days; German losses have been estimated at 83,000 for the same period.[84] A wave of mutinies broke out in the French armies, which eventually affected 54 divisions.[Note 9] The French strategy of breakthrough and decisive battle had failed disastrously and for the rest of 1917 the French armies resorted to a strategy of "healing and defence". Continuous and methodical battles were replaced by limited attacks followed by consolidation. A massive rearmament programme was begun to produce aircraft, heavy artillery, tanks and chemicals, which had similar goals to the Hindenburg Programme.[85]
The parts of the Western Front where German defences were rebuilt on the new principles or had naturally-occurring features, which the new principles imitated, such as the Chemin des Dames, withstood the Anglo-French attacks of the Nivelle Offensive in April 1917 although the cost in casualties was high. The rate of German infantry losses in these defences diminished, although this was also apparent in the rate of loss of the attackers, who were better organised and used more efficient methods, made possible by the increased flow of equipment and supplies to the Western Front, which had so concerned Ludendorff in September 1916 (In 1917 British artillery ammunition shortages ended and barrel-wear from firing so many shells became a problem.)[86] At Verdun in December 1916, Arras in April 1917 and at Messines in June, where the new German defensive principles of depth, camouflage and reverse-slope defences, dispersed methods of fortification and prompt reinforcement by Eingreif divisions, were not possible or had not been adopted in time, the Anglo-French armies inflicted costly defeats on the German armies. The German defensive strategy on the Western Front in 1917, succeeded in resisting the increase in the offensive power of the Entente, without the loss of vital territory but the attrition of German manpower was slowed rather than reversed. Unrestricted submarine warfare caused the United States to declare war on 6 April and failed to isolate Britain from its overseas sources of supply and the bombing offensive against Britain mainly acted to divert Anglo-French air defence resources, which slowed the rate at which the German air service was outnumbered. By the end of the Third Battle of Ypres in November 1917, the effectiveness of the methods of defence introduced in 1917 had been eroded and continuation of a defensive strategy in the west was made impossible. The defeat of Russia gave the German leadership a final opportunity to avoid defeat, rather than the attempts to compete with Allied numerical and industrial superiority, through economic warfare in the Atlantic and the domestic initiatives of the Hindenburg Programme,[87] the Auxiliary Service Law[88] and temporary demobilisation of skilled workers from the army.[89]
Casualties[]
The accuracy of Great War casualty statistics is disputed. Casualty data available refer to Western Front totals as shown in Winston Churchill's The World Crisis (1923–1929) and do not refer directly to the German withdrawal to the Hindenburg Line (Siegfriedstellung) or losses which would be considered "normal wastage", occurring as a consequence of the existence of the Western Front, rather than to particular military operations. Total British losses from January to March 1917 in France were given as 67,217, French losses given were 108,000 and German losses were 65,381.[90]
Defence of the Hindenburg Line 1917–1918[]


The first attack of the Nivelle Offensive by the British First and Third armies came at Arras, north of the Hindenburg Line on 9 April and inflicted a substantial defeat on the German Sixth Army, which occupied obsolete defences on forward slopes. Vimy Ridge was captured and further south the greatest depth of advance since trench-warfare began was achieved. German reinforcements were able to stabilise the front line, using both of the defensive methods endorsed in the new German training manual and the British continued the offensive, despite the difficulties of ground and German defensive tactics, in support of the French offensives further south and then to keep German troops in the area while the Messines Ridge attack was being prepared. German casualties have been estimated at 85,000 against British losses of 117,066 for the Third and First armies.[91]
During the Battle of Arras the British Fifth Army was intended to help the operations of the Third Army, by pushing back German rear guards to the Siegfriedstellung (Hindenburg Line) and then attacking the position from Bullecourt to Quéant, which was 3.5 miles (5.6 km) from the main Arras–Cambrai road. The German outpost villages from Doignies to Croisilles were captured on 2 April and an attack on a 3,500-yard (3,200 m) front, with Bullecourt in the centre was planned. The wire-cutting bombardment was delayed by transport difficulties behind the new British front line and the attack of the Third Army, which was originally intended to be simultaneous, took place on 9 April. A tank attack by the Fifth Army was improvised for 10 April on a front of 1,500 yards (1,400 m) to capture Riencourt and Hendecourt. The attack was intended to begin 48 minutes before sunrise but the tanks were delayed by a blizzard and the attack was cancelled at the last minute, the 4th Australian Division withdrawal from its assembly positions luckily obscured by a snowstorm. The cancellation did not reach the 62nd Division on the left in time and several patrols were already in the German barbed-wire when the order arrived. The attack was postponed for 24 hours but only four of the twelve tanks in the attack were in position on time. The tanks which attacked lost direction and were quickly knocked out, leaving no gaps in the barbed-wire for the infantry. Australian troops took a portion of the front Hindenburg trench and false reports of success led to cavalry being sent forward, where they were forced back by machine-gun fire as were the Australians by a counter-attack at 10:00 a.m. Total British casualties were 3,300, patrols from the 62nd Division lost 162 casualties, the 4th Australian Brigade lost 2,258 out of 3,000 men (1,164 taken prisoner) and the 12th Australian Brigade had 909 losses; German casualties were 750 men.[92]
At 4:05 a.m. on 15 April, elements of four German divisions attacked from the Siegfriedstellung (Hindenburg Line) from Havrincourt to Quéant to occupy Noreuil, Lagnicourt, Morchies, Boursies, Doignies, Demicourt and Hermies until nightfall, inflict casualties, destroy British artillery so as to make a British attack in the area impossible and to attract British reserves from the Arras front further north. Lagnicourt was occupied for a short time and five British guns destroyed but the rest of the attack failed. Co-ordination between German infantry and artillery suffered from the hasty nature of the attack, for which planning had begun on 13 April. Several units were late and attacked on unfamiliar ground, with 2,313 casualties against 1,010 Australian losses.[93]
Labour was transferred to work on the Hundingstellung from La Fère to Rethel and 20 fortress labour battalions were sent to work on the forward positions on the Aisne front on 23 February. The German strategic reserve rose to approximately 40 divisions by the end of March and the Aisne front was reinforced with the First Army, released by Operation Alberich and other divisions, which raised the number to 21 in line and 17 in reserve on the Aisne by early April.[94] The French Groupe d'armées du Nord (GAN) attacked the Hindenburg Line at St. Quentin on 13 April with no success and the "decisive" offensive, by the French Groupe d'armées de Réserve (GAR) began on 16 April, between Vailly and Rheims. The French breakthrough attempt was defeated but forced the Germans to abandon the area between Braye, Condé and Laffaux and withdraw to the Hindenburg Line from Laffaux Mill, along the Chemin des Dames to Courtecon. The German armies in France were still short of reserves, despite the retirements to the Hindenburg Line and divisions depleted by 163,000 casualties during the Nivelle Offensive replaced by those in reserve, had to change places with the counter-attack divisions rather than be withdrawn altogether.[95][96]

Another British attack at Bullecourt was planned after the failure of 11 April but postponed several times until the Third Army further north had reached the Sensée and there had been time for a thorough artillery preparation. By May the attack was intended to help the Third Army to advance, hold German troops in the area and assist the French army attacks on the Aisne. Two divisions were involved in the attack with the first objective at the second Hindenburg trench on a front of 4,000 yards (3,700 m), a second objective at the Fontaine–Quéant road and the final objective at the villages of Riencourt and Hendecourt. Many of the British transport and supply difficulties had been remedied, with the extension of railways and roads into the "Alberich" area. The attack began on 3 May and part the 2nd Australian Division reached the Hindenburg Line and established a foothold. Small parties of the 62nd Division reached the first objective and were cut off, the division having approximately 3,000 casualties; an attack by the 7th Division was driven back.[97]
From 4–6 May the battle in the 2nd Australian Division sector continued and the foothold in the Hindenburg Line was extended. The 7th Division continued to try to reach British parties, which had got into Bullecourt and been isolated. A German counter-attack on 6 May was defeated but the 2nd Australian Division and the 62nd Division had been exhausted and serious losses had been inflicted on the 1st Australian and 7th divisions. The German 27th, 3rd Guard, 2nd Guard Reserve divisions and a regiment of the 207th Division had made six big counter-attacks and also had many casualties. The British attacked again on 7 May with the 7th Division towards Bullecourt and the 1st Australian Brigade west along the Hindenburg trenches, which met at the second objective. Next day the "Red Patch" was attacked again and a small part held after German counter-attacks. The 5th Australian Division relieved the 2nd Australian Division by 10 May, while the battle in Bullecourt continued to the west, the 7th Division capturing the village except for the Red Patch on 12 May, while the 62nd Division advance was pushed back. The 58th Division relieved the Australians and British attacks on 13 May failed. A final German counter-attack was made to recapture all of Bullecourt and the Hindenburg trenches on 15 May. The attack failed, except at Bullecourt where the west of the village was regained. The 7th Division was relieved by part of the 58th Division, which attacked the Red Patch again on 17 May and captured the ruins, just before the Germans were able to withdraw, which ended the battle. The Fifth Army lost 14,000–16,000 casualties and German casualties in two divisions were 4,500 casualties, with casualties in the regiments of five other divisions engaged estimated as 1,000 at a minimum.[98] Total British losses for both Bullecourt operations were 19,342.[99]
The Battle of Cambrai began with the secret deployment of British reinforcements for the attack. Instead of a long period of artillery registration (firing ranging shots before the attack) and wire-cutting, which would have warning the German defence that an assault was being prepared, massed artillery fire did not begin until the infantry–tank advance began on 20 November, using unregistered (predicted) fire. 378 tanks were used to roll through the Siegfriedstellung (Hindenburg Line) barbed-wire fields, as a substitute for a long wire-cutting bombardment and the ground assault was accompanied by a large number of ground-attack aircraft. The British attack broke through the Siegfried I Stellung but was contained in the rear battlezone (rückwärtige Kampfzone) by the Siegfried II Stellung, which had been built on the east side of the St. Quentin canal on this part of the front. Preparations for a further advance were hampered by the obstacles of the Hindenburg defences, which had been crossed but which limited the number of routes, by which the most advanced British forces could be supplied. The German defence quickly recovered and on 30 November began a counter-offensive, using a similar short bombardment, air attacks and storm troop infantry tactics, which was contained by the British, in some parts of the battlefield using the Hindenburg Line defences captured earlier.[100]

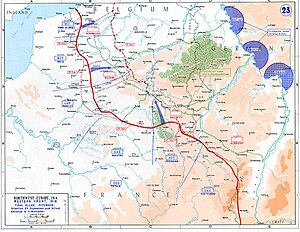
A sequence of Allied offensives began with attacks by American and French armies on 26 September from Rheims to the Meuse, two British armies at Cambrai on 27 September, British, Belgian and French armies in Flanders on 28 September and on 29 September the British Fourth Army (including the US II Corps) attacked the Hindenburg Line from Holnon north to Vendhuille while the French First Army attacked the area from St. Quentin to the south. The British Third Army attacked further north and crossed the Canal du Nord at Masnières. In nine days British, French and US forces crossed the Canal du Nord, broke through the Hindenburg Line and took 36,000 prisoners and 380 guns.[101] German troops were short of food, had worn out clothes and boots and the retreat back to the Hindenburg Line had terminally undermined their morale. The Allies had attacked with overwhelming material superiority, using combined-arms tactics, with a unified operational method and achieved a high tempo.[102] On 4 October the German government requested an armistice and on 8 October the German armies were ordered to retire from the rest of the Siegfriedstellung (Hindenburg Line).[103]
Notes[]
- ↑ The German order of battle after the retirement from north to south was 23rd Reserve Division, 220th Division, 26th Reserve Division, 2nd Guards Reserve Division, 38th Division, 4th Division, 50th Reserve Division, 9th Reserve Division, 22nd Reserve Division, 199th Division, 29th Division, 111th Division, 221st Division, 25th Division, 15th Reserve Division, 47th Division, 46th Reserve Division, 13th Division, 211th Division and 222nd Division.[1]
- ↑ The Hague Rules allowed prisoners of war to be used as labourers but not on work concerned with warlike activities.[22]
- ↑ On 24 February the Germans withdrew on an 18,000-yard (16,000 m) front opposite the Fifth Army, abandoning Warlencourt, Miraumont and Serre. A prisoner revealed that this was to be part of a bigger retirement to the Hindenburg Position.[34]
- ↑ The British Official History termed the operations the Advance to the Hindenburg Line, 1917, comprising Operations on the Ancre 11 January – 13 March 1917 and the German Retreat to the Hindenburg Line 14 March – 5 April 1917.[35]
- ↑ Delayed-action fuzes used a striker on a spring which was held back by a wire. Acid ate silently through the wire, to release the striker and detonate the explosive. A number of devices with such fuzes were planted in bunkers but most booby-traps had simple pressure detonators, wires were attached to useful items like stove chimneys or valuables and trip-wires on dug-out stairs were connected to bundles of hand-grenades. On some roads, heavy-artillery shells were buried with contact-fuzes, which would only be triggered by the weight of a lorry. British engineers and tunnelling companies scoured areas as they were occupied and disabled many of the explosives.[39] Roads were flooded by destroying drains and water-courses and wells sabotaged by drilling a shaft next to then and exploding a charge, permanently ruining the well. Much of the explosive used by the Germans (Donarit, Westphalite and Perdit) had the property of water-absorption so could be neutralised by dousing. Some British booby-trap patrols made German prisoners go first, who revealed traps rather than be blown up. British tunnellers removed 22,000 lb (10,000 kg) of explosives. In some areas no booby-traps were found, as German divisional commanders had been allowed to choose whether to mine their areas and some refused.[40]
- ↑ The first two German reserve lines had various British titles (Loupart, Bapaume, le Transloy and Bihucourt lines) and the third line was known as the Beugny–Ytres Switch, which were called Riegel (trench) I (Allainesstellung), II (Arminstellung) and III by the Germans. "R. I" extended from Essarts–Bucquoy–west of Achiet le Petit–Loupart Wood–south of Grévillers–west of Bapaume–le Transloy to Sailly Saillisel. "R. II" ran from Ablainzevelle–west of Logeast Wood–west of Achiet le Grand–western outskirts of Bapaume–Rocquigny–le Mesnil en Arrousaise to Vaux Wood. "R. III" branched from "R. II" at Achiet-le-Grand then ran to Beugny–Ytres–Nurlu–Templeux la Fosse.[43]
- ↑ From 30 January 1916, each British army had a Royal Flying Corps brigade attached, which was divided into wings, the "corps wing" with squadrons responsible for close reconnaissance, photography and artillery observation on the front of each army corps and an "army wing" which by 1917 conducted long-range reconnaissance and bombing, using the aircraft types with the highest performance.[63]
- ↑ "Zones" were based on lettered squares of the army 1:40,000 map; each map square was divided into four sections 3,000 yards (2,700 m) square. The observer used a call-sign of the map square letter then the zone letter to signal to the artillery. All guns and howitzers up to 6 inches (150 mm) able to bear on the target, opened rapid fire using corrections of aim from the air observer.[65]
- ↑ Between 16 April and 15 May the mutinies were isolated but then spread, with 46 incidents recorded by 31 May. From 1–6 June violent resistance increased, possibly six people being killed by mutineers, which threatened the battleworthiness of the French armies, before order slowly returned by the end of June.[85]
Footnotes[]
- ↑ Kahn 1970, pp. 2031.
- ↑ Miles 1938, pp. 228–231.
- ↑ Wynne 1939, pp. 134–135.
- ↑ Miles 1938, pp. 423–424.
- ↑ Sheldon 2005, p. 265.
- ↑ Miles 1938, p. 455.
- ↑ Asprey 1991, p. 285.
- ↑ Feldman 1966, p. 301.
- ↑ Feldman 1966, p. 271.
- ↑ Asprey 1991, pp. 286–294.
- ↑ Feldman 1966, p. 270.
- ↑ Hoeppner 1921, pp. 105–108.
- ↑ Wynne 1939, pp. 133–134.
- ↑ Falls 1940, p. 110.
- ↑ Sheldon 2009, p. 3.
- ↑ Sheldon 2008, pp. 229–230.
- ↑ Sheldon 2009, pp. 3–5.
- ↑ Doughty 2005, pp. 314–316.
- ↑ Doughty 2005, pp. 324–325.
- ↑ Neumann 1920, p. 223.
- ↑ 21.0 21.1 Sheldon 2009, p. 2.
- ↑ 22.0 22.1 Falls 1940, p. 92.
- ↑ Wynne 1939, p. 139.
- ↑ Wynne 1939, pp. 139–145.
- ↑ Samuels 1995, pp. 176–177.
- ↑ Samuels 1995, pp. 178–183.
- ↑ Samuels 1995, pp. 182–192.
- ↑ Samuels 1995, p. 185.
- ↑ Falls 1940, pp. 1–11 & 37–64.
- ↑ Jones 1928, pp. 317–318.
- ↑ Falls 1940, pp. 87–89.
- ↑ Falls 1940, pp. 89–90.
- ↑ Falls 1940, pp. 67–82.
- ↑ Harris 2008, p. 293.
- ↑ James 1924, pp. 15–16.
- ↑ Falls 1940, pp. 82–97.
- ↑ Beach 2004, pp. 187–191.
- ↑ Simkins 2003, p. 111.
- ↑ Falls 1940, pp. 148–149.
- ↑ Barton 2010, pp. 54–55.
- ↑ Falls 1940, pp. 113–115.
- ↑ Falls 1940, pp. 95–107.
- ↑ Falls 1940, p. 64.
- ↑ Falls 1940, pp. 104–109.
- ↑ Falls 1940, pp. 97–103.
- ↑ Falls 1940, pp. 97–110.
- ↑ Falls 1940, p. 115.
- ↑ Falls 1940, pp. 149–154.
- ↑ Falls 1940, p. 138.
- ↑ Falls 1940, pp. 127–135.
- ↑ Falls 1940, pp. 135–137.
- ↑ Falls 1940, pp. 138–153.
- ↑ Barton 2010, pp. 50–51.
- ↑ Philpott 2009, pp. 457–463.
- ↑ Falls 1940, pp. 111–126.
- ↑ Falls 1940, pp. 138–140.
- ↑ Falls 1940, pp. 140–144.
- ↑ Falls 1940, pp. 127–132.
- ↑ Falls 1940, pp. 132–136.
- ↑ Falls 1940, pp. 132–146.
- ↑ Falls 1940, pp. 152–160.
- ↑ Neumann 1920, pp. 225–227.
- ↑ Jones 1928, pp. 147–148.
- ↑ Jones 1931, pp. 324–328.
- ↑ Jones 1928, pp. 175–176.
- ↑ Jones 1931, pp. 328–331.
- ↑ Harris 2008, pp. 293–294.
- ↑ Griffith 1994, p. 85.
- ↑ Sheffield 2011, pp. 213–214.
- ↑ Brown 1998, pp. 221–222.
- ↑ Haig 1907, pp. 90–140.
- ↑ Falls 1940, pp. 69–70.
- ↑ Beach 2004, pp. 190–195.
- ↑ Walker 1998, p. 52.
- ↑ Falls 1940, p. 155.
- ↑ Falls 1940, p. 543.
- ↑ Thomas 2010, p. 260.
- ↑ Thomas 2010, pp. 253–255.
- ↑ Bean 1941, pp. 153–154.
- ↑ Falls 1940, pp. 160–162.
- ↑ Farndale 1986, p. 164.
- ↑ Falls 1940, p. 162.
- ↑ Harris 2008, p. 294.
- ↑ Falls 1940, pp. 499–500.
- ↑ 85.0 85.1 Doughty 2005, pp. 366–367.
- ↑ Brown 1998, p. 234.
- ↑ Feldman 1966, pp. 266–273.
- ↑ Feldman 1966, pp. 301–348.
- ↑ Feldman 1966, pp. 349–406.
- ↑ Churchill 1927, pp. 1423–1425.
- ↑ Falls 1940, p. 556.
- ↑ Falls 1940, pp. 357–369.
- ↑ Falls 1940, pp. 370–377.
- ↑ Falls 1940, p. 492.
- ↑ Nicholson 1962, p. 243.
- ↑ Falls 1940, pp. 491–499.
- ↑ Falls 1940, pp. 455–466.
- ↑ Walker 1998, pp. 466–186.
- ↑ Falls 1940, p. 561.
- ↑ Miles 1948, pp. iii–v.
- ↑ Boraston 1919, pp. 282–285.
- ↑ Philpott 2009, pp. 532–533.
- ↑ Edmonds & Maxwell-Hyslop 1947, pp. 210–211.
References[]
- Asprey, R. B. (1991). The German High Command at War: Hindenburg and Ludendorff and the First World War (Warner Books 1994 ed.). New York: William Morrow & Co. ISBN 0-7515-1038-6.
- Barton, P. (2010). Arras: The Spring 1917 Offensive in Panoramas, Including Vimy Ridge and Bullecourt. London: Constable. ISBN 978-1-84529-421-2.
- Beach, J. (2004). British Intelligence and the German Army 1914–1918 (PhD ed.). 2004: London University. OCLC 500051492.
- Bean, C.E.W. (1941). The Official History of Australia in the War of 1914–1918: Volume IV: The Australian Imperial Force in France, 1917 (1982 ed.). Australian War Memorial. ISBN 0-702-21710-7. http://www.awm.gov.au/histories/first_world_war/volume.asp?levelID=67890.
- Boraston, J. H. (1919). Sir Douglas Haig's Despatches (2nd 1920 ed.). London: Dent. OCLC 633614212.
- Brown, I. M. (1998). British Logistics on the Western Front: 1914–1918. Greenwood Press. ISBN 0-27595-894-9.
- Churchill, W (1927). The World Crisis: Vol IV. London: Thornton Butterworth. OCLC 758460454.
- Doughty, R. A. (2005). Pyrrhic Victory: French Strategy and Operations in the Great War. Cambridge, MA: Belknap Press. ISBN 0-67401-880-X.
- Maxwell-Hyslop, R.; Edmonds, J. E. (1947). Military Operations France and Belgium 1918 vol V 26th September – 11th November, The Advance to Victory (IWM & Battery Press 1993 ed.). London: HMSO. ISBN 0-89839-192-X.
- Falls, C. (1940). Military Operations France and Belgium, 1917 The German Retreat to the Hindenburg Line and the Battles of Arras (IWM & Battery Press 1992 ed.). London: HMSO. ISBN 0-89839-180-6.
- Farndale, M. (1986). History of the Royal Regiment of Artillery, Western Front 1914–18. London: Royal Artillery Institution. ISBN 1-870114-00-0.
- Feldman, G. D. (1966). Army, Industry and Labor in Germany 1914–1918 (Berg 1992 ed.). Princeton: Princeton University Press. ISBN 0-85496-764-8.
- Griffith, P. (1994). Battle Tactics of the Western Front: The British Army's Art of Attack 1916–1918 (Yale 1996 ed.). London: Yale. ISBN 0-30006-663-5.
- Haig, D. (1907). Cavalry Studies: Strategical and Tactical (General Books 2009 ed.). London: Hugh Rees Ltd.. ISBN 0-21796-199-1. http://archive.org/details/cavalrystudiess00haiggoog.
- Harris, J. P. (2008). Douglas Haig and the First World War (2009 ed.). Cambridge: CUP. ISBN 978-0-521-89802-7.
- Hoeppner, E. (1921). Germany's War in the Air (Battery Press 1994 ed.). Leipzig: K.F. Koehler. ISBN 0-89839-195-4.
- James, E. A. (1924). Record of the Battles and Engagements of the British Armies in France and Flanders 1914–18 (N & M Press 1994 ed.). London: Gale & Polden. ISBN 1-84342-196-8.
- Jones, H. A. (1928). The War in the Air, Being the Story of the Part Played in the Great War by the Royal Air Force Vol II (N & M Press 2002 ed.). London: Clarendon Press. ISBN 1-84342-413-4.
- Jones, H. A. (1931). The War in the Air, Being the Story of the Part Played in the Great War by the Royal Air Force Vol III (N & M Press 2002 ed.). London: Clarendon Press. ISBN 1-84342-414-2.
- Kahn, L (1970). Purnell's History of the First World War. London: BPC Publishing Ltd. OCLC 9091594.
- Miles, W. (1938). Military Operations, France and Belgium, 1916 2nd July 1916 to the End of the Battles of the Somme (IWM & Battery Press 1992 ed.). London: HMSO. ISBN 0-90162-776-3.
- Miles, W. (1948). Military Operations, France and Belgium, 1917 Vol. III The Battle of Cambrai (IWM & Battery Press 1992 ed.). London: HMSO. ISBN 0-90162-765-8.
- Neumann, G. P. (1920). The German Air Force in the Great War: Its History, Development, Organisation, Aircraft, Weapons and Equipment, 1914–1918 (Abridged translation 1920 ed.). Berlin: Mittler & Sohn. OCLC 773250508.
- Nicholson, G. W. L. (1962). Official History of the Canadian Army in the First World War: Canadian Expeditionary Force 1914–1919. Ottawa: Queen's Printer and Controller of Stationary. OCLC 59609928. http://www.dnd.ca/dhh/collections/books/engraph/details_e.asp?BfBookLang=1&BfId=22&cat=7. Retrieved 10 October 2013.
- Philpott, W. (2009). Bloody Victory: The Sacrifice on the Somme and the Making of the Twentieth Century (1st ed.). London: Little, Brown. ISBN 978-1-4087-0108-9.
- Samuels, M. (1995). Command or Control? Command, Training and Tactics in the British and German Armies 1888–1918. London: Frank Cass. ISBN 0-7146-4214-2.
- Sheffield, G. (2011). The Chief : Douglas Haig and the British Army. London: Aurum Press. ISBN 978-1-84513-691-8.
- Sheldon, J. (2005). The German Army on the Somme 1914–1916 (Pen & Sword Military 2006 ed.). London: Leo Cooper. ISBN 1-84415-269-3.
- Sheldon, J. (2008). The German Army on Vimy Ridge 1914–1917. Barnsley: Pen & Sword Military. ISBN 1-84415-680-X.
- Sheldon, J. (2009). The German Army at Cambrai. Barnsley: Pen & Sword Military. ISBN 978-1-84415-944-4.
- Simkins, P.; Jukes G. & Hickey M. (2003). The First World War: The War to End All Wars. Oxford: Osprey Publishing. ISBN 1-84176-738-7.
- Thomas, A. M. (2010). British 8th Infantry Division on the Western Front, 1914–18. Birmingham UK: Birmingham University. OCLC 690665118.
- Wynne, G. C. (1939). If Germany Attacks : The Battle in Depth in the West (Greenwood Press 1976 ed.). London: Faber & Faber. ISBN 0-8371-5029-9.
- Walker, J. (1998). The Blood Tub, General Gough and the Battle of Bullecourt, 1917 (Spellmount 2000 ed.). Charlottesville, Va: Howell Press. ISBN 1-86227-022-8.
External links[]
- The German Retreat and the Battle of Arras, Imperial War Museum
- The Hindenburg Line: The Apotheosis of German Fortifications on the Western Front in the Great War westernfront.co.uk
- Priestley, R. E. Breaking the Hindenburg line : the story of the 46th (North Midland) Division (1919)
- An interpretation of the Bullecourt photograph.
- Breaking the Hindenburg Line, Australian War Memorial
| Wikimedia Commons has media related to Hindenburg Line. |
| ||||||||||||||||||||||||||||||||||||||||||||||||||||||||||||||||||||||||||||
The original article can be found at Hindenburg Line and the edit history here.