
The Mediterranean campaign of 1793–1796 was a major theatre of conflict in the early years of the French Revolutionary Wars. Fought during the War of the First Coalition, the campaign was primarily contested in the Western Mediterranean between the French Navy's Mediterranean Fleet, based at Toulon in Southern France, and the British Royal Navy's Mediterranean Fleet, supported by the Spanish Navy and the smaller navies of several Italian states. Major fighting was concentrated in the Ligurian Sea, and focused on British maintenance of and French resistance to a British close blockade of the French Mediterranean coast. Additional conflict spread along Mediterranean trade routes, contested by individual warships and small squadrons.
The campaign began early in the War of the First Coalition, with an unsuccessful French attack on the neutral island of Sardinia in December 1792. In February 1793, France declared war on Great Britain, and Britain dispatched a fleet to the Mediterranean under Admiral Lord Hood to protect its trade routes in the region. The French Navy was in a state of disorder due to the ongoing social upheaval, and was initially unable to oppose the British and their allies. In August 1793, Hood and his Spanish and Italian allies were able to seize Toulon and the entire French fleet after a Royalist uprising in the town, followed by a four month siege by French Republican armies. The allies were eventually driven out and the French fleet recaptured, although nearly half had been destroyed by the retreating British. While the French repaired, Hood devoted 1794 to capturing the island of Corsica, intending to use it as a forward base for the blockade of Toulon. This took longer than expected, and by 1795 Hood had retired, replaced by William Hotham. Hotham faced the repaired French fleet under Pierre Martin, who led several sorties from Toulon, leading to two inconclusive British victories at the battles of Genoa and the Hyères Islands. Martin then deployed smaller squadrons on destructive operations against British commerce. Due to military success in Italy and diplomatic negotiations with Spain, by 1796 Britain's allies had broken away; Spain declared war on Britain in September, leaving the British fleet exposed between two powerful enemies. Unwilling to risk destruction of their fleet in the Mediterranean, the Admiralty withdrew the British, now under the command of Sir John Jervis, to the Tagus, abandoning the Mediterranean.
Background[]


Modern map of the Western Mediterranean. Most of the campaign was fought in the Ligurian Sea.
In the aftermath of the French Revolution of 1789, the newly formed French Republic had gone to war with the Austrian Empire and Prussia 1792,[1] and these enemies formed a coalition with other nations following the execution of the deposed French king Louis XVI on 21 January 1793.[2] The Kingdom of Great Britain joined the War of the First Coalition on 1 February 1793, and laid plans to open a new front in the Mediterranean Sea.[3]
The Mediterranean of 1793 was dominated on its eastern shores by the Ottoman Empire, which controlled Greece and Anatolia, the Levant and, through client states, the important North African nations of Tunis, Algiers and Egypt. The Ottoman Empire was ostensibly neutral in the conflict, but it had importance as a major international trading partner, while its North African cities maintained large pirate fleets which preyed on ships of all nations.[4] In the Adriatic Sea the only opposition to the Ottomans came from the small navy of the Republic of Venice, while elsewhere the Italian peninsula was divided between a number of independent states, dominated in the north by the Austrian Empire, and controlled in the south by the Kingdom of Naples. On the northwestern coast there were the Kingdom of Sardinia, the Republic of Genoa and the Grand Duchy of Tuscany. Although Naples retained a small fleet, none of the Italian states were notable sea powers; their importance lay in their ports and commercial strength in the Western Mediterranean.[5] The regional powers in the west were France, which maintained a large fleet at the fortified port of Toulon,[6] and the Kingdom of Spain.[7] Within this region the islands of Corsica, French-held but with a rebellious population, and Spanish Minorca, were significant naval assets.[8][9] The Spanish maintained a large fleet, which in 1793 was in a high-state of readiness for operations, but had allowed organisation and infrastructure to deteriorate in the preceding years through a lack of investment.[10] The Spanish were reluctant allies of Britain, with resentment over the recent Nootka Crisis still widespread.[5]
The French fleet was in a state of disorder at the start of the French Revolutionary Wars. Although successful in the American Revolutionary War of 1775–1783,[11] there had been little investment in the intervening decade; one of the causes of the Revolution were efforts to raise naval taxes by the French crown.[12] Toulon had been a political flashpoint during the Revolution, including a strike and riot by dockyard workers in November 1789.[13] Directives from the French National Convention targeting the professional officer class, mainly drawn from the aristocracy, led to widespread desertion by experienced officers while waves of revolutionary sentiment swept though the seamen of the fleet;[14] the Atlantic fleet at Brest experienced a series of mutinies between 1790 and 1792.[15] In Toulon the fleet and the town dissolved into factional infighting,[16] and in September 1792 the commander of the Mediterranean Fleet Joseph, Marquis de Flotte was dragged from his home and beaten to death by a revolutionary mob.[17]
Britain maintained no colonies or naval bases in the Mediterranean at the start of the Revolutionary Wars, with the exception of Gibraltar, a fortified port on the southern coast of Spain which had been captured in 1704.[18] For most of the eighteenth century Minorca had also been under British control, but it was recaptured by the Spanish in the American Revolutionary War, leaving the British with few assets in the region.[19] Britain did however have significant commercial interests in the Mediterranean and had, for more than a century, routinely deployed fleets to the sea in times of war to protect British trade routes.[9] Unlike the French Navy, the Royal Navy was in a state of high readiness, having been effectively modernised since the American war,[20] and partially mobilised in the Spanish Armament of 1790 and the Russian Armament of 1791.[21] At the outbreak of war the British had only a small frigate squadron, led by the 50-gun HMS Romney under Rear-Admiral Samuel Goodall, stationed in the Mediterranean.[22]
Deployment[]
The first operation in the Mediterranean campaign was a large-scale French attack on the island of Sardinia, part of the neutral Kingdom of Sardinia, ruled from Piemont in Northwestern Italy. A French fleet and army under Vice-amiral Laurent Truguet, Flotte's replacement, attacked Cagliari in January 1793 but was driven off with heavy casualties.[23] A second attack on the island of La Maddalena was equally unsuccessful.[24] The French fleet retired to Toulon in disorder and Truguet was replaced by Trogoff de Kerlessy,[25] commanding 30 ships of the line and 21 frigates in various states of repair.[6]
With the French in confusion, the British government sought alliances with the other enemies of France, including an attempt to gain Spanish agreement to place a British commander in overall command of the allied fleets in the Mediterranean. The Spanish, suspicious that the British would seek to engineer a mutually destructive engagement between the French and Spanish fleets and dominate the region in the aftermath, refused.[26] As negotiations continued, the British assembled a fleet for operations in the Mediterranean, despite severe manpower shortages.[27] Command of this fleet was awarded to the veteran Vice-Admiral Lord Hood, and ships were sent out by division as they were ready; two sailed under Rear-Admiral John Gell on 1 April, five on 15 April under Rear-Admiral Philip Cosby and five more under Vice-Admiral William Hotham in early May. Hood followed with his final division on 12 May with seven ships of the line, led by his flagship HMS Victory.[3][28] As Hood's fleet worked its way to the Straits of Gibraltar and then northeast to the Ligurian Sea, a Spanish squadron cruised off Southern France, although it was forced to withdraw in June with substantial numbers of sailors absent from duty due to sickness.[29] During this time the French remained at anchor in Toulon; 17 ships of the line were ready for sea, with another 13 refitting or under repair in the town's Arsenal.[30] In June, in response to the spreading Reign of Terror, the town council at Toulon had expelled the radical Jacobins from the city, declaring for the more moderate Girondists.[31] Trogoff had refused to align himself with either party, but his deputy Contre-amiral Saint-Julien was an adherent of the revolutionary cause, backed by a substantial proportion of the sailors of the French fleet.[32]
Siege of Toulon[]
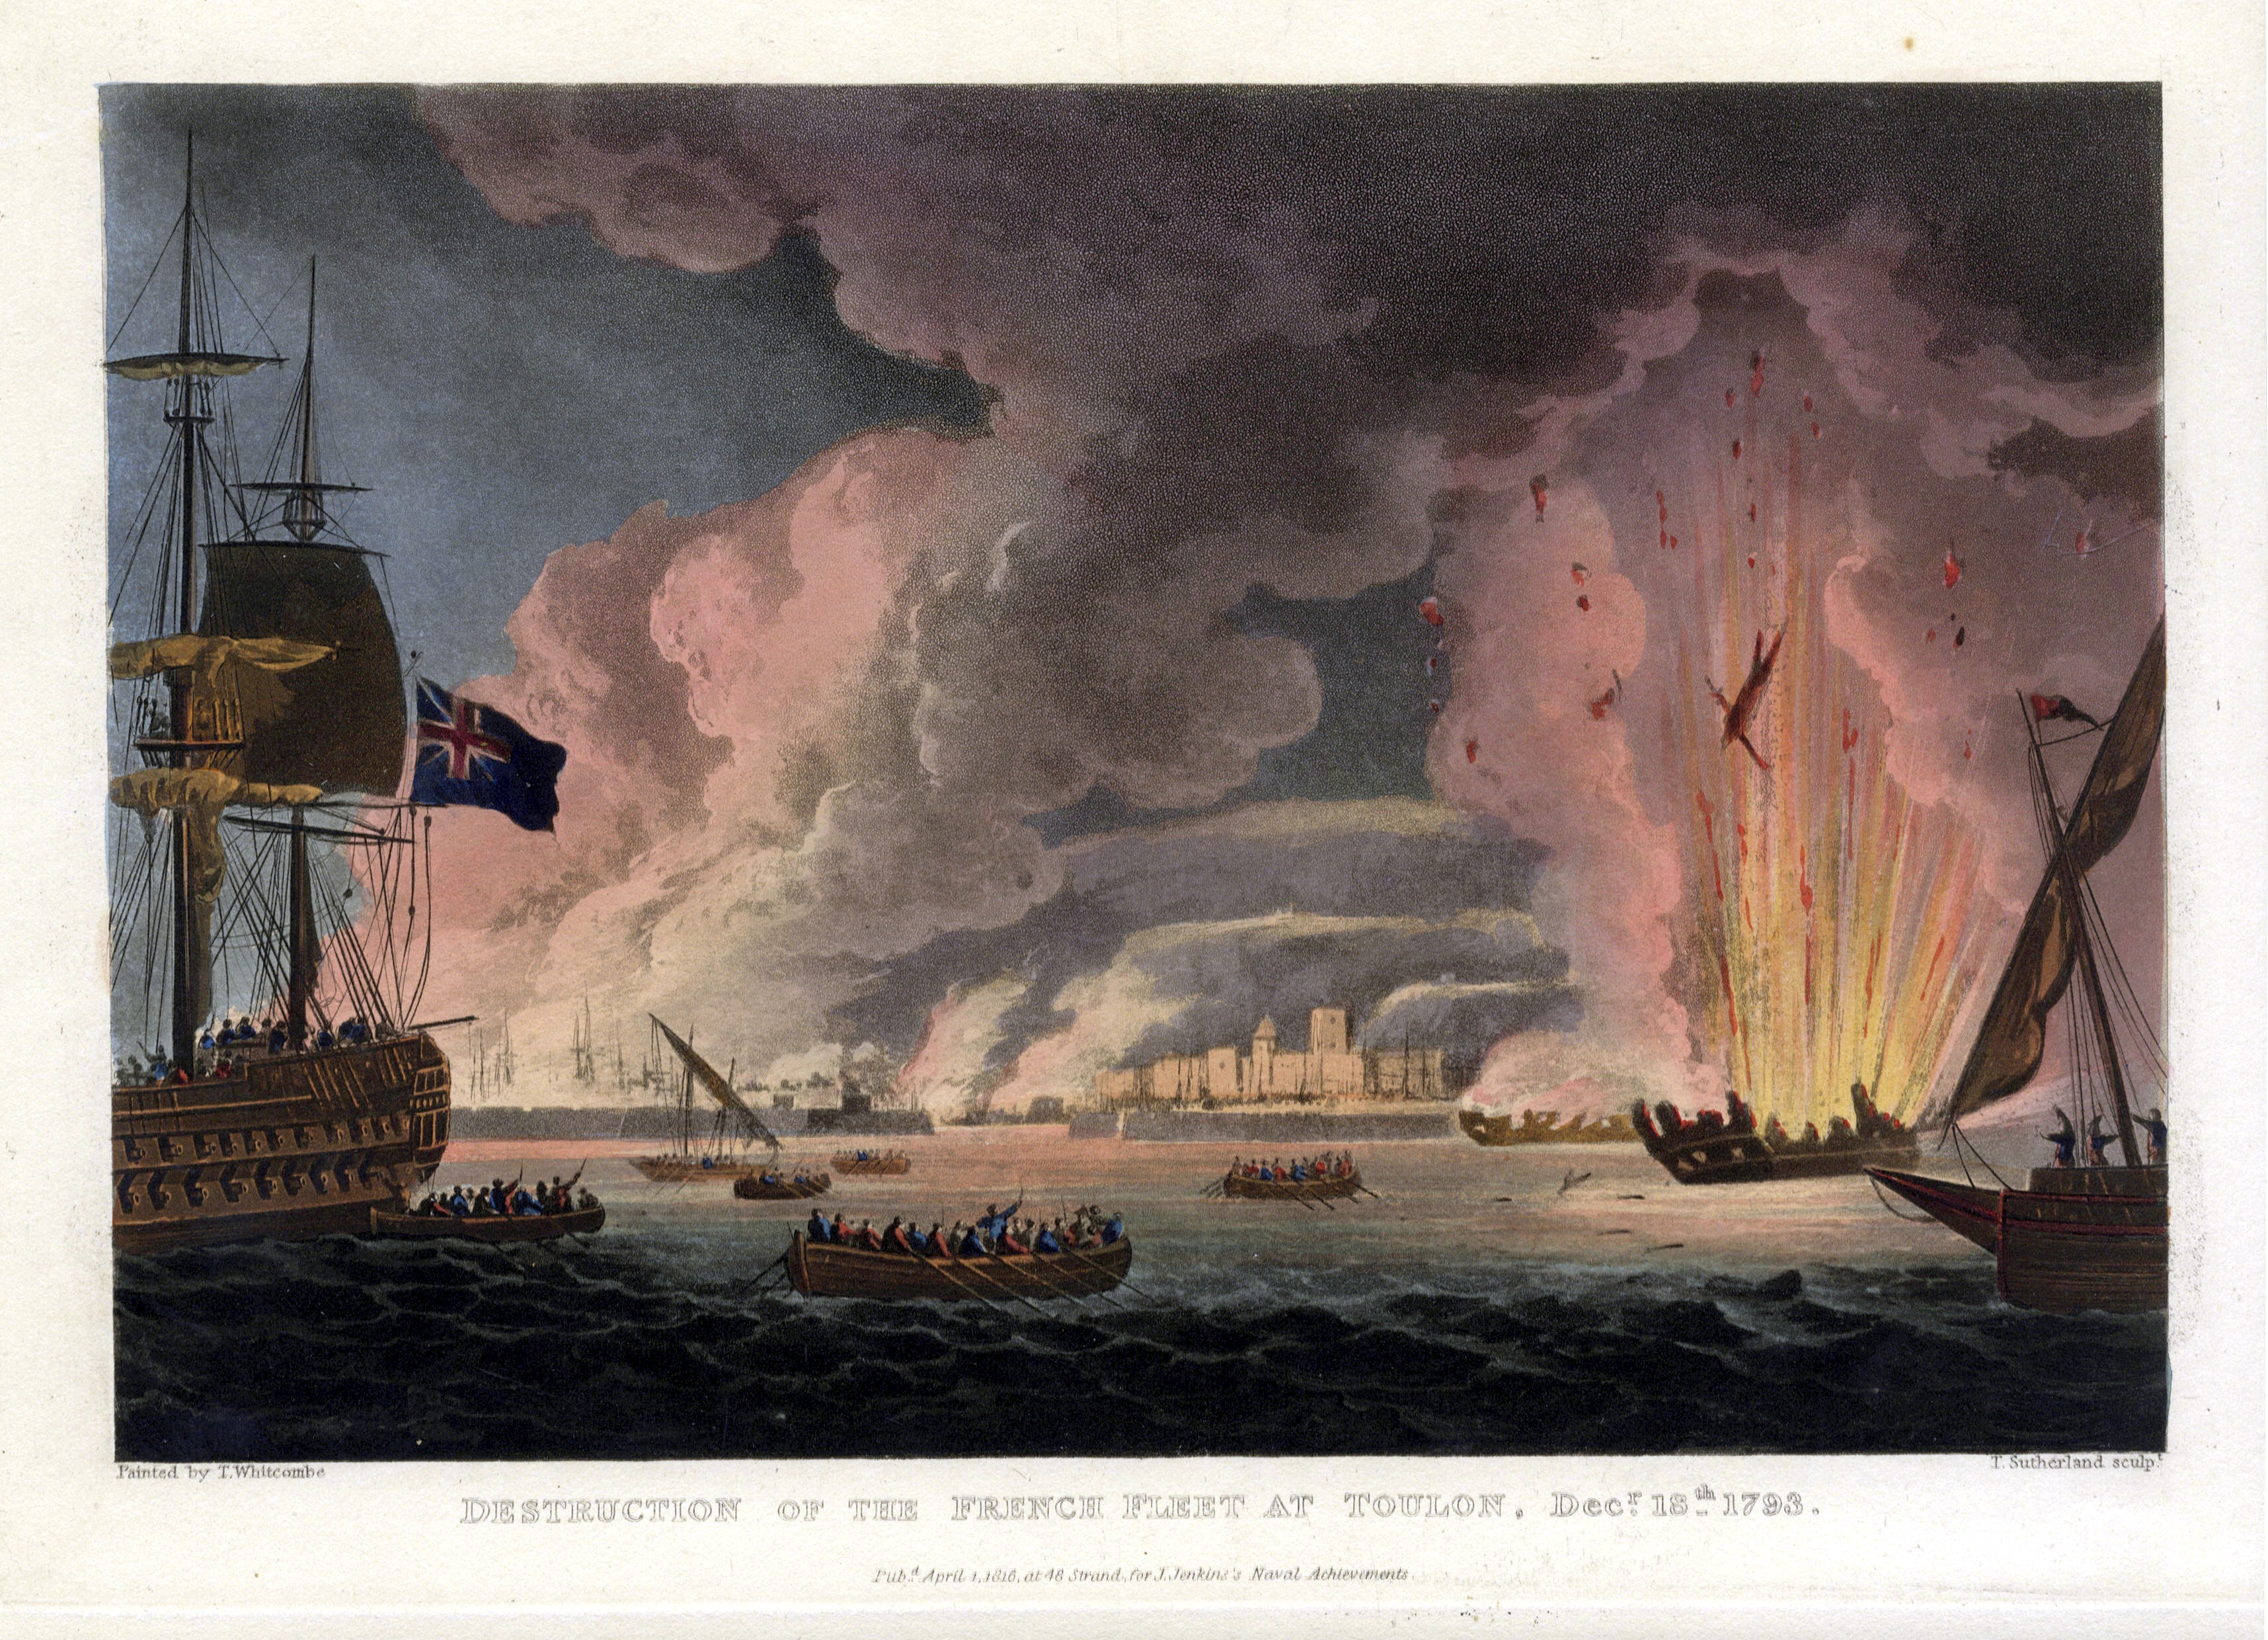
Destruction of the French fleet at Toulon
Hood's fleet reached the waters off Toulon in mid-August, and within days emissaries from the rebellious Royalists in the South of France had reached his flagship offering an alliance. Hood agreed, but only if they could guarantee the surrender of Toulon and the fleet within.[33] Following negotiations and a confrontation with rebellious sailors under Julien, Hood's fleet, supported by a Spanish force under Admiral Juan de Lángara, entered the city on 27 August and seized the entire French fleet.[34]
In September French Republican armies approached Toulon from the east and west, while thousands of rebellious sailors remained in the port. To solve the latter problem, Hood disarmed four French ships of the line and sent them as cartels to Brest,[35] but the allied army defending Toulon was far from cohesive, comprising British, Spanish, Neapolitan and French Royalist troops.[36] By late September the French had captured some of the heights over the town, the assaults led in part by a young artillery officer named Napoleon Bonaparte.[37] In September Hood sent HMS Agamemnon, commanded by Captain Horatio Nelson, on a diplomatic mission to Palermo, where he liaised with the ambassador Sir William Hamilton and persuaded King Ferdinand of Naples to supply troops for the siege.[38] In October Neapolitan units staged a counter attack,[39] but the relationship between Hood and Langara had broken down completely, their flagships openly threatening one another in the anchorage.[40]
After Hood sent a squadron under John Gell to raid Genoa on 5 October and seize a French frigate anchored there,[41] the Genoese, sympathetic to the French, refused to allow Austrian reinforcements to embark for Toulon.[42] A second French frigate was taken from La Spezia shortly afterward.[43] The following month the French Royalist ship of the line Scipion was lost with heavy loss of life at Leghorn in a possible arson attack.[44] Hood detached squadrons to engage other French forces in the Mediterranean, including one under Robert Linzee which attempted to persuade French garrisons on Corsica to surrender.[45] When this failed, Linzee attacked San Fiorenzo in the north of the island in late September but was driven off by shore defences.[46] Linzee was joined by Agamemnon at Caligari in late October after the latter had fought a brief and inconclusive engagement with a French frigate squadron.[47] He sailed for Tunis, where a French merchant convoy had anchored. Linzee attempted to persuade Bey Hammuda ibn Ali to permit a British attack on the French,but was rebuffed.[48] Nelson urged that the attack go ahead anyway, but Linzee declined.[49]
At Toulon a major Republican attack was driven back on 15 November, but an allied attack two weeks later failed.[50] General Dugommier launched a major assault on on 14 December, which broke through the Neapolitan lines.[51] Three days later the Spanish held fortifications were lost and French artillery was in a position to bombard the allied fleet.[52] Hood ordered his ships to withdraw to open water, and evacuate Toulon . As allied troops were removed from the docks, British and Spanish boat parties led by Captain Sir Sidney Smith entered the Arsenal with instructions to burn the disarmed French fleet.[53] Smith's crews destroyed eight ships of the line and two frigates.[54] Three ships of the line, six frigates and eight corvettes were removed by the allies and distributed to their navies, most going to the British.[55] The remaining 15 ships of the line and several smaller ships were damaged to a greater or lesser degree but were subsequently salvaged and repaired by the French. Significant parts of the French dockyard stores remained intact,[56] although the timber stores were destroyed.[57] Accusations were made against the Spanish; one historian accused them of "jealousy and treachery" in preserving the French fleet to prevent British supremacy in the region.[46] The allied soldiers were successfully removed, as well as more than 7,000 Royalist refugees.[58] In the aftermath of the siege 6,000 Toulonaise inhabitants were massacred by the Republicans, and there was a plan, later abandoned, to demolish the town entirely as punishment for rebellion.[59]
Corsica[]

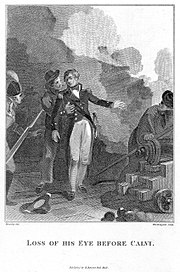
Loss of his Eye Before Calvi, 1808. Print depicting the wounding of Nelson during the siege. NMM.
At the start of 1794 Hood's fleet was anchored off the Îles d'Hyères. Hood gave orders for landings to be made on Corsica in preparation for seizing the island from the French and making use of the Bay of San Fiorenzo as a fleet anchorage.[8] Corsica had been in open rebellion against France since July 1793, under the command of Pasquale Paoli.[60] Landings were made in early February, and despite effective resistance British land forces, working in conjunction with Corsican irregulars, had seized the town's main defences by 18 February, forcing the French garrison to abandon the two frigates in the bay and retreat across the Serra Mountains to Bastia.[61]
Bastia was a much larger town with a significant garrison, and a bitter argument between Hood and army commander David Dundas delayed operations. Dundas resigned.[62] The attack was led by Nelson and Colonel William Villettes, who staged landings near Bastia on 4 April.[63] An attack from the sea was driven off by heated shot, and the strength of the town's gun batteries resulted in a lengthy siege through May.[64] Bastia surrendered on 22 May when food supplies ran out.[65] Cheered by successive British victories, Paoli staged elections among the Corsican population on 1 June, and by 16 June had ratified a new constitution that confirmed the Anglo-Corsican Kingdom as a self-governing part of the British Empire.[66]
The final operation was at Calvi, where two large forts blocked the approaches to the town. Substantial British reinforcements had arrived from Gibraltar, led by Charles Stuart, and he and Nelson landed an expeditionary force near Calvi on 17 June.[67] After British batteries were established on commanding positions, the French forts came under attack. Fort Mollinochesco was abandoned by 6 July, while Fort Mozello was stormed and captured on 18 July by forces under John Moore.[68] British casualties were significant; Nelson lost an eye during the fighting,[69] and more than a thousand British soldiers were reported sick with dysentery and malaria.[70][71] Over several weeks the town was battered into surrender, taking heavy damage and capitulating following extended negotiations on 10 August.[72]
Hood and his fleet were absent for the siege of Calvi as the French fleet, following extensive repairs, had finally emerged from Toulon under Contre-amiral Pierre Martin on 5 June.[73] On 11 June the fleets were within sight of one another, the French retreating into Gourjean Bay.[74] Hood planned an attack, but the operation was deemed too dangerous. Hood withdrew, leaving a large squadron under Vice-Admiral William Hotham to blockade the bay, although Hotham's force was driven off by a storm and Martin succeeded in returning to Toulon in November.[75]
Elsewhere in the Mediterranean, the ship of the line HMS Ardent disappeared on patrol off Villefranche-sur-Mer in April, presumed lost in an explosion with all hands.[76] On convoy protection in the Eastern Mediterranean, Romney encountered the French frigate Sibylle in Mykonos harbour. Captain William Paget attacked the frigate and in the ensuing Battle of Mykonos forced the French captain to surrender.[77] In the early autumn the 70-year old Hood was recalled to Britain in Victory, Hotham taking command of the fleet and blockade.[78] In December there was a minor mutiny at San Fiorenzo on HMS Windsor Castle, which Hotham resolved peacefully.[79] In the last weeks of the year, Martin sent a frigate squadron on a raiding cruise in the Mediterranean under Commodore Jean-Baptiste Perrée, capturing 25 merchant vessels and 600 prisoners before returning on 7 January 1795.[80]
Battles in the Ligurian Sea[]
Hotham had spent the winter patroling from San Fiorenzo, where HMS Berwick was damaged in a gale.[81] While Captain Littlejohn was still effecting repairs, Hotham sailed the fleet to Leghorn, leaving Berwick behind with only jury masts. When Berwick followed, Littlejohn ran directly into Martin's fleet, which had sailed for an operation in the Gulf of Genoa.[82] Littlejohn's crippled ship tried to run from the French but was overrun by Martin's frigates. At the ensuing Action of 7 March 1795 Littlejohn was decapitated by cannonfire and Berwick overwhelmed and captured.[83]
The following day Hotham learned that Martin was at sea and sailed in search. On 13 March he caught the French off Cape Noli and as Martin fled back towards Toulon, Hotham's ships attacked the French rearguard in a series of running engagements known as the Battle of Genoa.[84] Two French ships were overhauled and defeated with heavy casualties,[85] but three days after the battle the damaged British ship HMS Illustrious was driven ashore in a storm and wrecked.[86] Martin withdrew to the Îles d'Hyères, sending his most damaged ships and Berwick back to Toulon for repairs,[87] while Hotham anchored at San Fiorenzo to refit his own fleet.[88]
Both fleets received reinforcements in the spring, a force under Contre-amiral Jean François Renaudin arriving at Toulon to find the fleet there in a state of mutiny, which was resolved by Représentant Joseph Niou.[87] Hotham meanwhile was joined off Menorca by reinforcements under Rear-Admiral Robert Mann.[87] British and French scouting frigate squadrons clashed at the Action of 24 June 1795,[89] and that month Martin sailed once more. Hotham initially declined to pursue, but a detached squadron under Nelson was operating off Cap Corse.[90] Nelson led Martin to Hotham and the British fleet chased the French to the Îles d'Hyères, where in the Battle of the Hyères Islands the rearmost French ship was cut off and destroyed. Hotham discontinued the action with the French fleeing and vulnerable to the fury of his subordinates, and Martin was able to retire to Fréjus and then Toulon.[91]
Raiding cruises[]


Pierre Martin, Antoine Maurin, 1836.
Martin did not take the French fleet to sea again during the campaign. Instead, he detached raiding squadrons against British commerce. Firstly he sent Richery's expedition into the Atlantic,[92] where it attacked and badly damaged a valuable British convoy from the Levant before sheltering in the Spanish port of Cádiz.[93] Spain, under pressure from French victories in the War of the Pyrenees, had agreed a peace treaty with France on 19 August.[94] A British force under Mann sent in pursuit of Richery instituted a blockade of the port.[95] A second squadron, Ganteaume's expedition, attacked British commerce in the Aegean Sea before returning to Toulon ahead of a pursuit squadron under Captain Thomas Troubridge.[96] Hotham remained with his main fleet at San Fiorenzo and Leghorn, sending forces to harrass French coastal convoys supporting the Italian campaign; a squadron under Nelson destroyed large French supply convoy at Alassio on 26 August,[97] and HMS Southampton fought an inconclusive engagement with a French convoy off Genoa on 29 September.[98]
On 1 November 1795 Hotham was replaced by Vice-Admiral Sir John Jervis, commanding 18 ships of the line, and towards the end of the year Martin was replaced by Vice-amiral François-Paul Brueys, commanding 15 ships of the line.[99] Jervis was also concerned by the presence of seven Spanish ships of the line at Cartagena; the Spanish were still neutral, but their relationship with France was becoming closer.[99] In early 1796 Jervis sent a number of detached squadrons to sea in the spring; Vice-Admiral William Waldegrave took a squadron to Tunis and violated Tunisian neutrality by seizing three small French ships in the harbour.[100] A squadron under Nelson was sent to the Italian coast,[101] where the Montenotte Campaign, led by Napoleon Bonaparte, was inflicting severe defeats on the Austrian and Sardinian armies. On 10 April Nelson's force was positioned to provide artillery support for the Battle of Voltri, only to witness an Austrian failure to inflict serious damage on the retreating French.[102] On 25 April a supply convoy was destroyed at Finale Ligure, and on 31 April Napoleon's siege train was captured on board a coastal convoy at Oneglia, the loss of which later had a major impact on French efficiency at the Siege of Mantua.[103] Jervis remained off Toulon; on 11 April HMS Ça Ira was accidentally burned off San Fiorenzo,[104] and in June Jervis sent Southampton on a successful attack on a French corvette off the Îles d'Hyères.[105]
Nelson's operations were unable to check Bonaparte's advance inland, and on 15 May Victor Amadeus III of Sardinia signed a treaty ceding large tracts of land to France.[102] Naples sought peace soon afterwards. Napoleon's army advanced and defeated the Austrians at the Battle of Lodi, allowing French forces to spread across Northern Italy, threatening Leghorn.[106] On 27 June Jervis ordered a hasty evacuation of personnel, stores and shipping from the harbour, and HMS Inconstant came under heavy fire from advance French troops as it withdrew.[107] Jervis responded by seizing the Tuscan island of Elba to prevent the French occupying the island in preparation for an attack on Corsica.[108] In Corsica anti-British sentiment, initially provoked by British efforts to protect French-supporting Corsicans from reprisals,[109] had spread. Bitter infighting between supporters of Paoli and of the new president Carlo Andrea Pozzo di Borgo drove Paoli into exile in October 1795,[110] and British efforts to impose taxation on the populace led to an armed uprising centred on Corte in early 1796.[111] British troops initially moved against the rebels, before Viceroy Sir Gilbert Elliot managed to negotiate a truce.[112]
Evacuation of the Mediterranean[]
On 12 September 1796 the Treaty of San Ildefonso was signed in Paris between France and Spain. Britain immediately embargoed Spanish merchant shipping from British ports in anticipation of a Spanish declaration of war, which came on 5 October.[113] Orders were sent by Secretary of State for War Henry Dundas to Jervis, now operating at the end of a lengthy and vulnerable supply route in a region in which every British ally had been eliminated, to evacuate Corsica and retire to Gibraltar.[113][114] In anticipation of the Spanish reversal, Jervis had recalled the squadron off Cádiz under Mann on 29 July, but Mann sailed without restocking his ships and Jervis was forced to send him back to Gibraltar to collect supplies.[113] In the week before the declaration of war, Lángara sailed from Cádiz with the main Spanish fleet and encountered the returning squadron under Mann at sea; the British admiral abandoned two transports in a precipitate retreat to Gibraltar.[115]
The Spanish sailed past Gibraltar into the Mediterranean and joined with the squadron at Cartagena, forming a fleet of 26 ships of the line.[116] This fleet cruised in the Ligurian Sea, passing Cap Corse and sighting scouts from Jervis' fleet at San Fiorenzo. Jervis had only 14 ships of the line and might have been overwhelmed, but Lángara declined to attack, retiring to Toulon and uniting with Brueys.[117] Jervis was now hugely outnumbered by the 38 ships of the combined fleet, and anxiously awaited Mann's return,[118] unaware that the junior admiral had decided to return to Britain on his own initiative and against orders.[119] By mid-October it was clear that Mann would not return and Jervis gave orders for a complete British withdrawal from the Mediterranean.[120] British frigates had already clashed with Spanish scouts; at the Action of 13 October 1796 HMS Terpsichore captured the Spanish frigate Mahonesa off Cartagena.[121]
French forces landed in Corsica unopposed on 19 October, enthusiastically supported by Corsican rebels,[122] and Jervis detached Nelson to evacuate British personnel and sympathisers from Bastia.[123] Threatening to destroy the town if opposed, Nelson removed almost all British troops and stores by 21 October, when French troops appeared on the heights overlooking the town.[118] The French, commanded by Antoine Gentili, then drove through Corsican defences to San Fiorenzo, already evacuated by the British, followed shortly afterwards by an advance on Ajaccio.[124] By 4 November the entire island was in French hands once more.[125] The same day Jervis readied his fleet, accompanied by a large convoy of transports and merchant ships, and sailed westwards, arriving at anchor in Rosia Bay at Gibraltar on 11 December.[120] The Spanish fleet set out in pursuit, accompanied by a French squadron under Pierre-Charles Villeneuve, but was delayed at Cartagena and Villeneuve continued alone, passing Jervis and heading westwards into the Atlantic on 10 December during a storm.[126] The same storm wrecked the British ship HMS Courageux on the Moroccan coast at Monte Hacho with the loss of 464 lives.[127] On 16 December Jervis took his fleet out of the Straits of Gibraltar to the mouth of the Tagus near Lisbon, where he could more easily procure supplies and receive reinforcements from Britain;[120] during this operation another ship, HMS Bombay Castle, was wrecked on a sandbar.[128]
With Jervis at Gibraltar, the only remaining British force still in the Mediterranean was a small squadron under Nelson sent to retrieve the garrison on Elba. On 19 December Nelson, in the frigate HMS Minerve was attacked by the Spanish frigate Santa Sabina. The Spanish ship was defeated at the Action of 19 December 1796, but Nelson was forced to abandon the prize as Spanish reinforcements arrived.[129] Nelson reached Portoferraio shortly afterwards and took the remaining British troops and supplies on the island on board, sailing back to Gibraltar in convoy on 29 January 1797.[130] The last operation of the campaign was by Minerve and HMS Romulus, which reconnoitered Toulon, Barcelona and Cartagena on passage back to Gibraltar, arriving on 10 February as the last British forces in the Mediterranean.[131]
Aftermath[]
Jervis was forced to the Tagus, from where he rebuilt his fleet with reinforcements from Britain.[94] He focused operations on the Cádiz blockade, patrolling in search of the Spanish fleet. On 14 February 1797 he encountered a much larger Spanish force in fog off Cape St. Vincent and inflicted a severe defeat on the Spanish at the Battle of Cape St. Vincent, who retreated to Cádiz and did not re-emerge until the Croisière de Bruix campaign in 1799.[132] With British dominance at the Atlantic entrance to the Mediterranean established, Jervis awaited an opportunity to return to the Sea, while his blockading squadrons under Nelson harassed the Spanish, including a failed assault on Cádiz in June,[133] and the disastrous Battle of Santa Cruz in July at which Nelson lost an arm.[134] It was not until the spring of 1798 and the attempt by a French army under Bonaparte to invade Egypt that a British fleet was able once more to enter the Mediterranean.[135] In the Mediterranean campaign of 1798 a recovered Nelson tracked the French fleet and destroyed it at the Battle of the Nile,[136] reasserting British naval supremacy in the region and initiating the War of the Second Coalition.[137]
Blame for the failure of the British Mediterranean campaign of 1793–1796 has been apportioned by historians to Hotham, in his failure to inflict decisive defeats on the French Navy in 1795,[138] and Mann for deserting Jervis.[113] Sir William Hamilton, British ambassador to the Kingdom of Naples, wrote that "I can, entre nous, perceive that my old friend Hotham is not quite awake enough for such a command as that of the King's fleet in the Mediterranean."[139] Historian C. S. Forester criticised "the lack of energy and diligence on the part of [the] British Admiral",[91] and Noel Mostert wrote that "Man's actions were beyond all reason. [John] Byng was shot for less."[140] French victory in the campaign was due to the prowess of their armies on land, particularly Bonaparte's campaigns in Italy, and their diplomatic manoeuvering which left Britain isolated and outnumbered in the prosecution of the Toulon blockade.[94]
References[]
- ↑ Ireland, p.39
- ↑ Chandler, p.xxiv
- ↑ 3.0 3.1 James, Vol.1, p.65
- ↑ Mostert, p.279
- ↑ 5.0 5.1 Mostert, p.97
- ↑ 6.0 6.1 James, Vol.1, p.66
- ↑ James, Vol.1, p.51
- ↑ 8.0 8.1 Ireland, p.145
- ↑ 9.0 9.1 Gregory, p.29
- ↑ Ireland, p.119
- ↑ Ireland, p.58
- ↑ Ireland, p.60
- ↑ Ireland, p.66
- ↑ Ireland, p.77
- ↑ Ireland, p.70
- ↑ Ireland, p.78
- ↑ Ireland, p.79
- ↑ Musteen, p.5
- ↑ Ireland, p.118
- ↑ Mostert, p.52
- ↑ Mostert, p.91
- ↑ Ireland, p.140
- ↑ Smyth, p.57
- ↑ McLynn, p.60
- ↑ Ireland, p.81
- ↑ Ireland, p.144
- ↑ Mostert, p.99
- ↑ Ireland, p.142
- ↑ Bradford, p.90
- ↑ Clowes, p.204
- ↑ Ireland, p.161
- ↑ Mostert, p.103
- ↑ Mostert, p. 105
- ↑ Clowes, p.206
- ↑ James, Vol.1, p.70
- ↑ Gardiner, p. 86
- ↑ Ireland, p.197
- ↑ Bennett, p.32
- ↑ Rose, p.55
- ↑ Mostert, p. 113
- ↑ Rose, p. 48
- ↑ Gardiner, p. 99
- ↑ James, Vol.1, p. 88
- ↑ Grocott, p.4
- ↑ James, Vol.1, p.85
- ↑ 46.0 46.1 Clowes, p.212
- ↑ Bennett, p.33
- ↑ Bradford, p.99
- ↑ Rose, p. 54
- ↑ Rose, p. 62
- ↑ McLynn, p.74
- ↑ Mostert, p. 115
- ↑ Ireland, p.275
- ↑ Clowes, p.552
- ↑ James, Vol.1, p.83
- ↑ Ireland, p.280
- ↑ Rodger, p.427
- ↑ Ireland, p.284
- ↑ James, Vol.1, p.81
- ↑ Gregory, p.25
- ↑ Gregory, p.54
- ↑ Gregory, p.56
- ↑ Bennett, p.35
- ↑ James, Vol.1, p.190
- ↑ Gardiner, p.110
- ↑ Gregory, p.68
- ↑ Bennett, p.37
- ↑ "No. 13698". 2 September 1794. p. 883. https://www.thegazette.co.uk/London/issue/13698/page/883
- ↑ Bennett, p.40
- ↑ Gregory, p.59
- ↑ Bennett, p.39
- ↑ Gregory, p.63
- ↑ Troude, p.367
- ↑ Clowes, p.246
- ↑ Troude, p.369
- ↑ Grocott, p.7
- ↑ Clowes, p.486
- ↑ Mostert, p.158
- ↑ James, Vol.1, p.194
- ↑ James, Vol.1, p.254
- ↑ Clowes, p.267
- ↑ Troude, p.425
- ↑ James, Vol.1, p.255
- ↑ Gardiner, p.117
- ↑ Clowes, p.271
- ↑ Grocott, p.11
- ↑ 87.0 87.1 87.2 James, Vol.1, p.266
- ↑ Clowes, p.273
- ↑ James, Vol.1, p.289
- ↑ Clowes, p.274
- ↑ 91.0 91.1 Forester, p.78
- ↑ James, Vol.1, p.273
- ↑ Troude, p.437
- ↑ 94.0 94.1 94.2 Gardiner, p.89
- ↑ Clowes, p.277
- ↑ Troude, p.439
- ↑ Bradford, p.120
- ↑ Clowes, p.494
- ↑ 99.0 99.1 James, Vol.1, p.308
- ↑ Clowes, p.284
- ↑ Forester, p.81
- ↑ 102.0 102.1 Mostert, p.179
- ↑ James, Vol.1, p.309
- ↑ Grocott, p.33
- ↑ Clowes, p.499
- ↑ Mostert, p.182
- ↑ James, Vol.1, p.310
- ↑ Gardiner, p.119
- ↑ Gregory, p.72
- ↑ Gregory, p.107
- ↑ Gregory, p.114
- ↑ Gregory, p.118
- ↑ 113.0 113.1 113.2 113.3 Mostert, p.184
- ↑ Rodger, p.436
- ↑ Clowes, p.286
- ↑ James, Vol.1, p.311
- ↑ Clowes, p.287
- ↑ 118.0 118.1 James, Vol.1, p.312
- ↑ Mostert, p.185
- ↑ 120.0 120.1 120.2 Mostert, p.186
- ↑ Clowes, p.504
- ↑ Gregory, p.154
- ↑ Bennett, p.93
- ↑ Gregory, p.159
- ↑ Gregory, p.160
- ↑ James, Vol.1, p.315
- ↑ Grocott, p.41
- ↑ Grocott, p.42
- ↑ Bradford, p.128
- ↑ James, Vol.1, p.318
- ↑ Mostert, p.189
- ↑ Clowes, p. 320
- ↑ Clowes, p. 321
- ↑ Bradford, p.157
- ↑ Mostert, p. 257
- ↑ Clowes, p.353
- ↑ Rodger, p. 461
- ↑ Mostert, p.172
- ↑ Bennett, p.44
- ↑ Mostert, p.188
Bibliography[]
- Bennett, Geoffrey (2002) [1972]. Nelson the Commander. London: Penguin. ISBN 0-141391-29-4.
- Bradford, Ernle (1999) [1977]. Nelson: The Essential Hero. Ware: Wordsworth Military Library. ISBN 1-84022-202-6.
- Chandler, David (1999) [1993]. Dictionary of the Napoleonic Wars. Wordsworth Military Library. ISBN 1-84022-203-4.
- Clowes, William Laird (1997) [1900]. The Royal Navy, A History from the Earliest Times to 1900, Volume IV. Chatham Publishing. ISBN 1-86176-013-2.
- Forester, C. S. (2001) [1929]. Nelson. London: Chatham Publishing. ISBN 1-86176-178-3.
- Gardiner, Robert (editor) (2001) [1996]. Fleet Battle and Blockade. Caxton Editions. ISBN 1-84067-363-X.
- Gregory, Desmond (1985). The Ungovernable Rock: A History of the Anglo-Corsican Kingdom and its role in Britain's Mediterranean Strategy During the Revolutionary War (1793–1797). London & Toronto: Associated University Presses. https://play.google.com/books/reader?id=aknvnX-xouwC&printsec=frontcover&output=reader&hl=en&pg=GBS.PA67.w.1.2.0.
- Grocott, Terence (2002) [1997]. Shipwrecks of the Revolutionary & Napoleonic Era. Caxton Editions. ISBN 1-84067-164-5.
- Ireland, Bernard (2005). The Fall of Toulon: The Last Opportunity the Defeat the French Revolution. Cassell. ISBN 0-3043-6726-5.
- James, William (2002) [1827]. The Naval History of Great Britain, Volume 1, 1793–1796. London: Conway Maritime Press. ISBN 0-85177-905-0.
- McLynn, Frank (1998). Napoleon: A Biography. London: Pimlico. ISBN 0-7126-6247-2.
- Mostert, Noel (2007). The Line upon a Wind: The Greatest War Fought at Sea Under Sail 1793 – 1815. Vintage Books. ISBN 978-0-7126-0927-2.
- Musteen, Jason R. (2011). Nelson's Refuge: Gibraltar in the Age of Napoleon. Naval Investiture Press. ISBN 978-1-59114-545-5
- Rodger, N.A.M. (2004). The Command of the Ocean. Allan Lane. ISBN 0-7139-9411-8.
- Rose, John Holland (1922). Lord Hood and the Defence of Toulon. Cambridge: Cambridge University Press. OCLC 9913896.
- Smyth, William Henry (1828). Sketch of the Present State of the Island of Sardinia. London: John Murray. https://books.google.co.uk/books?id=IowLjTthXZ4C&printsec=frontcover&dq=Sketch+of+the+Present+State+of+the+Island+of+Sardinia&hl=en&sa=X&ved=0ahUKEwi8v6T_u-TWAhXiZpoKHZ9CBf4Q6AEIKDAA#v=onepage&q=Truguet&f=false.
- Troude, Onésime-Joachim (1867) (in French). Batailles navales de la France. 2. Challamel ainé. https://books.google.com/books?id=TwZv6FX-RpsC.
The original article can be found at Mediterranean campaign (1793–1796) and the edit history here.