m (Remove some templates. interwiki links, delink non military terms, cleanup and move Wikipedia link above categories, replaced: ==Notes== ;Footnotes {{reflist|group=nb}} ;Citations {{reflist|3|colwidth=35em}} ==References== {{refbegin}} *{{cite b...) |
m (→German forces: Remove some templates, interwiki links, delink non military terms and cleanup) |
||
| (10 intermediate revisions by one other user not shown) | |||
| Line 21: | Line 21: | ||
{{Campaignbox British airborne forces operations}} |
{{Campaignbox British airborne forces operations}} |
||
| − | '''Operation Deadstick''' was the codename for an [[airborne forces]] operation by the [[British Army]] that took place on 6 June 1944<ref name="Fowler, p.62">Fowler, p.62</ref> as part of the [[Normandy landings]]. The mission's objective was to capture intact two road bridges in Normandy across the |
+ | '''Operation Deadstick''' was the codename for an [[airborne forces]] operation by the [[British Army]] that took place on 6 June 1944<ref name="Fowler, p.62">Fowler, p.62</ref> as part of the [[Normandy landings]]. The mission's objective was to capture intact two road bridges in Normandy across the River Orne and the Caen Canal providing the only exit eastwards for British forces from their landing on [[Sword Beach]]. Intelligence reports said both bridges were heavily defended by the Germans and wired for demolition. Once captured, the bridges had to be held against any counter-attack until the assault force was relieved by [[British Commandos|commandos]] and infantry advancing from the British landing zone. |
The mission was vital to the success of the [[Operation Tonga|British airborne landings]]. Failure to capture the bridges intact, or to prevent their demolition by the Germans, would leave the [[6th Airborne Division]] cut off from the rest of the Allied armies with their backs to the two waterways. If the Germans retained control over the bridges, they could be used by their armoured divisions to attack the landing beaches of Normandy. |
The mission was vital to the success of the [[Operation Tonga|British airborne landings]]. Failure to capture the bridges intact, or to prevent their demolition by the Germans, would leave the [[6th Airborne Division]] cut off from the rest of the Allied armies with their backs to the two waterways. If the Germans retained control over the bridges, they could be used by their armoured divisions to attack the landing beaches of Normandy. |
||
| Line 28: | Line 28: | ||
==Background== |
==Background== |
||
| − | |||
===British Forces=== |
===British Forces=== |
||
| − | During the planning stage of the [[Normandy invasion]], the decision was made to land the [[6th Airborne Division]] on the left flank of the invasion beaches between the |
+ | During the planning stage of the [[Normandy invasion]], the decision was made to land the [[6th Airborne Division]] on the left flank of the invasion beaches between the River Orne and the River Dives.<ref>Ambrose, p.41</ref> Their primary objective was to capture the two road bridges over the River Orne and the Caen Canal and prevent a German [[flanking attack]] on the landing area.<ref>Tugwell, pp.203–204</ref> Failure to capture the bridges would leave the 6th Airborne Division cut off in enemy territory,<ref name=howard>{{cite web|accessdate=1 April 2010|publisher=''The Independent''|title=Obituary, Major John Howard|date=11 May 1999|last=Arthur|first=Max|url=http://www.independent.co.uk/arts-entertainment/obituary-major-john-howard-1092864.html}}</ref> so the [[5th Parachute Brigade]] were earmarked to defend the bridges against counter-attacks.<ref>Ferguson, p.16</ref> However, divisional commander [[Major-General]] [[Richard Nelson Gale|Gale]] decided that the only way to capture the bridges intact was by a glider ''[[coup de main]]'' assault. He then asked [[Brigadier]] [[Hugh Kindersley]] of the [[6th Airlanding Brigade]] to nominate his best company for the operation.<ref name=fo12>Fowler, p.12</ref> |
| − | 'D' Company, 2nd (Airborne) Battalion, [[Oxfordshire and Buckinghamshire Light Infantry]], under the command of [[Major]] [[John Howard (British Army officer)|John Howard]] and [[second in command]] [[Captain (British Army and Royal Marines)|Captain]] Brian Priday, was selected for the mission.<ref>Ambrose, p.27</ref> The company had trained hard and became the fittest in the battalion, often utilizing bomb-damaged inner-city areas to practice street fighting with live ammunition.<ref>Ambrose, pp.35–37</ref> Howard expected the invasion to involve night-fighting and changed the daily routine to ensure that his men were up to the task. For weeks at a time, they rose at 20:00 and completed [[Military exercise|exercises]], drills and normal paperwork throughout the night before retiring at 13:00.<ref>Ambrose, pp.43–44</ref> General Gale tested the company through two exercises where the objective was to capture bridges when it became apparent that the company would not be able to carry out the mission on its own. Asked to select two more [[platoon]]s from the battalion to join them, Howard chose two from 'B' Company commanded by Lieutenants Fox and [[Sandy Smith (British Army officer)|Smith]].<ref name=fo12/> Any explosive charges found attached to the bridges were the responsibility of 30 [[Royal Engineers]] from the 249th (Airborne) Field Company, commanded by Captain Jock Neilson.<ref>Ambrose, pp.53–55</ref> Changes were then made to the operational plan to accommodate six platoons. Three were assigned to attack each bridge simultaneously with infantry overcoming the troops on guard duty while the engineers located and dismantled any demolition charges.<ref>Tugwell, p.211</ref> For six days and nights the company carried out exercises just outside |
+ | 'D' Company, 2nd (Airborne) Battalion, [[Oxfordshire and Buckinghamshire Light Infantry]], under the command of [[Major]] [[John Howard (British Army officer)|John Howard]] and [[second in command]] [[Captain (British Army and Royal Marines)|Captain]] Brian Priday, was selected for the mission.<ref>Ambrose, p.27</ref> The company had trained hard and became the fittest in the battalion, often utilizing bomb-damaged inner-city areas to practice street fighting with live ammunition.<ref>Ambrose, pp.35–37</ref> Howard expected the invasion to involve night-fighting and changed the daily routine to ensure that his men were up to the task. For weeks at a time, they rose at 20:00 and completed [[Military exercise|exercises]], drills and normal paperwork throughout the night before retiring at 13:00.<ref>Ambrose, pp.43–44</ref> General Gale tested the company through two exercises where the objective was to capture bridges when it became apparent that the company would not be able to carry out the mission on its own. Asked to select two more [[platoon]]s from the battalion to join them, Howard chose two from 'B' Company commanded by Lieutenants Fox and [[Sandy Smith (British Army officer)|Smith]].<ref name=fo12/> Any explosive charges found attached to the bridges were the responsibility of 30 [[Royal Engineers]] from the 249th (Airborne) Field Company, commanded by Captain Jock Neilson.<ref>Ambrose, pp.53–55</ref> Changes were then made to the operational plan to accommodate six platoons. Three were assigned to attack each bridge simultaneously with infantry overcoming the troops on guard duty while the engineers located and dismantled any demolition charges.<ref>Tugwell, p.211</ref> For six days and nights the company carried out exercises just outside Exeter, in the south west of England, where two bridges similar to their objectives were found over the River Exe.<ref name=wood/> |
Transport to Normandy was arranged in six [[Airspeed Horsa]] gliders, piloted by 12 NCOs from 'C' Squadron, [[Glider Pilot Regiment]].<ref>Tugwell, p.39</ref><ref group="nb">All Glider Pilot Regiment pilots were at least of the rank of sergeant and trained soldiers.</ref> The Horsa had a wingspan of {{convert|88|ft}} and a length of {{convert|67|ft}}, with a maximum load of {{convert|15,750|lb}} or space for two pilots, twenty-eight troops or a mixture of two [[Willys MB|jeeps]], artillery guns and trailers.<ref>Fowler, p.9</ref><ref>Peters, p.9</ref> Pilot mission training involved practice landings on a small strip of land, instrument flying using stopwatches for accurate course changes and fitting flight crew goggles with dark glass to get them used to night flying. By May 1944 they had carried out 54 training flights, flying in all weathers both day and night.<ref>Ambrose, pp.57–59</ref> |
Transport to Normandy was arranged in six [[Airspeed Horsa]] gliders, piloted by 12 NCOs from 'C' Squadron, [[Glider Pilot Regiment]].<ref>Tugwell, p.39</ref><ref group="nb">All Glider Pilot Regiment pilots were at least of the rank of sergeant and trained soldiers.</ref> The Horsa had a wingspan of {{convert|88|ft}} and a length of {{convert|67|ft}}, with a maximum load of {{convert|15,750|lb}} or space for two pilots, twenty-eight troops or a mixture of two [[Willys MB|jeeps]], artillery guns and trailers.<ref>Fowler, p.9</ref><ref>Peters, p.9</ref> Pilot mission training involved practice landings on a small strip of land, instrument flying using stopwatches for accurate course changes and fitting flight crew goggles with dark glass to get them used to night flying. By May 1944 they had carried out 54 training flights, flying in all weathers both day and night.<ref>Ambrose, pp.57–59</ref> |
||
| Line 40: | Line 39: | ||
[[File:Airspeed Horsa interior.jpg|thumb|left|Interior of a Horsa glider, looking to the rear from the cockpit.]] |
[[File:Airspeed Horsa interior.jpg|thumb|left|Interior of a Horsa glider, looking to the rear from the cockpit.]] |
||
| − | At the end of May 1944, 'D' Company left the battalion camp at |
+ | At the end of May 1944, 'D' Company left the battalion camp at Bulford in Wiltshire for [[RAF Tarrant Rushton]] in Dorset. The base was then secured and Howard briefed everyone on the mission, distributing photographs of the bridges and unveiling a model of the area.<ref>Fowler, p.17. 22</ref> Glider pilot commander [[Staff Sergeant]] [[Jim Wallwork]] told Howard that with a full load of men, ammunition, assault boats and engineers' stores his gliders would be dangerously overloaded. Howard decided to only take one assault boat per glider and leave behind two men from each platoon.<ref>Ambrose, p.85</ref> At the last minute Doctor John Vaughan replaced an injured man in one of the platoons.<ref>Fowler, p.22</ref> |
On 5 June 1944 the company made final preparations for the mission. Each man was issued their personal weapons and ammunition as well as up to nine hand grenades and four [[Bren gun]] magazines.<ref>Fowler, p.27</ref> Each platoon also had a [[2-inch mortar]] and a radio.<ref name=amb88>Ambrose, p.88</ref> Just before the men boarded the gliders, codewords were issued. 'Ham' indicated the canal bridge was captured and 'Jam' the river bridge. Capture and destruction of the canal bridge would be signalled using the codeword 'Jack'; 'Lard' would be used if a similar fate befell the river bridge.<ref>Ambrose, p.89</ref> |
On 5 June 1944 the company made final preparations for the mission. Each man was issued their personal weapons and ammunition as well as up to nine hand grenades and four [[Bren gun]] magazines.<ref>Fowler, p.27</ref> Each platoon also had a [[2-inch mortar]] and a radio.<ref name=amb88>Ambrose, p.88</ref> Just before the men boarded the gliders, codewords were issued. 'Ham' indicated the canal bridge was captured and 'Jam' the river bridge. Capture and destruction of the canal bridge would be signalled using the codeword 'Jack'; 'Lard' would be used if a similar fate befell the river bridge.<ref>Ambrose, p.89</ref> |
||
===Bridges=== |
===Bridges=== |
||
| − | [[File:River orne bridge.jpg|thumb |
+ | [[File:River orne bridge.jpg|thumb|The River Orne Bridge]] |
| − | The Ranville bridge spans the River Orne and the Bénouville bridge crosses the Caen Canal to the west. They are {{convert|5|mi}} from the coast and provided the only access to the city of |
+ | The Ranville bridge spans the River Orne and the Bénouville bridge crosses the Caen Canal to the west. They are {{convert|5|mi}} from the coast and provided the only access to the city of Caen.<ref name=fowl10/> The main road between the two communes crosses the bridges and then continues east to the River Dives. At {{convert|190|ft}} long and {{convert|12|ft}} wide, the Caen Canal bridge opens to allow canal traffic to pass underneath. The controls were housed in a nearby cabin.<ref>Ambrose, p.70</ref> The canal itself is {{convert|27|ft}} deep by {{convert|150|ft}} wide, with earth and stone banks {{convert|6|ft}} high. Small [[tarmac]] tracks run on both banks along the canal's entire length.<ref>Ambrose, pp.69–70</ref> |
Between the two bridges there is a strip of mostly marshy ground some {{convert|550|yd}} wide, broken up by ditches and small streams.<ref name=amb3>Ambrose, p.3</ref><ref name=amb71>Ambrose, p.71</ref> |
Between the two bridges there is a strip of mostly marshy ground some {{convert|550|yd}} wide, broken up by ditches and small streams.<ref name=amb3>Ambrose, p.3</ref><ref name=amb71>Ambrose, p.71</ref> |
||
| Line 56: | Line 55: | ||
[[File:Bundesarchiv Bild 101I-721-0386-15, Frankreich, Soldaten mit MG 34.jpg|thumb|left|German soldiers with an [[MG 34]] machine-gun.]] |
[[File:Bundesarchiv Bild 101I-721-0386-15, Frankreich, Soldaten mit MG 34.jpg|thumb|left|German soldiers with an [[MG 34]] machine-gun.]] |
||
| − | A second division, the [[21st Panzer Division|21st Panzer]], moved into the area in May 1944. One of its regiments, the 125th [[Panzergrenadier]], commanded by Colonel [[Hans von Luck]], was billeted at [[Vimont, Calvados|Vimont]] just east of Caen.<ref name=fo11>Fowler, p.11</ref> There was also a battalion of the 192nd Panzergrenadier Regiment based at [[Cairon]] to the west of the bridges.<ref name=ford47/> Colonel von Luck trained his regiment in anti-invasion operations. He also identified likely incursion points and marked out forward routes, rest and refuelling areas and anti-aircraft gun positions.<ref name=amb76>Ambrose, p.76</ref> The 21st Panzer Division was a new formation based on the former [[Afrika Korps]] unit, which had been destroyed in North Africa.<ref name=fo11/> Although equipped with an assortment of older tanks and other armoured vehicles, the division's officers were veterans and 2,000 men from the old division filled its ranks.<ref name=fo12/> Further afield were the [[12th SS Panzer Division]] at |
+ | A second division, the [[21st Panzer Division|21st Panzer]], moved into the area in May 1944. One of its regiments, the 125th [[Panzergrenadier]], commanded by Colonel [[Hans von Luck]], was billeted at [[Vimont, Calvados|Vimont]] just east of Caen.<ref name=fo11>Fowler, p.11</ref> There was also a battalion of the 192nd Panzergrenadier Regiment based at [[Cairon]] to the west of the bridges.<ref name=ford47/> Colonel von Luck trained his regiment in anti-invasion operations. He also identified likely incursion points and marked out forward routes, rest and refuelling areas and anti-aircraft gun positions.<ref name=amb76>Ambrose, p.76</ref> The 21st Panzer Division was a new formation based on the former [[Afrika Korps]] unit, which had been destroyed in North Africa.<ref name=fo11/> Although equipped with an assortment of older tanks and other armoured vehicles, the division's officers were veterans and 2,000 men from the old division filled its ranks.<ref name=fo12/> Further afield were the [[12th SS Panzer Division]] at Lisieux and the [[Panzer Lehr Division]] at Chartres, both less than a day's march from the area.<ref name=ford204/> |
Defences were in place at both bridges. On the west bank of the Caen Canal bridge there were three machine-gun emplacements and on the east bank a machine-gun and an anti-tank gun. To their north were another three machine-guns and a [[bunker|concrete pillbox]]. An anti-aircraft tower equipped with machine-guns stood to the south.<ref>Ambrose, pp.70–71</ref> At the River Orne bridge, the eastern bank south of the bridge had a pillbox with anti-tank and anti-aircraft guns. To the north of the bridge were two machine-guns. Both bridges had sandbagged trench systems along the banks.<ref>Ambrose, p.72–73</ref> |
Defences were in place at both bridges. On the west bank of the Caen Canal bridge there were three machine-gun emplacements and on the east bank a machine-gun and an anti-tank gun. To their north were another three machine-guns and a [[bunker|concrete pillbox]]. An anti-aircraft tower equipped with machine-guns stood to the south.<ref>Ambrose, pp.70–71</ref> At the River Orne bridge, the eastern bank south of the bridge had a pillbox with anti-tank and anti-aircraft guns. To the north of the bridge were two machine-guns. Both bridges had sandbagged trench systems along the banks.<ref>Ambrose, p.72–73</ref> |
||
==Deadstick== |
==Deadstick== |
||
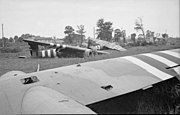
| − | [[File:Operation Deadstick canal bridge gliders.jpg|thumb |
+ | [[File:Operation Deadstick canal bridge gliders.jpg|thumb|The three Caen Canal gliders, the bridge is hidden by the trees in the distance.]] |
{{further|Operation Tonga|Normandy Landings}} |
{{further|Operation Tonga|Normandy Landings}} |
||
At 22:56 on 5 June, 1944, the six gliders towed by [[Handley Page Halifax|Halifax bombers]] took off from RAF Tarrant Rushton.<ref name=fo32>Ford, p. 32.</ref> Horsa number one, the first of the three headed for the Caen Canal, carried Major Howard with [[Lieutenant]] [[Den Brotheridge|Brotheridge's]] platoon, number two bore [[David Wood (British Army officer)|Lieutenant Wood's]] platoon, and number three carried Lieutenant Smith's platoon. Captain Priday with Lieutenant Hooper's platoon made for the river bridge aboard number four. Horsa number five carrying Lieutenant Fox's platoon and was followed by number six bearing [[Tod Sweeney|Lieutenant Sweeney's]] platoon. Each glider also carried five men from the Royal Engineers platoon.<ref>Fowler, pp. 28–9.</ref> Flying over the English Channel at {{convert|7,000|ft}}, the bombers crossed the Normandy coast at 00:07 on 6 June, 1944 and released their towed gliders.<ref name=fo32/> With Staff Sergeant Wallwork at the controls, the number one glider crashed into the barbed wire surrounding the canal bridge defences at 00:16.<ref>Ford and Zaloga, p.214</ref> The other two gliders followed at one minute intervals. The number two glider broke in half and came to halt at the edge of a large pond.<ref name=fo32/> One of the men fell into the water and drowned, becoming the first casualty of the operation.<ref>Ambrose, p. 98.</ref> Lieutenants Brotheridge and Smith's platoons headed for the bridge, while Lieutenant Wood's platoon moved towards the trenches on its north east side.<ref>Ambrose, pp.96–98</ref> |
At 22:56 on 5 June, 1944, the six gliders towed by [[Handley Page Halifax|Halifax bombers]] took off from RAF Tarrant Rushton.<ref name=fo32>Ford, p. 32.</ref> Horsa number one, the first of the three headed for the Caen Canal, carried Major Howard with [[Lieutenant]] [[Den Brotheridge|Brotheridge's]] platoon, number two bore [[David Wood (British Army officer)|Lieutenant Wood's]] platoon, and number three carried Lieutenant Smith's platoon. Captain Priday with Lieutenant Hooper's platoon made for the river bridge aboard number four. Horsa number five carrying Lieutenant Fox's platoon and was followed by number six bearing [[Tod Sweeney|Lieutenant Sweeney's]] platoon. Each glider also carried five men from the Royal Engineers platoon.<ref>Fowler, pp. 28–9.</ref> Flying over the English Channel at {{convert|7,000|ft}}, the bombers crossed the Normandy coast at 00:07 on 6 June, 1944 and released their towed gliders.<ref name=fo32/> With Staff Sergeant Wallwork at the controls, the number one glider crashed into the barbed wire surrounding the canal bridge defences at 00:16.<ref>Ford and Zaloga, p.214</ref> The other two gliders followed at one minute intervals. The number two glider broke in half and came to halt at the edge of a large pond.<ref name=fo32/> One of the men fell into the water and drowned, becoming the first casualty of the operation.<ref>Ambrose, p. 98.</ref> Lieutenants Brotheridge and Smith's platoons headed for the bridge, while Lieutenant Wood's platoon moved towards the trenches on its north east side.<ref>Ambrose, pp.96–98</ref> |
||
| Line 99: | Line 98: | ||
Just after midday, the 21st Panzer Division received permission to attack the landings. Colonel Von Luck east of the River Orne moved the 125th Panzergrenadier Regiment towards the bridges. The column was quickly spotted and engaged for the next two hours by Allied artillery and aircraft causing heavy losses.<ref>Ambrose, p.163</ref> The 1st Battalion, 192nd Panzergrenadier Regiment and the 100th Panzer Regiment, attacking from west of the canal, had more success reaching the beaches between the British [[Sword Beach]] and the Canadian [[Juno Beach]].<ref>Ford and Zaloga, p.254</ref> |
Just after midday, the 21st Panzer Division received permission to attack the landings. Colonel Von Luck east of the River Orne moved the 125th Panzergrenadier Regiment towards the bridges. The column was quickly spotted and engaged for the next two hours by Allied artillery and aircraft causing heavy losses.<ref>Ambrose, p.163</ref> The 1st Battalion, 192nd Panzergrenadier Regiment and the 100th Panzer Regiment, attacking from west of the canal, had more success reaching the beaches between the British [[Sword Beach]] and the Canadian [[Juno Beach]].<ref>Ford and Zaloga, p.254</ref> |
||
| − | At 13:30 the men at the bridges heard the sound of |
+ | At 13:30 the men at the bridges heard the sound of bagpipes, played by [[Bill Millin]] of the [[1st Commando Brigade]]. As the commandos arrived they crossed the bridges and joined the rest of 6th Airborne Division defending the eastern side of the bridges. Some of the tanks accompanying the commandos moved into Bénouville to reinforce its defences while others crossed the bridges with the commandos.<ref>Fowler, p.56</ref> At 15:00 a boat loaded with German infantry approached from Caen. It was engaged with the anti-tank gun manned by number One Platoon. It was hit in the stern by the second round fired and retreated back toward Caen.<ref>Fowler, p.53</ref> |
At 21:15 the 2nd Battalion, [[Royal Warwickshire Regiment]] of the [[185th Infantry Brigade (United Kingdom)|185th Infantry Brigade]] arrived from Sword Beach and began taking over the bridges' defences.<ref>Gale, p.85</ref> At around midnight Howard handed over command of the bridges to the Warwickshire Regiment and his company left to join the rest of their battalion at Ranville.<ref>Ambrose, p.169</ref> At 03:30 they finally located the battalion's positions. They found Captain Priday and number Four Platoon had already joined the battalion. The platoon had landed beside the River Dives at [[Varaville]] about {{convert|8|mi}} away,<ref name=fowler44/> and had spent the previous day fighting their way towards the bridges, trying to rejoin the company.<ref>Fowler, p.58</ref> |
At 21:15 the 2nd Battalion, [[Royal Warwickshire Regiment]] of the [[185th Infantry Brigade (United Kingdom)|185th Infantry Brigade]] arrived from Sword Beach and began taking over the bridges' defences.<ref>Gale, p.85</ref> At around midnight Howard handed over command of the bridges to the Warwickshire Regiment and his company left to join the rest of their battalion at Ranville.<ref>Ambrose, p.169</ref> At 03:30 they finally located the battalion's positions. They found Captain Priday and number Four Platoon had already joined the battalion. The platoon had landed beside the River Dives at [[Varaville]] about {{convert|8|mi}} away,<ref name=fowler44/> and had spent the previous day fighting their way towards the bridges, trying to rejoin the company.<ref>Fowler, p.58</ref> |
||
| Line 107: | Line 106: | ||
Of the 181 men (139 infantry, 30 engineers and 12 pilots) of 'D' Company involved in the capture of the bridges, two had been killed and fourteen wounded.<ref name=wood>{{cite web|date=16 March 2009|accessdate=1 April 2011|title = Obituary, Colonel David Wood|publisher= Daily Mail |url=http://www.dailymail.co.uk/news/article-1162452/Last-surviving-officer-daring-World-War-II-Pegasus-Bridge-operation-dies-aged-85.html}}</ref> On 9 June, the [[Luftwaffe|German Air Force]] attacked the bridges with 13 aircraft. The British had positioned light and medium sized anti-aircraft guns around the bridges and in the face of intense anti-aircraft fire the attack failed, although they did claim one of the bridges was destroyed by a direct hit.<ref>Fowler, pp. 54–5.</ref> |
Of the 181 men (139 infantry, 30 engineers and 12 pilots) of 'D' Company involved in the capture of the bridges, two had been killed and fourteen wounded.<ref name=wood>{{cite web|date=16 March 2009|accessdate=1 April 2011|title = Obituary, Colonel David Wood|publisher= Daily Mail |url=http://www.dailymail.co.uk/news/article-1162452/Last-surviving-officer-daring-World-War-II-Pegasus-Bridge-operation-dies-aged-85.html}}</ref> On 9 June, the [[Luftwaffe|German Air Force]] attacked the bridges with 13 aircraft. The British had positioned light and medium sized anti-aircraft guns around the bridges and in the face of intense anti-aircraft fire the attack failed, although they did claim one of the bridges was destroyed by a direct hit.<ref>Fowler, pp. 54–5.</ref> |
||
| − | The 6th Airborne retained control of the area between the Rivers Orne and Dives until 14 June, when the [[51st (Highland) Infantry Division]] took over the southern part of the Orne bridgehead. In the days that followed the division was reinforced by the Dutch [[Princess Irene Brigade]] and the [[1st Belgian Infantry Brigade]]. A period of static warfare ended on 22 August when the division crossed the River Dives. Within nine days it had advanced {{convert|45|mi}} to the mouth of the |
+ | The 6th Airborne retained control of the area between the Rivers Orne and Dives until 14 June, when the [[51st (Highland) Infantry Division]] took over the southern part of the Orne bridgehead. In the days that followed the division was reinforced by the Dutch [[Princess Irene Brigade]] and the [[1st Belgian Infantry Brigade]]. A period of static warfare ended on 22 August when the division crossed the River Dives. Within nine days it had advanced {{convert|45|mi}} to the mouth of the River Seine. Between the 6 June and 26 August when they were pulled out of the front line the division's casualties were; 821 killed, 2,709 wounded, and 927 missing.<ref name= modxx>{{cite web|accessdate=2 April 2011|publisher=[[Ministry of Defence (United Kingdom)]]|date= 22 November 2005 | title = The British Airborne Assault|series=Commemorating the 60th Anniversary of D-Day|url= http://webarchive.nationalarchives.gov.uk/+/http://www.mod.uk/aboutus/dday60/airborne.htm}}</ref> After Operation Deadstick the engineers, glider pilots and 'B' Company men were returned to their parent formations. 'D' Company played their part in the division's defence of the Orne bridgehead and advance to the River Seine. On 5 September when the division was withdrawn to England, all that remained of the company were 40 men under the only remaining officer, Major John Howard, the other officers, sergeants and most of the junior NCOs having been among the casualties.<ref>Ford and Zaloga, p. 221.</ref> |
The glider pilots were the first group to leave 'D' Company, their expertise being required for other planned operations. In particular Operation Comet, which included another ''coup-de-main'' operation where eighteen gliders would be used to capture three bridges in the Netherlands. The mission would be carried out by the [[1st Airborne Division]] with a brigade allocated to defend each bridge. Comet was scheduled for the 8 September 1944, but was delayed and then cancelled. The plans were adapted and became [[Operation Market Garden]], involving three airborne divisions, however the ''coup-de-main'' assault plans were not carried out.<ref>Tugwell, p. 231.</ref> |
The glider pilots were the first group to leave 'D' Company, their expertise being required for other planned operations. In particular Operation Comet, which included another ''coup-de-main'' operation where eighteen gliders would be used to capture three bridges in the Netherlands. The mission would be carried out by the [[1st Airborne Division]] with a brigade allocated to defend each bridge. Comet was scheduled for the 8 September 1944, but was delayed and then cancelled. The plans were adapted and became [[Operation Market Garden]], involving three airborne divisions, however the ''coup-de-main'' assault plans were not carried out.<ref>Tugwell, p. 231.</ref> |
||
| Line 116: | Line 115: | ||
[[File:03 Pegasus Bridge2.JPG|thumb||The original [[Pegasus Bridge]] at the [[Memorial Pegasus]] in Benouville.]] |
[[File:03 Pegasus Bridge2.JPG|thumb||The original [[Pegasus Bridge]] at the [[Memorial Pegasus]] in Benouville.]] |
||
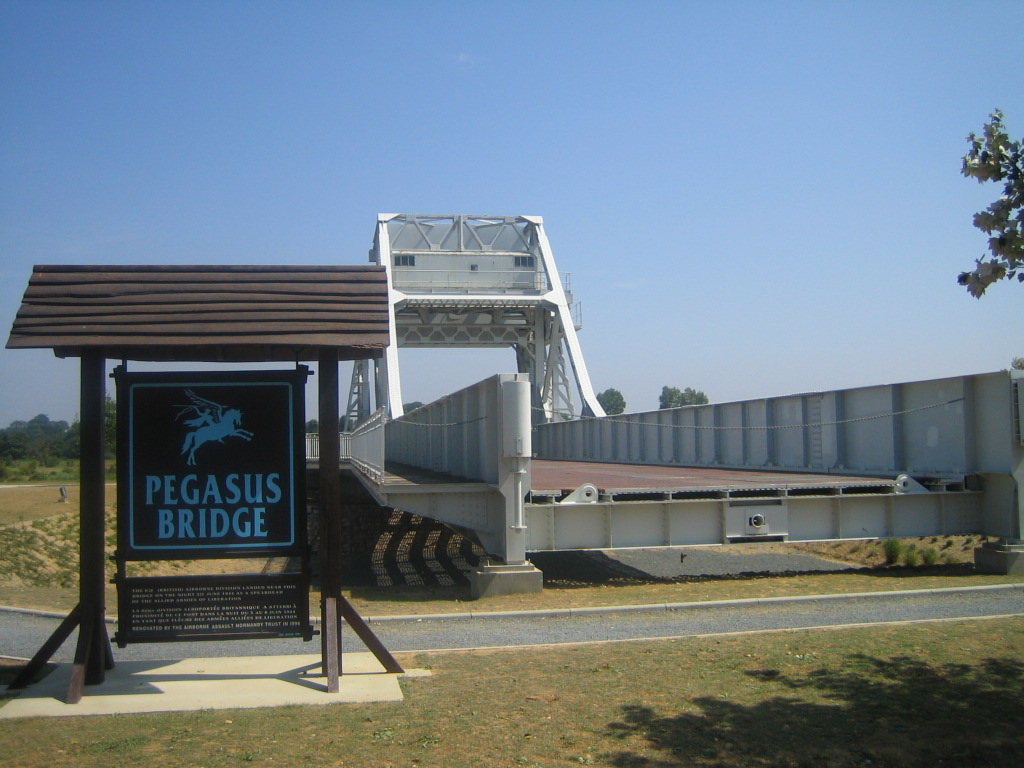
| − | The Caen Canal bridge was renamed [[Pegasus Bridge]] after the emblem of the British airborne forces,<ref>Guard, p.227</ref> while the River Orne bridge became [[Horsa Bridge]]. The road across them is now the "Esplanade Major John Howard".<ref>{{cite web|date=17 March 17, 2009|accessdate=1 April 2011|publisher='' |
+ | The Caen Canal bridge was renamed [[Pegasus Bridge]] after the emblem of the British airborne forces,<ref>Guard, p.227</ref> while the River Orne bridge became [[Horsa Bridge]]. The road across them is now the "Esplanade Major John Howard".<ref>{{cite web|date=17 March 17, 2009|accessdate=1 April 2011|publisher=''Western Morning News''|title=Pegasus Bridge mission hero dies at 85|url=http://www.thisiswesternmorningnews.co.uk/news/Hero-daring-Pegasus-Bridge-mission-dies-85/article-774492-detail/article.html}}</ref> Since the end of the war, Pegasus Bridge and the adjacent Café Gondree have become a place where British veterans of the conflict visiting Normandy congregate.<ref>{{cite web|accessdate=10 April 2011|last=Mendrick|first=Robert|title=D-Day veterans recall heroic deeds on 65th anniversary|publisher=''[[London Evening Standard]]''|date=5 June 2009|url=http://www.thisislondon.co.uk/standard/article-23704075-d-day-veterans-recall-heroic-deeds-on-65th-anniversary.do}}</ref> In 1994 when Pegasus Bridge was replaced by a new structure, the original bridge was added to the displays at the [[Memorial Pegasus|Pegasus Museum]] in Benouville.<ref>{{cite web|accessdate=1 April 2011|publisher=D-Day Commemoration Committee|title=Memorial Pegasus|author=D-Day Commemoration Committee|url=http://www.memorial-pegasus.org/mmp/musee_debarquement/index.php?lang=uk}}</ref> |
The original model of the area around the bridge, that was used to brief troops taking part in the assault, is preserved in [[Airborne Assault: The Museum of The Parachute Regiment and Airborne Forces]], located at the [[Imperial War Museum Duxford]].<ref>{{cite web |url=http://www.paradata.org.uk/content/airborne-assault-museum-parachute-regiment-and-airborne-forces-0|title=Airborne Assault, The Museum of The Parachute Regiment and Airborne Forces}}</ref> |
The original model of the area around the bridge, that was used to brief troops taking part in the assault, is preserved in [[Airborne Assault: The Museum of The Parachute Regiment and Airborne Forces]], located at the [[Imperial War Museum Duxford]].<ref>{{cite web |url=http://www.paradata.org.uk/content/airborne-assault-museum-parachute-regiment-and-airborne-forces-0|title=Airborne Assault, The Museum of The Parachute Regiment and Airborne Forces}}</ref> |
||
| Line 122: | Line 121: | ||
A number of books have been written about or have mentioned the assault. In 1962, Operation Deadstick featured in [[Darryl Zanuck]]'s film ''The Longest Day'' which was based on the book of the same title by [[Cornelius Ryan]]. Major John Howard was played by [[Richard Todd]] who had been an officer in the 7th Parachute Battalion during the battle.<ref>{{cite web|date=9 May 1999|first=Richard|last=Goldstein|accessdate=1 April 2011|publisher=''New York Times''|title=John Howard Is Dead at 86; British Hero of D-Day Invasion|url=http://query.nytimes.com/gst/fullpage.html?res=990DEEDA1F3CF93AA35756C0A96F958260}}</ref> |
A number of books have been written about or have mentioned the assault. In 1962, Operation Deadstick featured in [[Darryl Zanuck]]'s film ''The Longest Day'' which was based on the book of the same title by [[Cornelius Ryan]]. Major John Howard was played by [[Richard Todd]] who had been an officer in the 7th Parachute Battalion during the battle.<ref>{{cite web|date=9 May 1999|first=Richard|last=Goldstein|accessdate=1 April 2011|publisher=''New York Times''|title=John Howard Is Dead at 86; British Hero of D-Day Invasion|url=http://query.nytimes.com/gst/fullpage.html?res=990DEEDA1F3CF93AA35756C0A96F958260}}</ref> |
||
| − | In 2003, the attack on the Bénouville (Pegasus) Bridge was recreated in the highly successful and lauded video game, |
+ | In 2003, the attack on the Bénouville (Pegasus) Bridge was recreated in the highly successful and lauded video game, Call of Duty, in which the player joins the assault of the 6th Airborne Division in both capturing and holding the bridge. |
==Notes== |
==Notes== |
||
Revision as of 03:12, 31 May 2021
| Operation Deadstick | |||||||
|---|---|---|---|---|---|---|---|
| Part of Normandy landings | |||||||
 Caen canal bridge 9 June 1944, with Horsa gliders in the background | |||||||
| |||||||
| Belligerents | |||||||
|
|
| ||||||
| Commanders and leaders | |||||||
|
Major John Howard Lieutenant-Colonel Richard Pine-Coffin |
Major Hans Schmidt Generalmajor Edgar Feuchtinger | ||||||
| Units involved | |||||||
|
'D' Company, 2nd Ox and Bucks LI 7th Parachute Battalion |
Company, 736th Grenadier Regiment 21st Panzer Division | ||||||
| Strength | |||||||
|
'D' Company 180 men 7th Parachute Battalion ~ 200 men |
~50 at the bridge[1] 21st Panzer Division 12,350 men 127 tanks 40 self propelled guns[2] | ||||||
| Casualties and losses | |||||||
|
2 dead, 14 wounded 'D' Company 18 dead, 36 wounded 7th Parachute Battalion[3] |
Men unknown | ||||||
| |||||
Operation Deadstick was the codename for an airborne forces operation by the British Army that took place on 6 June 1944[4] as part of the Normandy landings. The mission's objective was to capture intact two road bridges in Normandy across the River Orne and the Caen Canal providing the only exit eastwards for British forces from their landing on Sword Beach. Intelligence reports said both bridges were heavily defended by the Germans and wired for demolition. Once captured, the bridges had to be held against any counter-attack until the assault force was relieved by commandos and infantry advancing from the British landing zone.
The mission was vital to the success of the British airborne landings. Failure to capture the bridges intact, or to prevent their demolition by the Germans, would leave the 6th Airborne Division cut off from the rest of the Allied armies with their backs to the two waterways. If the Germans retained control over the bridges, they could be used by their armoured divisions to attack the landing beaches of Normandy.
Responsibility for the operation fell to the men of 'D' Company, 2nd (Airborne) Battalion, Oxfordshire and Buckinghamshire Light Infantry, part of the 6th Airborne Division. The assault group comprised a reinforced company of six infantry platoons and an attached platoon of Royal Engineers. They flew from the south of England to Normandy in six Airspeed Horsa gliders. Through what was later described as the "most outstanding flying achievements of the war", the gliders delivered the company to their objective. After a brief fire fight, both bridges were captured within minutes of landing, then successfully defended against tank, gun boat and infantry counter-attacks until the company relief arrived.
Background
British Forces
During the planning stage of the Normandy invasion, the decision was made to land the 6th Airborne Division on the left flank of the invasion beaches between the River Orne and the River Dives.[5] Their primary objective was to capture the two road bridges over the River Orne and the Caen Canal and prevent a German flanking attack on the landing area.[6] Failure to capture the bridges would leave the 6th Airborne Division cut off in enemy territory,[7] so the 5th Parachute Brigade were earmarked to defend the bridges against counter-attacks.[8] However, divisional commander Major-General Gale decided that the only way to capture the bridges intact was by a glider coup de main assault. He then asked Brigadier Hugh Kindersley of the 6th Airlanding Brigade to nominate his best company for the operation.[9]
'D' Company, 2nd (Airborne) Battalion, Oxfordshire and Buckinghamshire Light Infantry, under the command of Major John Howard and second in command Captain Brian Priday, was selected for the mission.[10] The company had trained hard and became the fittest in the battalion, often utilizing bomb-damaged inner-city areas to practice street fighting with live ammunition.[11] Howard expected the invasion to involve night-fighting and changed the daily routine to ensure that his men were up to the task. For weeks at a time, they rose at 20:00 and completed exercises, drills and normal paperwork throughout the night before retiring at 13:00.[12] General Gale tested the company through two exercises where the objective was to capture bridges when it became apparent that the company would not be able to carry out the mission on its own. Asked to select two more platoons from the battalion to join them, Howard chose two from 'B' Company commanded by Lieutenants Fox and Smith.[9] Any explosive charges found attached to the bridges were the responsibility of 30 Royal Engineers from the 249th (Airborne) Field Company, commanded by Captain Jock Neilson.[13] Changes were then made to the operational plan to accommodate six platoons. Three were assigned to attack each bridge simultaneously with infantry overcoming the troops on guard duty while the engineers located and dismantled any demolition charges.[14] For six days and nights the company carried out exercises just outside Exeter, in the south west of England, where two bridges similar to their objectives were found over the River Exe.[15]
Transport to Normandy was arranged in six Airspeed Horsa gliders, piloted by 12 NCOs from 'C' Squadron, Glider Pilot Regiment.[16][nb 2] The Horsa had a wingspan of 88 feet (27 m) and a length of 67 feet (20 m), with a maximum load of 15,750 pounds (7,140 kg) or space for two pilots, twenty-eight troops or a mixture of two jeeps, artillery guns and trailers.[17][18] Pilot mission training involved practice landings on a small strip of land, instrument flying using stopwatches for accurate course changes and fitting flight crew goggles with dark glass to get them used to night flying. By May 1944 they had carried out 54 training flights, flying in all weathers both day and night.[19]
Howard was not told the exact details of the operation until 2 May, 1944.[20] His orders were to seize the bridges over the River Orne and Caen Canal at Bénouville and Ranville intact and hold them until relieved.[21] The relief force would initially be a company from the 7th Parachute Battalion under Howard's command. When the remainder of the parachute battalion arrived, he would hand over to their commander Lieutenant-Colonel Richard Pine-Coffin. The 3rd Infantry Division and the commandos of the 1st Commando Brigade were scheduled to land at Sword Beach at 06:00 on the day then advance to the bridges where they were expected to arrive at 11:00.[22]
Interior of a Horsa glider, looking to the rear from the cockpit.
At the end of May 1944, 'D' Company left the battalion camp at Bulford in Wiltshire for RAF Tarrant Rushton in Dorset. The base was then secured and Howard briefed everyone on the mission, distributing photographs of the bridges and unveiling a model of the area.[23] Glider pilot commander Staff Sergeant Jim Wallwork told Howard that with a full load of men, ammunition, assault boats and engineers' stores his gliders would be dangerously overloaded. Howard decided to only take one assault boat per glider and leave behind two men from each platoon.[24] At the last minute Doctor John Vaughan replaced an injured man in one of the platoons.[25]
On 5 June 1944 the company made final preparations for the mission. Each man was issued their personal weapons and ammunition as well as up to nine hand grenades and four Bren gun magazines.[26] Each platoon also had a 2-inch mortar and a radio.[27] Just before the men boarded the gliders, codewords were issued. 'Ham' indicated the canal bridge was captured and 'Jam' the river bridge. Capture and destruction of the canal bridge would be signalled using the codeword 'Jack'; 'Lard' would be used if a similar fate befell the river bridge.[28]
Bridges


The River Orne Bridge
The Ranville bridge spans the River Orne and the Bénouville bridge crosses the Caen Canal to the west. They are 5 miles (8.0 km) from the coast and provided the only access to the city of Caen.[1] The main road between the two communes crosses the bridges and then continues east to the River Dives. At 190 feet (58 m) long and 12 feet (3.7 m) wide, the Caen Canal bridge opens to allow canal traffic to pass underneath. The controls were housed in a nearby cabin.[29] The canal itself is 27 feet (8.2 m) deep by 150 feet (46 m) wide, with earth and stone banks 6 feet (1.8 m) high. Small tarmac tracks run on both banks along the canal's entire length.[30] Between the two bridges there is a strip of mostly marshy ground some 550 yards (500 m) wide, broken up by ditches and small streams.[31][32]
The Ranville bridge over the River Orne is 350 feet (110 m) long and 20 foot (6.1 m) wide and can be opened to allow river traffic to pass. The river is between 160 and 240 feet (49 and 73 m) wide and with an average depth of 9 feet (2.7 m). It has mud banks averaging about 3.6 feet (1.1 m) high and a tidal rise and fall of between 16 and 6.5 feet (4.9 and 2.0 m). A number of small houses lie to the west of the river interconnected by a track between 8 and 10 feet (2.4 and 3.0 m) wide runs along both banks.[32]
German forces
The bridge was guarded by 50 men belonging to the German 736th Grenadier Regiment, 716th Infantry Division.[1] The unit was commanded by Major Hans Schmidt and based at Ranville, 1.2 miles (1.9 km) east of the River Orne.[31] The 716th was a static formation and had been assigned to Normandy since June 1942.[33] The division's eight infantry battalions were deployed to defend 21 miles (34 km) of the Atlantic wall.[34][35] The unit was poorly equipped with a mixture of foreign weapons and manned by conscripts from Poland, Russia and France under a German officer and senior non-commissioned officers (NCOs). Schmidt's soldiers had orders to blow up the two bridges if they were in danger of capture.[1]


German soldiers with an MG 34 machine-gun.
A second division, the 21st Panzer, moved into the area in May 1944. One of its regiments, the 125th Panzergrenadier, commanded by Colonel Hans von Luck, was billeted at Vimont just east of Caen.[36] There was also a battalion of the 192nd Panzergrenadier Regiment based at Cairon to the west of the bridges.[37] Colonel von Luck trained his regiment in anti-invasion operations. He also identified likely incursion points and marked out forward routes, rest and refuelling areas and anti-aircraft gun positions.[38] The 21st Panzer Division was a new formation based on the former Afrika Korps unit, which had been destroyed in North Africa.[36] Although equipped with an assortment of older tanks and other armoured vehicles, the division's officers were veterans and 2,000 men from the old division filled its ranks.[9] Further afield were the 12th SS Panzer Division at Lisieux and the Panzer Lehr Division at Chartres, both less than a day's march from the area.[34]
Defences were in place at both bridges. On the west bank of the Caen Canal bridge there were three machine-gun emplacements and on the east bank a machine-gun and an anti-tank gun. To their north were another three machine-guns and a concrete pillbox. An anti-aircraft tower equipped with machine-guns stood to the south.[39] At the River Orne bridge, the eastern bank south of the bridge had a pillbox with anti-tank and anti-aircraft guns. To the north of the bridge were two machine-guns. Both bridges had sandbagged trench systems along the banks.[40]
Deadstick

The three Caen Canal gliders, the bridge is hidden by the trees in the distance.
At 22:56 on 5 June, 1944, the six gliders towed by Halifax bombers took off from RAF Tarrant Rushton.[41] Horsa number one, the first of the three headed for the Caen Canal, carried Major Howard with Lieutenant Brotheridge's platoon, number two bore Lieutenant Wood's platoon, and number three carried Lieutenant Smith's platoon. Captain Priday with Lieutenant Hooper's platoon made for the river bridge aboard number four. Horsa number five carrying Lieutenant Fox's platoon and was followed by number six bearing Lieutenant Sweeney's platoon. Each glider also carried five men from the Royal Engineers platoon.[42] Flying over the English Channel at 7,000 feet (2,100 m), the bombers crossed the Normandy coast at 00:07 on 6 June, 1944 and released their towed gliders.[41] With Staff Sergeant Wallwork at the controls, the number one glider crashed into the barbed wire surrounding the canal bridge defences at 00:16.[43] The other two gliders followed at one minute intervals. The number two glider broke in half and came to halt at the edge of a large pond.[41] One of the men fell into the water and drowned, becoming the first casualty of the operation.[44] Lieutenants Brotheridge and Smith's platoons headed for the bridge, while Lieutenant Wood's platoon moved towards the trenches on its north east side.[45]
Bridges captured


Glider troops and a French civilian, the man on the left, Private Musty, is armed with a German MP 40.
The Germans knew the invasion was imminent if not the exact location; Major Schmidt, in command of the bridges, had been told that they were one of the most critical points in Normandy.[36] The defenders however were not on full alert and only two sentries were on duty when the gliders landed.[36] The sound of a gunshot alerted the two sentries on the bridge. As Brotheridge's platoon attacked, one ran off shouting "paratroops" while the second fired a flare gun to alert nearby defenders. Brotheridge shot him while other members of his platoon cleared the trenches and pillbox with grenades. Alerted by the flare, the German machine gunners opened fire at the men on the bridge, wounding Brotheridge as he threw a grenade. The grenade silenced one of the machine gun positions and another was taken out by Bren gun fire. Number One Platoon crossed the bridge to take up a defensive position on the west bank. The Royal Engineers from number one glider searched for explosive charges and cut the fuse wires when they found any.[46] Lieutenant Smith's platoon crossed the bridge next, exchanging fire with the German defenders, whereupon Smith was wounded by a grenade.[47] Using grenades and sub-machine gun fire, the platoons cleared the trenches and bunkers. By 00:21 German resistance on the west bank of the canal bridge was over.[48] Checking the area, the men of Brotheridge's platoon now realised that their leader was wounded. He failed to recover and soon died of his wounds, becoming the first Allied soldier killed by enemy action during the invasion.[49] On the east bank Lieutenant Wood's platoon cleared the trenches and bunkers with little opposition. Woods was hit in the leg by machine-gun fire as he ordered the platoon to storm the German defences. All three platoon commanders at the canal bridge were now either dead or wounded.[50]
At 00:19 pathfinders from the 22nd Independent Parachute Company landed in the area between the River Orne and the River Dives.[nb 3] Brigadier Nigel Poett commanding 5th Parachute Brigade and a small team accompanied them. Disoriented after landing, Poett heard Brotheridge's Sten gun and set off for the bridges with the only man he could locate .[53] Only one of the Germans at the bridge, Unteroffizier Weber escaped 'D' Company's attack, he reached Bénouville and reported the bridge had been captured.[54]
Lieutenant Fox's glider number five was the first to land 330 yards (300 m) from the river bridge at 00:20 while glider number four was reported missing. When the Germans opened fire with an MG 34, the platoon responded with a 2-inch (51 mm) mortar and destroyed the gun with a direct hit. They then crossed the bridge without further opposition.[55] At 00:21 number six glider landed 770 yards (700 m) short of the bridge. Lieutenant Sweeney left one of his sections on the west bank then moved the rest of the platoon across the bridge to take up defensive positions on the east bank.[56]
From his newly established command post in the trenches on the eastern bank of the canal near the bridge, Major Howard learned that the river bridge had also been taken. Captain Neilson of the engineers reported that although the bridges had been prepared for demolition, the explosives had not been attached.[nb 4] Howard ordered his signalman to transmit the code words 'Ham' and 'Jam'[7] then brought Fox's platoon across the canal bridge, positioning them at the Bénouville to Le Port crossroads as the company's forward platoon.[58]
7th Parachute Battalion
At 00:50 aircraft carrying the rest of the 6th Airborne Division appeared overhead and the paratroopers descended into drop zones marked out by the pathfinders.[59] Howard began blowing the morse code letter 'V' on his whistle, to help guide the 7th Parachute Battalion to the bridges. The first paratroops to arrive at 00:52 were Brigadier Poett and the soldier he had picked up en route. Briefed by Howard on the situation, they heard tanks and lorries moving around in Bénouville and Le Port.[60] On the drop zone, only about 100 men of the 7th Parachute Battalion had made it to the rallying point but all their signal equipment, machine guns and mortars were missing.[61] Lieutenant-Colonel Pine-Coffin, aware that his battalion was the only unit allocated defensive positions west of the bridges, decided they could not wait any longer and at 01:10 left for the bridges.[62]


Panzer IV similar to the one destroyed at the Caen Canal Bridge.
At about the same time Major Schmidt, the German commander of the bridge guard force, decided he needed to see for himself what was happening. He headed for the bridge in his SdKfz 250 with a motorcycle escort. Travelling at high speed they unknowingly passed the forward line of 'D' Company's defence and drove onto the bridge whereupon the company opened fire. The soldier aboard the motorcycle was killed and the SdKfz 250 was forced off the road. Schmidt and his driver were taken prisoner.[63]
The commander of the 716th Infantry Division Generalleutnant Wilhelm Richter was informed at 01:20 of the parachute landings and that the bridges had been captured intact. One of his first actions was to contact Generalmajor Edgar Feuchtinger of 21st Panzer Division. Richter ordered the division to attack the landing areas.[64] While Feuchtinger's tanks were delegated to support the 716th, it was also part of the German armoured reserve, which could not move without orders from the German High Command.[64] All German panzer formations could only be moved on the direct orders of Adolf Hitler, who was sleeping at the time and his staff refused to wake him. When Colonel Von Luck of the 125th Panzergrenadier Regiment received the news of the airborne landings at 01:30 he ordered the regiment to their assembly areas north and east of Caen and waited for further orders.[65]
The closest large German unit to the canal bridge were the 2nd Battalion, 192nd Panzergrenadier Regiment based at Cairon. General Feuchtinger ordered them to recapture the bridges and then attack the parachute landing zones further west. At 02:00 the 2nd Battalion headed for the bridges from the west, supported by the 1st Panzerjager Company and part of the 989th Heavy Artillery Battalion coming from the north.[37] As the first Panzer IVs from the north reached the junction leading to the bridge, the leading vehicle was hit by a round from 'D' Company's only serviceable PIAT anti-tank weapon. The vehicle exploded, setting off its stowed ammunition, and the other tanks withdrew.[66][nb 5]
The first company of the 7th Parachute Battalion, commanded by Major Nigel Taylor, arrived at the bridges.[4] Howard directed them to defensive positions west of the canal in Bénouville and Le Port.[69] When Lieutenant-Colonel Pine-Coffin arrived at the bridges, he was briefed by Howard, and crossed into Bénouville and set up his headquarters beside the church.[70] Pine-Coffin had about 200 men in his three companies. He positioned 'A' and 'C' Companies in Bénouville facing south towards Caen and 'B' Company in Le Port facing Ouistreham.[71] 'D' Company was now pulled back into the area between the two bridges and held in reserve. A further check of the trenches and bunkers captured a number of Germans.[72]
At 03:00 the 8th Heavy Company, 192nd Panzergrenadier Regiment with 75 mm SP guns, 20 mm AA guns and mortars attacked 'A' and 'C' Companies, 7th Parachute Battalion, from the south.[37] The paratroops were forced back and the Germans established their own positions in Bénouville, but were unable to break the British line. They dug in and waited for tank support before moving forward again.[37] The Germans fired mortar rounds and machine guns at the paratroopers and attempted small assaults on their positions throughout the night.[37]
Just before dawn Howard summoned his platoon commanders to a meeting. With their senior officers dead or wounded, numbers One, Two and Three Platoons were now commanded by corporals. Howard's second in command, Captain Priday and number Four Platoon were missing. Only Lieutenants Fox and Sweeney in Five and Six Platoons had a full complement of officers and NCOs.[73] The landings at Sword Beach began at 07:00, preceded by a heavy naval bombardment. At the bridges, daylight allowed German snipers to identify targets and anyone moving in the open was in danger of being shot.[74] The men of number One Platoon who had taken over the 75 mm anti-tank gun on the east bank of the canal used it to engage possible sniper positions in Bénouville, the Château de Bénouville and the surrounding area.[75] At 09:00, two German gunboats approached the canal bridge from Ouistreham. The lead boat fired its 20 mm gun and number Two Platoon returned fire with a PIAT, hitting the wheelhouse of the leading boat, which crashed into the canal bank. The second boat retreated to Ouistreham.[76] A lone German aircraft bombed the canal bridge at 10:00, dropping one bomb. The bomb struck the bridge but failed to detonate.[77]
1st Commando Brigade
The German 2nd Battalion, 192nd Panzergrenadier Regiment continued to attack Bénouville and Le Port, assisted by their tanks, mortars and infantry. The attack caused serious problems for the understrength 7th Parachute Battalion until the leading tank was blown up with a Gammon bomb, blocking the road.[78] During the attack 13 of the 17 tanks trying to get through to the bridge were destroyed.[79] The paratroopers were then reinforced by number One Platoon from 'D' Company. The platoon moved forward into Bénouville and cleared the Germans in house to house fighting. Numbers Five and Six Platoons also moved into positions opposite the Gondree Cafe on the west bank of the canal. By midday most of the missing men from the 7th Parachute Battalion had arrived at the bridges and the three platoons were moved back to their original positions.[80]

Captain Priday (centre) and men from the missing glider.
Just after midday, the 21st Panzer Division received permission to attack the landings. Colonel Von Luck east of the River Orne moved the 125th Panzergrenadier Regiment towards the bridges. The column was quickly spotted and engaged for the next two hours by Allied artillery and aircraft causing heavy losses.[81] The 1st Battalion, 192nd Panzergrenadier Regiment and the 100th Panzer Regiment, attacking from west of the canal, had more success reaching the beaches between the British Sword Beach and the Canadian Juno Beach.[82]
At 13:30 the men at the bridges heard the sound of bagpipes, played by Bill Millin of the 1st Commando Brigade. As the commandos arrived they crossed the bridges and joined the rest of 6th Airborne Division defending the eastern side of the bridges. Some of the tanks accompanying the commandos moved into Bénouville to reinforce its defences while others crossed the bridges with the commandos.[83] At 15:00 a boat loaded with German infantry approached from Caen. It was engaged with the anti-tank gun manned by number One Platoon. It was hit in the stern by the second round fired and retreated back toward Caen.[84]
At 21:15 the 2nd Battalion, Royal Warwickshire Regiment of the 185th Infantry Brigade arrived from Sword Beach and began taking over the bridges' defences.[85] At around midnight Howard handed over command of the bridges to the Warwickshire Regiment and his company left to join the rest of their battalion at Ranville.[86] At 03:30 they finally located the battalion's positions. They found Captain Priday and number Four Platoon had already joined the battalion. The platoon had landed beside the River Dives at Varaville about 8 miles (13 km) away,[58] and had spent the previous day fighting their way towards the bridges, trying to rejoin the company.[87]
Aftermath
Bénouville was the farthest forward point of the British advance on 6 June 1944.[88] Of the 181 men (139 infantry, 30 engineers and 12 pilots) of 'D' Company involved in the capture of the bridges, two had been killed and fourteen wounded.[15] On 9 June, the German Air Force attacked the bridges with 13 aircraft. The British had positioned light and medium sized anti-aircraft guns around the bridges and in the face of intense anti-aircraft fire the attack failed, although they did claim one of the bridges was destroyed by a direct hit.[89]
The 6th Airborne retained control of the area between the Rivers Orne and Dives until 14 June, when the 51st (Highland) Infantry Division took over the southern part of the Orne bridgehead. In the days that followed the division was reinforced by the Dutch Princess Irene Brigade and the 1st Belgian Infantry Brigade. A period of static warfare ended on 22 August when the division crossed the River Dives. Within nine days it had advanced 45 miles (72 km) to the mouth of the River Seine. Between the 6 June and 26 August when they were pulled out of the front line the division's casualties were; 821 killed, 2,709 wounded, and 927 missing.[52] After Operation Deadstick the engineers, glider pilots and 'B' Company men were returned to their parent formations. 'D' Company played their part in the division's defence of the Orne bridgehead and advance to the River Seine. On 5 September when the division was withdrawn to England, all that remained of the company were 40 men under the only remaining officer, Major John Howard, the other officers, sergeants and most of the junior NCOs having been among the casualties.[90]
The glider pilots were the first group to leave 'D' Company, their expertise being required for other planned operations. In particular Operation Comet, which included another coup-de-main operation where eighteen gliders would be used to capture three bridges in the Netherlands. The mission would be carried out by the 1st Airborne Division with a brigade allocated to defend each bridge. Comet was scheduled for the 8 September 1944, but was delayed and then cancelled. The plans were adapted and became Operation Market Garden, involving three airborne divisions, however the coup-de-main assault plans were not carried out.[91]
Prior to being withdrawn on 16 July, Major Howard was awarded the Distinguished Service Order, presented in the field by General Bernard Montgomery.[92] Other awards were the Military Cross to Lieutenant's Smith and Sweeney,[93][94] the Military Medal to Sergeant Thornton[95] and Lance-Corporal Stacey,[96] Lieutenant Brotheridge was posthumously mentioned in dispatches.[97] Air Chief Marshal Trafford Leigh-Mallory of the Royal Air Force praised the pilots involved, saying the operation included the "most outstanding flying achievements of the war".[98] The feat was recognised by the award of the Distinguished Flying Medal to eight of the glider pilots involved.[99]
Legacy

The original Pegasus Bridge at the Memorial Pegasus in Benouville.
The Caen Canal bridge was renamed Pegasus Bridge after the emblem of the British airborne forces,[100] while the River Orne bridge became Horsa Bridge. The road across them is now the "Esplanade Major John Howard".[101] Since the end of the war, Pegasus Bridge and the adjacent Café Gondree have become a place where British veterans of the conflict visiting Normandy congregate.[102] In 1994 when Pegasus Bridge was replaced by a new structure, the original bridge was added to the displays at the Pegasus Museum in Benouville.[103]
The original model of the area around the bridge, that was used to brief troops taking part in the assault, is preserved in Airborne Assault: The Museum of The Parachute Regiment and Airborne Forces, located at the Imperial War Museum Duxford.[104]
A number of books have been written about or have mentioned the assault. In 1962, Operation Deadstick featured in Darryl Zanuck's film The Longest Day which was based on the book of the same title by Cornelius Ryan. Major John Howard was played by Richard Todd who had been an officer in the 7th Parachute Battalion during the battle.[105]
In 2003, the attack on the Bénouville (Pegasus) Bridge was recreated in the highly successful and lauded video game, Call of Duty, in which the player joins the assault of the 6th Airborne Division in both capturing and holding the bridge.
Notes
- Footnotes
- ↑ 21st Panzer Divisions losses in the battle are not known, but when the division crossed the River Seine at the end of August 1944, it had no armour and only 300 men in its ranks.[2]
- ↑ All Glider Pilot Regiment pilots were at least of the rank of sergeant and trained soldiers.
- ↑ Ambrose writes it was 00:19, but in Ford and Zaloga the pathfinders landed at 00:15 before 'D' Company, while the Ministry of Defence documents that the bridges had been seized when the pathfinders were dropped at 00:20.[51][52]
- ↑ The bridges had been prepared for demolition with the explosive charges stored nearby, and were only to be fitted when ordered by the High Command.[57]
- ↑ Ambrose writes the vehicle was a Panzer IV, in Fowler some troops thought it was a French Char B1. Hall writes it was a Panzer IV belonging to the 716th Infantry Division and Simon Fraser, 15th Lord Lovat the commander of the 1st Commando Brigade said it was a half-track.[67][68]
- Citations
- ↑ 1.0 1.1 1.2 1.3 Fowler, p.10
- ↑ 2.0 2.1 Mitcham, p.58
- ↑ "WO 171/1239". National Archives. http://www.nationalarchives.gov.uk/catalogue/displaycataloguedetails.asp?CATLN=6&CATID=5455868http://www.pegasusarchive.org/normandy/war_7thBatt.htm. Retrieved 3 April 2010. fee required
- ↑ 4.0 4.1 Fowler, p.62
- ↑ Ambrose, p.41
- ↑ Tugwell, pp.203–204
- ↑ 7.0 7.1 Arthur, Max (11 May 1999). "Obituary, Major John Howard". The Independent. http://www.independent.co.uk/arts-entertainment/obituary-major-john-howard-1092864.html. Retrieved 1 April 2010.
- ↑ Ferguson, p.16
- ↑ 9.0 9.1 9.2 Fowler, p.12
- ↑ Ambrose, p.27
- ↑ Ambrose, pp.35–37
- ↑ Ambrose, pp.43–44
- ↑ Ambrose, pp.53–55
- ↑ Tugwell, p.211
- ↑ 15.0 15.1 "Obituary, Colonel David Wood". Daily Mail. 16 March 2009. http://www.dailymail.co.uk/news/article-1162452/Last-surviving-officer-daring-World-War-II-Pegasus-Bridge-operation-dies-aged-85.html. Retrieved 1 April 2011.
- ↑ Tugwell, p.39
- ↑ Fowler, p.9
- ↑ Peters, p.9
- ↑ Ambrose, pp.57–59
- ↑ Ambrose, p.61
- ↑ Ambrose, p.11
- ↑ Ambrose, pp.62–63
- ↑ Fowler, p.17. 22
- ↑ Ambrose, p.85
- ↑ Fowler, p.22
- ↑ Fowler, p.27
- ↑ Ambrose, p.88
- ↑ Ambrose, p.89
- ↑ Ambrose, p.70
- ↑ Ambrose, pp.69–70
- ↑ 31.0 31.1 Ambrose, p.3
- ↑ 32.0 32.1 Ambrose, p.71
- ↑ Ford and Zaloga, p.202
- ↑ 34.0 34.1 Ford and Zaloga, p.204
- ↑ Ford and Zaloga, p.197
- ↑ 36.0 36.1 36.2 36.3 Fowler, p.11
- ↑ 37.0 37.1 37.2 37.3 37.4 Ford, p.47
- ↑ Ambrose, p.76
- ↑ Ambrose, pp.70–71
- ↑ Ambrose, p.72–73
- ↑ 41.0 41.1 41.2 Ford, p. 32.
- ↑ Fowler, pp. 28–9.
- ↑ Ford and Zaloga, p.214
- ↑ Ambrose, p. 98.
- ↑ Ambrose, pp.96–98
- ↑ Ambrose, p. 100.
- ↑ Fowler, p.40
- ↑ Ambrose, p.108
- ↑ Fowler, p.59
- ↑ Fowler, p.41
- ↑ Ford and Zaloga, p.19
- ↑ 52.0 52.1 "The British Airborne Assault". Ministry of Defence (United Kingdom). 22 November 2005. http://webarchive.nationalarchives.gov.uk/+/http://www.mod.uk/aboutus/dday60/airborne.htm. Retrieved 2 April 2011.
- ↑ Ambrose, p.104
- ↑ Tugwell, p.216
- ↑ Fowler, p.43
- ↑ Ambrose, p.107
- ↑ Ford and Zaloga, p.219
- ↑ 58.0 58.1 Fowler, p.44
- ↑ Fowler, p.42
- ↑ Ambrose, pp.119–120
- ↑ Fowler, p.49
- ↑ Ambrose, p.122
- ↑ Fowler, p.48
- ↑ 64.0 64.1 Ford, p.46
- ↑ Ambrose, p.137
- ↑ Ambrose, pp.130–131
- ↑ Hall, p.120
- ↑ Fowler, p.45
- ↑ Ambrose, p.132
- ↑ Ford, p.40
- ↑ Ford and Zaloga, p.223
- ↑ Fowler, p.50
- ↑ Ambrose, pp.139–140
- ↑ Fowler, p.51
- ↑ Fowler, P.54
- ↑ Ambrose, pp.153–154
- ↑ Fowler, p.55
- ↑ Ambrose, p.162
- ↑ Ambrose, p.168
- ↑ Ambrose, pp.155–159
- ↑ Ambrose, p.163
- ↑ Ford and Zaloga, p.254
- ↑ Fowler, p.56
- ↑ Fowler, p.53
- ↑ Gale, p.85
- ↑ Ambrose, p.169
- ↑ Fowler, p.58
- ↑ Ambrose, p.171
- ↑ Fowler, pp. 54–5.
- ↑ Ford and Zaloga, p. 221.
- ↑ Tugwell, p. 231.
- ↑ "No. 36679". 29 August 1944. https://www.thegazette.co.uk/London/issue/36679/page/
- ↑ "No. 36679". 29 August 1944. https://www.thegazette.co.uk/London/issue/36679/page/
- ↑ "No. 36679". 29 August 1944. https://www.thegazette.co.uk/London/issue/36679/page/
- ↑ "No. 37072". 10 May 1945. https://www.thegazette.co.uk/London/issue/37072/page/
- ↑ "No. 36679". 31 August 1944. https://www.thegazette.co.uk/London/issue/36679/page/
- ↑ "No. 36720". 26 September 1944. https://www.thegazette.co.uk/London/issue/36720/page/
- ↑ "Heroes of Pegasus Bridge". The Independent. 31 May 2009. http://www.independent.co.uk/news/uk/this-britain/heroes-of-pegasus-bridge-who-also-liberated-a-bar-1693512.html. Retrieved 1 April 2011.
- ↑ "No. 36753". 19 October 1944. https://www.thegazette.co.uk/London/issue/36753/page/
- ↑ Guard, p.227
- ↑ "Pegasus Bridge mission hero dies at 85". Western Morning News. 17 March 17, 2009. http://www.thisiswesternmorningnews.co.uk/news/Hero-daring-Pegasus-Bridge-mission-dies-85/article-774492-detail/article.html. Retrieved 1 April 2011.
- ↑ Mendrick, Robert (5 June 2009). "D-Day veterans recall heroic deeds on 65th anniversary". London Evening Standard. http://www.thisislondon.co.uk/standard/article-23704075-d-day-veterans-recall-heroic-deeds-on-65th-anniversary.do. Retrieved 10 April 2011.
- ↑ D-Day Commemoration Committee. "Memorial Pegasus". D-Day Commemoration Committee. http://www.memorial-pegasus.org/mmp/musee_debarquement/index.php?lang=uk. Retrieved 1 April 2011.
- ↑ "Airborne Assault, The Museum of The Parachute Regiment and Airborne Forces". http://www.paradata.org.uk/content/airborne-assault-museum-parachute-regiment-and-airborne-forces-0.
- ↑ Goldstein, Richard (9 May 1999). "John Howard Is Dead at 86; British Hero of D-Day Invasion". New York Times. http://query.nytimes.com/gst/fullpage.html?res=990DEEDA1F3CF93AA35756C0A96F958260. Retrieved 1 April 2011.
References
- Ambrose, Stephen E (2003). Pegasus Bridge. London, United Kingdom: Pocket Books. ISBN 978-0-7434-5068-3.
- Ferguson, Gregory (1984). The Paras 1940-84, Volume 1 of Elite series. Oxford, United Kingdom: Osprey Publishing. ISBN 0-85045-573-1.
- Ford, Ken (2002). D-Day 1944: Sword Beach & British Airborne Landings. Campaign series. 3. Oxford, United Kingdom: Osprey Publishing. ISBN 1-84176-366-7.
- Ford, Ken; Zaloga, Steven J (2009). Overlord the D-Day Landings. Oxford United Kingdom: Osprey Publishing. ISBN 978-1-84603-424-4.
- Fowler, Will (2010). Pegasus Bridge — Benouville, D-Day 1944. Raid Series. Oxford, United Kingdom: Osprey Publishing. ISBN 1-84603-848-0.
- Gale, General Sir Richard Nelson (1948). With the 6th Airborne Division in Normandy. Great Missenden, Buckinghamshire: Sampson Low, Marston & Co Ltd.
- Guard, Julie (2007). Airborne: World War II Paratroopers in Combat. Oxford, United Kingdom: Osprey Publishing. ISBN 1-84603-196-6.
- Hall, Anthony (2003). Operation Overlord D-Day Day by Day. Hoo, Kent: Grange Books. ISBN 1-84013-592-1.
- Mitcham, Samuel W (2007). German Order of Battle: Panzer, Panzer Grenadier, and Waffen Ss Divisions in World War II. Volume 3 of Stackpole military history series. Mechanicsburg, Pennsylvania: Stackpole Books. ISBN 0-8117-3438-2.
- Peters, Mike; Buist, Luuk (2009). Glider Pilots at Arnhem. Pen & Sword Books. ISBN Barnsley, England1844157636.
- Tugwell, Maurice (1971). Airborne to battle: a History of Airborne Warfare, 1918-1971. London, United Kingdom: Kimber. ISBN 0-7183-0262-1.
External links
| Wikimedia Commons has media related to Operation Deadstick. |
- List of 'D' Company men involved in the operation
- History of the 2nd Battalion Oxfordshire and Buckinghamshire Light Infantry
Coordinates: 49°14′32″N 0°16′28″W / 49.24222°N 0.27444°W
The original article can be found at Operation Deadstick and the edit history here.