

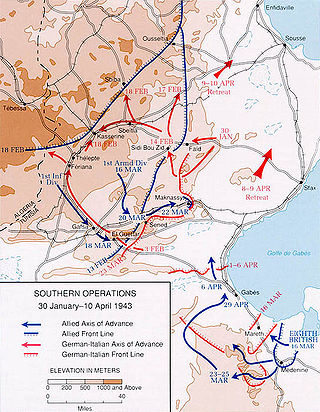
Sketchmap of Tunisia during the 1942 - 1943 campaign
Operation Pugilist was an Allied operation in Tunisia during the Second World War. In his General Plan, General Bernard Montgomery stated "...the object of operation Pugilist is to destroy the enemy now opposing Eighth Army in the Mareth position, and to advance and capture Sfax."[2] Pugilist itself was indecisive and failed to make a decisive breakthrough. It did, however, establish an alternative route of attack and thus laid the ground for Supercharge II, an outflanking manoevre via the Tebaga Gap.
Background[]
After a failed attempt, at Medenine, to interfere with Allied preparations (Operation Capri), Axis forces had withdrawn to prepared defences at the Mareth Line. At the same time, Erwin Rommel returned permanently to Europe, command being assumed by Italian General Giovanni Messe, the first time that German units came under Italian command, albeit with a German "liaison" officer, Major-General Fritz Bayerlein. The command structure, however, was not unified. Italian orders were ignored and German units effectively set their own objectives, leaving Italian units to conform.[3]
There were also disagreements within the German command. Rommel doubted the efficacy of the Mareth Line and had long advocated a position at Gabès, between the sea and extensive, impassable salt marshes known as the Chotts. He had also argued that actions at Mareth and Gabès could only delay and Axis forces should concentrate much further north.[4] Hitler disagreed until Rommel had returned to Germany and only accepted the arguments on March 10. Further disagreements from Albert Kesselring and the Italian high command impeded and finally reversed the decision and reinstated the Mareth position.
Geography[]
The rough southern Tunisia broken terrain of the local geography greatly influenced the course of both operations Pugilist and Supercharge II as terrain suitable for military movement was limited by difficult rocky ridge lines and desert. Opposite the bight where the north-south coast opens out again towards the east the semi-arid scrub covered coastal plain[5] is delimited inland by the Matmata Hills (or Monts des Ksour) which lie south to north. Across this plain in a line roughly SW to NE was a line of forts[5] and fortifications built by the French in the 1930s—known as the Mareth Line[5]—and along which Rommel keyed his defense. In the north, both the hills and line of forts terminate at the Tebaga Gap, a low pass which separates the Matmata hills from the Djebel Tebaga hills, another line of high ground to the west of the gap running east-west: north and west of this are the Chotts. West of the Matmata Hills, the terrain is dry country, the Dahar, and then impassable sand of the Grand Erg Oriental. The town of Gabès lies on the coast where the coastal plain meets the route from the Tebaga Gap. North of Gabès, the road to Sfax passes between the sea and the Chotts and this was Montgomery's only route north, a way blocked by the Mareth Line.
The Axis defences of the Mareth Line took advantage of the terrain. Wadi Zigzaou is a natural anti-tank obstacle with steep banks rising up to 70 feet: the north-western side had been fortified by the French and subsequently reinforced. It crosses the coastal plain from Zarat to Toujane; in the Matmata Hills, the terrain alone was sufficient defence. In 1938, the French had determined that the Dahar was impassable to motorised transport and so had not extended the Mareth Line. By 1943, however, military transportation had improved. The British also had practical experience in desert mobility and so considered that the Dahar might offer an opportunity for outflanking the Mareth Line - the so-called "left hook". The Germans sought to defend it but Rommel had long advocated, albeit unsuccessfully, the Gabès gap as a better defensive alternative.
The battle[]
First assault on the Mareth Line[]

On 19 March 1943 XXX Corps of the British Eighth Army under General Bernard Montgomery assaulted the Mareth Line. The 50th (Northumbrian) Infantry Division, with difficulty, penetrated the Italian held line near Zarat. The terrain and heavy rain, however, prevented deployment of tanks and anti-tank guns and the 15th Panzer Division's counter-attack on 22 March recaptured much of the bridgehead.
Soon after, XXX Corps prepared a new attack towards Tallouf. The 4th Indian Infantry Division was detailed to make a night attack on 23 March around the left-hand end of the Line. This would coincide with the wide "left hook" manoeuver Montgomery was planning.
Preparations for the "left hook"[]
In early January 1943, a Long Range Desert Group patrol, commanded by Captain N. P. Wilder, had found a usable pass into the Dahar - dubbed "Wilder's Gap". A later patrol, commanded by Lt R. A. Tinker, had penetrated to the Tebaga Gap, proved the route was practicable and demonstrated the weakness of the Axis defences. Tinker's incursion went further north to Gafsa and made contact with the British First Army, advancing from the west, on 2 February.
Montgomery strengthened the New Zealand 2nd Division, commanded by Bernard Freyberg, into the New Zealand Corps and issued orders for it to move south through the Matmata Hills, via "Wilder's Gap", into the Dahar. Efforts were to be made to disguise this movement from enemy reconnaissance. Staff from Lieutenant-General Brian Horrocks' X Corps were seconded to provide adequate HQ personnel for the new New Zealand Corps and this caused some inter-personal difficulties between the generals. The New Zealand Corps' advance was planned in three stages, from 19 March. First, a 20 mile overnight march to Wadi bel Krecheb; second, another overnight march of 40 miles to just short of the Tebaga Gap. The third stage was the capture of the entrance to the Gap at first light on 21 March, or as soon as possible. Thereafter, the corps would advance to El Hamma, overlooking the coast road north of Gabès. The flank of the advance was to be protected by Leclerc's Free French and the King's Dragoon Guards. An exploiting thrust by X Corps from El Hamma to Gedes would cut off the Italian 1st Army defending the Mareth positions and provide the New Zealand Corps with the opportunity to advance to Sfax, some 80 miles up the coast from Gedes, and the landing grounds on the west side of the town.
During planning, emphasis was laid on the need for surprise and the ability to "blitz" enemy positions. The Corps was relatively light with infantry, and great emphasis was laid on artillery to break enemy concentrations and morale. Extensive efforts were made to co-ordinate air support by fighter and bomber aircraft. A simultaneous frontal attack by XXX Corps on the Mareth Line would divide enemy attention and thereby make effective counter-attack difficult. In addition, British First Army's U.S. II Corps, advancing from the west through El Guettar would threaten enemy communications and pin potential Axis reinforcements from the Sfax area.
Execution[]
As planned, The New Zealand Corps engaged the enemy in the Tebaga Gap on 21 March but progress over the next four days against the determined defence of German 164th Light and 21st Panzer Divisions was very slow, although the entrance to the gap was secured. On the Mareth line XXX Corps too had made some progress but there had been no breakthrough there either. On 23 March, Montgomery issued orders for X Corps' 1st Armoured Division to reinforce the New Zealand Corps from reserve (where it had been held to exploit the anticipated breakthrough either by XXX or NZ Corps during Pugilist) and for General Horrock's X Corps HQ to take overall control of the Allied forces operations in the Tebaga Gap.
Supercharge II[]
Operation Supercharge II was planned to start on the afternoon of 26 March. The New Zealand Corps was to attack into the Tebaga Gap on a two brigade front and create a break in the enemy's defences which would be exploited by X Corps' 1st Armoured Division. After half an hour's bombing, the Allied artillery bombardment commenced at 4.00pm and the attack went in. It appeared that the two German divisions in the line (164th Light and 21st Panzer) had not expected a daylight assault and were taken by surprise. By dark a gap in the defences had been made and delaying until there was light from the moon which rose at 11.00pm, 1st Armoured Division poured through and then rapidly moved on El Hamma, 20 miles to the northeast and halfway to Gabès on the coast. Meanwhile, German 15th Panzer Division was brought out of reserve to counterattack the New Zealand Corps on their right flank on the morning of 27 March. By 9.00am the attack had been repelled and the New Zealand Corps took the initiative, thrusting up into the hills on their right. By the evening of 27 March, German resistance had been broken and the line of communication forward to the advancing 1st Armoured secured.
Meanwhile, 1st Armoured had been halted by the defences the Germans had improvised at El Hamma whilst the tanks had waited for the moonlight. Freyberg convinced Horrocks that the New Zealand Corps, then heading down the road to El Hamma to link with first Armoured, should branch off to the right and, avoiding the defensive concentration at El Hamma, head across the broken ground directly towards Gabès.
By 28 March, all the Axis forces on the Mareth Line had withdrawn to face the advancing X and New Zealand Corps on their right flank but the pinning of 1st Armoured at El Hamma had allowed them to avoid encirclement. On 29 March, NZ Corps took Gedes and continuing pressure on the Axis defences forced a further withdrawal to a new defensive line some 15 miles to the rear of Gabès at Wadi Akarit whilst 164th Light, 15th Panzer and 21st Panzer Divisions fought protective rearguard actions. El Hamma was evacuated on 29 March, leaving the way open for 1st Armoured to advance northward with the New Zealand Corps on their right.
Aftermath[]
On 31 March, Operation Supercharge II was terminated and the New Zealand Corps was broken up and its elements allocated between X and XXX Corps. On 30 March, Montgomery sent the following message to Freyberg:
My very best congratulations to NZ Corps and 10 Corps on splendid results achieved by the left hook. These results have led to the complete disintegration of the enemy resistance and the whole Mareth position. Give my congratulations to all your officers and men, and tell them how pleased I am with all they have done.[6]
Despite this, not all of the original Pugilist objectives had been met: the enemy forces had managed to escape the noose and establish a new defensive line at the Wadi Akarit, which would have to be overcome before Sfax could be taken.
Order of battle[]
British Eighth Army (General Sir Bernard Montgomery)[]
XXX Corps (Lieut.-General Sir Oliver Leese)
- British 50th (Northumbrian) Infantry Division
- British 51st (Highland) Infantry Division
- 4th Indian Infantry Division
- British 201st Guards Brigade
- British 23rd Armoured Brigade
New Zealand Corps (Lieut.-General Bernard Freyberg)
- New Zealand 2nd Division
- British 8th Armoured Brigade
- 1st Battalion King's Dragoon Guards
- 64th Medium Regiment, Royal Artillery
- 57th Anti-Tank Regiment, Royal Artillery
- One Battery 53rd Light Anti-Aircraft Regiment, Royal Artillery
- Leclerc's Force
X Corps (Lieut.-General Sir Brian Horrocks)
- British 1st Armoured Division
- British 7th Armoured Division (including 4 Light Armoured Brigade, less King's Dragoon Guards)
- Free French Flying Column
1st Italian Army (General Giovanni Messe)[]
In the line:
Italian XX Corps
In reserve:
Covering Tebaga:
- Saharan Group
Uncommitted:
On the Gafsa front:
The 19th Flak Division, with sixteen 88-millimetre batteries and several 20-millimetre anti-aircraft batteries, was all on the coast, the 1st Luftwaffe Brigade, little stronger than a battalion, was behind Giovani Fascisti, and Africa Panzer Grenadier Regiment watched the main Gabès–Mareth road. These, together with 164 Light Division, comprised the only mobile infantry groups available.
See also[]
Footnotes[]
- ↑ Stevens (1962), p. 248 & 249.
- ↑ Stevens (1962), p. 133
- ↑ Stevens (1962), p. 173
- ↑ Lewin, Ronald (2004). Rommel as Military Commander. Barnsley, South Yorkshire: Pen & Sword. p. 192. ISBN 1-84415-040-2.
- ↑ 5.0 5.1 5.2 "The Battle for North Africa", (1996), rebroadcast The Military Channel 27 June 2009, 2hr documentary
- ↑ Stevens (1962), p. 248.
References[]
- Anderson, Charles R.. Tunisia 17 November 1942 to 13 May 1943. WWII Campaigns. United States Army Center of Military History. CMH Pub 72-12. http://www.history.army.mil/brochures/tunisia/tunisia.htm.
- Anderson, Lt.-General Kenneth (1946). Official despatch by Kenneth Anderson, GOC-in-C First Army covering events in NW Africa, 8 November 1942–13 May 1943."No. 37779". 5 November 1946. https://www.thegazette.co.uk/London/issue/37779/page/
- Stevens, Major-General W.G. (1962). Bardia to Enfidaville. The Official History of New Zealand in the Second World War 1939–1945. Wellington: Historical Publications Branch. http://www.nzetc.org/tm/scholarly/tei-WH2Bard-c7-9.html.
The original article can be found at Operation Pugilist and the edit history here.