

The Third Battle of Morlancourt was fought on 10 June 1918, on the Western Front during World War I. The battle took place during the final stages of the German Spring Offensive, and saw troops from the Australian 2nd Division carry out a dusk assault on the Morlancourt spur, which provided observation of the village of Sailly-Laurette, to the south of Morlancourt. The main attack was carried out by the 7th Brigade, with flanking elements carrying out diversionary demonstrations. The assault proved successful for the Allies, with all objectives being secured, and a large number of prisoners being taken.
Background[]
Situated on the northern bank of the River Somme,[1] Morlancourt is about 26 kilometres (16 mi) north-east of Amiens, in the Somme department of northern France. The battle took place in the final stages of the German Spring Offensive, a large-scale offensive on the Western Front that had rapidly gained ground through the Somme after it had commenced on 21 March.[2] With the vital rail junction at Amiens under threat, the Australian Corps had been rushed south to help shore up the Allied line. Subsequently, two separate battles had been fought around Morlancourt in the preceding months: the first battle in March had seen two brigades from the Australian 3rd Division clash with the German 18th Division when the Australians had advanced to fill a gap that had formed in the Allied line north of the River Somme.[3] In the second battle, the Australian 9th Brigade had used peaceful penetration tactics, consisting of a series of minor raids, to advance their front line 1.61 kilometres (1.00 mi) throughout early May.[4]
That month, Lieutenant General John Monash became commander of the Australian Corps, replacing William Birdwood.[5] Following the German attack on the French around Aisne, the Allies began reorganising their defensive planning to negate the German assault techniques and to improve survivability of troops in forward areas.[6] The German attack around the Aisne had demonstrated the vulnerability of garrisoning outposts too strongly, as heavy trench mortar bombardments had inflicted heavy casualties on the troops in the forward area, which had helped the Germans to break-in to the Allied position. It also demonstrated the need to maintain strong counterattacking forces in depth, with the ability to respond quickly to any assault, and to use manoeuvre to retake any ground lost. Machine gun positions were established 1,500 yards (1,400 m) behind the line, outside of the initial bombardment area, and efforts we made to improve the protection provided to troops by increasing the amount of dug-outs and establishing alternative firing positions for supporting artillery batteries. Troops in forward areas were to be consolidated into platoon strength positions to provide sufficient forces for a counter-attack, and further training was provided to perfect techniques such as gas drills and fire and movement in situations where only limited artillery support was available. Staff training was also increased to improve command and control.[7]
Amidst concerns about a German offensive along the Amiens front, Monash began planning an attack in the Morlancourt sector using troops from Major General Charles Rosenthal's Australian 2nd Division.[5] Rosenthal had taken command of the 2nd Division on 22 May, having previously been involved in the fighting around Morlancourt during the second battle in May as a brigade commander. Upon taking command, he began planning for the completion of the efforts to secure the cross-spur around Sailly-Laurette. This would help improve their observation of the battlefield, and help set the conditions for further advances beyond Morlancourt, although it would expose the Australian flank to German forces around Hamel to the south of the river.[8]
Prelude[]
On the night of 4/5 June, the Germans launched a heavy artillery bombardment that included gas and smoke, and elements of the 27th Reserve Infantry Regiment (assigned to the General Ernst Kabisch's 54th Infantry Division[9]) attacked isolated posts north of the Bray–Corbie Road that were held by the 5th Brigade. The attack was repulsed by the Australians, with the weight of the German bombardment and assault largely falling on unoccupied areas, but indicated the vulnerability of maintaining isolated posts. On the night of 5/6 June, the 7th Brigade (Brigadier General Evan Wisdom) relieved the 5th, adopting positions along the front from which it would subsequently launch the attack.[10] That night, the Germans launched a follow up effort. This was a more limited attack than that of the previous night, and was only focused upon securing prisoners. In this vein, a small party of Germans from the 90th Reserve Infantry Regiment attempted to penetrate the wire around the positions held by the 28th Battalion, which had just moved up to the line, and were subsequently fired upon by several Lewis gunners, forcing them to retire.[11]
Despite the German assault, the Australian assault preparations continued as planned. As preparations were made, heavy mortar fire harassed the German defenders, and cut the wire obstacles that had been laid down by the Germans in front of their positions.[12] For the assault, Wisdom detailed a force of around 1,500 men, who would attack across a frontage of about 3,000 yards (2,700 m). Artillery support would be provided by seven brigades of British and Australian field artillery, as well as several trench mortar batteries. Thirty-four Vickers machine guns from the 2nd Machine Gun Battalion would also provide fire support from depth positions, while two machine guns from the battalion's 7th Company would advance with the first wave of each battalion. In an effort to surprise the defenders, Wisdom decided upon a dusk attack, something which the Australians had not attempted since the attack on Pozieres in mid-1916.[13] This decision was reached following an appreciation of the ground: the objective was located on the forward slope, and was easily observed, and it was felt that a dusk assault might over some concealment.[5] The approach to the trenches from which the Australians planned to launch their assault was too exposed. As a result, the assaulting troops had to be moved up to their forming up positions the night before the assault, and would have to remain hidden for a whole day. This required the construction of a 500-yard (460 m) loop line behind the forward line of troops around the Bray–Corbie Road. Several new strong points were also established by the infantry, while engineers laid down wire and pioneers helped to extend and expand the previously existing assembly and communications trenches, as well as establishing several new ones.[14]
Battle[]
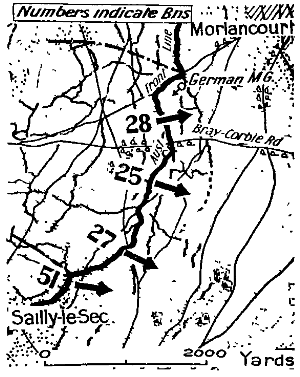
Preliminary moves began on the night of 9 June, as the Australian assault companies were brought up to the assembly areas along the front. The assault would be carried out by three of the brigade’s four infantry battalions: the 25th, 27th and 28th. The fourth battalion, the 26th, was to be held in reserve and it subsequently occupied a depth position with five platoons along the line that had been held in April, with the 2nd Pioneers in between them and the remainder of the 26th Battalion. The 18th Battalion, from the recently rotated 5th Brigade, was positioned a little further back to the southwest of the 26th. At the same time, the alternative trench across the Bray–Corbie Road was finalised during the morning of the 10 June, but going was slow and as a result it could not be occupied before darkness fell on the evening of the assault.[15]

Map depicting the start positions of the Australian battalions prior to the attack
Throughout the day the weather had been clear and bright, and the soldiers in the assembly areas kept occupied with battle preparations. The need for secrecy was important to the success of the operation and the troops in the assembly areas were under strict instructions to remain out of sight. Nevertheless, the Germans ultimately detected the Australian preparations and in the early evening, around 19:00 hours, a German aircraft swooped over the assembly area. An hour later a patrol of five aircraft flew across the front. This presaged a heavy German bombardment at 20:30 hours, but it was only perfunctory and ended ten minutes later having resulted in few casualties amongst the Australians. Meanwhile, the defending German troops were placed on alert in anticipation of the attack.[16] At 21:00 hours, a heavy Allied bombardment of the German front lines began. Just prior to this, the assault companies from the 25th and 28th Battalions assembled in the alternative trench that had been dug across the Bray–Corbie Road and waited for the appointed time. At 21:45 hours, with about 15 minutes of light remaining, the attack began, amidst a heavy supporting artillery barrage.[3] Meanwhile, the 2nd Division's other two brigades held the line: the 6th Brigade on their left, and the 13th Brigade on their right.[5] The assault fell around the intersection of the positions held by two German divisions: the 54th Infantry and the 24th Reserve Division.[17] The centre of the assault was assigned to the 25th Battalion, south of the Bray–Corbie Road, while the 28th was positioned on the left, and the 27th on the right.[18] On both the left and right flanks, neighbouring units carried out demonstrations, mainly with artillery, but also with some raiding, to deceive the Germans into thinking the assault was being carried out across a larger front.[19]
The Australians advanced under a creeping barrage that lifted at a rate of 100 yards (91 m) every two minutes, with officers controlling the rate of advance to prevent the soldiers being shelled by their own artillery. Nevertheless, some casualties were experienced amongst the 27th Battalion, on the right of the line, when supporting artillery showered assault troops with shrapnel as they moved through the advanced part of their trench line prior to going over the top.[20] About 20 Australians from the 25th Battalion were also hit by shrapnel south of the Bray–Corbie Road after advancing into the supporting barrage due to over eagerness.[21] Heavy machine gun fire was laid down by the defenders, but in places this lacked support as the Allied bombardment forced the defending infantry to remain in their trenches, while others hastily withdrew. Resistance was strongest in the 27th Battalion's sector. As the assault developed, the defence grew more stubborn across the front as the Germans reorganised.[22] This resistance was overwhelmed and by 22:00 hours the 7th Brigade had reached its objective;[5] green flares were fired to signal the success.[23] Elsewhere, on the extreme right of the Australian position, the 51st Battalion, assigned to the 4th Division carried out a supporting attack against the 107th Reserve Infantry Regiment, to link in with the 2nd Division's gains, and provide protection to its flank.[24]
Aftermath[]
Capture of the spur completed the process which had begun with the earlier two battles.[8] In the immediate aftermath, the Australians rapidly sought to consolidate their position following the assault as a counter-attack was expected. Covering parties were sent out, and details worked to bring up machine guns, mortars and ammunition. Pioneers dug a series of communication trenches, while the infantry established outposts and defended locations along the new line. Casualties were carried by stretcher bearers from the 5th and 6th Field Ambulances, to a casualty collection point on the Bray–Corbie Road, dubbed Windy Corner, where they were loaded into ambulances and vans for onward evacuation. Aircraft from No. 3 Squadron, AFC reconoitred the front to confirm the extent of the advance.[25] Meanwhile, heavy German shelling harassed the line,[26] but a protective counter-battery barrage was fired in response, until around 23:15 when the front died down. Throughout the night, minor patrol actions were fought on the flanks, particularly around the positions held by the 28th and 51st Battalions, and an attempted counterattack was spoiled in the 28th Battalion's sector around midnight.[27]
Minor skirmishes and sniping continued into 11 June as mopping up operations harassed small groups of Germans in Morlancourt and forced them down the valley towards Sailly-Laurette. German artillery, supported by German aircraft, continued to harass the Australians until later that day, after which it became clear to the Australians that no further counter-attacks would eventuate.[28] During the battle, a total of 325 Germans were taken prisoner, while the Australians lost 400 killed or wounded.[29] Following the assault, the 2nd Division was placed into corps reserve, and the 7th Brigade was relieved by Brigadier General Edwin Tivey's 8th Brigade on 14/15 June, after which it was moved back to Allonville.[26] The next significant action for the Australians on the Western Front would be launched around Hamel on 4 July.[29] This would be a rehearsal for the Allied Hundred Days Offensive that began on 8 August 1918, which ultimately ended the war following an armistice in November.[30] Before this, though, the Germans launched the fifth and final attack of their Spring Offensive on 15 July at the Second Battle of the Marne.[31] Although this attack was defeated in three days, it demonstrated that the Germans still held offensive intent, and that in theory, Amiens was still under threat despite the earlier defensive actions. As a result, the commander of the Australian 5th Division, Major General Talbot Hobbs, began planning further offensive actions south of Morlancourt, in the sector held by the 8th Brigade with a view to disrupting German defences and eliminating observation posts that were being used by snipers and artillery observers. On 29 July, about a week prior to the launch of the main Allied offensive, the 8th Brigade launched a limited offensive action around Beacon Hill. The attack proved successful, after which the Australians were withdrawn and replaced by British troops. Although successful in securing around 100 prisoners, and a large number of machine guns and other heavy weapons, the operation was later criticised by Major General John Fuller as being unnecessary and inviting German reprisals, which later disrupted the efforts of III Corps in the sector at the start of the Allied offensive.[32]
References[]
Citations
- ↑ Carlyon 2006, p. 650.
- ↑ Baldwin 1962, pp. 140–141.
- ↑ 3.0 3.1 Coulthard-Clark 1998, p. 139.
- ↑ Carlyon 2006, p. 635.
- ↑ 5.0 5.1 5.2 5.3 5.4 Belham & Denham 2009, p. 37.
- ↑ Bean 1942, pp. 216–217.
- ↑ Bean 1942, pp. 216–218.
- ↑ 8.0 8.1 Bean 1942, p. 219.
- ↑ Bean 1942, p. 240.
- ↑ Bean 1942, pp. 220–223.
- ↑ Bean 1942, p. 223.
- ↑ Bean 1942, pp. 223–224.
- ↑ Bean 1942, pp. 224–225.
- ↑ Bean 1942, pp. 224–226.
- ↑ Bean 1942, p. 226.
- ↑ Bean 1942, pp. 227 & 230.
- ↑ Bean 1942, p. 229.
- ↑ Bean 1942, pp. 226 & 231.
- ↑ Bean 1942, pp. 239–240.
- ↑ Bean 1942, pp. 228–229.
- ↑ Bean 1942, Note p. 233.
- ↑ Bean 1942, pp. 228–235.
- ↑ Bean 1942, p. 235.
- ↑ Bean 1942, p. 231.
- ↑ Bean 1942, p. 238.
- ↑ 26.0 26.1 Belham & Denham 2009, p. 38.
- ↑ Bean 1942, p. 236.
- ↑ Bean 1942, pp. 235–239.
- ↑ 29.0 29.1 Coulthard-Clark 1998, p. 148.
- ↑ Prior 2014, pp. 17–18.
- ↑ Baldwin 1962, p. 145.
- ↑ Clissold 1982, pp. 3–12.
Bibliography
- Baldwin, Hanson (1962). World War I: An Outline History. London: Hutchinson. OCLC 988365.
- Bean, C. E. W. (1942). The Australian Imperial Force in France during the Allied Offensive, 1918. Official History of Australia in the War of 1914–1918. VI (1st ed.). Sydney, New South Wales: Angus & Robertson. OCLC 609294177. https://www.awm.gov.au/collection/C1417018.
- Belham, David; Denham, Peter (2009). The Blue Diamonds: The History of 7th Brigade, 1915–2008. Puckapunyal, Victoria: Department of Defence. OCLC 525034269.
- Carlyon, Les (2006). The Great War. Sydney, New South Wales: Pan Macmillan. ISBN 978-1-4050-3799-0.
- Clissold, Barry (January–March 1982). "Morlancourt: Prelude to Amiens". Military Historical Society of Australia. pp. 3–12. ISSN 0048-8933.
- Coulthard-Clark, Chris (1998). Where Australians Fought: The Encyclopaedia of Australia's Battles (1st ed.). St Leonards, New South Wales: Allen and Unwin. ISBN 978-1-86448-611-7.
- Prior, Robin (2014). "The Western Front 1917–18: The Bloody Road From Stalemate to Victory". Australian War Memorial. ISSN 1327-0141.
Further reading[]
- Edmonds, J. E. (1939). Military Operations: France and Belgium, May–July: The German Diversion Offensives and the First Allied Counter-Offensive. History of the Great War based on Official Documents by Direction of the Committee of Imperial Defence. III (1st ed.). London: Macmillan. OCLC 220616786.
External links[]
- Third Battle of Morlancourt, Australian War Memorial
The original article can be found at Third Battle of Morlancourt and the edit history here.